Best Free Video Editing Software for Windows 11 [Tested First-hand]
13 min. read
Updated on
Read our disclosure page to find out how can you help MSPoweruser sustain the editorial team Read more
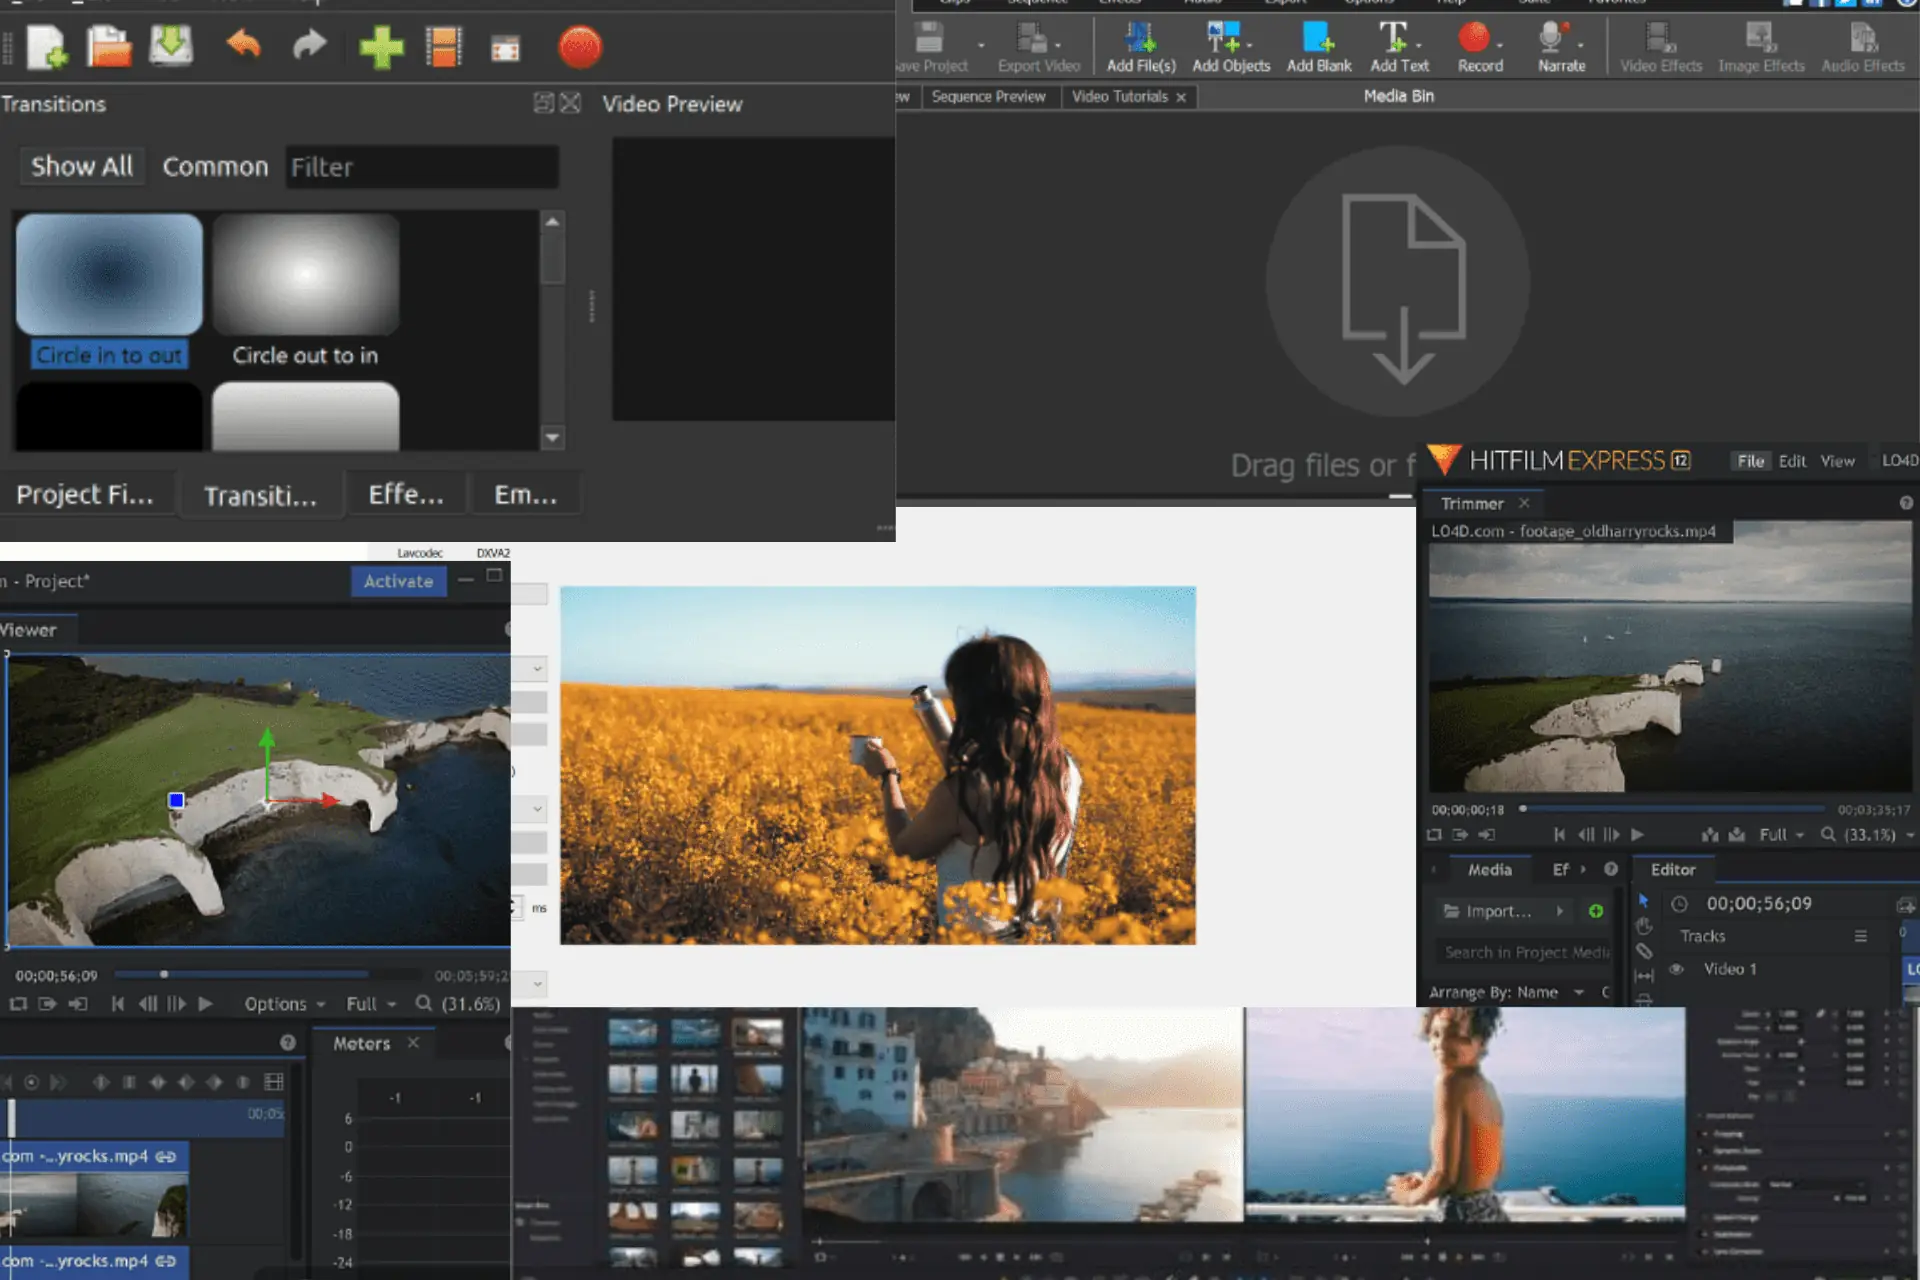
If you’re looking for the best free video editing software for Windows 11, this piece will be right up your alley.
Today, you don’t need to be a professional video editor to make YouTube videos, Instagram shorts, or even online courses. The internet is already flooded with numerous video editing tools that you can use to create awesome visuals at no cost.
So, without further ado, let’s check them out:
Best Free Video Editing Software for Windows 11
After testing over 30 tools, here are my top picks at a glance:
| Software | Best for | Advanced color grading options | Extensive exporting features | VFX editing features |
| 1. VideoProc Vlogger | for mid-level video editing | Yes | Yes | Yes |
| 2. VideoPad | mid-level editing | Yes | Yes | Yes |
| 3. DaVinci Resolve | all levels of video editing | Yes | Yes | Yes |
| 4. HitFilm | mid-level editing | Yes | Yes | Yes |
| 5. Shotcut | standard video editing | No | No | Yes, but not a wide range of VFX effects available. |
| 6. OpenShot | basic editing | No | Yes | No |
| 7. Lightworks | mid to professional level editing | Yes | No | No |
| 8. VSDC Video Editor | mid-level video editors | Yes | Yes | Yes |
| 9. Clipchamp | for mid-level editing by small businesses or social marketers | No | No | No |
| 10. Avidemux | basic video editing | No | Yes | No |
Now, let’s check out each of them in more detail:
1. VideoProc Vlogger – Best Free Software for Vloggers
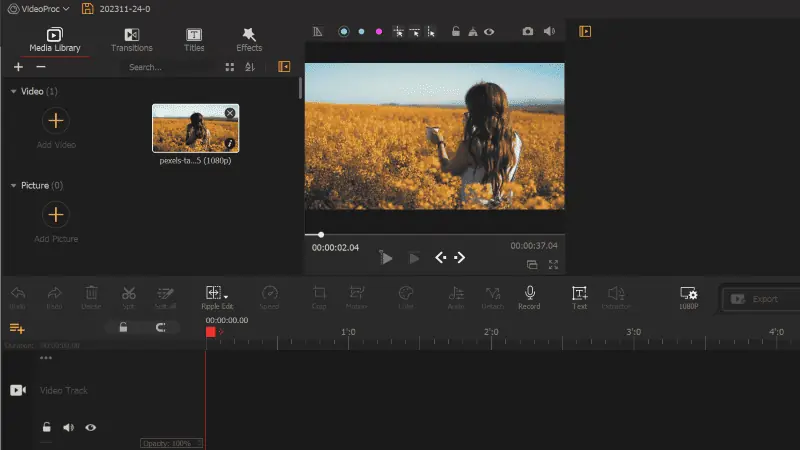
Videoproc Vlogger offers all the standard video editing features like cuts, transitions, effects, audio edits, etc.,
With over 60 presets, you can easily add suitable transitions for smoother video flow. The software lets you adjust the volume, apply sound effects, modify voice, etc.
Additionally, you get over 50 effects and filter presents to fine-tune the final result.
The setup was also straightforward. Once you click on the download button on its website, a 144 MB file gets installed on your machine, and that’s it.
Pros:
- 90 plus built-in 3D LUTs for color grading and color correction.
- Green screen feature to change the background of any clip.
- You can record or change the pitch of voice-over post-production.
- Denoising feature for better audio quality.
- Blend mode to create different types of effects by blending pixels.
- Step-by-step guides to learn about its features.
Cons:
- Not ideal for low-end PCs as it requires a considerable amount of resources.
2. VideoPad – Best Lightweight Software for Quick Editing
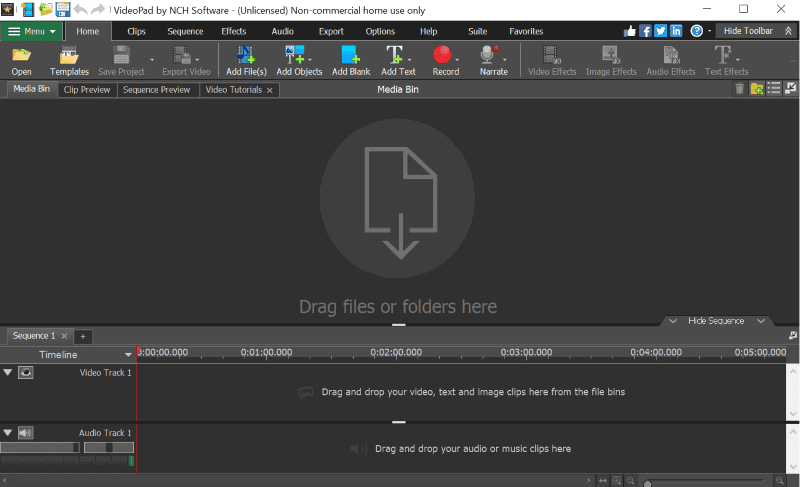
Many times, you’ll need some small tweaks to get your perfect video – adding filters, transitions, text, etc. VideoPad is a great choice for such tasks.
VideoPad stands out for its intuitive interface and super-fast video stream processor, making it a good choice for quick video editing.
With VideoPad, you can import and mix multiple audio tracks, apply audio effects, record your vocals, and add audio effects like echo, choral, and much more.
Pros:
- 50+ effects and transitions.
- Free Sound Effect Library.
- 60+ supported video formats.
- Fine-tune colors with color grading and color correction features.
- Video stabilization feature to remove camera shakes.
- Lightweight video editor
Cons:
- Some complaints about audio quality from the community.
- Frequent software bugs, so not suitable for professional video editing.
Download VideoPad Video Editor
3. DaVinci Resolve – Best Software for Professional Video Editing
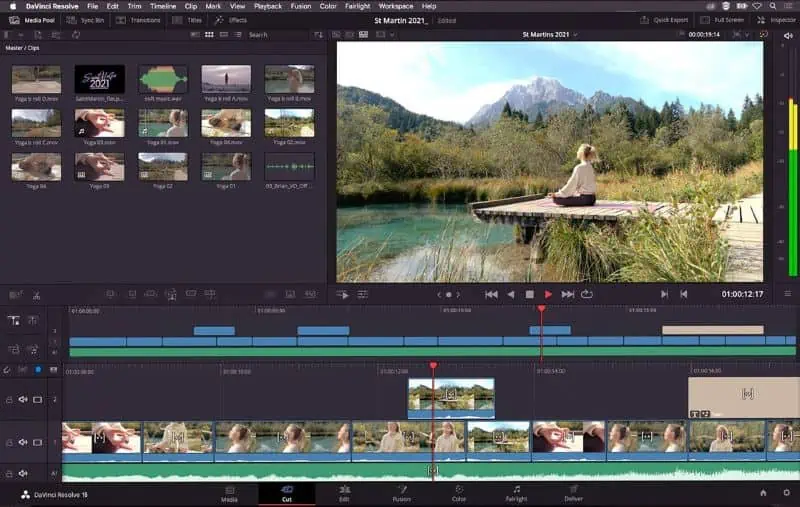
DaVinci Resolve is a powerful all-in-one tool for professional editing, color correction, visual effects, audio post-production, and more.
The software offers exceptional quality with 32-bit float processing image technology and YRGB color science for accurate color representation.
Overwrite a specific timeline of the video with another clip, modify the playback speed of scenes in a video, and trim during live playback with ease.
Moreover, you can create 2D or 3D titles, automate effect settings, create soundtracks, etc.,
Simply drag and drop single video clips or entire folders into the media pool at the top left corner and start editing.
Pros:
- Wide range of creative tools for video editing, motion graphics, audio post-production, etc.,
- The user interface is easy for beginners, yet powerful for professionals.
- Best software for color correction and color grading.
- Lots of quick export options.
- Effective sound editing features.
- The effect library offers over 30 different transitions.
- Ability to process videos in 4k and above resolutions.
Cons:
- A bit of a learning curve, especially for its advanced features.
- No support for external software integration.
4. HitFilm – Powerful Video Editing Software
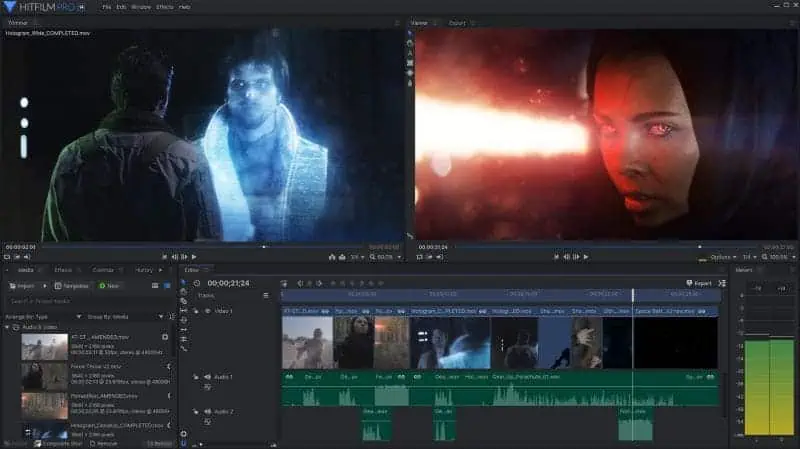
One top choice, HitFilm has gained the trust of professionals across the globe.
The main sections you’ll find in its interface include the Trimmer, allowing you to preview edits before using them in the timeline. The Editor section is for all the audio and video edits, and you can see the results of your editing in the Viewer section.
The tool has a range of functionalities from basic editing tools like cut, trim, split, and crop to advanced features like ready-made transitions and customizable presets.
You can buy additional add-ons like Foundry – a 3D camera tracker, Mocha HitFilm – for advanced motion tracking capabilities, and Boris – for creating 3D titles.
However, the software is a bit on the heavier side, taking a longer time to respond on my 8 GB RAM system compared to other tools on my list.
Pros:
- Clean UI with powerful tools.
- Paid add-ons are available to extend its functionality.
- Attractive effects library.
- Free VFX library.
- Efficient masking tools.
Cons:
- Advanced editing features are watermarked.
- Heavy software.
5. Shotcut – Best Free Cross-platform Video Editing Software
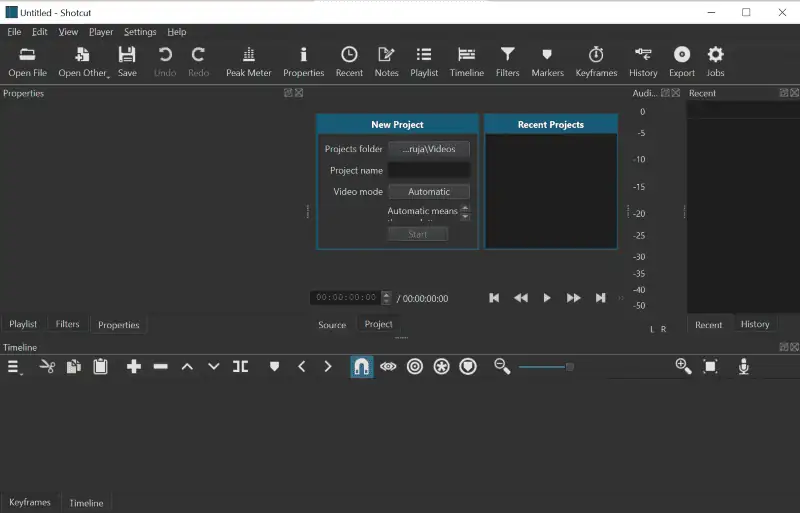
Shotcut is an open-source, cross-platform free video editing software for Windows 11, Mac, and Linux. The interface seems light and simple, yet hides a lot of advanced features.
The left side contains all the images and videos imported to the software for editing, while the right pane of the screen is where you can view the current editing clips.
The effects library is decent enough to make or edit some creative videos. You can seamlessly drag and drop many of its tools like effects, transitions, source clips, images, etc., anywhere on the timeline.
For someone looking for intensive color grading, Shotcut might not be the ideal choice, as the options here are quite limited.
Pros:
- Allows you to work with unlimited audio and video tracks.
- Supports numerous image, audio, and video formats.
- Has a decent video filter library.
- Comes in a portable version that runs from an external device.
- Customizable keyboard shortcuts.
Cons:
- Limited color grading and color correction features.
- Software crashes and freezes frequently on low-end PCs or while working with large files.
6. OpenShot – Best Video Editing App for Beginners
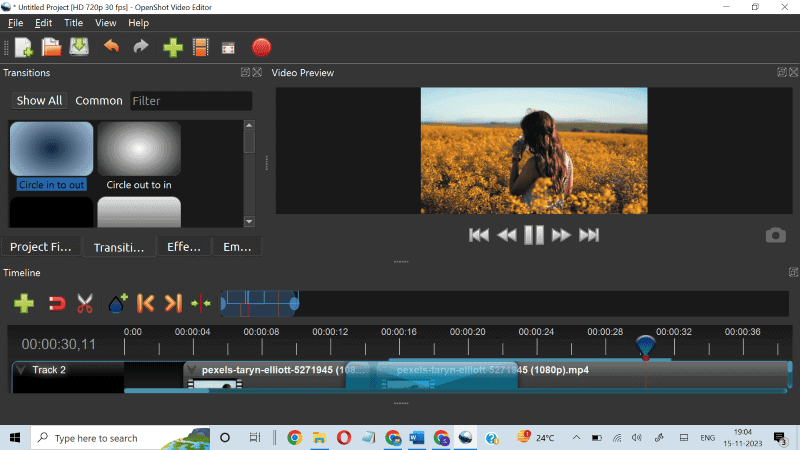
OpenShot is a simple and powerful software for basic video editing that works on Windows, Mac, and Linux.
If you want to add titles, the software has built-in support for Blender. Just click on the Title button in the top menu, and you can create 3D titles.
The bottom section of the interface is dedicated to the timeline, which lets you have unlimited video and audio tracks. On the left side of the screen, you’ll find filters, transitions, titles, effects, etc., while the right side is primarily for video previews.
All the filters, transitions, and effects support the drag-and-drop feature. Just hold an effect with your cursor and drop it into the tracker, and the changes will be applied.
You can import all the standard video, audio, and image formats into the software. Export options are also extensive.
Pros:
- Very easy-to-use and straightforward tool with a simple interface.
- Lightweight software.
- A lot of free OpenShot tutorials on the internet.
- Provides an animation framework to animate different parts of your clip.
- You can use the tool’s template or make your own to add titles to your videos.
- Export your projects with no watermark for free.
Cons:
- Limited editing features for professional video editors.
7. Lightworks – Good Choice for Home Users
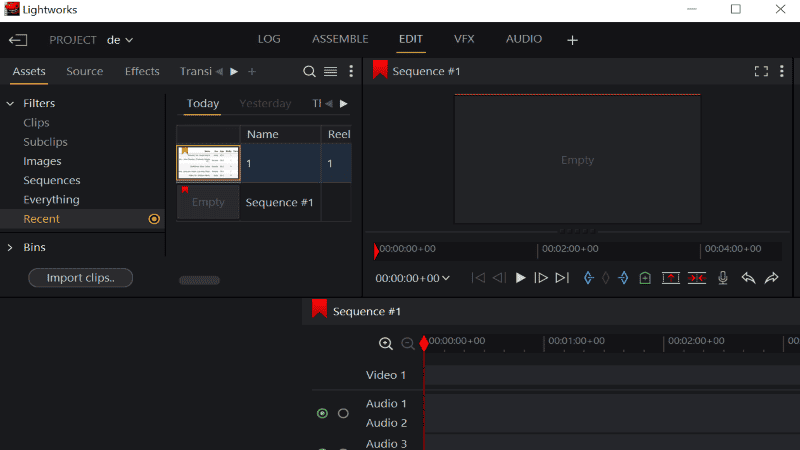
Lightworks is a highly flexible software. It serves as a very simple tool for beginners while also offering more advanced features for expert users.
During my tests, I could easily navigate the interface and get started quickly. The top menu has buttons for Log, editing, VFX effects, and audio. Clicking on each opens a separate workspace specific to that feature.
The editing workspace has all the features that a professional video editor needs from adding multiple layers to working with the clips by setting in and out points for a video.
Color correction, title add-ons, transitions, effects, and much more are available in the VFX workspace of the software.
And while you must pay if you want to access its advanced features, the free version is more than enough for casual users.
Pros:
- Clean user interface.
- Free version with no watermarks.
- Numerous effects and filters.
- A very flexible video editor.
- You can zoom in really close on the timeline to mark or cut the video exactly where you want.
Cons:
- Limited export options compared to other free video editors.
8. VSDC Free Video Editor – Best Video Editing Software for Windows
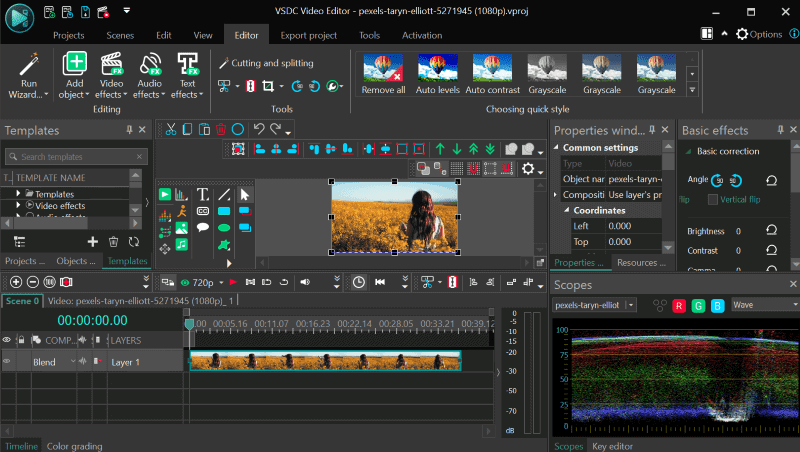
VSDC Free Video Editor is another great choice for Windows users, giving you nonlinear editing software where you can combine videos, images, and objects and work on them.
Like many other video editors, VSDC doesn’t demand high-end PC configurations. The software works on old computers as well.
VSDC has an array of effects, transitions, and filters and offers a free screen recorder.
Additionally, you get all the standard editing features, color correction, and ready-made filters. However, for advanced features like motion tracking, recording real-time voiceovers, and sound graph tracking, you’ll need to pay for the Pro version.
Keep in mind, however, that for first-time users, the interface may feel a bit difficult and clumsy.
Pros:
- Offers a free screen recorder.
- It can detect the format of uploads and lets you convert to the desired format easily.
- Easy to import and export your projects.
- Accurate and precise text addition feature. Very useful for adding subtitles.
- Not resource-hungry.
- Easy drag and drop options.
Cons:
- Full-screen video preview is not available.
- Clumsy interface.
9. Clipchamp – Best Video Editing Software for Windows 11 from Microsoft
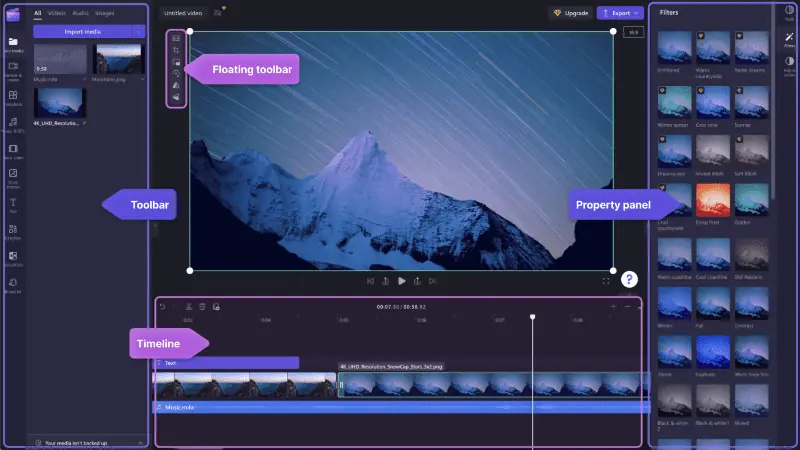
Owned by Microsoft, Clipchamp is an editing software that lets you make unlimited videos with no watermarks. The tool is available in the Microsoft Store for desktops, in the App Store for macOS, and as a web app.
It offers various stock images, audio libraries, filters, and effects that you can add to your videos.
Like many other excellent video editors, Clipchamp positions features and media sources to the left part of the home page, with a preview window on the right. The timeline is conveniently located at the bottom of the screen.
While testing the software, I found audio recording and creation tools, preset templates, stock video and images, text, transitions, and many more editing features on the left-side menu.
What sets this software apart is its smart AI tools like Autocaptions and text-to-speech. Moreover, the software has a webcam recorder tool called Speaker Coach, capable of giving you improvement suggestions for the recording.
Pros:
- Smart AI tools like auto-captions, text-to-speech, and speaker coach.
- A lot of how-to videos on the product.
- A modern interface and easy navigation.
- Various prebuilt templates for social media.
- Free audio, video, and image stock.
Cons:
- No cloud sync feature for free users.
Download Clipchamp for Windows
10. Avidemux – Best for Simple and Quick Editing
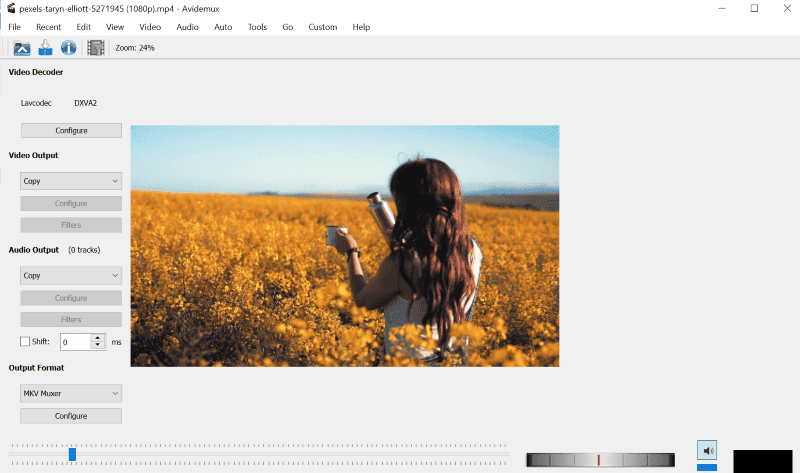
Developed by Sourforge, Avidemux is a safe pick if you often need basic editing like cropping, cutting, rotating, or adding filters to videos. The interface is very clear and basic but looks a bit dated.
The tool offers numerous export options, letting you customize the output’s quality and format settings.
File, Edit, View, Audio, and Video features are found on the top menu with related buttons. The bottom of the home page is taken by the timeline and a few forward and backward buttons. Video output and Audio output format settings are sectioned on the left side.
Pros:
- A wide range of export options for encoding.
- All basic features like crop, cut, trim, etc., for quick edits.
- Completely free and runs on Windows, Linux, and macOS.
- You can precisely locate clips by frames.
Cons:
- Basic functionality.
- No support for multiple tracks.
How I Chose the Best Free Video Editing Software For Windows 11?
To list down the perfect picks, I tested more than 18 tools and compiled the above list of the 10 best free video editor software for Windows 11. All the mentioned apps are tested on my Windows 11 8 GB RAM PC.
To give you the best list, I’ve considered all the standard video editing software components including UI, video editing features like transitions, filters, cropping options, trimming, etc., audio editing features, import and export options, watermarks, and compatibility with Windows. Alternatively, you could explore other free video editors without watermarks.
Now, let me take it a step further with an easy step-by-step on how to use the video editors above:
How to edit a video for free?
For this guide, I’ll be using the Openshot video editor as an example:
Launch the application and click on the green “+” icon at the top menu bar to import videos from your hard disk.
To Trim:
For trimming, drag the ends of the video on the timeline to the left or right as you need.
To Split Clip:
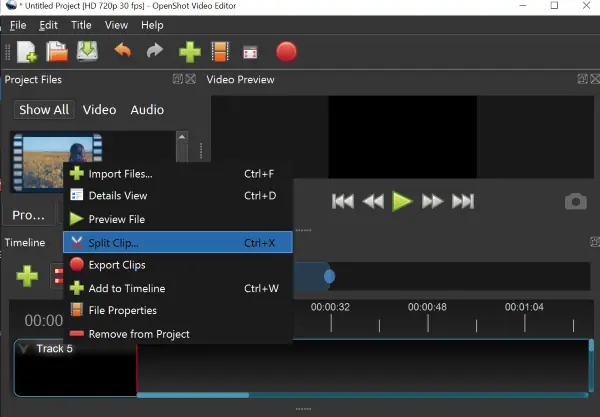
Step 1 – Right-click on the video under “Project Files” and click “Split clip“.
Step 2 – Click on the “Start” button and drag the pointer to the start point you want to set.
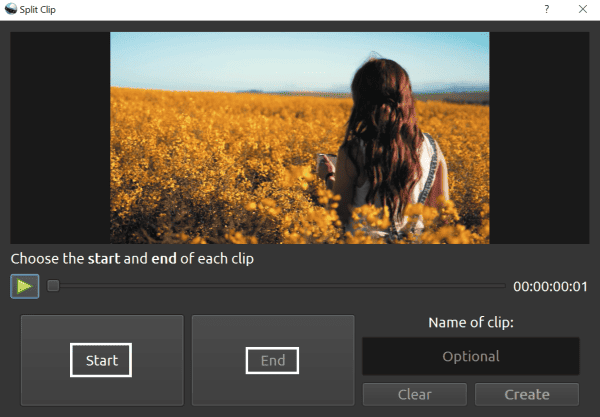
Step 3 – Now click on the “End” button and place the pointer at the endpoint you want to set.
Step 4 – Click “Create“.
To apply transitions:
Step 1 – Click on the “Transitions” button on the home page.
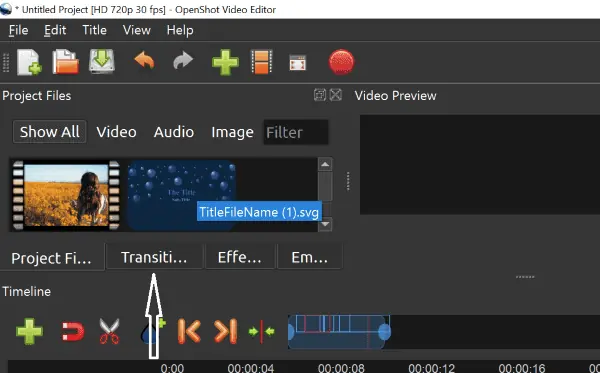
Step 2 – Drag and drop the transition you liked into the timeline.
Step 3 – You can move the transitions along the timeline to the left or right and apply them exactly where you need them.
To Apply Effects –
Step 1 – Go to “Effects” on the home page.
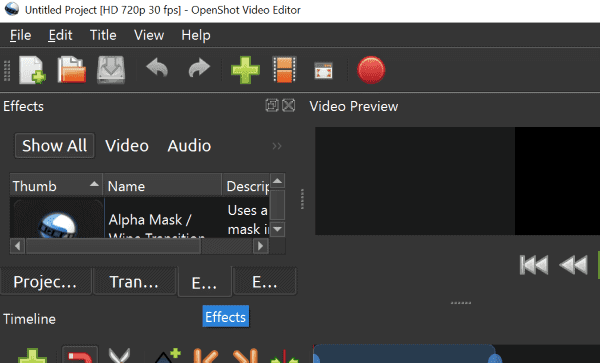
Step 2 – Drag and drop an effect into the timeline.
Step 3 – Right-click on the effect in the timeline and select “properties” to customize it.
To Add Text:
Step 1 – Click “Title” on the top menu bar.
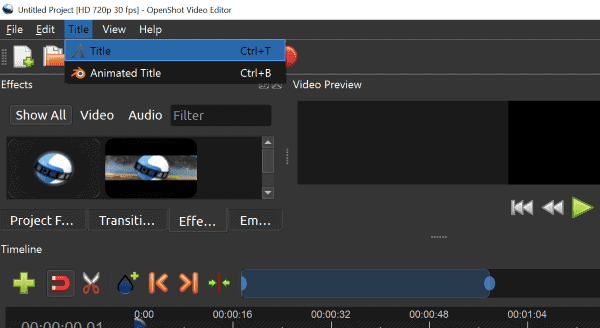
Step 2 – Select the font style and write your text in line 1.
Step 3 – Click “Save“.
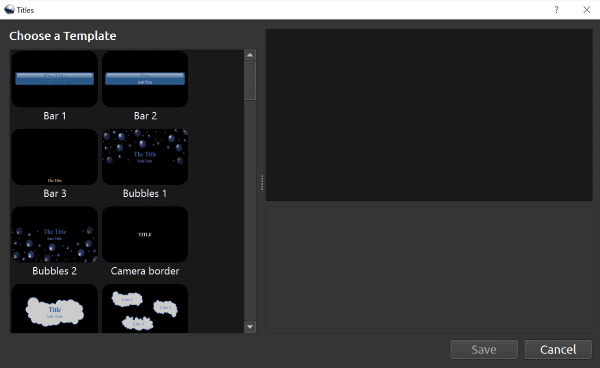
Step 4 – Now the text file will be available in the project files section. Drag and drop it into the timeline.
To Export Videos:
Step 1 – Click the “File” button on the top menu bar.
Step 2 – Click on “Export” project then export video.
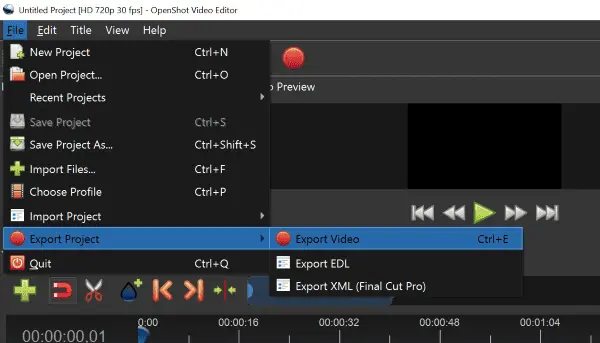
And there you have it! You now have the best free video editing software for Windows 11 and a neat guide on how to use it. And if you’re interested, you can also check out this great list of the top video compressors for 2024.
Which app did you pick and why? Let me know in the comments!




User forum
0 messages