Krea AI Review - Is It Worth Trying?
If you’re looking for a comprehensive and honest Krea AI review, this is the one.
I tested the tool for a week to give you all you need to know about this AI art generator. I delved into its features, pros and cons, pricing, use cases, and more. In the end, I’ll also show you how to use it step-by-step.
Sounds good? Let’s jump in!
What is Krea AI?
Krea AI is a design, video, and photo generator powered by artificial intelligence. You can use it to create cartoons, logo illusions, patterns, and videos.
Additionally, you get a comprehensive image editor that lets you view changes in real-time.
The web app is an excellent alternative to Midjourney, Leonardo AI, Adobe Firefly, and DeepAI.
Here’s an overview of Krea AI’s pros and cons.
| Pros | Cons |
| Fast processing speed | Sometimes, the images can be very unrealistic, especially for humans |
| Displays your edits in real-time | The free version generates watermarked images |
| Loads of backgrounds available | A steep learning curve when it comes to editing |
| Encodes prompts quickly and accurately | |
| Free version available | |
| Intuitive interface | |
| The app is regularly improved and updated | |
| Discord channel for community engagement | |
| It has a large image store at your disposal |
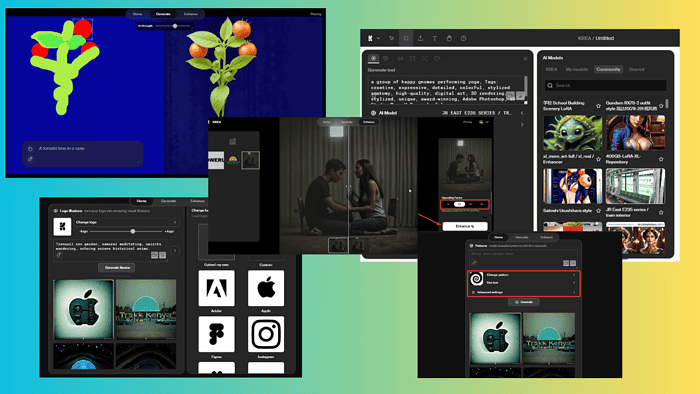
Features
Unfortunately, at the time of writing, Krea’s video generator was under maintenance. However, all its other features were fully functional. So, let me show you what they are and how well they work:
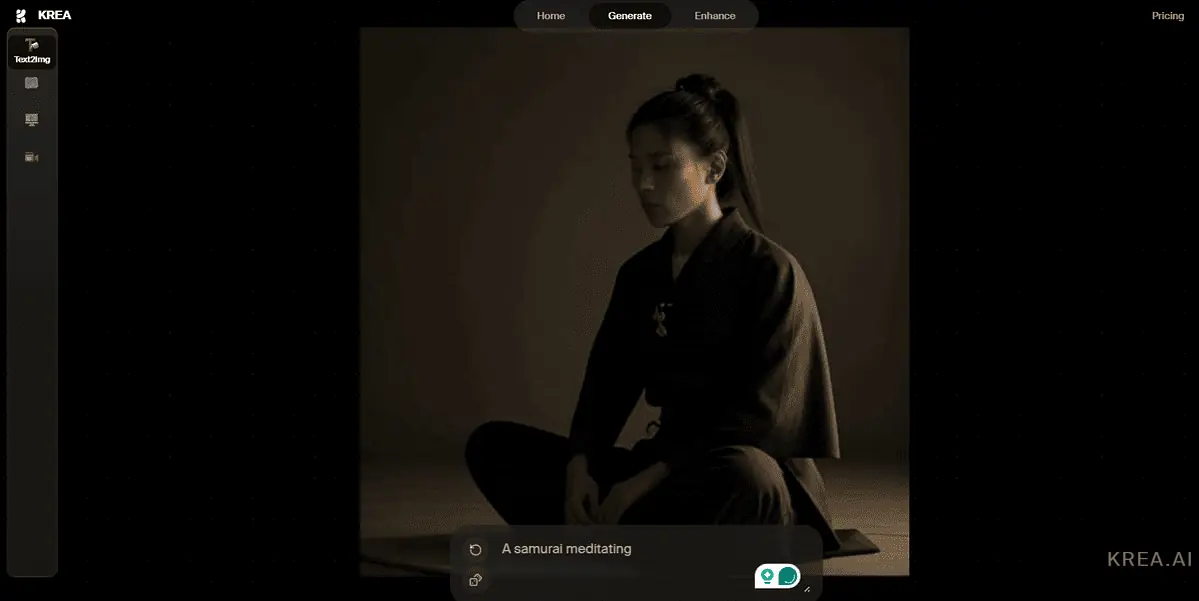
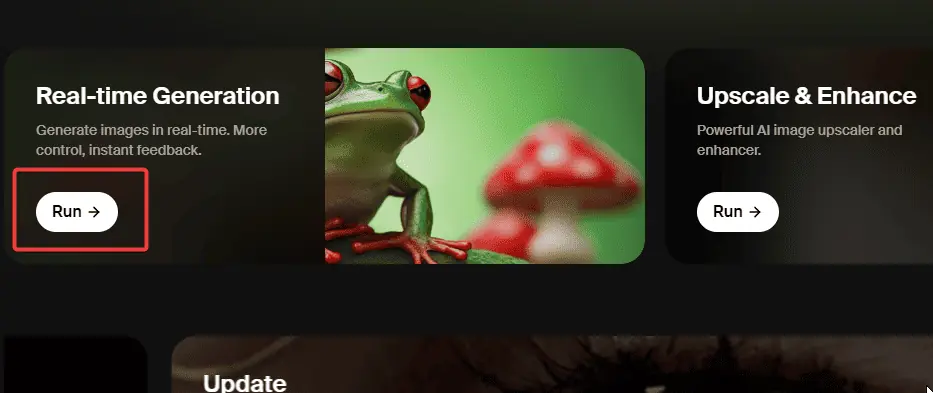
1. Real-time Generation
Krea AI offers three ways to generate images – text-to-image, image-to-image, and screen-to-image.
Whichever you choose, you’ll see a text box to write your prompt:
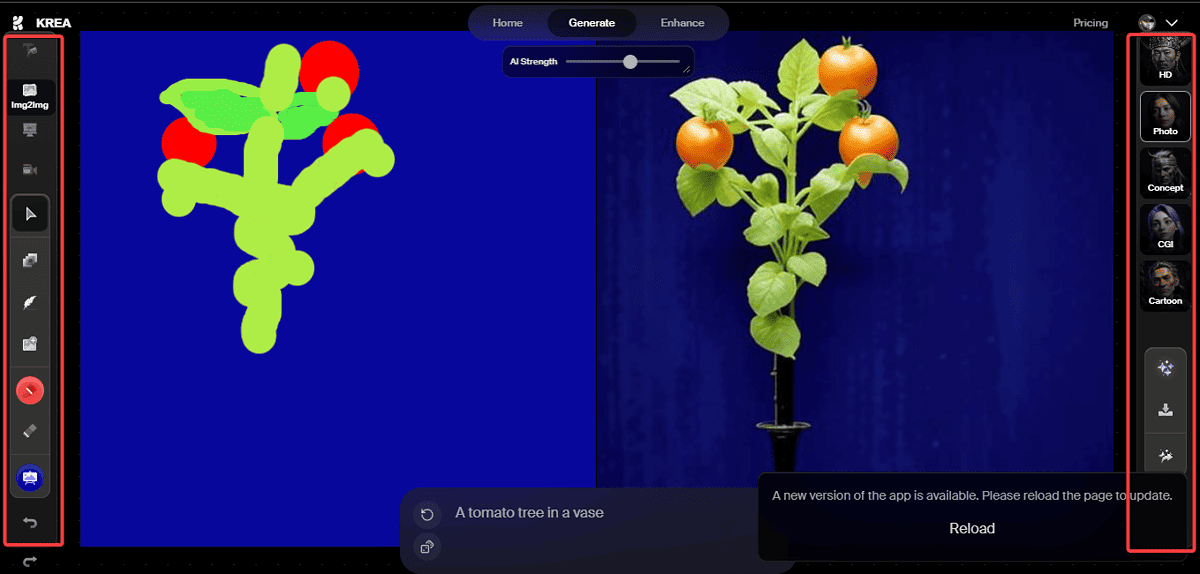
You’ll also see automatic objects/shapes on the left side of the canvas; you can use them to edit the image or delete them. Moving them around changes the image composition and perspective:
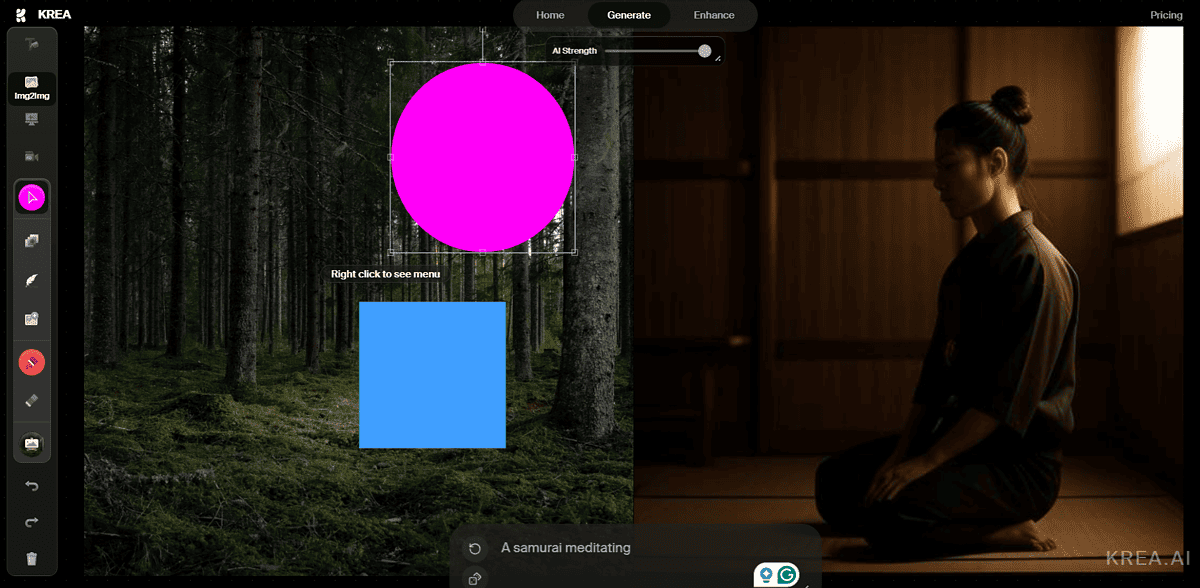
Krea lets you view the changes you make on the left side reflected in the generated image on the right. It will display your work in real-time whether you begin afresh or edit the template.

As you type a prompt, you see the image change immediately.
Even when you change a letter in your prompt, the real-time generator will give you completely different results.
Generally, the tool works well. However, make sure to inspect images of humans, as some of them might look deformed:

2. Logo Illusions
This feature helps you transform a logo into a visual illusion. A good example is how your logo would look in rock visuals, deserts, water bodies, forests, and many more.
First, you need to upload your logo or use the pre-existing ones.
Then, you can enter your prompt and hit the Generate illusion button to get a variation.
You can do this multiple times with the same prompt until you like the output. Also, you can take advantage of the preset styles on the right side to further transform your logo.
The logo strength bar allows you to increase or reduce the AI’s impact on the original image.
Overall, the feature works pretty well, but I noticed that creating an illusion with a wordy prompt might make the image distorted. Additionally, the end result may have nothing in common with the original logo:
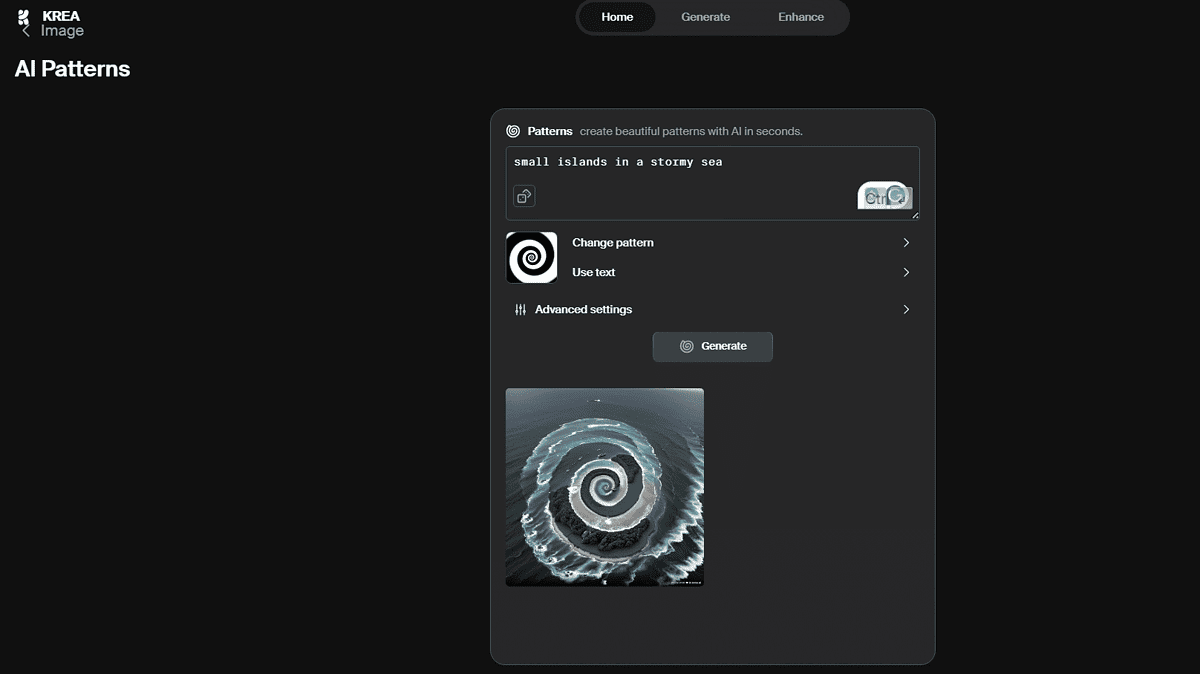
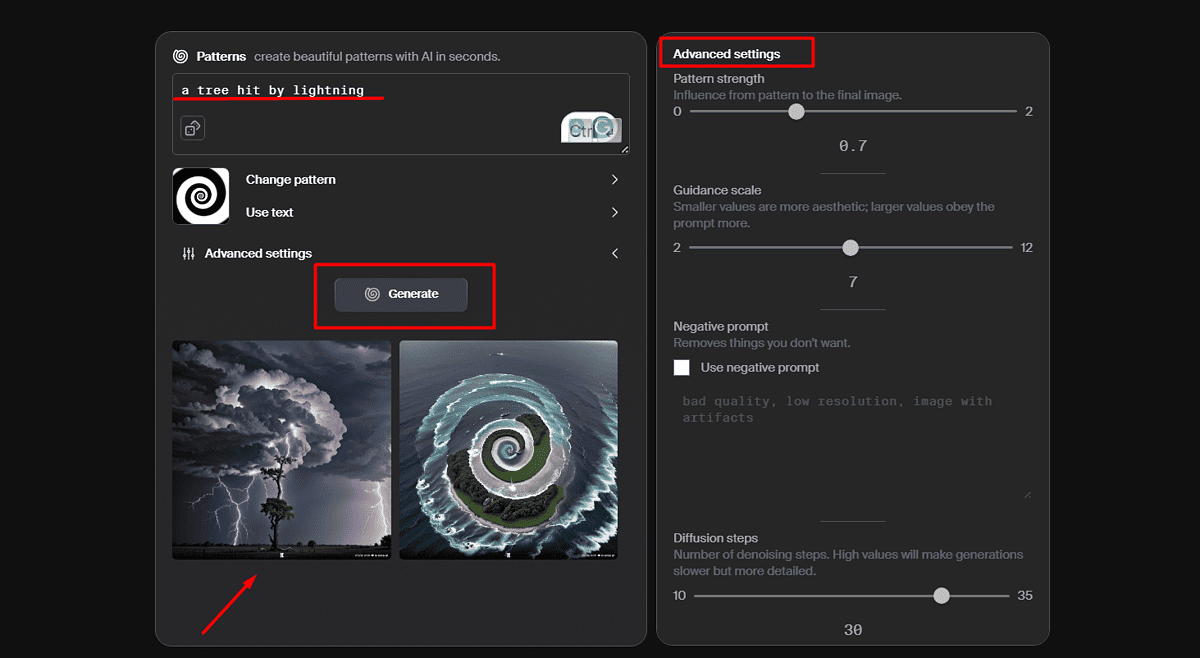
3. AI Patterns
Krea AI has an in-built app for creating graphic patterns. Here, you can use either random prompts or insert your own.
On the AI Patterns window, you can customize or change the pattern, or even insert text on the right side.

The Random prompt button is located inside the text area. Once you click it, you get a different prompt automatically, which will give different results when you click the Generate button.
In the Advanced Settings section, you have the following options:
- Guidance scale – This option lets you decide how much the AI should follow your prompts to the letter. The scale ranges from 2 to 12.
- Pattern strength – This tells the AI how you want your pattern to look in terms of preciseness.
- Negative prompt – Once you tick the box next to this option, insert a prompt indicating the elements you don’t want in your final pattern – for example, blurred images, artifacts, distortion, etc.
- Diffusion steps – These steps determine how you’ll denoise your patterns. If you choose a high value, the pattern generation will be slower than lower values, but it will be more detailed.
There are over 40 pattern presets to choose from or you can upload your own custom one.
4. Shapes and Tool Selection
Krea AI has numerous useful tools and shapes to enhance your art and video generation. In each editor, you’ll see different tools on both the left and right.
For example, on the real-time generator, you can use shapes like circles, triangles, squares, or rectangles. You can also select tools like erasers, paintbrushes, cameras, background colors, etc.
On the right side, you can select the general look for the image, such as Default, Concept, Portrait, Cartoon, and more.
I find the tool selection straightforward. You can hover the cursor over any icon and it will indicate its function.
5. Random Prompts
In every section of Krea AI, there’s a text area where you enter your prompt. You’ll find an automatic prompt, but you can customize it or change it to your liking.

There is a circular button with an arrow in the text area. If you click on it, you will get another random prompt. Click on it as many times as you want until you get the best result.
I like this feature, but its use cases are limited. If you’re not brainstorming or looking for inspiration, I suggest crafting your own prompts.
6. AI Models
Krea’s AI Models let you further customize its outputs. You have access to both native and user-made models, all with different settings and suitable for various purposes.
To access the Krea AI community models, go to the Generate tab. On the right side, you’ll see the various models you can choose from. For example, the LeLo model will make all objects in your images resemble Lego pieces.
Furthermore, you can change the AI engine. By default, it’s set to STABLE DIFFUSION XL. But you can select others like Krea, Real, Illustration, and more.

Now, since some models are user-created they might not always be accurate, so getting the best result will require trial and error. However, you also get the option to train your own AI model and set everything exactly the way you want it.
7. Backgrounds
The tool has various background options. The canvas background icon is located at the bottom-left side.

There are four options under Krea AI backgrounds:
- Color – you get any color you want. Click on the preferred shade from the grade. You can also move the color point across the color bar.
- Photos – There’s a huge collection of photos with elements like nature, people, space, product display, and city.
- Textures – You get over 30 texture types to choose from, including abstract paintings, water drops, neon lights, and more
- Illustrations – There are about 10 illustrations available, featuring different lighting and scenarios.
Once you click on a canvas background, the real-time generator changes its output immediately. It tries to either use the entire background in the generated image or incorporate parts of it.
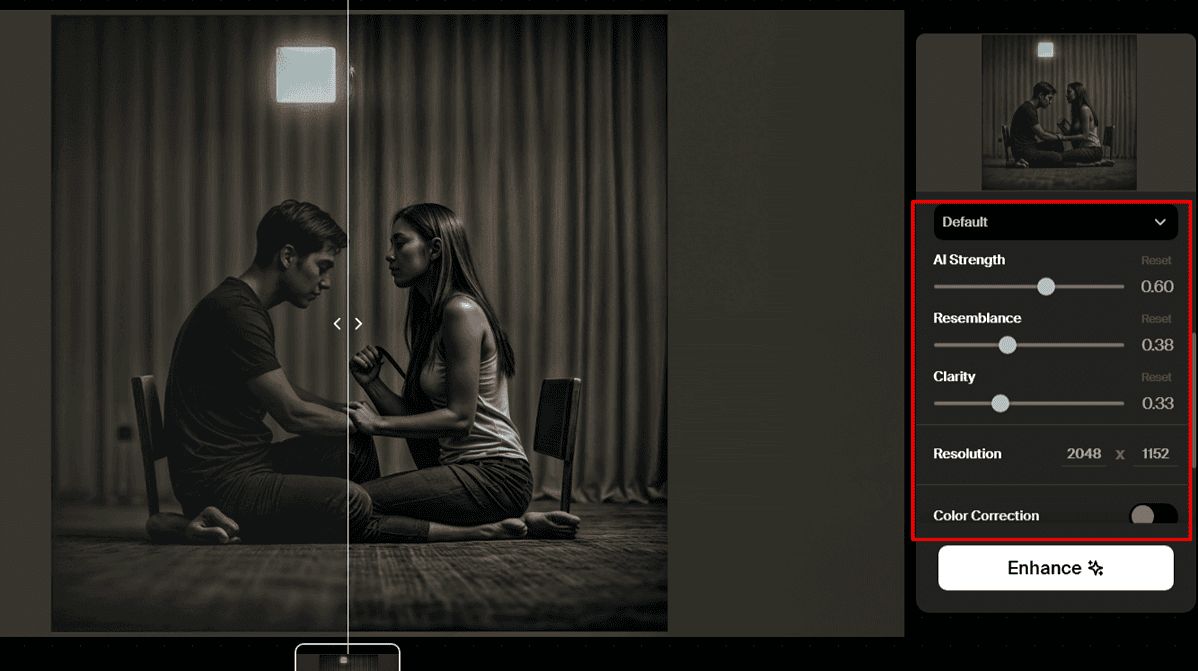
8. Upscaler and Enhancer
The software has an Upscale and enhance feature that allows you to fine-tune your images or graphics.

Here, you can pick the Upscaling Factor, ranging from 1x to 8x, each offering better quality. If you sign up for a Pro plan, you can unlock 4K upscaling.
You also get different settings for aspects like clarity, resemblance, AI strength, color correction, and more. What I liked is that you also get a negative prompts box where you can specify elements to exclude from the image.
You can upload files from your device or use the ones you’ve generated and saved on the app.
How to use Krea AI
Now let me show you how to use Krea AI’s various features.
1. Use Real-Time Generator
First, go to the official Krea AI website and click Run under Real-Time Generation. If you don’t have an account, you will be prompted to register using Google, or email and username.
After that, you will taken to the real-time generator canvas. On the left side, draft your art and you will see live results on the right side.
Go to the prompt text area to write your own or click the circular icon to load random prompts.
Use the tools on the left side menu to further customize your images. Use the redo and undo icons if you’re unsatisfied with the current design.
On the right, use the menu options to complete year creation like downloading the image, sending it to the enhancer, or any other option.
TIP: Use the AI Strength scale to increase, or increase its accuracy and preciseness.
2. Use Enhancer
To access the Enhancer, go to the home page and click Run under Upscale & Enhance. If you’re already on the real-time generator, head to the top bar and select Enhance.
On the left side, you will see all the pictures you’ve uploaded or enhanced before (if any). Above that, click the upload sign to access the file from your device.

On the right hand, select the upscaling factor such as 1X, 2X, 4X, or 8X.
Then, use the sliders to adjust settings like resemblance, AI strength, clarity, and more. Once you’re done, click the Enhance button to see the result.
3. Use AI Patterns
Go to the home page and click Run under the AI Pattern option. At the top, you’ll see the prompt text area. You can write a custom one or click the Random prompt button.
Select Change pattern to browse from the available options. You can also click Use text, and insert custom text on the right side.

Choose the Advanced settings option to get further pattern configurations. Once you’re happy with the result, hit the Generate button.
4. Use Logo Illusions
First, head over to the Krea AI home page and click Run under Logo Illusions.
After that, click Generate illusion and see what you get on the left side. To insert your logo, click Change logo and then select the Upload button on the right side to access files on your device.
To customize a logo, use the text field to input your prompt. Move the logo scaling bar to change the accuracy and preciseness of the logo illusion. Hit Generate illusion again to view the final result.
Right-click the image and select Save as… to save it on your PC.
Pricing
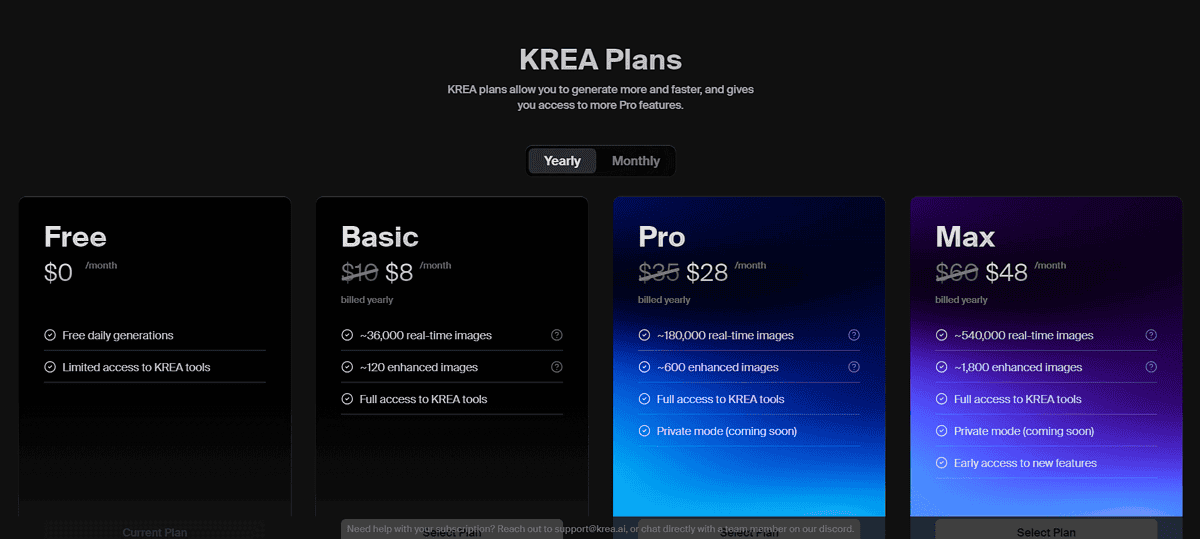
Krea AI has four pricing plans:
- Free – Comes with a free daily art generation, and access to Krea AI tools is limited.
- Basic – Costs $8 per month billed annually or $10/mo billed monthly. You will get 36,000 real-time images, full access to Krea tools, and 120 enhanced images.
- Pro – Offers 180,000 real-time images, Private mode, and access to all tools. Its price is $35/month billed monthly, or $28/mo billed yearly.
- Max – You get early access to new features, Private mode, 540,000 real-time images, 1800 enhanced images, and more. It goes for $60/month billed monthly, or $48/mo if you commit for the full year.
There’s no mention of a refund policy, so try to get the most out of the free version before purchasing a plan.
Krea AI Review – Verdict
Krea AI is a solid all-in-one tool for your image generation and editing needs.
However, I wouldn’t recommend it if you’re mainly working with images depicting humans as it sometimes generates them with deformed legs, hands, faces, and eyes.
Also, the logo illusion feature occasionally fails, especially for logos that include words.
That aside, Krea AI is a near-perfect tool. The real-time editor is a blast to use, and the customization options you get are plenty.
I also liked the speed, with most images taking no more than 15 seconds to generate.
So, will you give this tool a go? Let me know in the comments below.
Read our disclosure page to find out how can you help MSPoweruser sustain the editorial team Read more


Improve this guide


User forum
3 messages