Fix Exception Access Violation on Windows 11 PC
7 min. read
Updated on
Read our disclosure page to find out how can you help MSPoweruser sustain the editorial team Read more
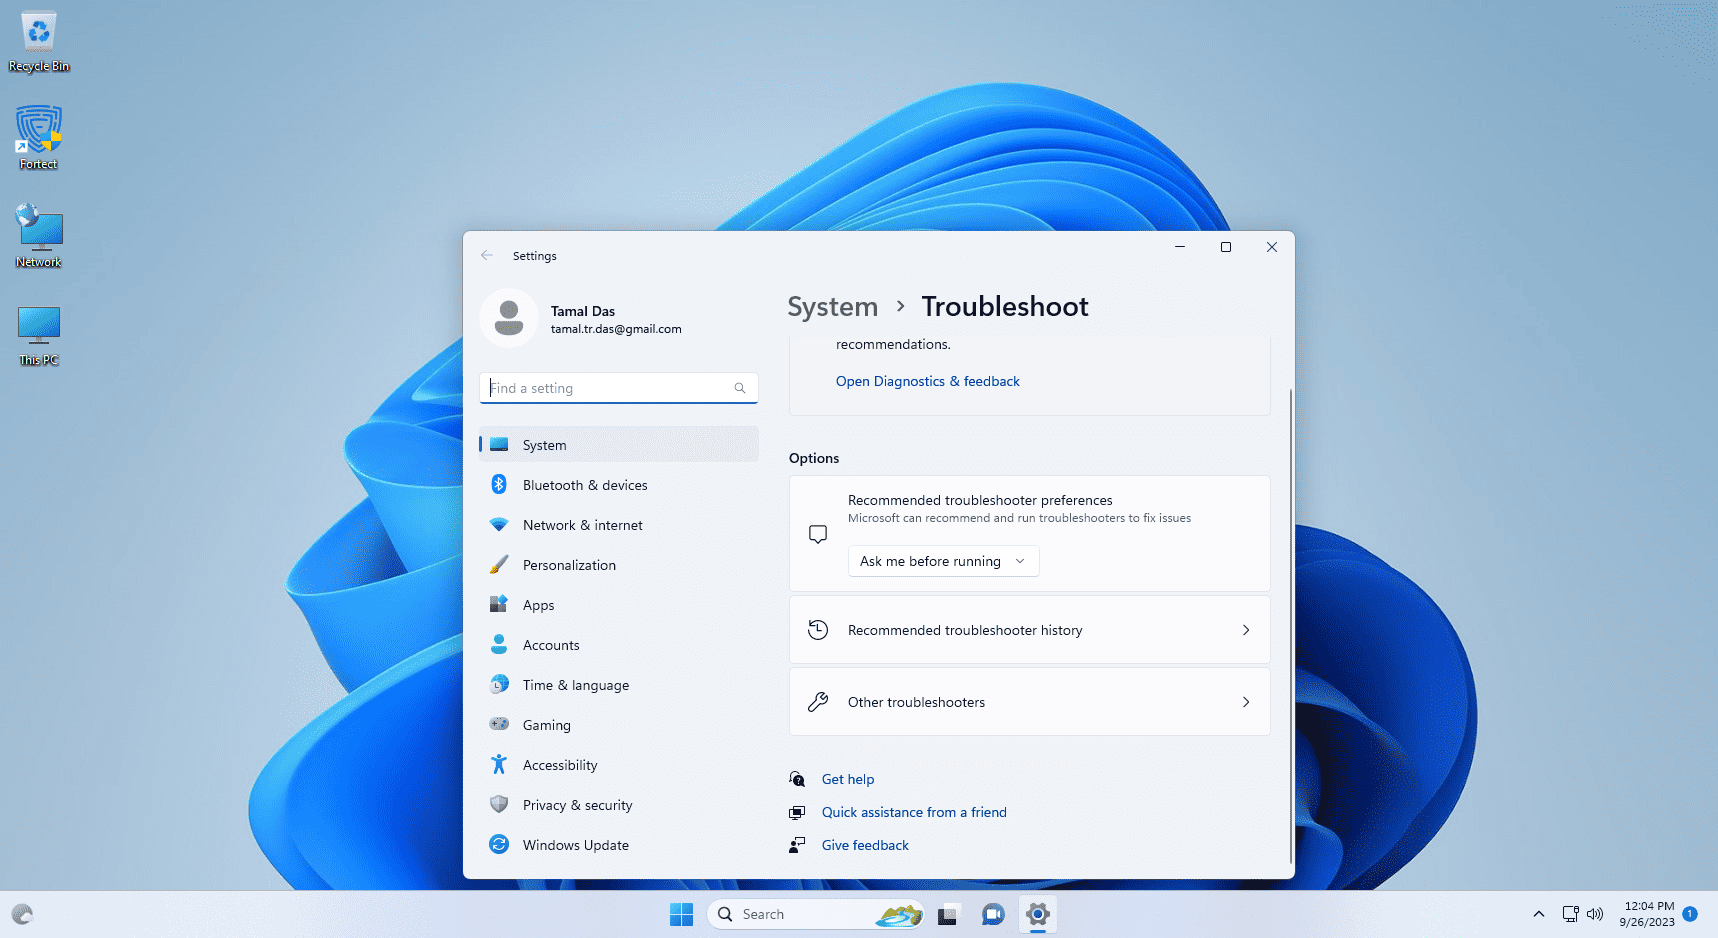
The memory runtime error known as Exception Access Violation is quite common on Windows 11 PCs. If you’re seeing this issue when running an app, we’ve got you covered!
In this article, you’ll find seven straightforward solutions to tackle the Exception Access Violation Windows 11 error. Whether you’re a tech-savvy user or a novice, these methods are easy to follow. Let’s get started!
What Does Exception Access Violation Mean?
Exception Access Violation is a common error in Windows computers that occurs when a program attempts to access a portion of computer memory it’s not allowed to.
This violation often results in the program crashing or freezing. Basically, it’s a security measure to prevent unauthorized access to system memory.
This error almost always clearly indicates that there’s a problem with the program code of the software that failed to access secured memory. Rarely, the issue can also be linked to failing memory modules or RAM chips.
Exception Access Violation has many error variations, such as:
- “0xC0000005 Access Violation” is a generic error with the hexadecimal code 0xC0000005, indicating a memory access violation.
- “Access Violation at Address ######## in Module ‘X.dll’. Read/Write of Address ########” points to a specific DLL (Dynamic Link Library) module and the memory addresses involved.
- “Unhandled Exception Access Violation” typically occurs when a program doesn’t handle an access exception properly, leading to a crash.
- “Memory Access Violation” is a more general error message without specifying addresses or modules.
The generic and all the above variations of the error can occur due to the following reasons:
- Malware or viruses that attempt to manipulate system memory
- Memory-related issues, such as corrupted or faulty RAM modules
- Software bugs or compatibility issues with third-party applications
- Corrupted Windows 11 system files or configurations
- Conflicts between software components, such as DLL files
- Stack or heap memory overflow in the running application.
How To Resolve Exception Access Violation Error on Windows 11?
Solution 1: Scan the System for Malware
Scanning your system for malware should be your first step, as it can sometimes be the cause of such issues.
If you’re using a third-party antivirus program, ensure that it’s up-to-date. It regularly receives updates to detect and remove the latest threats.
As you know, Windows 11 comes with a built-in antivirus tool called Windows Defender. So, make sure it’s enabled and up-to-date. Then, follow these steps to perform a deep scan for viruses and malware:
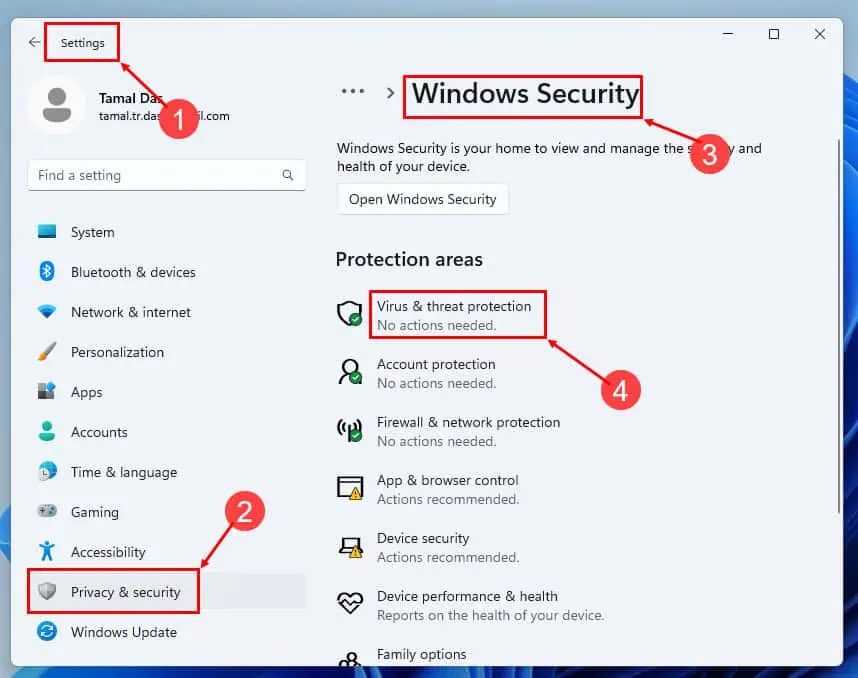
- Press Win + I to open the Settings.
- Go to Privacy & security on the left side panel of the Settings window.
- On the right side, select Windows Security.
- Below the Protection areas section, you should find the Virus & Threat Protection option.
- Click on it.
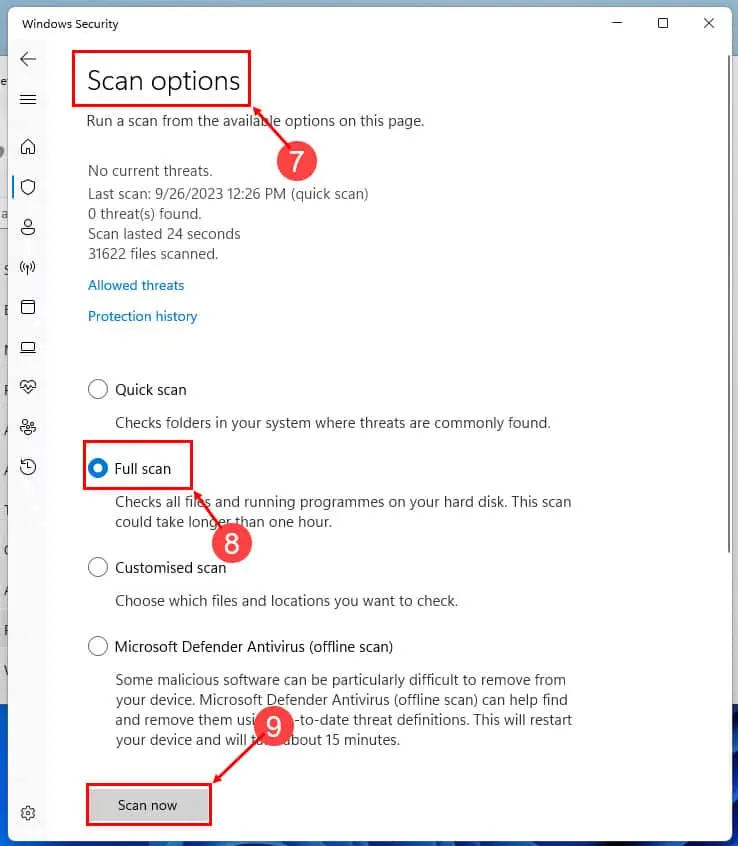
- The Windows Security dialog will show up.
- Click the Scan options hyperlink.
- Select the Full scan option.
- Now, just hit the Scan now button.
Restart your PC once the scanning is over. Now, run the app that showed the memory access runtime error and see if it’s resolved or not.
Solution 2: Run Windows Memory Diagnostic
- Press Win + S to open the Windows Search bar.
- Type “Windows Memory Diagnostic” and press Enter.
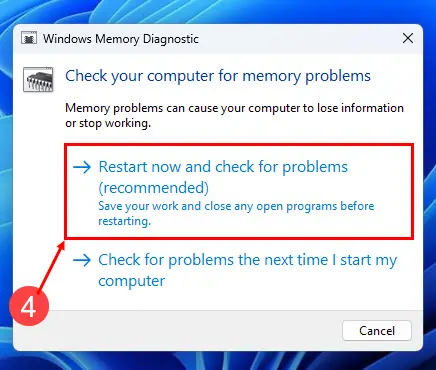
- A dialog box will appear, asking whether you want to restart your computer and check for memory problems now or later.
- Select “Restart now and check for problems (recommended)” to immediately start the memory diagnostic process.
- Alternatively, choose “Check for problems the next time I start my computer” if you want to run it after your next reboot.
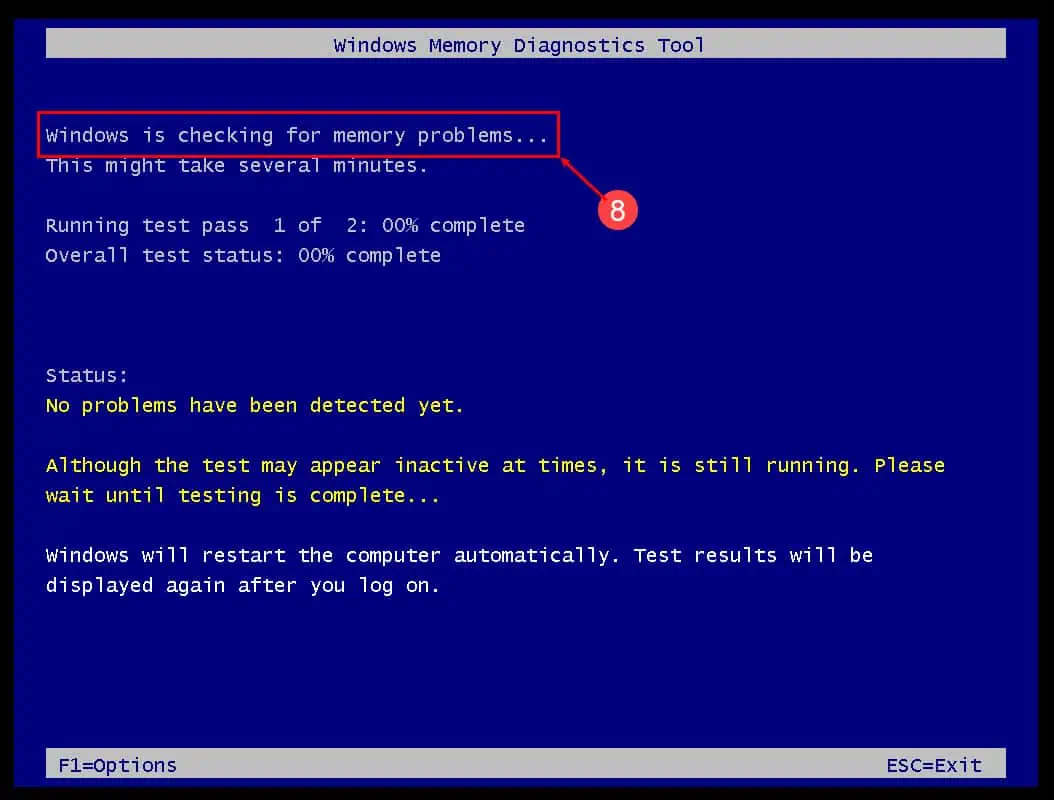
- When your computer restarts, the Windows Memory Diagnostic tool will automatically check your computer’s memory for problems.
- You’ll see a blue screen with a progress bar indicating the status of the memory test.
Once the scanning is over, Windows 11 will come back to the login screen. Log in to your local or cloud Windows 11 account on the PC and go to the home screen.
Now, follow these steps to review the scan results:
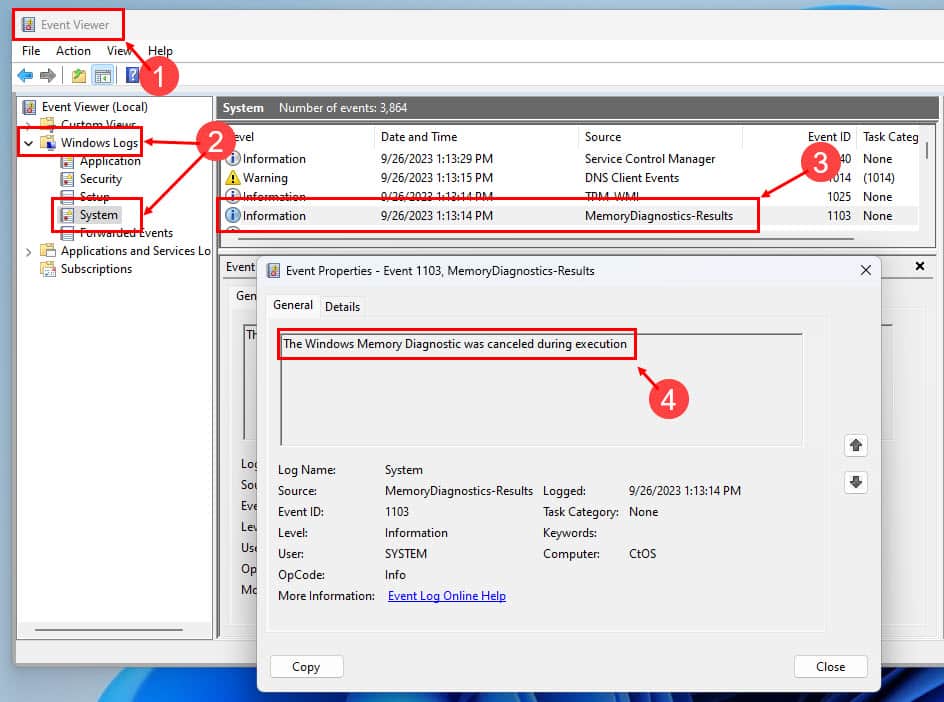
- Press Win + S, type “Event Viewer,” and press Enter.
- In Event Viewer, expand the Windows Logs section and select System.
- Look for an entry with MemoryDiagnostics-Results as the source.
- This entry will contain information about the memory test results.
- If no errors are found, it will report that no problems were detected.
- If errors are detected, it will provide details about the issues.
If you find any memory errors, you may need to replace or upgrade the faulty RAM modules.
Solution 3: Remove and Re-Install the RAM Chips
If you’re repeatedly facing Memory Access Violation on games, graphic designing apps, video editing tools, etc., the issue could be with the RAM modules. Here’s how you can test this hypothesis:
- Shut down the PC.
- Remove all cables connected to the CPU tower.
- Open the side door of the CPU tower.
- Touch a metal grounded to the concrete floor or wall to discharge static electricity.
- Alternatively, use an anti-static wristband.
- Remove the RAM modules located near the CPU cooling system.
- Now, install just one RAM.
- Put back the CPU tower side cover.
- Connect all the cables.
- Start the PC and go to the home screen.
- Try to run the same app and see if you’re getting the memory access issue or not.
If you’re not seeing the error anymore, the RAM chip you’ve removed was faulty. You may need to test a few more times to confirm.
Note: The above method is suitable for desktop PCs since disassembling and assembling is easy. You can also try this on your laptop. However, you’ll probably need a new RAM chip because most laptops use only one RAM module.
Solution 4: Perform a Clean Boot
- Press Windows + R to launch the Run tool.
- Type
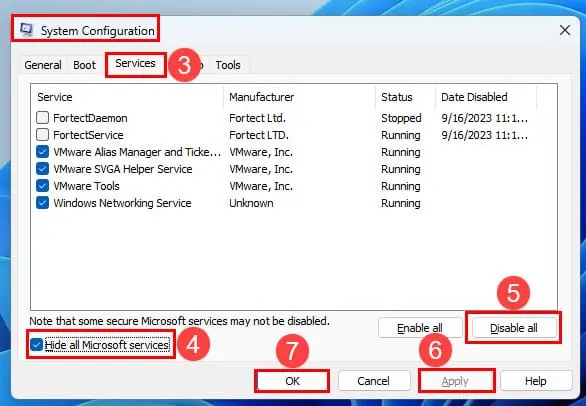
msconfigand hit Enter. - Select the Services tab on the System Configuration window.
- Checkmark the Hide all Microsoft Services checkbox.
- Now, hit the Disable All button.
- Click Apply.
- Click OK.
- Restart the PC to do a clean boot.
If the issue gets resolved after performing a clean boot, there must be a third-party app causing the trouble. Uninstall the recently installed apps to fix the memory access error.
Solution 5: Disable Data Execution Prevention (DEP)
Suppose a specific app is repeatedly showing Exception Access Violation on Windows 11. If everything else is fine with your PC, you could whitelist it so Windows won’t stop the app from accessing secure memory locations. Still, you should only do this if you trust the software.
Here are the instructions:
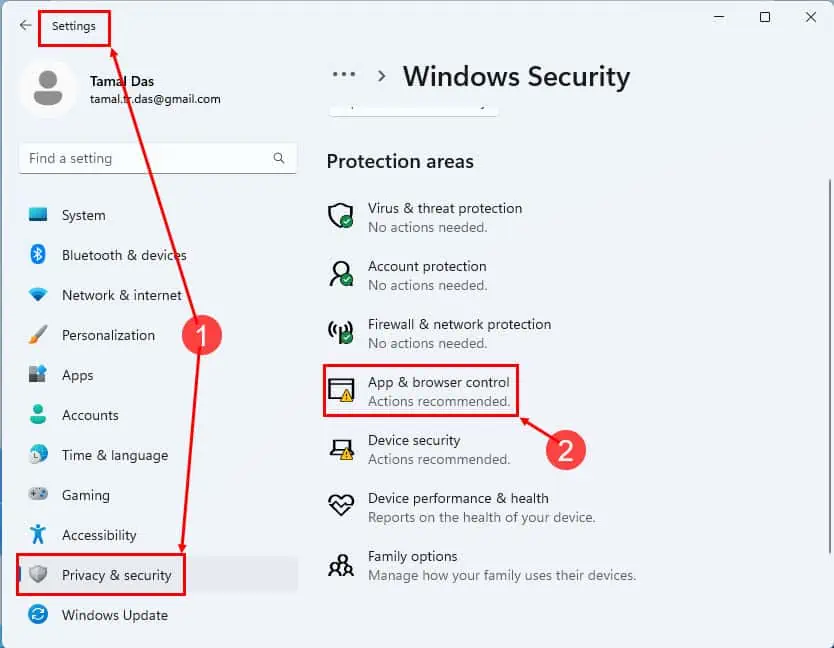
- Press Windows + I and click on the Privacy & security menu on the left.
- On the right side, tap the App & browser control button.
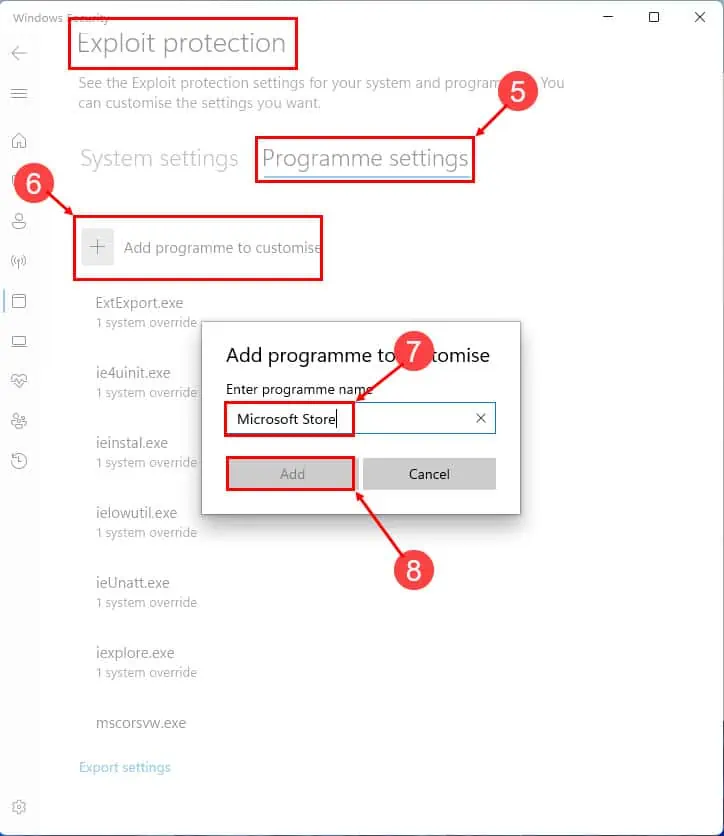
- Scroll down the new window until you find the Exploit protection settings hyperlink.
- Click on it.
- Now, select the Program settings tab.
- Hit the Add program to customize button.
- Click Add by program name option.
- Type the name of the app and click Add.
Now, launch the same app and it should be working now.
Solution 6: Adjust Compatibility Settings
- Select the app that’s showing the Exception Access Violation Windows 11 error.
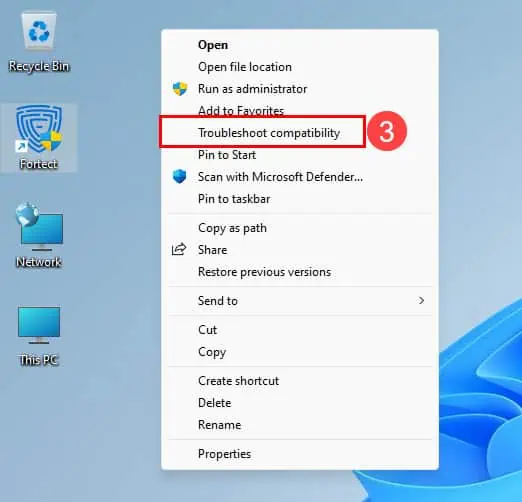
- Right-click and choose Show more options.
- On the new context menu, click the Troubleshoot compatibility option.
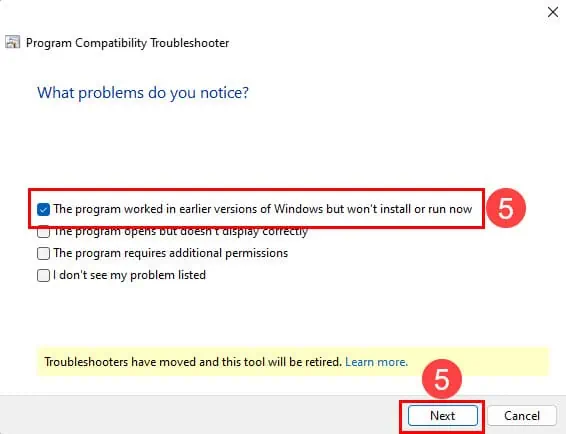
- Click the Troubleshoot program option.
- Checkmark the first checkbox and click Next.
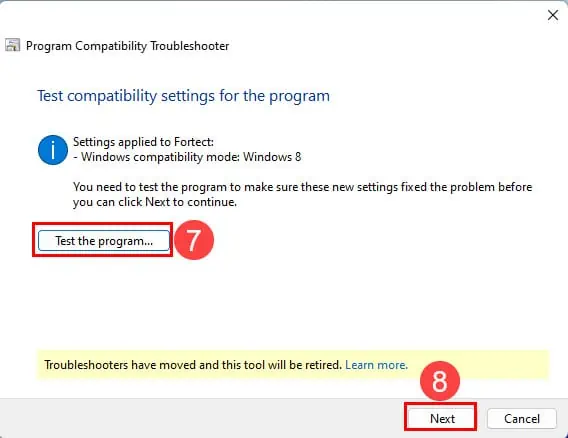
- Choose Windows 8 or 7 from the list and click Next.
- Click on the Test the program button.
- If the app works now, click Next.
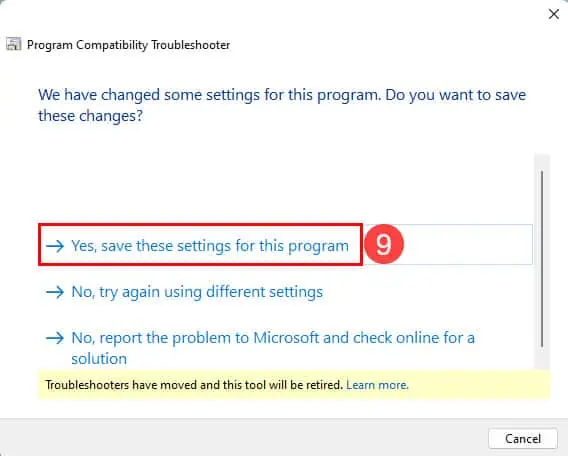
- On the final window, click Yes, save these settings… option.
- Click Close to complete the troubleshooting.
Conclusion
Resolving the Exception Access Violation Windows 11 error doesn’t have to be complicated. By following the methods mentioned in this article, you can mitigate this issue with ease.
If you know a better way to fix this or if we helped you, don’t forget to write a comment in the comment box below.






User forum
0 messages