ADB 101: What does it do and how to set it up on Windows 11?
Android Debug Bridge (ADB) is a useful command-line tool Google created for developers who want to access the hidden settings of different Android devices.
It has three components that work together to establish communication between your computer and a device: a client, a daemon (adbd), and a server. The client represents your PC that you will connect to your handheld device, and this is the component that sends commands using a USB cable. Meanwhile, a daemon runs commands on a device, while the server is the one that manages communication between the client and the daemon. Unlike the daemon that runs as a background process on a device, the server runs as a background process on the computer.
ADB can be used on different computer systems, such as Windows, macOS, and even Linux. But in this case, we will highlight its use on Windows 11. It is important to note, however, that ADB is not a tool readily installed on your computer. You need to initiate its download, but the good news is that Google provides direct links to where you can download the ADB for Windows 11.
Nonetheless, understanding the tool’s use is crucial before you download it. Google created ADB for developers, which means it will give you high-level tweaks for your phone or other Android devices. Specifically, it establishes communication between the device and the computer, allowing you to debug the former’s system and its apps, access a Unix shell, and perform other commands.
Installing ADB drivers on your Windows 11 PC
Here is a step-by-step process to install the ADB drivers on your Windows 11 PC.
- On an ADB user guide page provided by Google, you can access the link to the download page of the ADB tool. It offers the ADB drivers in three options, depending on your computer’s operating system. Choose the first one to get the latest version you can use for your Windows 11.
- Clicking the “Download SDK Platform-Tools for Windows” option will bring you to a prompt page. Just check the box and click the Download Android SDK Platform-Tools for Windows button to start the download.
- Once the ZIP file is downloaded, you have to move and then extract the folder to a folder you can easily access. We recommend having it on your Windows 11 PC’s root (C:\) drive.
- To perform the extraction process, just right-click the ZIP file and select the “Extract all…” option. After that, a prompt will appear. Just select the “Extract” button to continue.
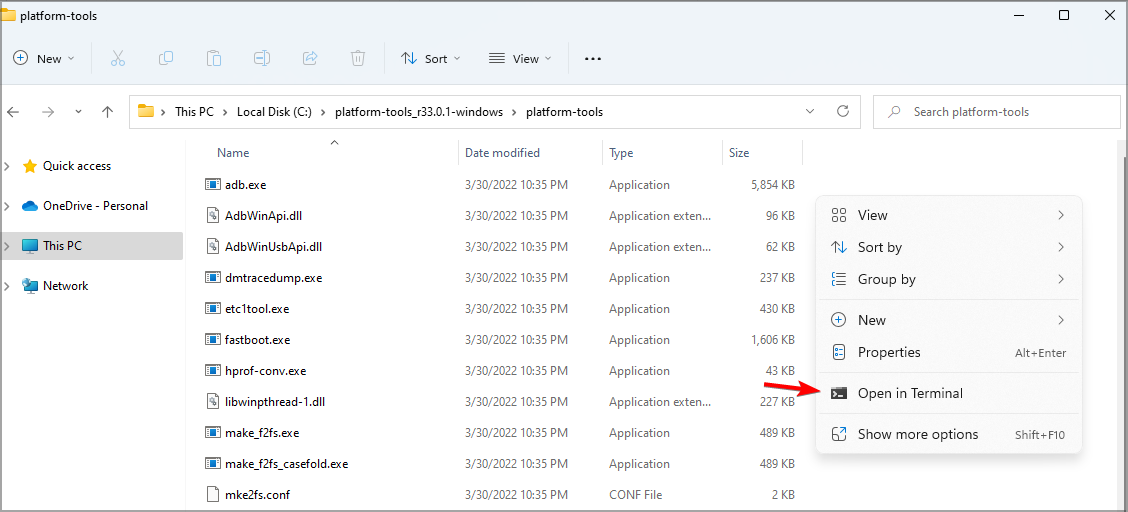
- Open the folder you extracted and right-click within it. Select the “Open in Terminal” option to launch Windows PowerShell command prompt.
Activating ADB debugging on Android device
Downloading the ADB drivers is not just the only thing you should do in order to run ADB commands on Android devices. You also have to prepare your phone or tablet for the communication between the ADB components to work. Here’s how you can enable ADB debugging on your device.
- You need to enable the Developer Mode, which is hidden by default. To do it, go to Settings > About Phone > Build Number. Quickly tap the Build number seven times to activate the mode.
- Once activated, the Developer Options of the device’s system will appear. The placement of the section differs depending on your phone mode or brand. You can find it upon opening the Settings; sometimes, it is inside the Systems and Updates area and other places. It could also be named differently on other devices.
- Go to the Developer Options and activate the USB Debugging option under the Debugging section.
- Connect your device to the Windows 11 PC using a USB cable, and change the USB mode to “file transfer (MTP)” mode.
- Your device will show a dialog asking permission for USB Debugging that allows debugging through this computer. Tap “OK” to continue. You can also check the box within the dialog box, so you won’t have to do it every time you connect the device to the PC.
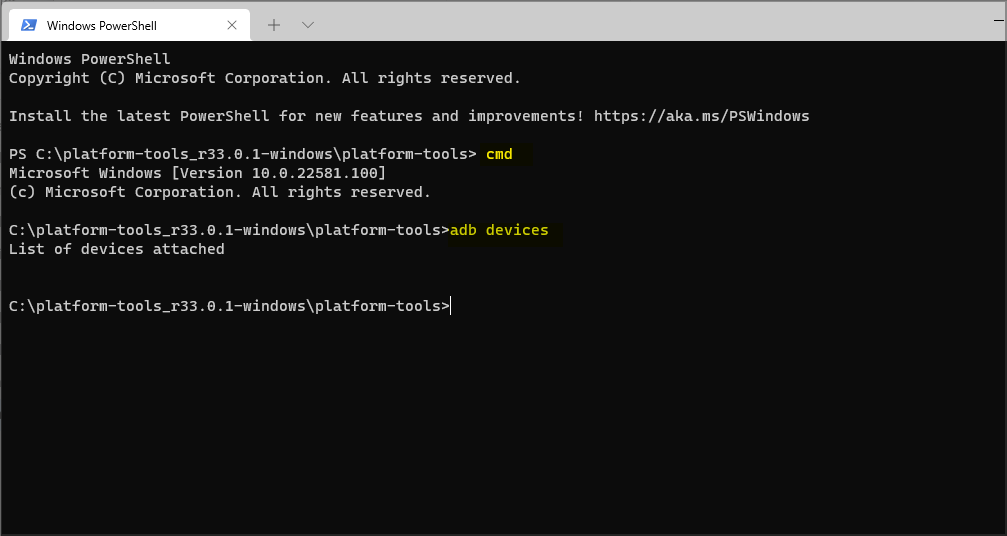
Once everything is set (ADB driver is installed, the Developer Options of handheld Android device is activated, and the device itself is connected to PC via USB cable), you can verify if your device is successfully connected to the PC. Just execute on the Command Prompt window of your PC the commands “cmd” and “adb devices.” Doing so will show you the “List of devices attached.”
Using a USB cable when performing ADB debugging is commonly used by developers, but it can also be done wirelessly on specific devices connected over Wi-Fi. Setting up the devices require more work, but it removes common USB connection issues like driver installation.
ADB can be used on devices running different Android operating system versions. However, note that the instructions for wireless debugging differ on devices running Android 11 or higher and Android 10 and lower. Here’s how you can do it.
Wireless debugging for devices running Android 11 and higher
- Before starting, it is required that the Windows 11 PC and the device are both connected to the same wireless network.
- Enable the Developer Options of your device using the same steps mentioned above.
- In the Developer Options, go to the Debugging section and activate “Wireless debugging.” Select “Allow” when you receive a prompt.
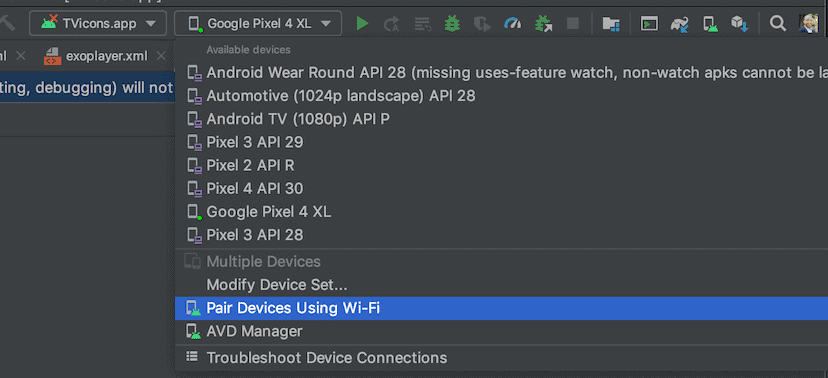
- Launch the Android Studio Bumblebee on your PC, and select “Pair Devices Using Wi-Fi,” which you can access through its run configurations dropdown menu. You’ll see a popup window to pair devices either using a QR code or a pairing code.
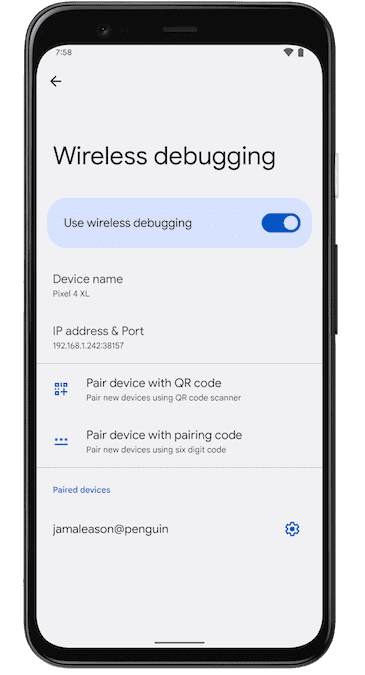
- Check your device and tap “Wireless debugging” to start the pairing. As said, there are two ways to do it: via a QR code or a pairing code. Choose which one suits you better.
Wireless debugging for devices running Android 10 and lower
- Connect your device and PC to the same Wi-Fi network.
- Connect the device to the PC using a USB cable, and set the device to wait for a TCP/IP connection on port 5555.
- Disconnect the device from the Windows 11 PC by removing the USB cable.
- You can now connect to the PC using the IP address of your Android device.
- In case the connection is lost, just execute the “adb connect” or “adb kill-server” commands, with the latter requiring you to repeat the process all over again.
There are instances that you could encounter problems establishing the connection between the Windows 11 PC and your Android device, and the reasons might differ depending on the type of debugging you are using. For instance, wireless debugging can be problematic if the PC and device are separately connected to two different networks. It could also happen if no ADB drivers are installed on the PC or when they are outdated. For wired debugging, a faulty USB can also lead to problems.
Once everything is fixed, using the ADB can give you a lot of things to explore on your Android devices. It can deliver a wide variety of commands, from copying files to customizing the OEM features or user interfaces and many more. In the Android Studio Users Guide document, Google provides a list you can try to run commands to set up port forwarding, stop the ADB server, issue shell commands, and more.
Using them, you can get more control over the Android device and make relevant tweaks. Nonetheless, while ADB is not generally harmful (it doesn’t make changes to PC), inappropriately using it can lead to some problems. With this, you might want to assess your reasons for using it and your skills and knowledge before installing ADB drivers and executing ADB commands.
Read our disclosure page to find out how can you help MSPoweruser sustain the editorial team Read more




User forum
1 messages