TubeBuddy Review - Is It The Best YouTube SEO Tool?
Looking for an honest and detailed TubeBuddy review? You’re in the right place!
I tested the tool for more than a week and I’ll discuss its features, pros and cons, pricing, use cases, and more. Additionally, I’ll throw in a step-by-step guide to help you get started with the app.
Sounds good? Let’s get into it!
What Is TubeBuddy?
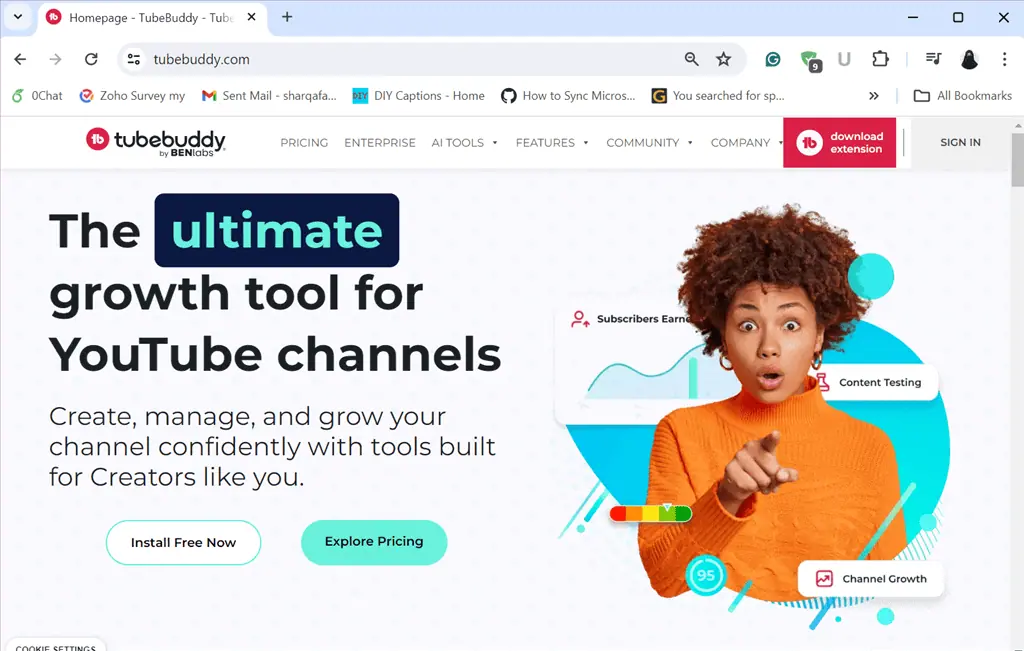
TubeBuddy is a powerful YouTube SEO tool developed by BENlabs. It aims to help you manage and grow your YouTube Channel with several built-in tools, including Keyword Explorer, Click Magnet, Thumbnail Generator, Video A/B Testing, Bulk Processing, Health Report, COPPA Center, and more.
TubeBuddy is available as a free browser extension that integrates directly into your YouTube dashboard. Once you install it and log in to YouTube, you’ll see several new, ready-to-use features. Notably, TubeBuddy is YouTube-certified, which means it’s 100% safe to install and use.
This tool is trusted by over 10 million users and holds a 4.6/5 rating across different review sites. Moreover, its active users reported an average increase of 79% more views and 32% more subscribers since they started using it.
Before discussing the features, here’s a quick overview of TubeBuddy’s strengths and weaknesses:
| Pros | Cons |
| YouTube-certified tool | Supports only one channel per license |
| Easy to Use | Limited bulk updates |
| Offers a 14-day free trial of the Pro plan | Requires subscription to a Legend plan to try advanced features |
| Helps you master YouTube SEO | Sometimes, its tools load very slowly |
| Efficient Bulk Processing Tools | |
| Exceptional Video A/B Testing | |
| Provides in-depth keyword research | |
| Adds YouTube video tags automatically | |
| Supports tools for analyzing competitors | |
| Offers an SEO Studio with helpful tools |
Features
To give you a comprehensive and authentic TubeBuddy review, I tested this tool for more than a week and observed its performance.
So, let me share its valuable features and my experience with them:
1. Keyword Explorer
TubeBuddy’s Keyword Explorer is used to identify popular keywords or search phrases for YouTube SEO. For instance, if you’ve got a video topic in your mind, type it in the search bar of Keyword Explorer, and check out the relevant keyword suggestions.
Using the tool you can easily discover the keywords that have the potential to gain more views. In addition, it also lists the trending topics, so you can catch the wave, create content, and publish it on your channel.
Another important aspect is that the search bar of Keyword Explorer uses the same terms as YouTube auto-suggest. This means you don’t have to switch between Keyword Explorer and the YouTube search bar while doing the keyword research.
To use Keyword Explorer:
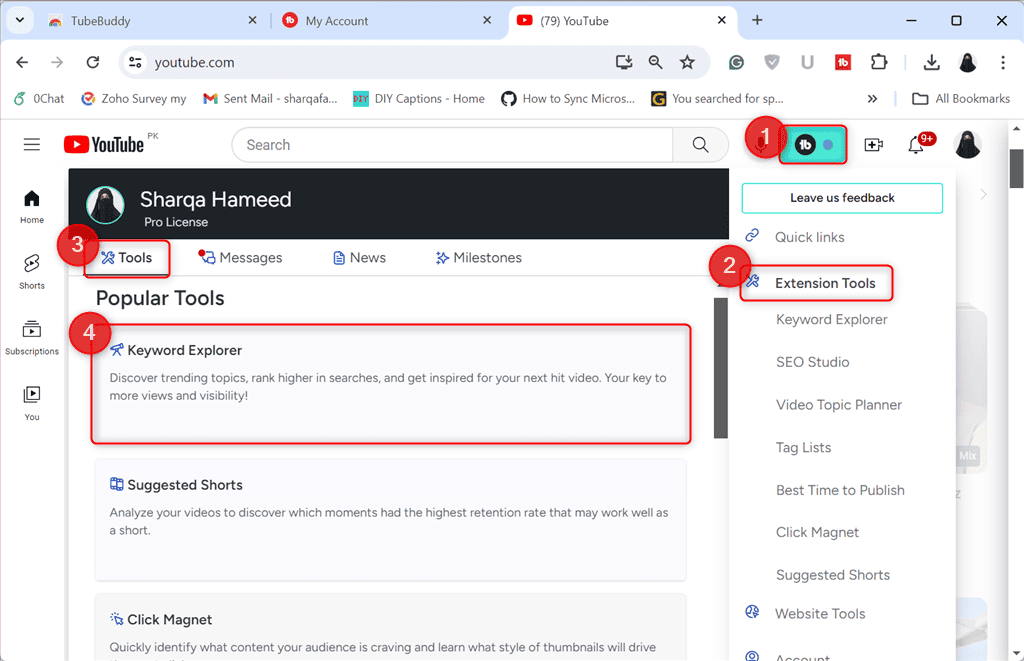
- Click on the TubeBuddy’s drop-down menu from the top right side of YouTube channel
- Switch to the Tools tab
- Select Keyword Explorer from the Popular Tools Category
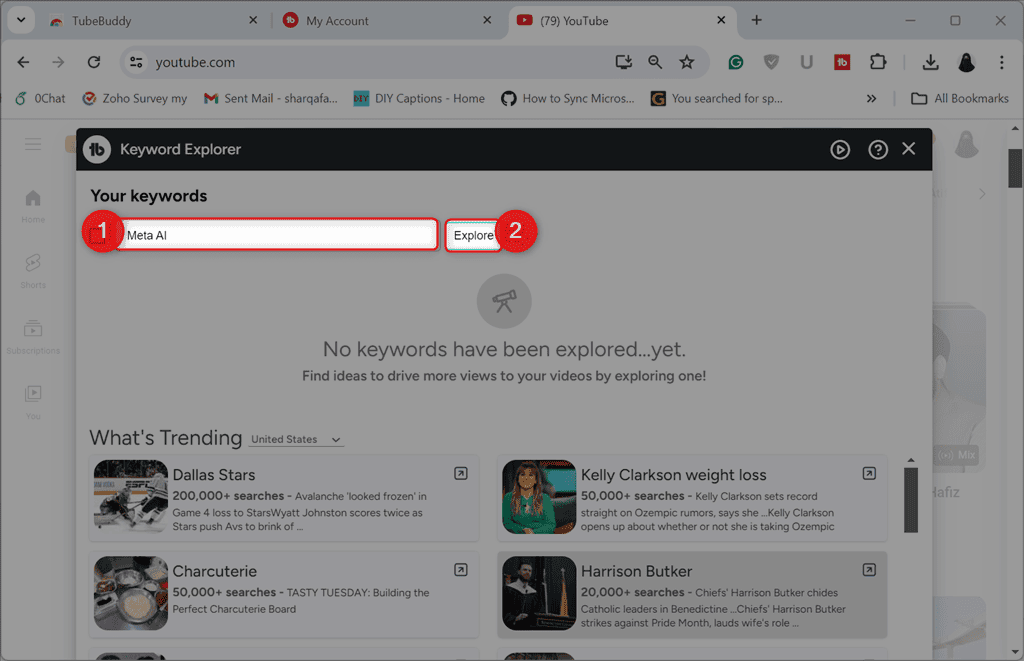
- Finally, enter your keyword and click Explore.
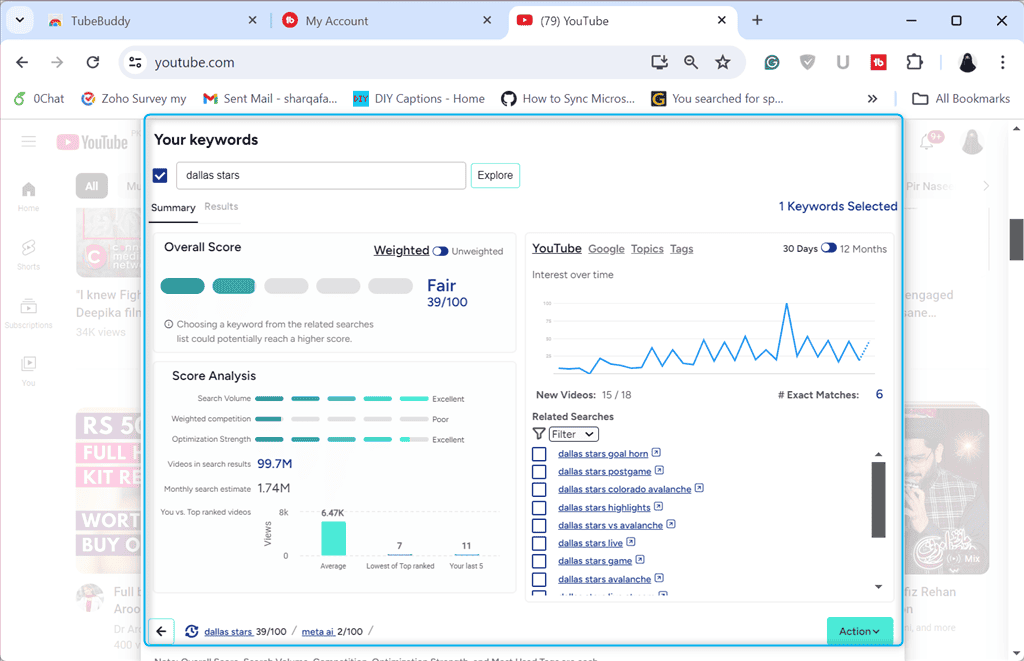
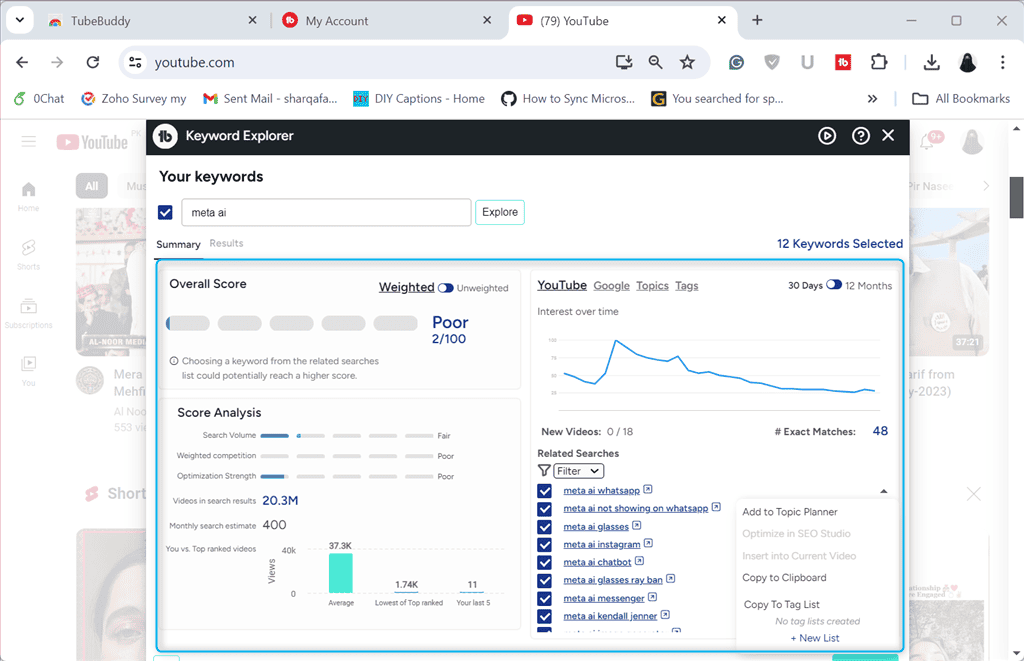
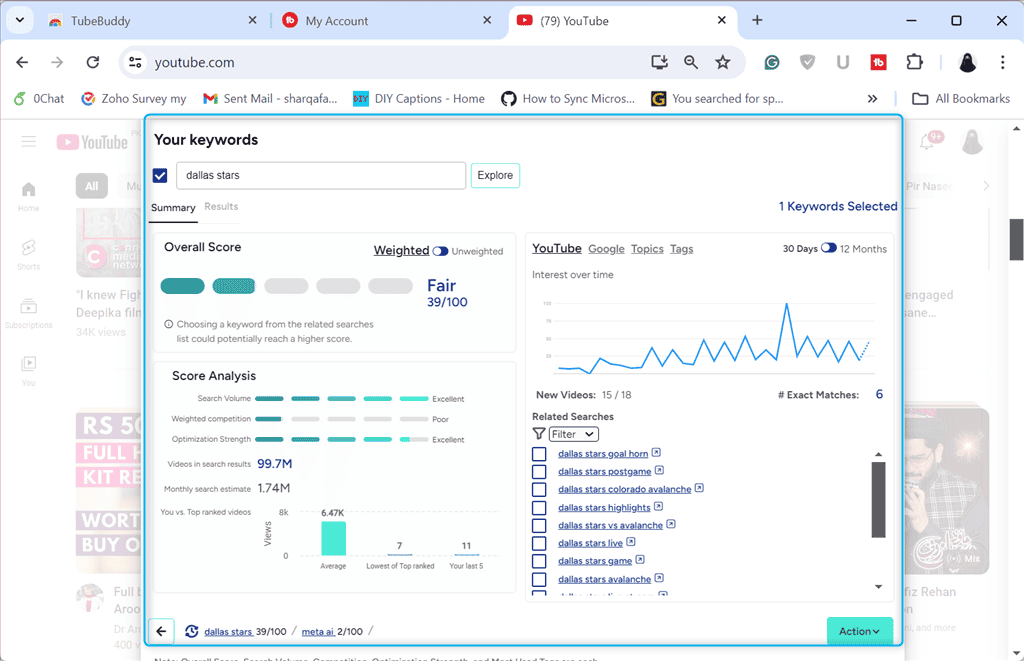
I tested the feature and searched for the “Dallas stars” keyword. As a result, within a few seconds, TubeBuddy calculated the YouTube data and fetched the advanced analytics for my keyword which included:
- Overall Score (Weighted and Unweighted)
- Search Volume of the typed keyword
- Weighted competition score
- Optimization strength
- Monthly search estimate
- Videos found in search results related to the keyword
- A graph showing the audience’s interest over time
- Related searches, etc.
Keep in mind that TubeBuddy’s free plan only offers 3 search results per keyword, which is quite limited. So, to perform extensive keyword research, you have to upgrade to its paid plans.
2. Videolytics
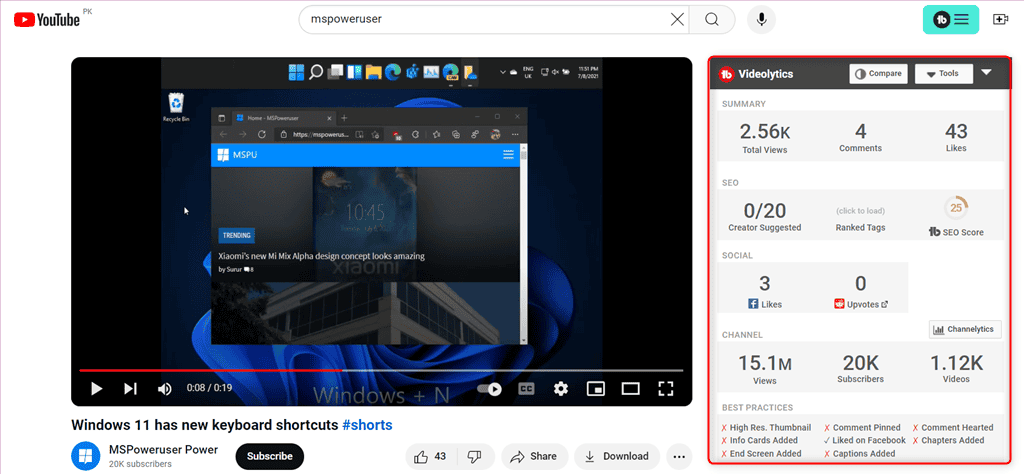
Unlike the basic video stats provided by YouTube, TubeBuddy’s Videolytics feature shows you a complete summary of the on-screen playing video. It assists in tracking engagement metrics, video views, and overall audience demographics that ultimately help to identify YouTube trends and optimize content strategy.
For each YouTube video, Videolytics includes:
- Total views
- Total comments
- Number of likes
- Number of suggested videos from the creator
- Ranked tags
- TubeBuddy SEO score
- Total number of Facebook likes
- Number of Upvotes
- Total channel views
- Number of channel subscribers
- Total number of uploaded videos on the channel
- Best practices for the current videos
- Video tags.
The Videolytics feature also allows you to compare the current video with any other popular video from the same or your channel. In addition, you can paste the ID or URL of another video and view the comparison within seconds.
Using this feature, you can easily analyze your competitors’ videos and understand their SEO strategies.
As per my personal experience, I’d say that Videolytics can help you create well-optimized YouTube SEO videos if used correctly. However, the detailed data insights provided with each video make it difficult to identify the most crucial factors behind the video’s reach.
3. Channelytics
Similar to Videolytics, Channelytics is another stand-out feature of TubeBuddy that lets you check out your competitors’ YouTube channels at a glance. For instance, with Channelytics, you can see what tags your competitors assigned to their YouTube channels or how many videos they’ve uploaded recently.
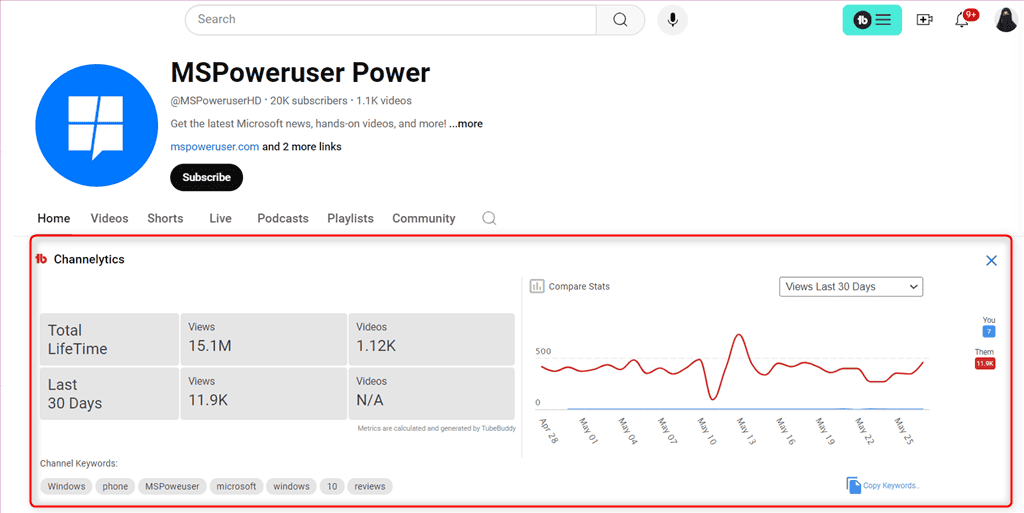
To be more specific, Channelytics displays:
- Total lifetime views and videos
- Last 30 days’ views and videos
- A graph to compare the last 30 days’ views, subscribers, and videos
- Channel keywords
In my case, I viewed the analytics of the MSPowerUser YouTube Channel. To do so, I typed “mspoweruser” in the YouTube search bar and opened the Channel. Within a few seconds, TubeBuddy displayed the Channelytics at the top of the Home tab.
Keeping an eye on your competitors assists in filling the optimization gap and increases the possibility of growth. However, it’s also important to focus on analyzing long-term trends and making adjustments to your own content strategy.
4. Health Report
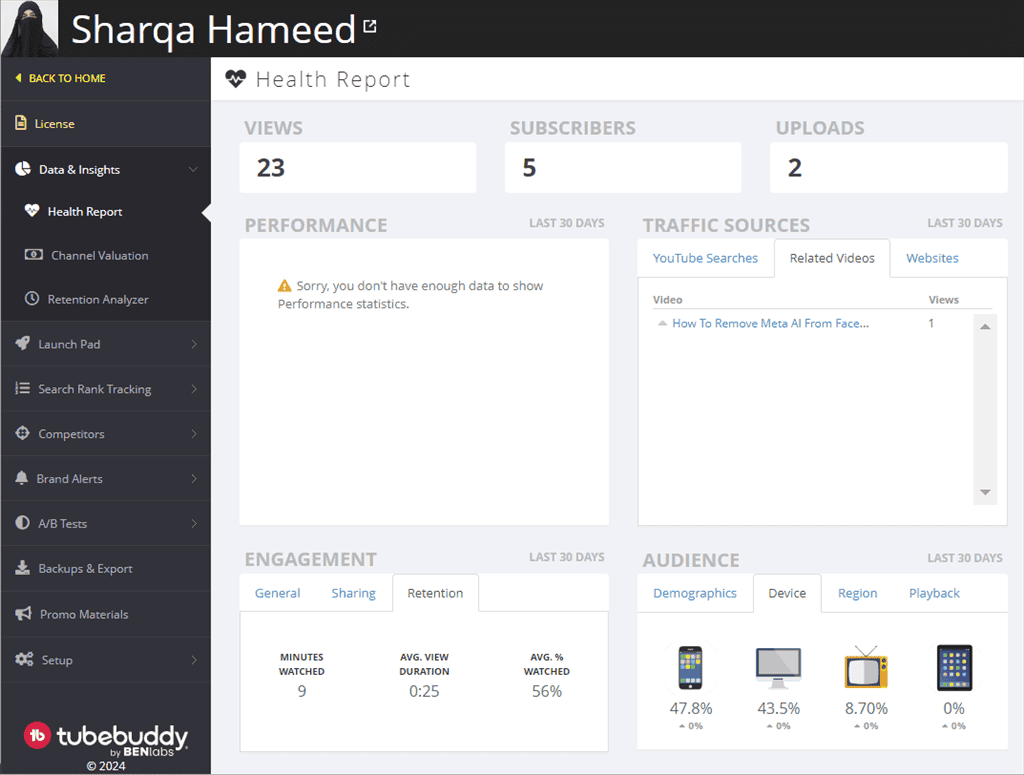
The Health Report feature of TubeBuddy gives you an overall look at the performance of your YouTube channel. Furthermore, it displays information related to:
- Total number of views
- Total number of subscribers
- Total number of uploads
- Performance in the last 30 days
- Traffic sources: YouTube searches, Related videos, and Websites
- Engagement: General, Sharing, and Retention
- Audience: Demographics, Device, Region, and Playback.
Think of it like a regular check-up for your YouTube channel that helps you understand what’s working and what’s not. Moreover, with the Health Report feature of TubeBuddy, you can keep your channel’s growth on track.
To test it, I signed in to access my TubeBuddy dashboard and clicked the Health Report icon. As a result, it showed me different states related to my channel.
However, it didn’t display the performance statistics because of insufficient data.
5. Comment Formatting
The Comment Formatting feature of TubeBuddy permits you to change your comment style for better engagement. You can use it in both cases, for instance, while responding to your own comments or when you want to comment on someone else’s video.
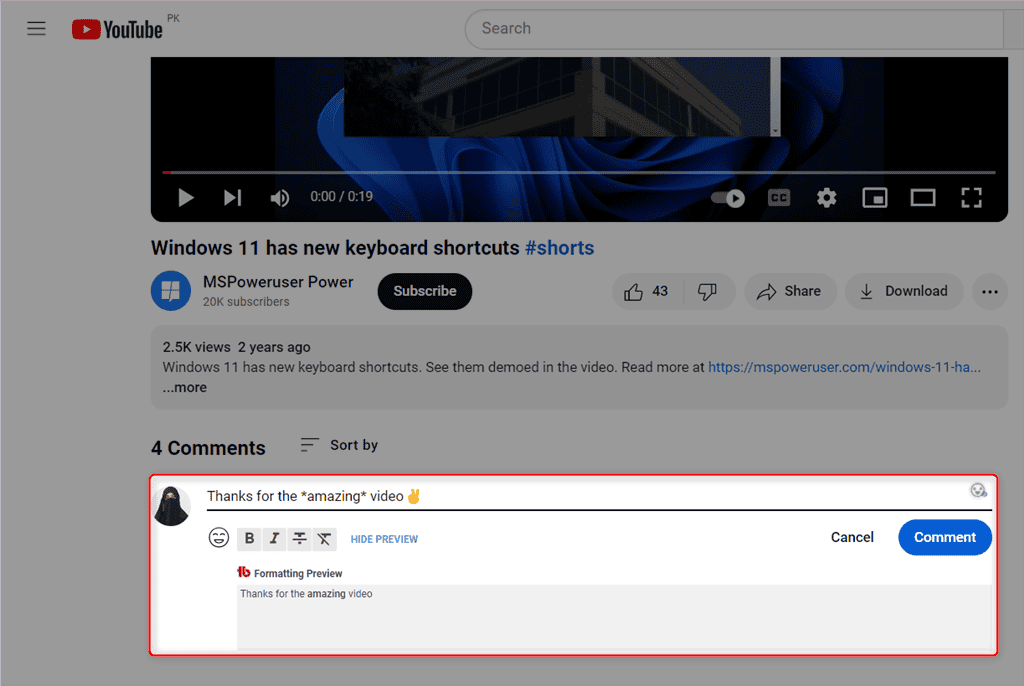
TubeBuddy’s Comment Formatting feature allows you to:
- Bold a specific part of the comment
- Italicize text
- Add strikethrough or underline the text
- Add emojis using the TubeBuddy emoji library
In addition, it also gives a real-time preview of how the formatted comment looks like.
All of these Comment Formatting options can improve the overall user experience and make your comments more eye-catching and attractive.
In my case, I tested it to bold some portion of my comment and viewed its live preview. However, I’ve noticed that Comment Formatting options lack advanced features, such as font styles or colors.
6. Canned Responses
As your YouTube channel grows naturally, you get tons of new comments on your videos. In such a situation, TubeBuddy’s Canned Responses stand out as a time-saver feature that assists you in going through the comments and replying to them using pre-written responses.
The Canned Responses feature allows you to respond to repetitive comments or questions quickly. Moreover, it also helps in adding pre-defined answers for your YouTube audience and managing interactions with them.
It works in such a way that whenever a similar question pops up in the comments section, you only have to select the added canned response and hit Reply. Additionally, you can share these responses with your comment moderation team.
To test it, I navigated to TubeBuddy’s main dashboard and clicked the + Add Canned Responses button. After that, I added two pre-written responses with the commenter’s name in shortcodes.
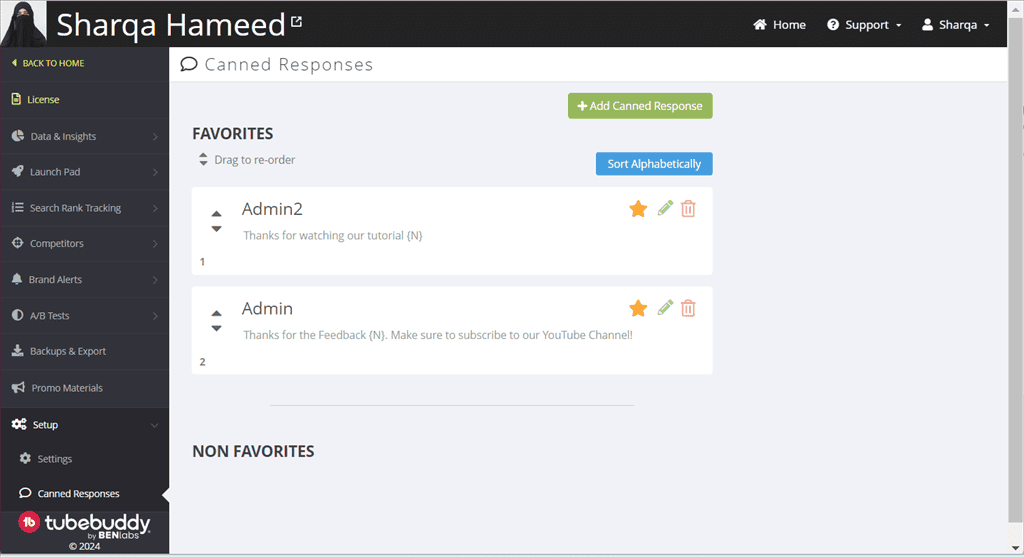
Now, to utilize the pre-defined responses, firstly, I opened the comment section of the desired video. Then, I clicked on TubeBuddy’s drop-down menu and selected one of the pre-defined canned responses to add.
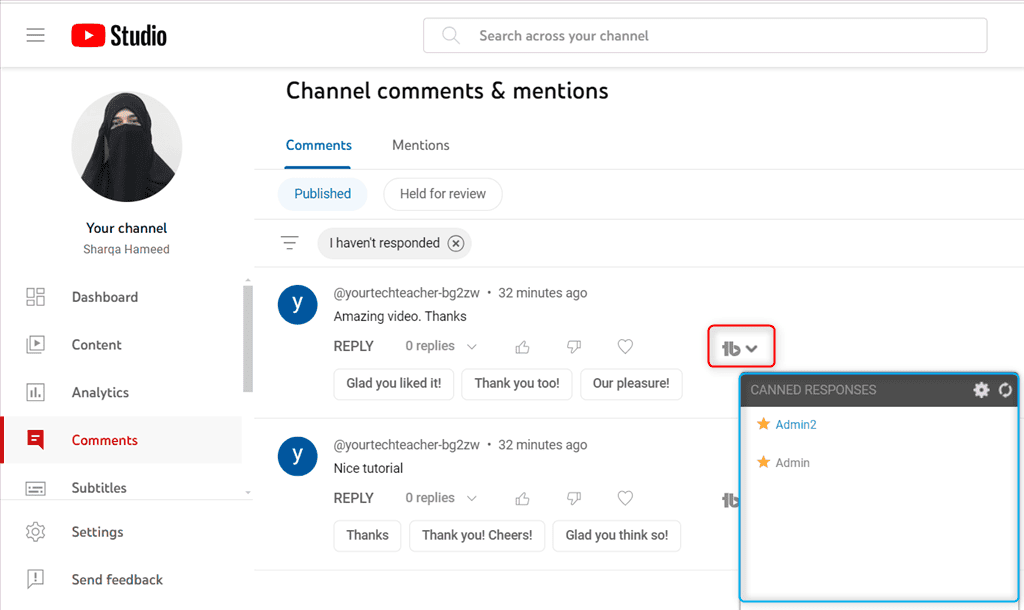
As per my experience, I found TubeBuddy’s Canned Responses quite handy and time-saving. It allowed me to personalize each template with a placeholder to refer to the username.
However, the free plan restricts the number of canned responses you can create and store.
7. Video Tags
While watching a YouTube video, the TubeBuddy Video Tags feature shows you a proper list of tags added to it. It also has the option to view the search ranking for each of the embedded tags. Moreover, using this feature, you can add and manage your existing tag list and even import tags from the top-performing videos.
For instance, I played a YouTube video and scrolled down through its Videolytics from the right side to check out the relevant video tags.
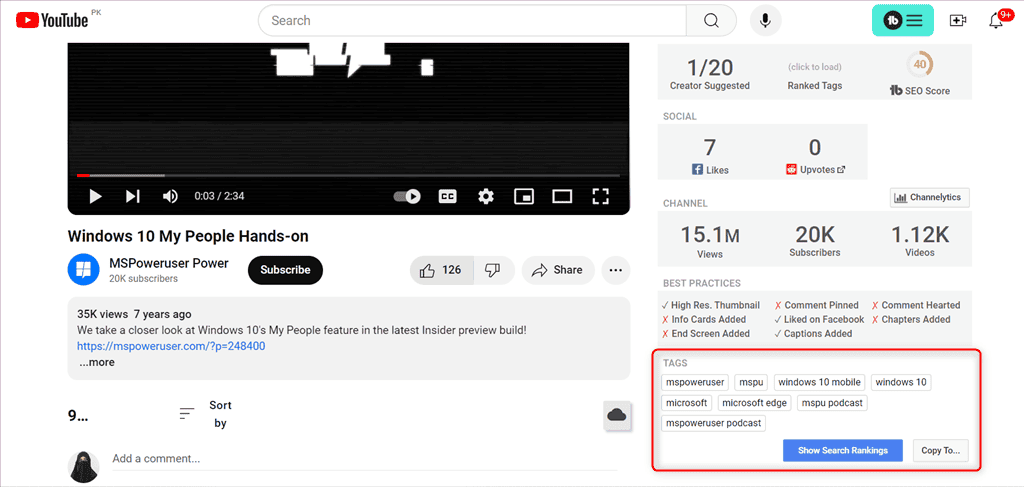
Then, I clicked on the Show Search Rankings button to verify where the video ranks in the YouTube search results.
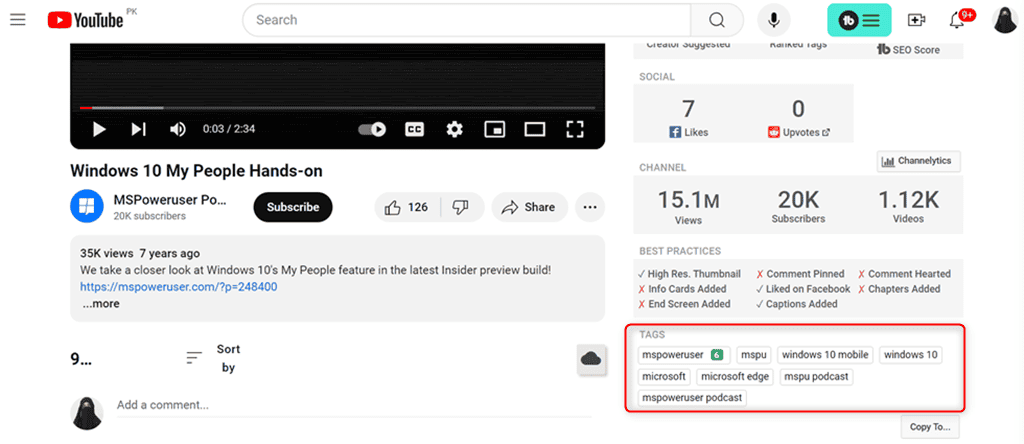
Thus, with the Video Tags feature, you can get a list of tags your competitors use and apply them to your videos with ease.
8. Recommended Tags
Recommended Tags work as AI YouTube keyword suggestions that you can add to published and new videos that need to be uploaded. For this, TubeBuddy uses artificial intelligence to provide a list of tags relevant to the video content.
Notably, you can sort these tags with respect to:
- Relevance
- Keyword Score
- Search Traffic.
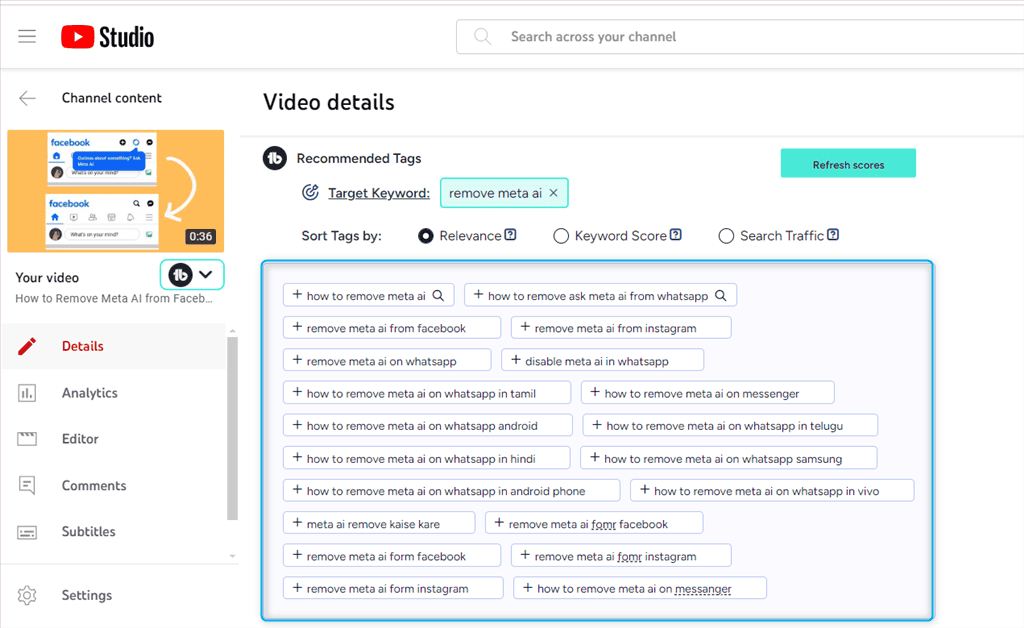
Moreover, you can add a target keyword or phrase to get more specific tags that resonate better with your video.
Other than this, TubeBuddy also supports some tools that can help you to Copy, Sort, Import, Translate tags or even search them out individually using Keyword Explorer.
9. Tag Translator
Tag Translator is another premium feature of TubeBuddy that lets you reach a global audience. It helps you translate selected video tags in 40+ languages. This ultimately increases the chances of visibility of your videos in those languages or respective regions.
In simple words, if you’ve added translated tags, YouTube will recommend your video as a Suggested Video next to foreign languages.
For instance, I tried to translate some tags from English to German.
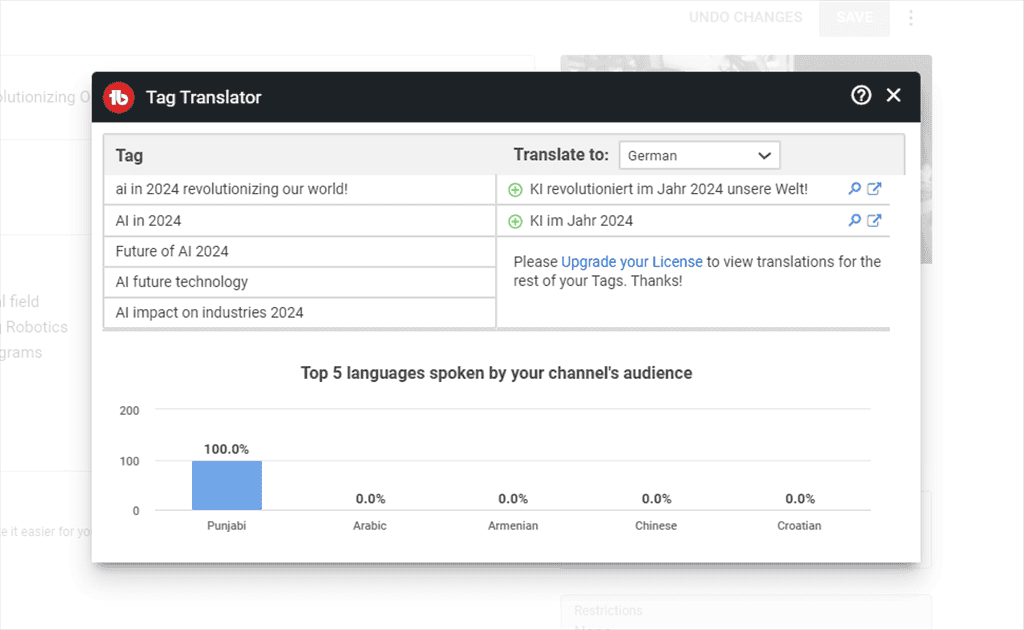
However, translating tags for local audiences or specific niches might require manual adjustment for accuracy.
10. Tag Lists
TubeBuddy allows you to create and maintain separate lists for keywords or tags. This specifically helps in doing keyword research and preparing your strategy ahead of time.
While exploring your competitor’s YouTube channel or playing related videos, with just one click, you can add their popular tags to your channel Tag lists.
Once you upload your YouTube video, click Import under the Tags Tools, add all saved keywords from the Tag lists, and click INSERT.
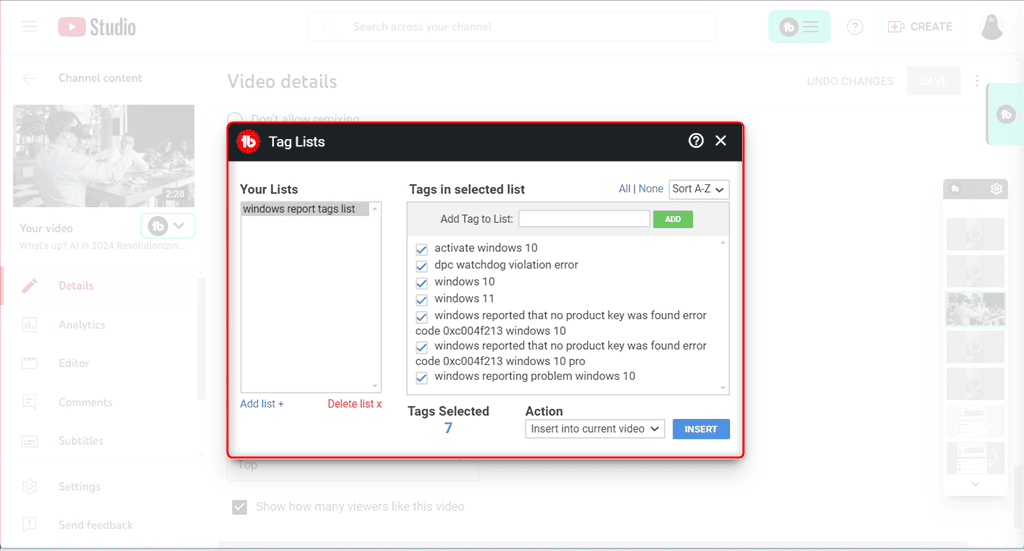
Defining top tags for your videos increases the chances of getting a high rank in YouTube search results. However, if not managed carefully, these Tag Lists can become inconsistent across videos, which may impact search optimization.
11. Tag Rankings
With TubeBuddy’s Tag Ranking feature, you can verify your video position against specified tags. This feature displays a green circle on the right side of the keyword that represents the video position from the top of the search.
Notably, to fetch unbiased results, TubeBuddy evaluates the ranking position of the video utilizing the browser’s incognito mode.
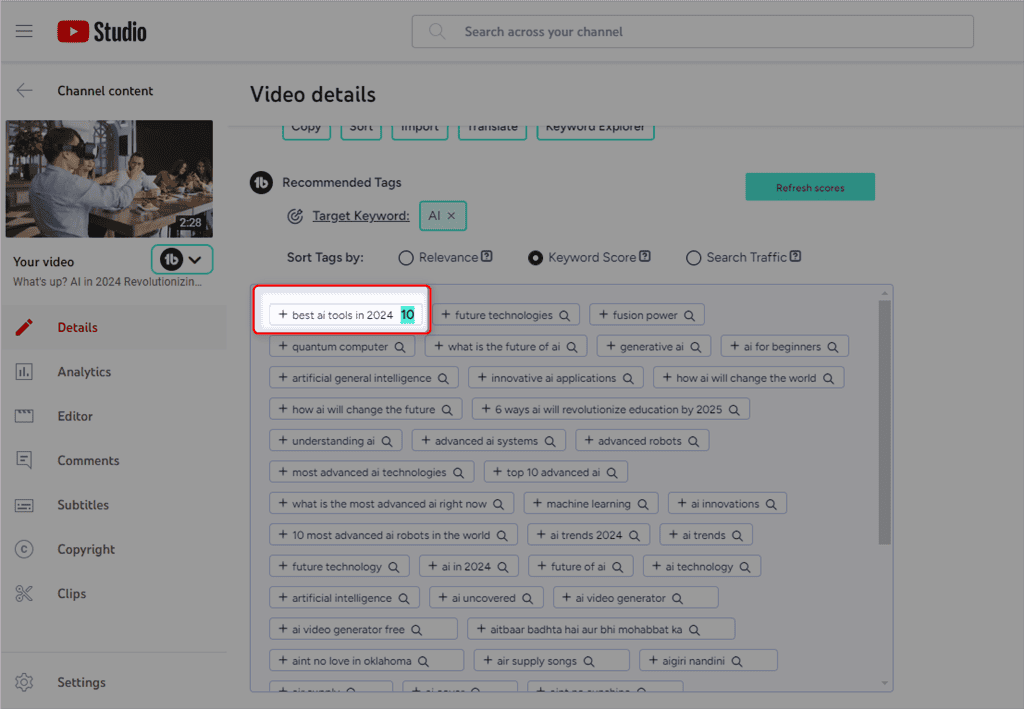
After a few weeks, visit your published video and verify if its ranking has improved or not. You can also use the Auto Sorter tool to put the best videos at the top.
However, search engine algorithms change frequently. So, it’s important to focus on creating quality content and a long-term SEO strategy, instead of completely relying on Tag Rankings.
12. Tag Sorter
TubeBuddy’s Tag Sorter feature is used for reordering the video tags to put the most important ones at the top.
For instance, if your YouTube video is already ranking for different keywords, utilize the Tag Sorter tool and sort the video tags with respect to their search position.
To use it:
- Switch to the Content tab in the YouTube Studio
- Open the desired video
- Scroll down through the Edit page and find the Video Tags section
- Click the Sort button to launch TubeBuddy’s Tag Sorter tool
- Drag and drop to change the placements of the tags
- Or, click the AUTO SORT BY RANK button to let TubeBuddy reorder tags based on their rankings
- Finally, click the APPLY & CLOSE button to insert the tags in the updated order.
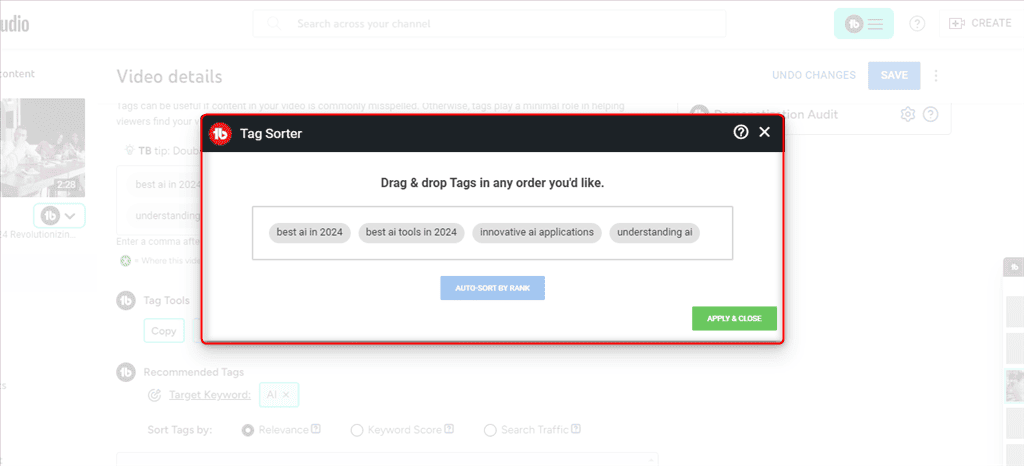
This is how you can revisit your old videos and reorder the tags to make sure the content is up to date for optimal ranking.
Notably, the available sorting option might not be customizable for specific tag management requirements.
13. View and Copy Video Tags
Another smart way to improve your videos’ ranking is to perform a competitor search, analyze their content, and implement what you learn.
In this regard, TubeBuddy supports a View and Copy Video Tags feature that lets you copy your competitors’ video tags with just one click and either create a new tag list or save it to the clipboard.
This feature is a part of Videolytics and is located at the right sidebar of the onscreen playing video.
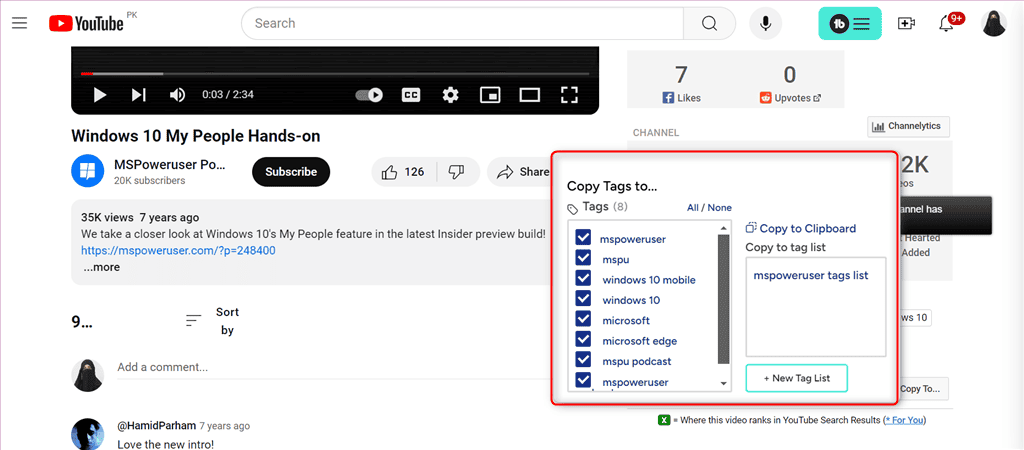
However, it doesn’t offer insights into the existing video tags and you’ll still need to analyze performance data separately.
14. Playlist Action Bar
The Playlist Action Bar is mainly utilized to change a playlist’s privacy settings and remove unlisted or private videos with ease. Additionally, it helps you to sort playlists based on these three categories:
- Standard: Sorts videos by most popular in terms of views, newest or oldest added, or published date
- Misc: Sorts content alphabetically, or reverse, random, privacy order, etc.
- Analytics: Sorts videos in terms of average view duration or percentage, comments, likes, shares, or gained subscribers
Keep in mind that there’s a risk of drop-off in case your YouTube videos playlist isn’t properly organized. Hence, use the Playlist Action bar and put your best-performing videos at the top.
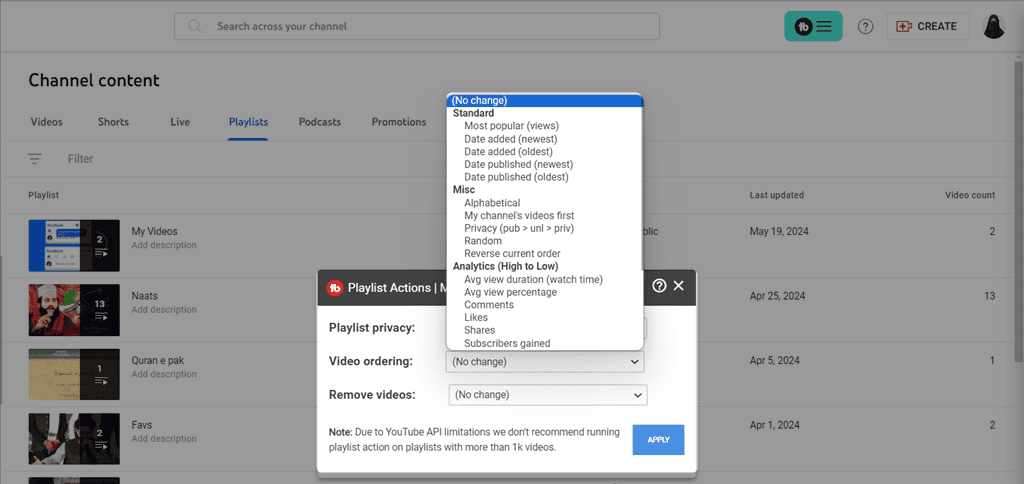
You may have seen most of the mentioned playlist sorting options in the YouTube Studio. However, sorting playlists by analytics is a crucial feature of TubeBuddy supported in its Pro and Legends plans.
15. Random Comment Picker
TubeBuddy’s Random Comment Picker feature allows you to select any random comment from a published video. This feature is useful in certain cases like running a contest or doing a giveaway on your YouTube channel.
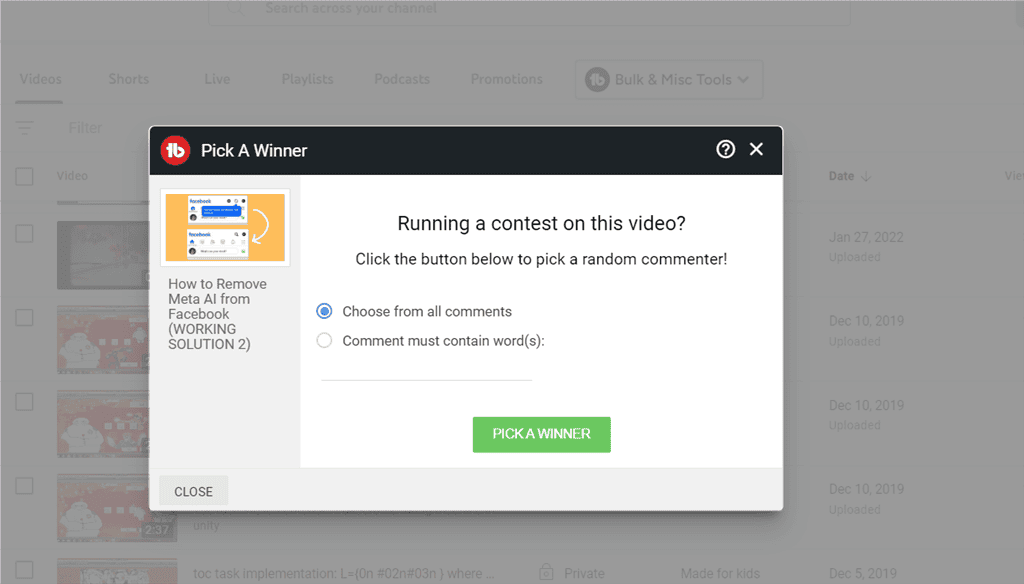
The Random Comment Picker lets you pick a winner totally in an unbiased manner and without using any third-party tool. However, it lacks advanced options like weighted randomization or excluding specific entries.
16. Quick Edit Bar
While working on a video within YouTube Creator Studio, you’ll see the Quick Edit Sidebar at the right side of the window. This is a fantastic feature that lets you switch between multiple videos without opening them all in different tabs.
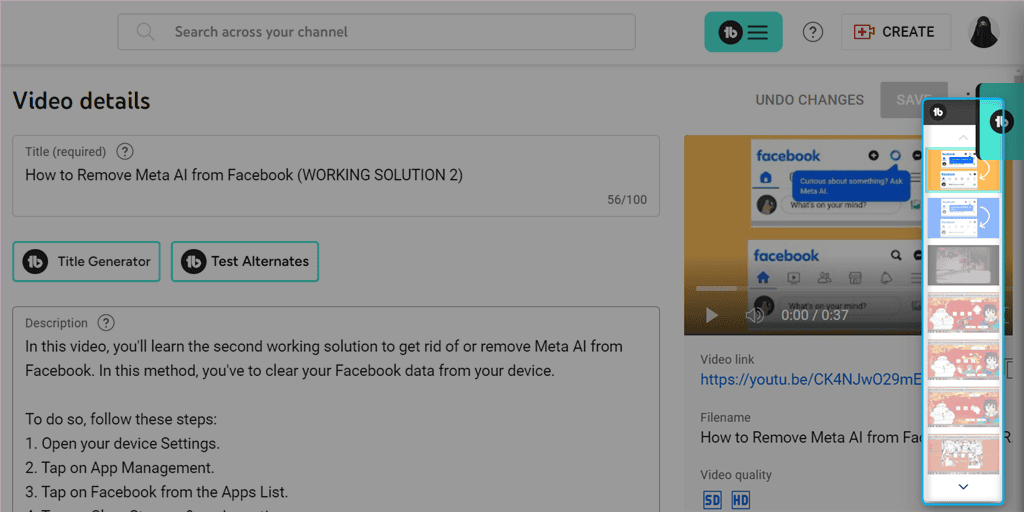
So, to jump from one video to another, I simply clicked on the desired video from the Quick Edit Bar. As a result, this feature saved the time I’d have spent manually navigating between videos.
However, for more complex tasks, you may need to switch to full editing mode manually.
17. Quick Links Menu
Similar to Quick Edit Bar, TubeBuddy has embedded a Quick Links Menu to YouTube that enables you to access most of its useful features and tools with just a click.
This menu is placed at the top sidebar of your YouTube Studio and allows you to quickly access:
- Extension Tools
- Quick Links
- Keyword Explorer
- SEO Studio
- Video Topic Planner
- Tag Lists
- Best Time to Publish
- Click Magnet
- Suggested Shorts
- Websites Tools
- Account
- Community
- Support, etc.
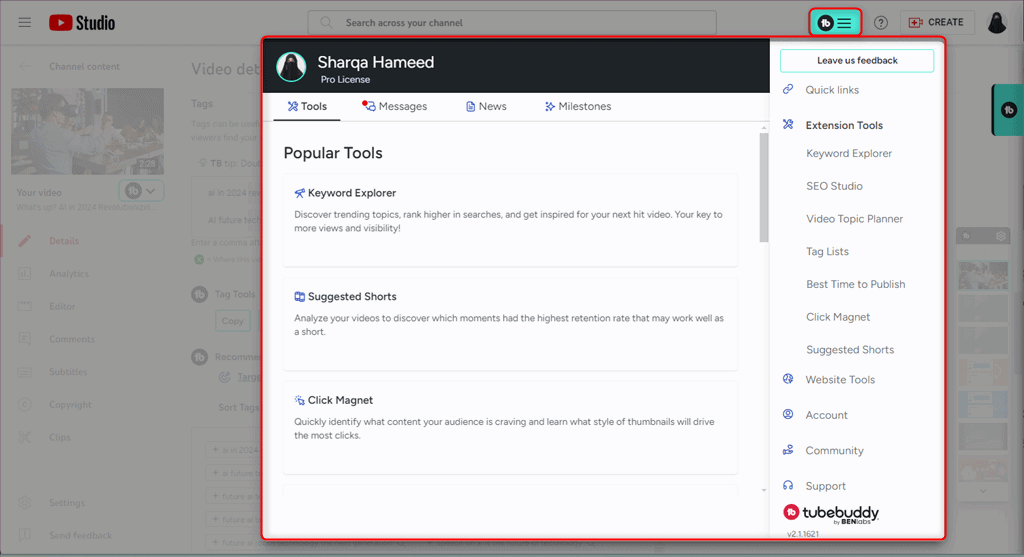
However, too many quick links can overwhelm some new users and make the interface feel cluttered.
18. Thumbnail Generator
TubeBuddy offers a built-in Thumbnail Generator that helps you create thumbnails for YouTube videos using:
- A still video frame
- A solid color
- A custom image or existing thumbnail
Additionally, it supports different options for editing such as adding text, shapes, frames, emojis, images, a background, and templates.
To use TubeBuddy’s Thumbnail Generator:
- Open YouTube Studio and hover over the required video
- Click on the TubeBuddy’s icon and select the Thumbnail Generator option, under the Misc section
- Add a background of your choice
- Add layers of images, shapes, text, emojis, or frames
- Finally, click on the Save button.
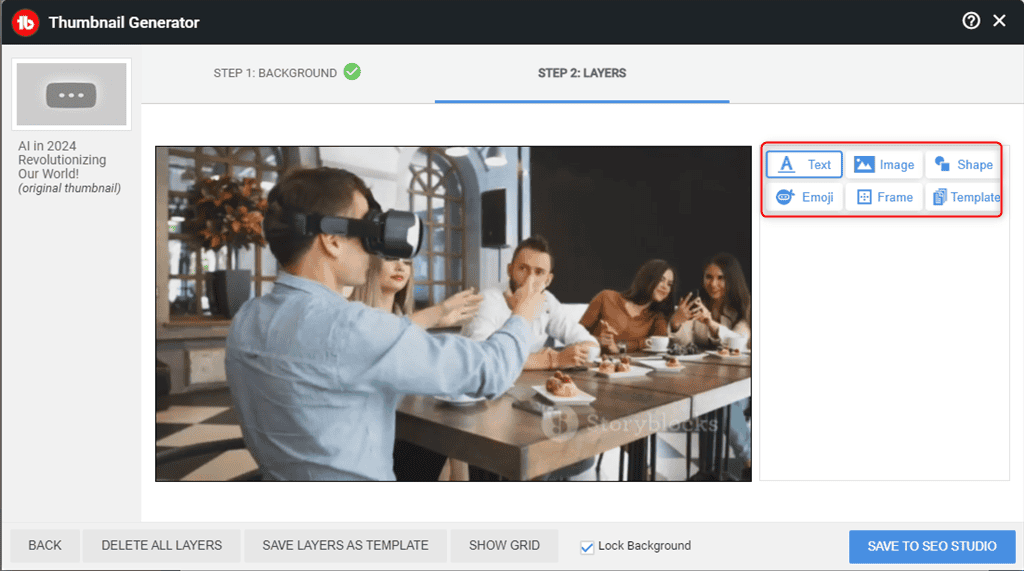
However, as per my experience, TubeBuddy’s Thumbnail Generator creates pretty average thumbnails. It only supports a limited number of fonts, however, you can upload custom font files.
Overall, for better thumbnail creation and customization, I’d recommend you consider other alternatives, such as Canva or Adobe Creative Cloud.
19. Thumbnail Analyzer
Pairing with the Thumbnail Generator, TubeBuddy also supports a Thumbnail Analyzer tool that assists you in selecting the best thumbnail for your YouTube Video. All you’ve to do is:
- Open the Thumbnail Analyzer tool
- Upload or drag & drop your thumbnail variation images
- Check out which thumbnail is more effective (in terms of CTR) and select it for the video.
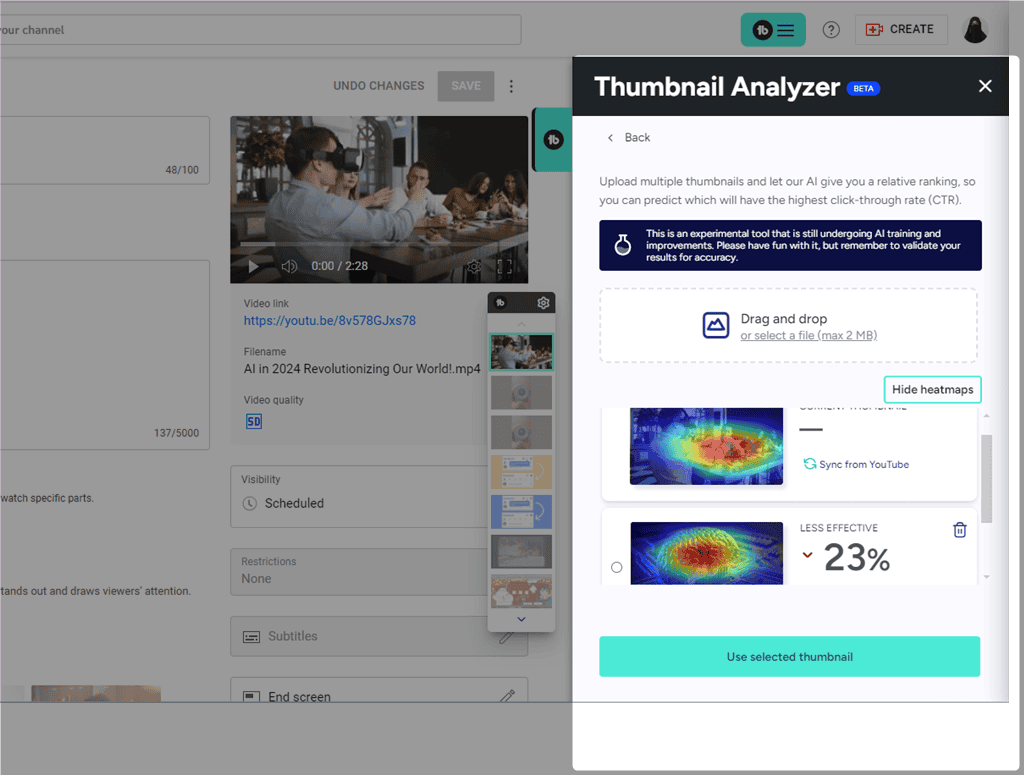
This tool is a part of TubeBuddy’s free plan in which you can upload 5 thumbnail variations. On the other hand, the Pro and Legend plans allow uploading 10 and 20 thumbnails, respectively.
Notably, Thumbnail Analyzer is an experimental tool that’s still undergoing AI improvements and training. You can try it out, however, remember to verify your result for accuracy.
20. Card Templates
By default, YouTube enables you to add embedded notifications or info cards at certain times of your videos. With each card, you can attach and link different types of content, like:
- External links
- YouTube playlists
- YouTube videos
- YouTube playlist
However, adding the same card to multiple videos consumes a lot of time. However, with the Card Templates feature, you can save each card as a separate template and reuse it with just a single click.
To create a card template:
- Firstly, open the required video and locate the Cards menu from the right side
- Then, create a card as per your preference and save it
- Finally, mark the Set this video as a card template checkbox to turn the card into a template.
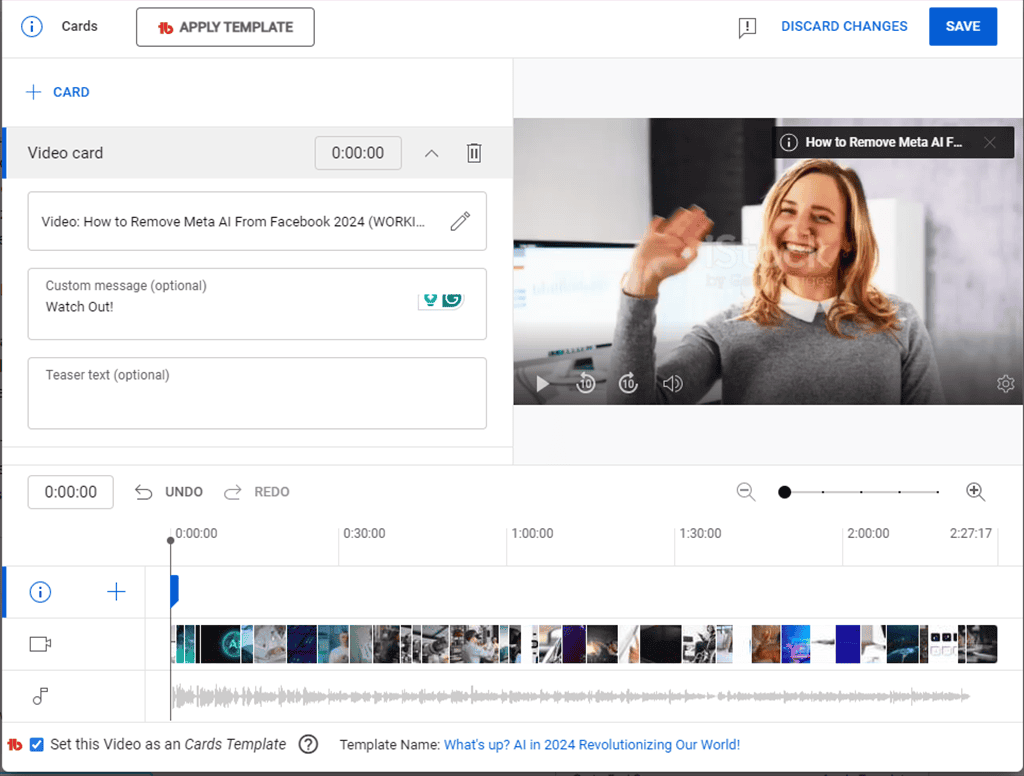
After performing the procedure, you can apply the newly created card template to a single or multiple YouTube videos. I personally, found the Card Template feature a great time-saver as it allowed me to re-use my card template over and over again.
21. End Screen Templates
Similar to Card Template, TubeBuddy offers the End Screen Templates feature that enables you to save and reuse end screens in different videos. You can use this tool to promote any additional content, and share playlists, videos, or links to your website.
To create an end screen template:
- Open a video and click on the End Screens icon from the bottom right side of the YouTube Studio window
- Then, set your end screen template and its relevant timeline
- After that, mark the Set this video as an End Screen Template checkbox
- Enter a template name and save it.
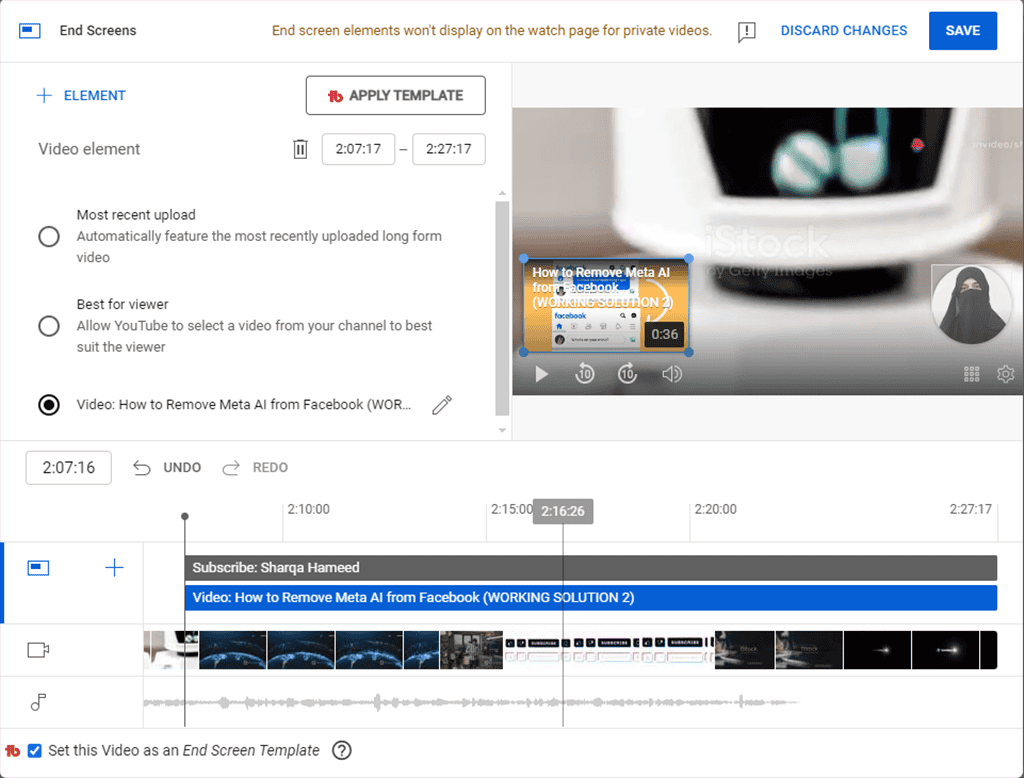
To apply the created template, open the End Screen popup and click on the Apply Template button. As the last step, choose between applying the entire template or only selected elements.
22. Default Upload Profiles
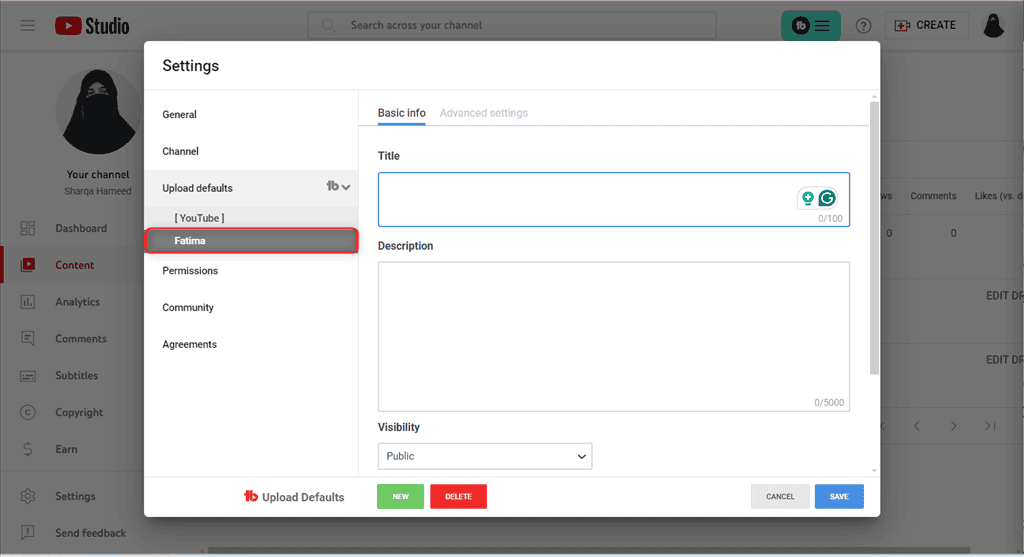
TubeBuddy’s Default Upload Profiles feature is of great use in case you want to create content for different audiences from a single YouTube channel. This feature allows you to add an unlimited number of Default Upload Profiles and choose different templates while uploading a new video.
To create a new upload profile:
- Navigate to your YouTube Studio Settings
- Look for the Upload Default option in the onscreen popup and click on the TubeBuddy icon next to it
- From the footer, click on the New button to create a new upload profile
- Enter its Title and Description, and set its Visibility.
- Lastly, click on the NEW button.
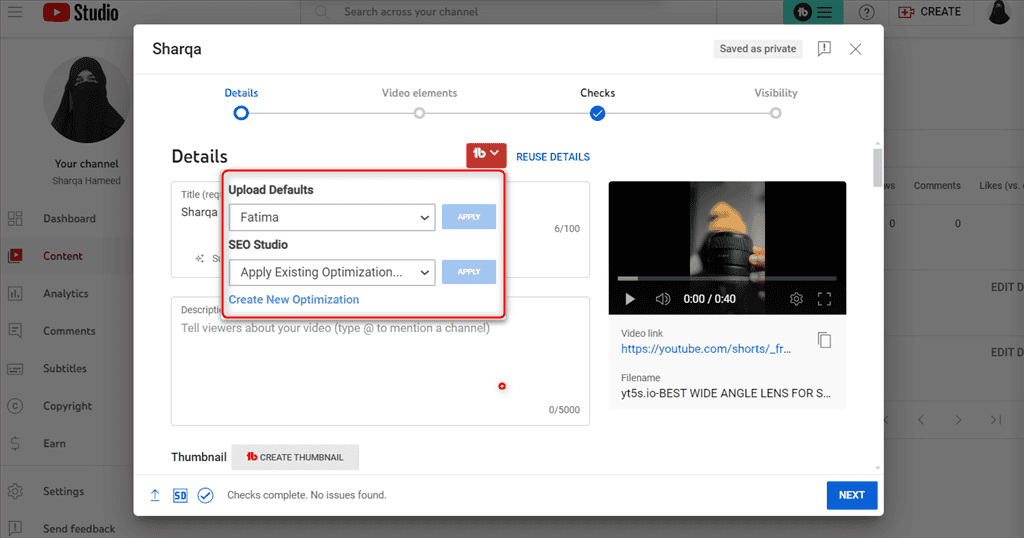
To use the created upload profile:
- Drag and drop or upload your video file
- Move to the Details page and click on TubeBuddy’s icon
- Select the profile from the Upload Default drop-down menu and click Apply.
However, switching between profiles might require manual intervention, which interrupts the upload workflow.
23. Video Topic Planner
Unlike other tools such as Workflowy and ClickUp, TubeBuddy’s Video Topic Planner is more like a simple tool used for taking notes on the go. It helps you to plan and organize video topics for the future.
To use the Video Topic Planner:
- Open the Quick Links Menu of TubeBuddy
- Select Video Topic Planner from Extension Tools
- Then, add the title of the video and include a detailed outline of the idea
- Unmark the This video topic was created checkbox and click Save
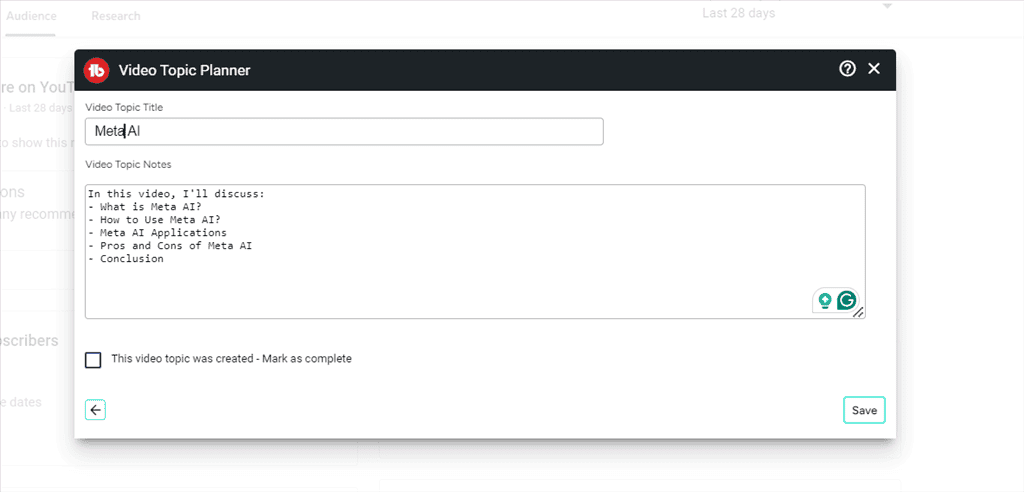
Once you’ve implemented the video idea, mark the Video completed checkbox and you’re all done!
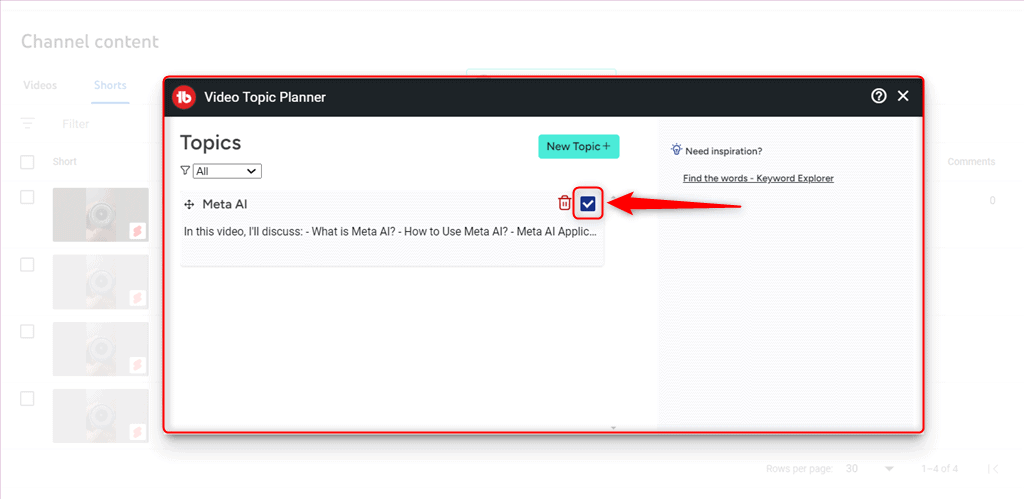
However, the Video Topic Planner might not smoothly integrate with other project management tools like Asana for further development.
24. Advanced Video Embed
By default, YouTube offers only the option to change the video start time, turn on or off privacy-enhanced more, and show or hide player controls. However, there are a lot of other options that TubeBuddy includes in its Advance Video Embed feature.
This tool makes it easy to customize any embedded video player in a few seconds. With it, you can have an embedded video that exactly matches the style and theme of your website.
To access TubeBuddy’s Advanced Video Embed tool:
- Open the desired video in the YouTube Studio
- Look for the TubeBuddy’s icon from the left sidebar and click on it
- Under the Misc section, select the Advanced Embed option
- From the Advanced Video Embed popup window, mark the checkboxes as per your preferences
- Finally, click COPY and embed the video where required.
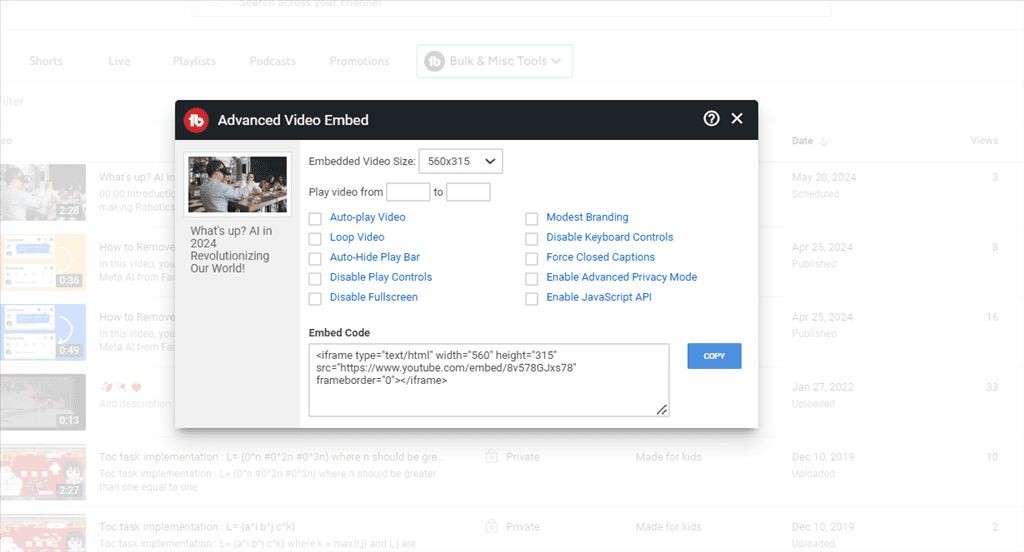
However, the level of customization for embedded video players might be restricted compared to dedicated embedding services, such as Vimeo.
25. COPPA Center
COPPA Center is another great feature that helps you scan all your published videos. It then analyzes if YouTube has marked any of them as made for kids or not.
In addition, using this tool, you can also review and manually mark videos as not made for kids and submit them to YouTube.
To use TubeBuddy’s COPPA Center:
- Open the Content tab within YouTube Studio
- Click on the TubeBuddy’s icon from the top bar
- Select COPPA Center from the Extension Tools section
- Lastly, press the Start Scan button.
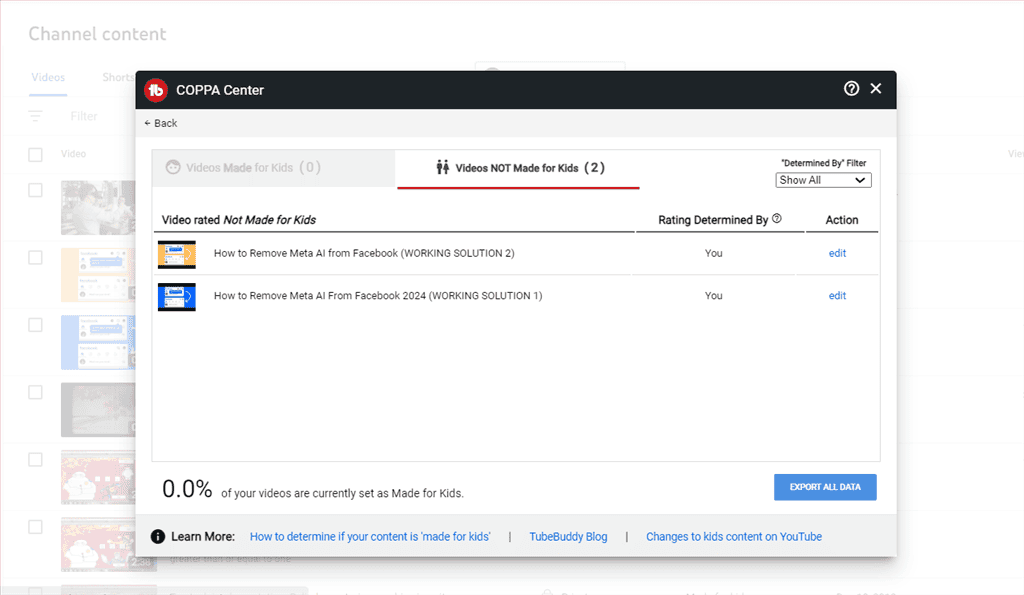
Consequently, TubeBuddy performs a quick scan of your channel and lists videos in two different categories:
- Videos made for Kids
- Videos NOT made for Kids
Check if YouTube AI has correctly classified them, otherwise, manually mark and resubmit them and resubmit videos.
Keep in mind, that the tool identifies COPPA violations within your existing videos. It won’t offer guidance for future content creation.
26. Auto Translator
Similar to Tag Translator, TubeBuddy’s Auto Translator is a premium feature used to target global viewership for YouTube videos. It helps to translate titles and video descriptions in different languages.
To test the feature:
- Open the Content tab within your YouTube Studio
- Open your video in editing mode
- From the left side, navigate to the Subtitles tab and click on the ADD LANGUAGE button
- Finally, select the desired language from the list to add it.
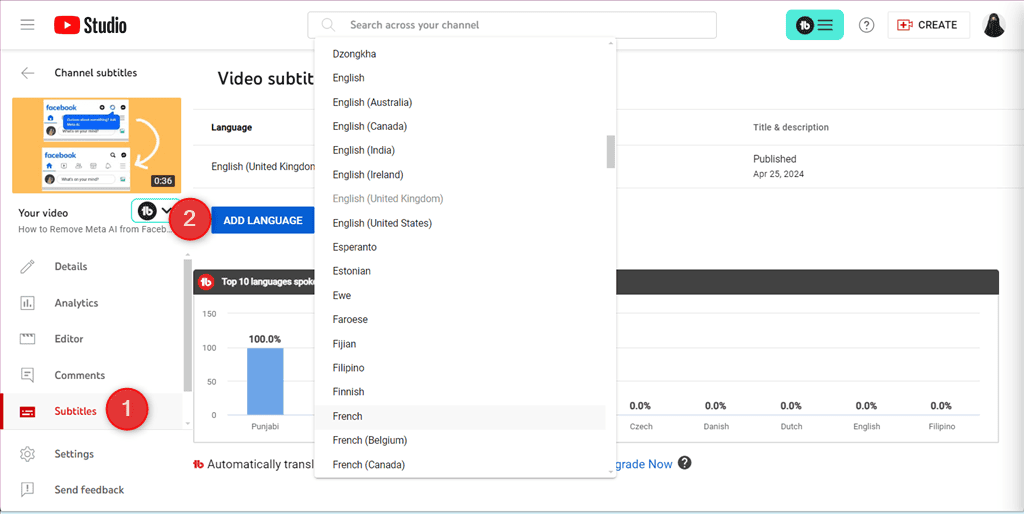
To utilize the added language, click on the Add button in the Title or Description column. After doing so, press the Translate button to start an AI-based translation.
27. Best Practices Audit
TubeBuddy’s Best Practices Audit feature is used to analyze videos. More specifically, it helps in performing an audit with recommendations on improving a video to gain more reach.
To set best practices for your YouTube content:
- Navigate to TubeBuddy’s dashboard using the Quick Links menu
- Switch to the Opportunities Setup tab, under the Launchpad section
- Select or deselect the listed actions as per your preference.
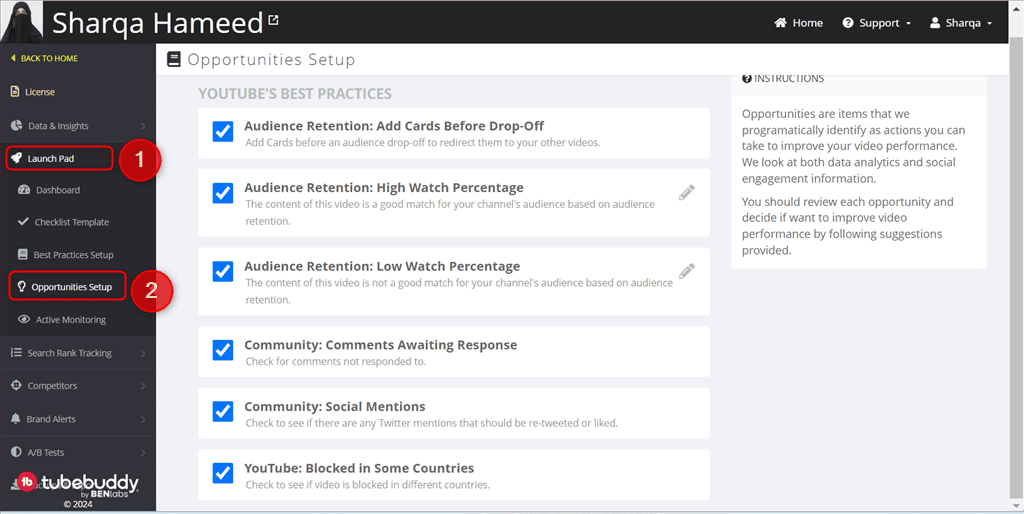
Next, switch to the Dashboard and select your YouTube video.
Consequently, TubeBuddy performs the audit and displays a report related to what’s missing and how it would benefit your video.
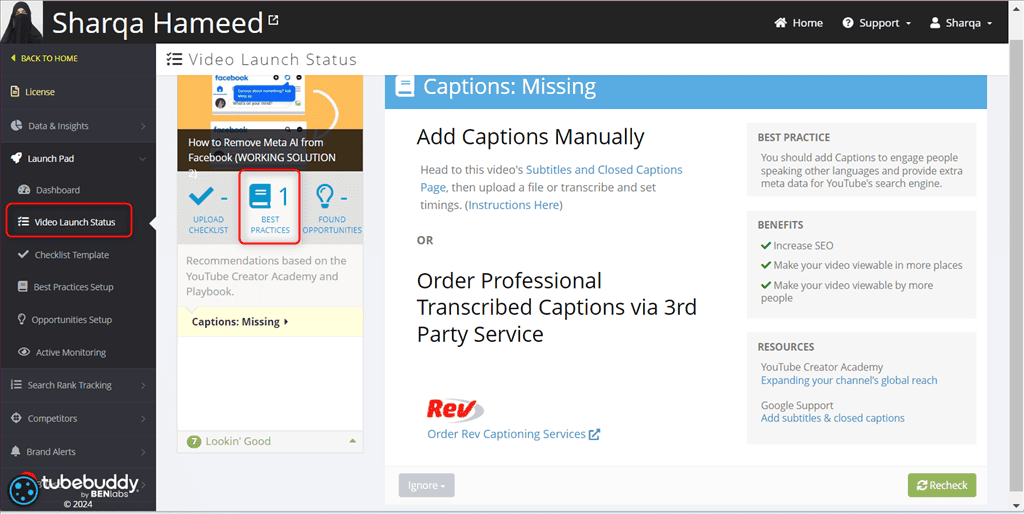
However, the best practices evolve over time and the audit might not always reflect the latest SEO trends or YouTube algorithm updates.
28. Opportunities Setup
Opportunities Setup lets you add video tags based on actual user searches. This ultimately helps to boost watch time and views.
To access Opportunities Setup:
- Click on the Launch Pad option from the TubeBuddy homepage.
- Hit the Select Video option to add a video for optimization
Within a few seconds, TubeBuddy scans and analyzes the video to give recommendations.
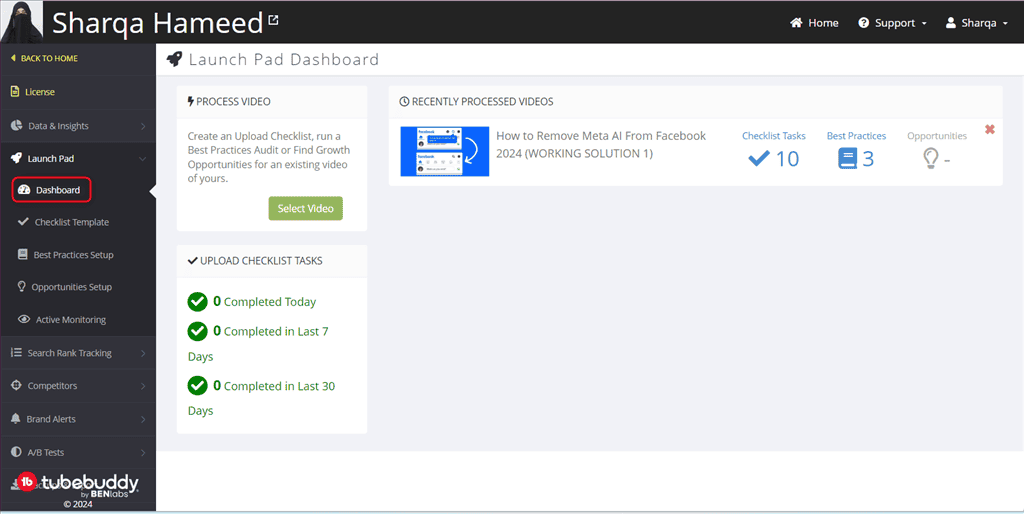
As a part of the report, TubeBuddy lists suggested tags for which other keywords the selected video is ranked. This helps to add them as video tags and update the video.
However, the identified tags are sometimes highly competitive, which makes it challenging for your video to rank well using those terms alone.
29. Instant Suggestion Tool
Besides Recommended Tags, TubeBuddy also offers an Instant Suggestion tool specifically for terms or tags.
As you type more and more words in the Tags container or input field, this feature lists instant suggestions for the most popular tags. To add one more search term to your video, simply click on the + button.
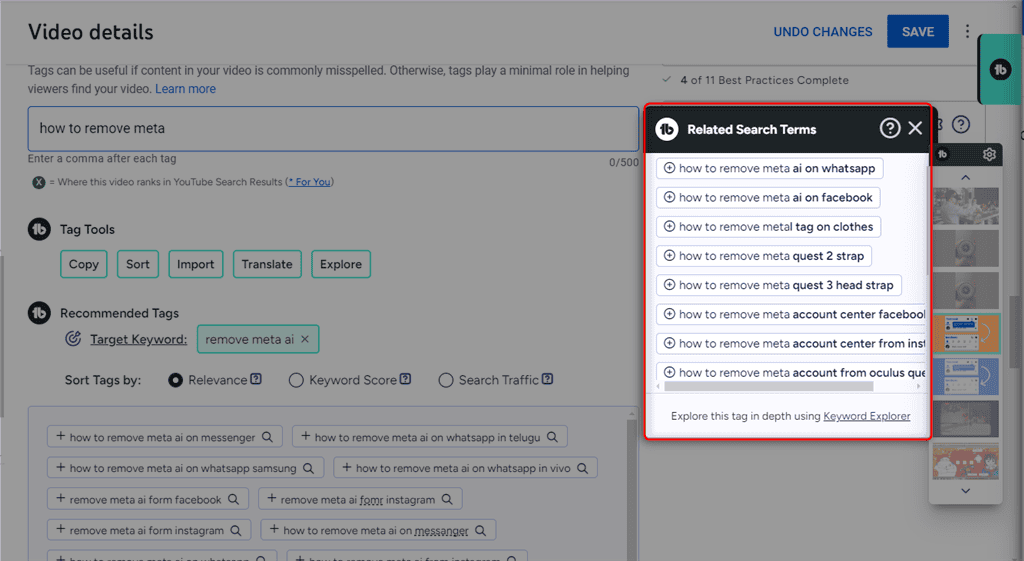
The Instant Suggestion tool works quite similar to the autocomplete feature of Google. Moreover, it provides a quick way to extract and add the best keywords to a video.
Keep in mind that these instant or real-time suggestions might not be specific enough for niche audiences or local SEO optimization.
30. Search Explorer
This tool shows you different options related to keyword scores and stats while browsing on YouTube.
These include:
- Search Volume
- Searches Per Month
- Competitors
- Unweighted and Weighted Score
- Related searches
- Most and Least Views
- Number of keywords in titles, descriptions, and tags
- Number of published videos in last 7 days
- Top channel
- Video you own, etc.
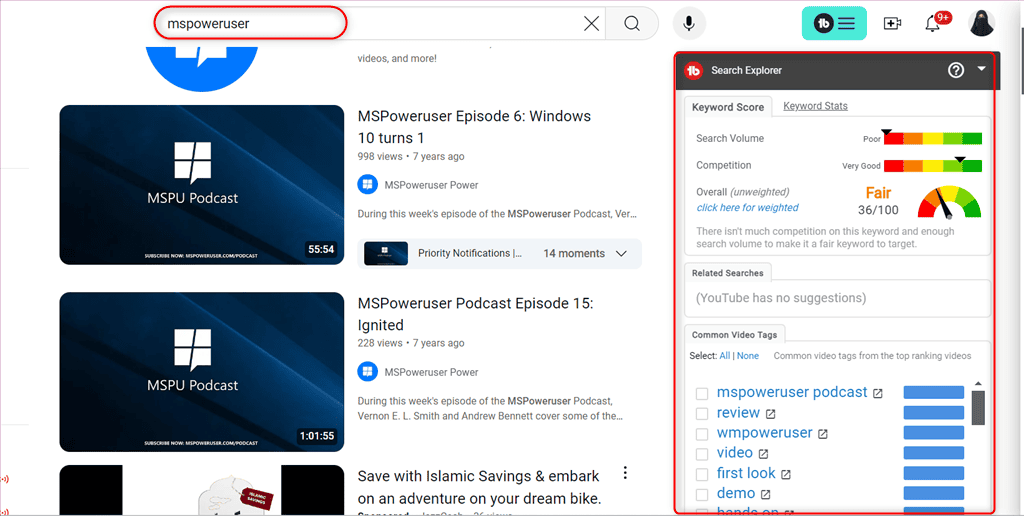
In case you find any interesting keywords, click on the COPY button to add them to the tags list.
However, compared to the Legend plan, the Free and Pro plans of TubeBuddy offer limited data on search volume and keywords’ competition.
31. Search Rank Tracking
Search Rank Tracking is a premium feature that assists in tracking the results of your YouTube SEO strategy. It further supports these three tools:
- Keywords to Track: Track keywords, phrases, and sentences that you want to dominate your channel
- Ranking Reports: Generate a ranking report for the specified target keywords
- Scheduling: Schedule the generation of new reports once per month or week.
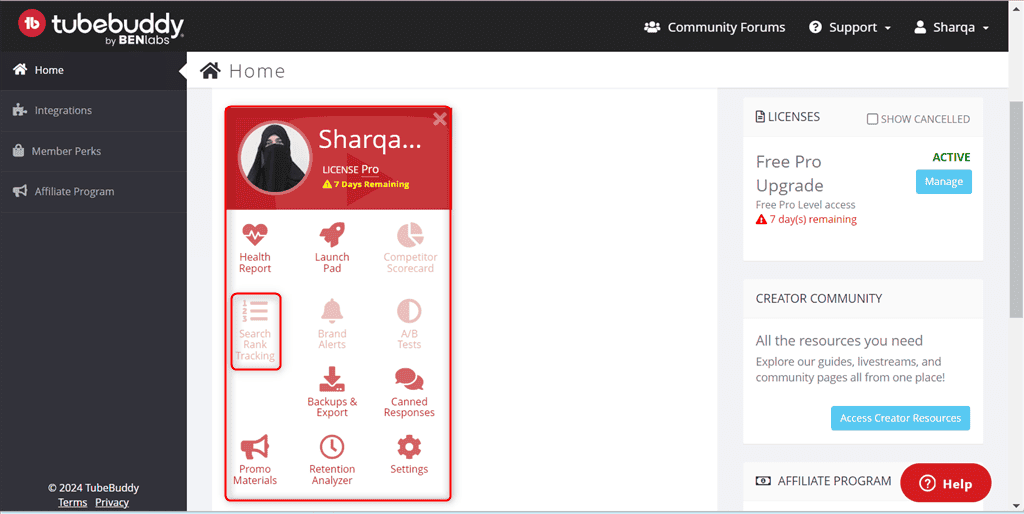
Keep in mind that search engine algorithms change frequently and TubeBuddy might not always reflect the latest ranking factors.
32. Search Positions
With the Search Positions feature, you can track and identify how well your target keywords or video tags are ranking over time.
To do so, open any of your videos and click on TubeBuddy’s icon, below the thumbnail. After that, select the Search Positions option, under the Video SEO section.
In the opened Search Rankings popup window, you may see a list of your video tags with their respective search results. Then, from the bottom input field, specify your own Custom Search Terms and let TubeBuddy track how their ranking has changed over time.
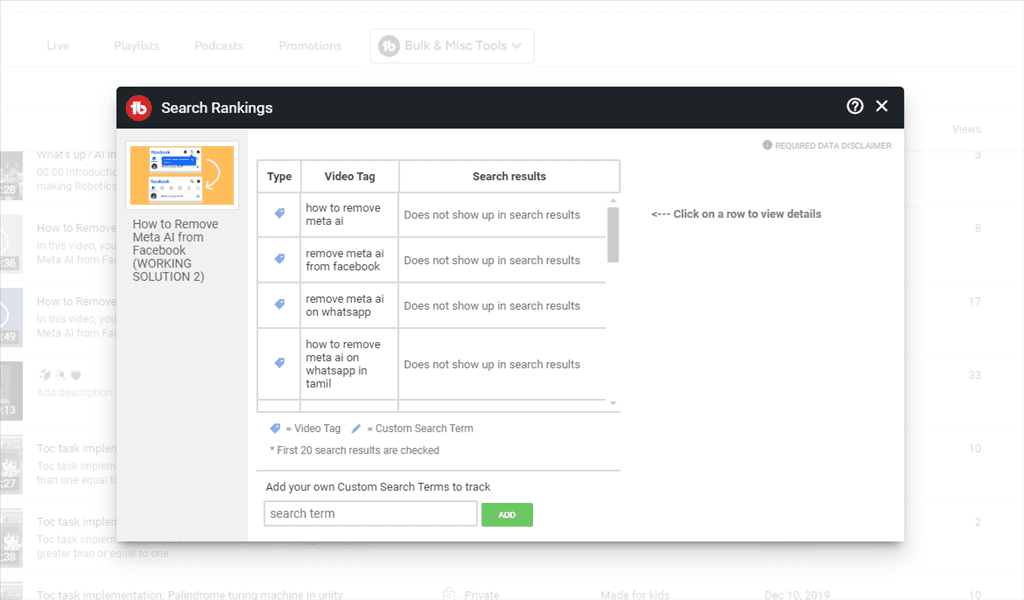
Similar to Search Rank Tracking, this feature might not offer extensive historical data on video ranking positions.
33. SEO Studio
SEO Studio is one of the newly launched features of TubeBuddy that lets you optimize your video for better ranking on Google and YouTube. More specifically, it guides you to improve the description, tags, and title.
To utilize it:
- Click on TubeBuddy’s icon from the top bar and open Extension Tools
- Select SEO Studio from the tools list
- Then, set your target keyword and click START.
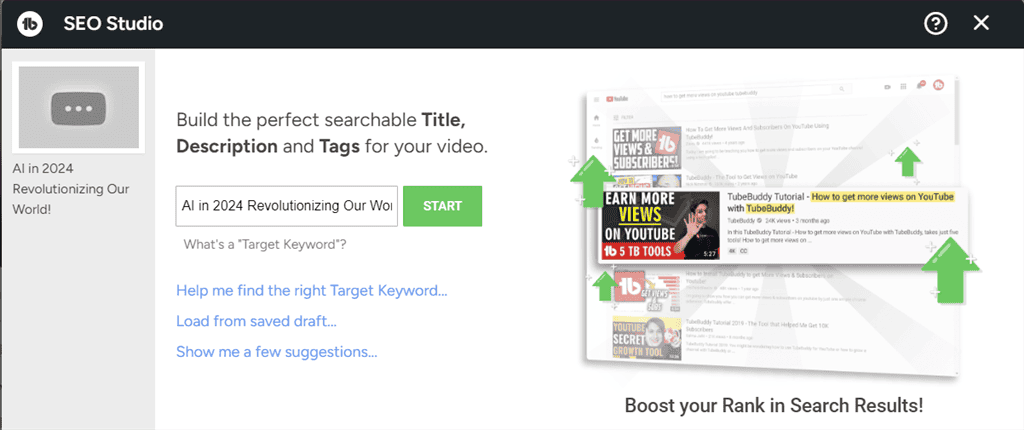
Add your video title and description, view the TubeBuddy SEO Score from the right side, make adjustments as per the given instructions, and hit NEXT.
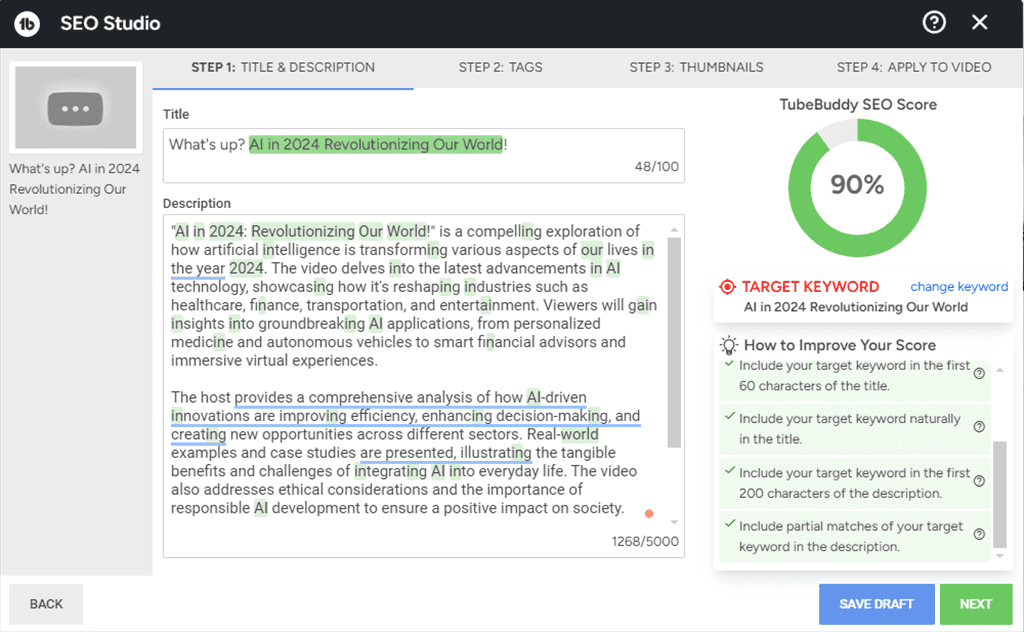
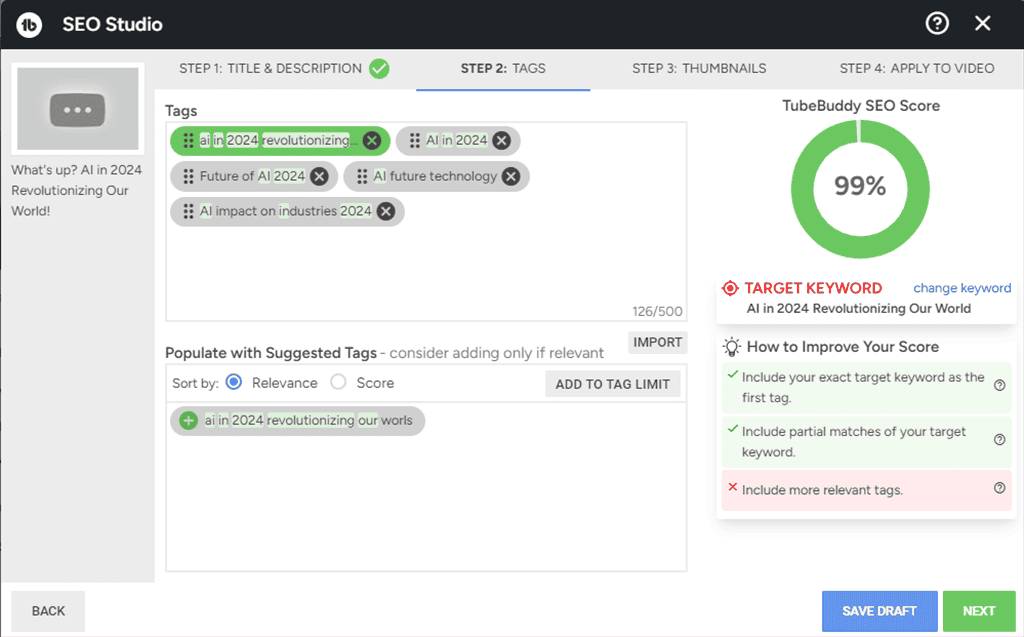
Repeat the same process for your video tags and thumbnail, and click NEXT.
If you want to come back and optimize the video later, click on SAVE DRAFT. Otherwise, apply all of the added changes by clicking the green APPLY TO VIDEO button.
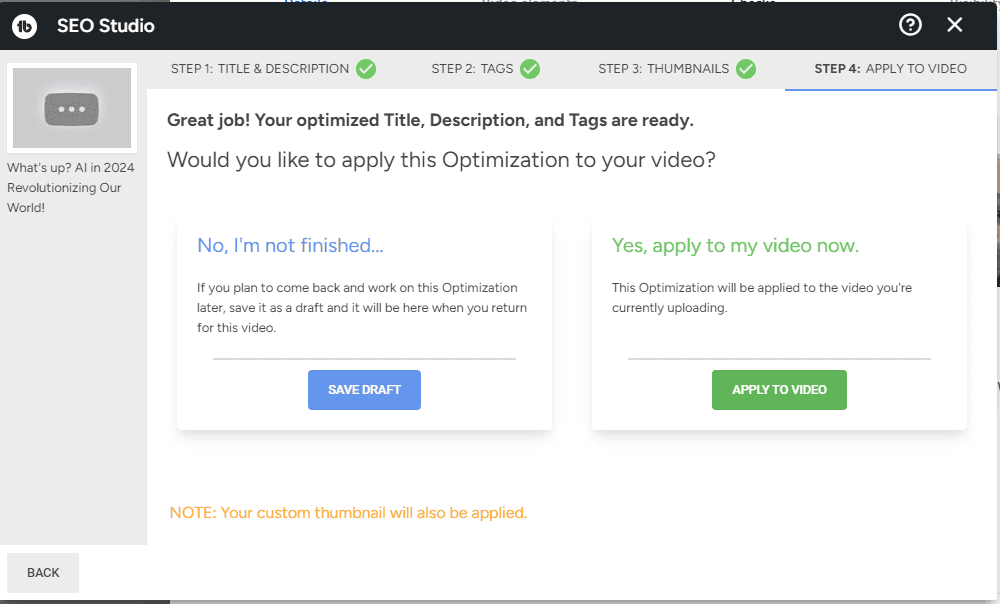
That’s how you can optimize each aspect of your YouTube video with the help of TubeBuddy’s SEO Studio. However, it might be overwhelming for new YouTubers, and they may need time to explore and learn its functionalities.
34. Demonetization Double-Check
With the help of TubeBuddy’s Demonetization Double-Check tool, you can locate demonetized videos in your channel and resubmit them in bulk for manual review.
To use it:
- Open the Content tab within your YouTube Studio
- Navigate to Bulk & Misc Tools and select the Demonetization Double-Check option
- From the popup window, select the option to either go with recent videos (100 videos, quick method) or all videos (5000 videos, which may take a while).
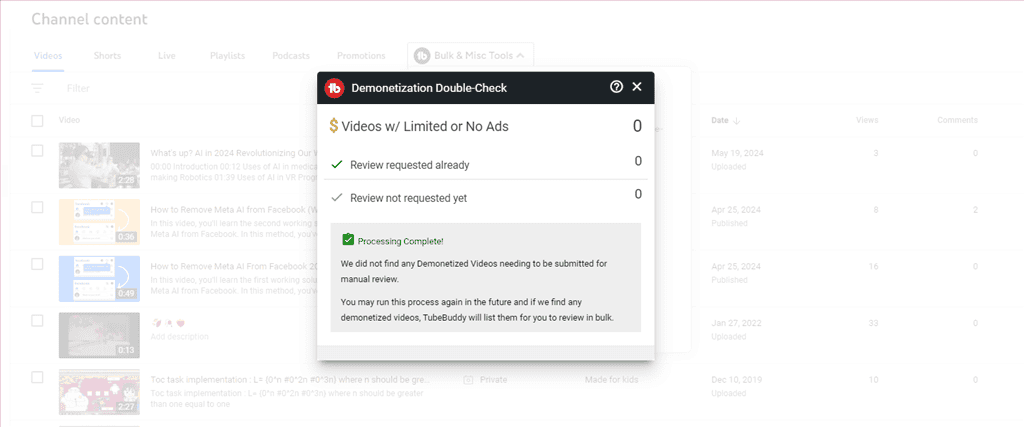
In my case, none of my channel’s videos were flagged as demonetized. However, if your channel has some, mark them in bulk and resubmit them to YouTube.
35. Publish to Facebook
The Facebook integration feature of TubeBuddy enables you to re-publish your content as a native video on the linked Facebook page.
To use thefeature:
- Move to the Content tab in your YouTube Studio
- Hover over the required video (it should be either public or unlisted)
- From the popup window, select Publish to Facebook option, under the Syndicate section
- Click the CHOOSE FILE button and select the video from your hard disk
- Check out the pre-populated Title, Description fields, and the Thumbnail
- Choose whether you want to Publish now, save it as a draft, or schedule it for future publishing
- Finally, click the PUBLISH TO FACEBOOK button.
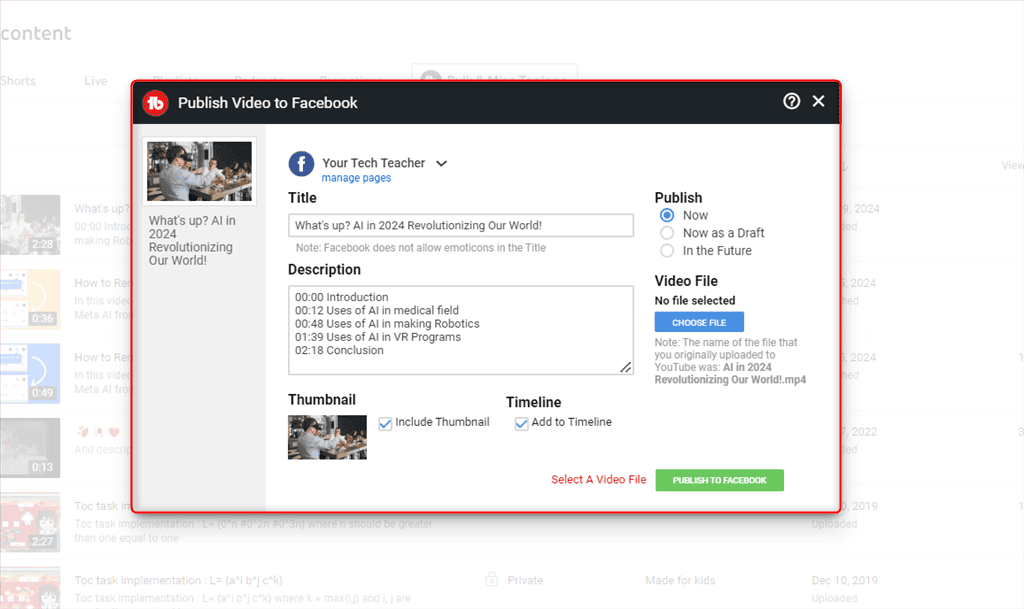
However, TubeBuddy’s Pro plan doesn’t offer advanced scheduling features for Facebook publishing compared to the Legend plan.
36. Milestones
TubeBuddy supports a Milestones feature that lets you quickly create an achievement photo with minimal effort.
To access the tool:
- Click on TubeBuddy’s icon from the dashboard
- From the right side panel, navigate to the Quick Links category
- Switch to Milestones tab
- Check out the list of current and upcoming achievements and share them as needed.
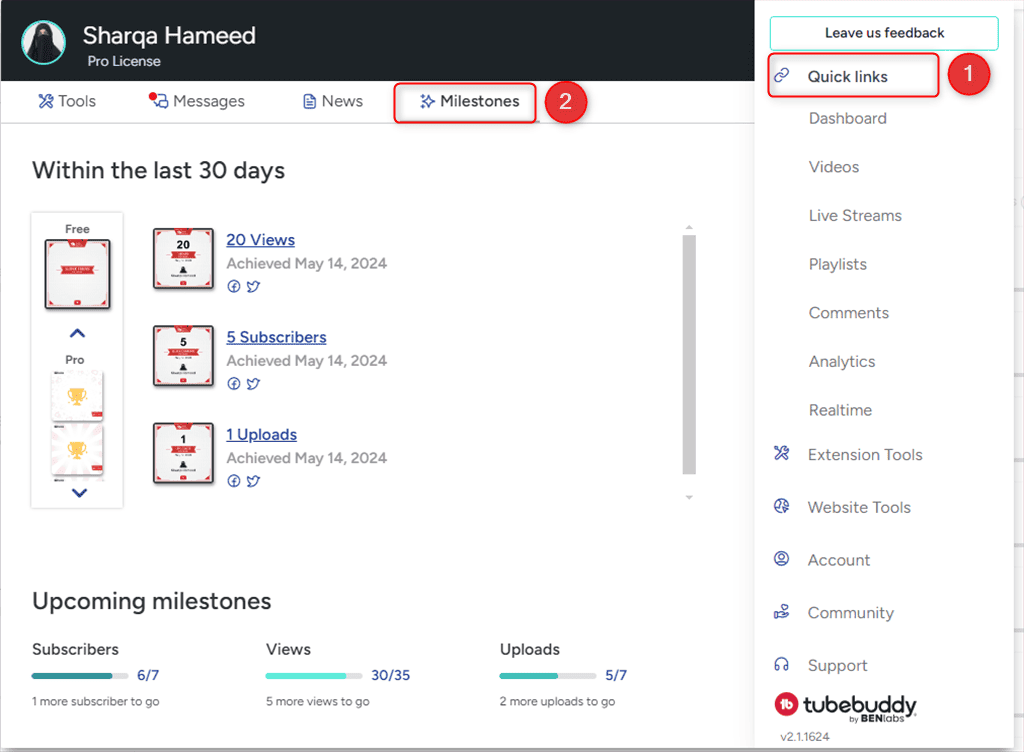
Notably, with TubeBuddy’s paid plans, you can access and use premium Milestones templates as the free version offers a limited number of template options.
37. Share Tracker
As a YouTuber, it’s your job to market video or YouTube content as far and wide as you can.
To do so, you can use the Share Tracker feature of TubeBuddy. This tool enables you to share your videos across desired social media platforms. More specifically, it keeps records of which videos have been shared and which haven’t yet.
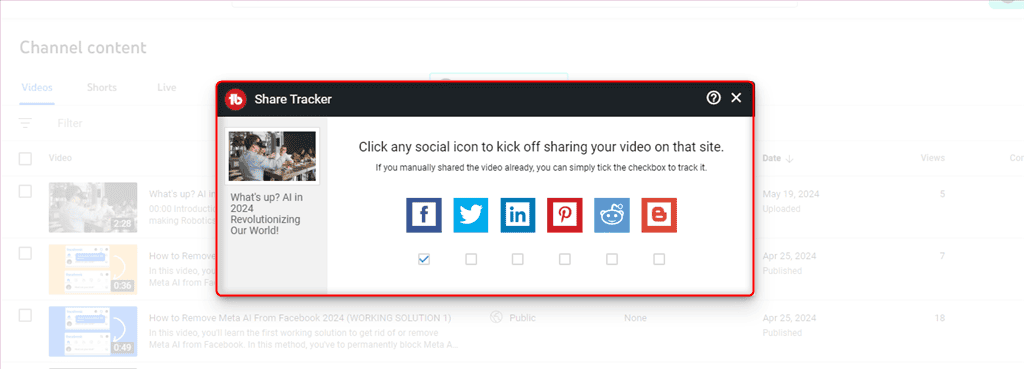
I found the Share Tracker a valuable addition to TubeBuddy as it makes things a lot easier than traditional content-sharing methods.
38. Export Comments
While starting a new content series on YouTube, you may want to consider your audience’s feedback to make your future videos more impactful and exciting. Once you’ve gathered a lot of comments, it’s better to export them in batch and analyze the input later.
For this, you can use TubeBuddy’s Export Comments feature, which lets you export all comments (1000, maximum) from a selected video to a CSV file.
To do so:
- Switch to the Content tab of your YouTube Studio
- Hover the mouse over the selected video
- Click on TubeBuddy’s icon
- Select the Export Comments option, under the Misc Tools
- Follow the on-screen instructions to complete the comment export operation.
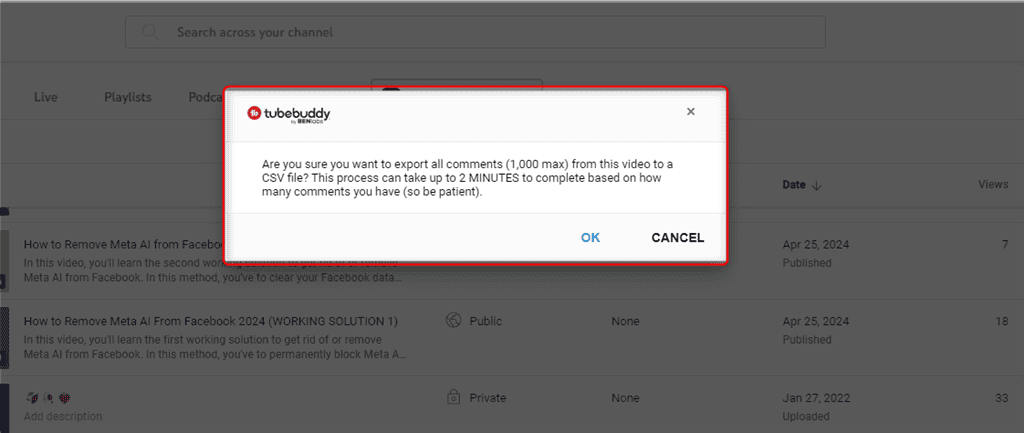
However, sometimes managing large volumes of exported comments becomes time-consuming and needs additional data analysis tools, such as Excel.
39. Channel Backup
The Channel Backup feature is mainly used to compile a list of your channel’s metadata and download it as a CSV file. You can then use the file for analysis in Google Sheets or Excel.
To create your Channel Backup:
- Open TubeBuddy’s Quick Links Menu in YouTube Studio
- Switch to the Backup & Export option from the Website Tools
- Click on Backup my entire channel and press the Start New Backup button.
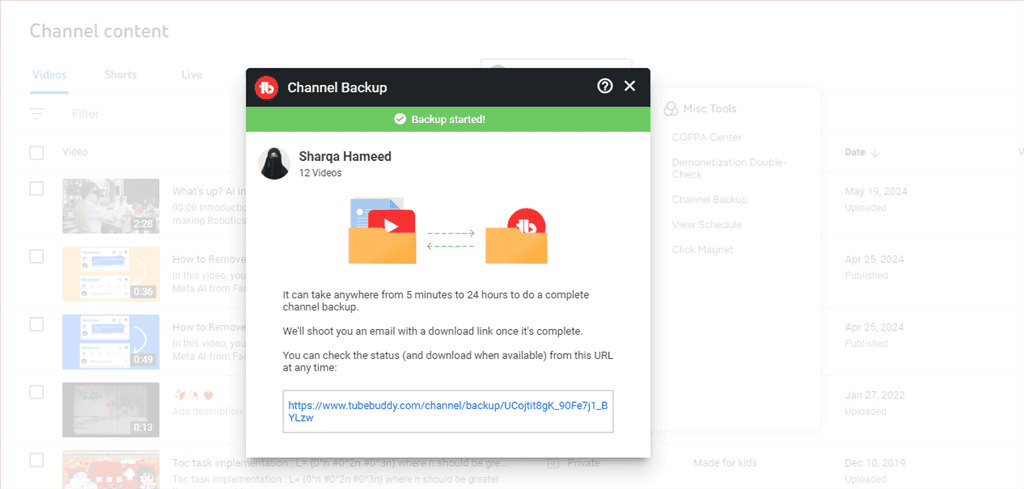
For each of your YouTube Videos, the downloaded backup files include:
- Titles
- Tags
- Video ID
- Channel ID
- Description
- Category
- Privacy
- Date Published
However, depending on your TubeBuddy plan, there might be limitations on the amount of video content you can back up.
40. Language Analysis
TubeBuddy’s Language Analysis feature assists you in deciding whether you’ve got a second audience group that needs translated descriptions, titles, or subtitles for your videos.
To access the Languages Analysis tool:
- Open any of your channel’s video
- Navigate to the Subtitles tab
- View the top 5 or 10 languages spoken by your audience.

The number of languages included in the above graph depends on your TubeBuddy subscription.
41. Title Generator
TubeBuddy’s Title Generator uses AI to suggest video titles for the selected video. To use it, simply enter your video topic while editing the video.
As a result, TubeBuddy generates a list of interesting title ideas.
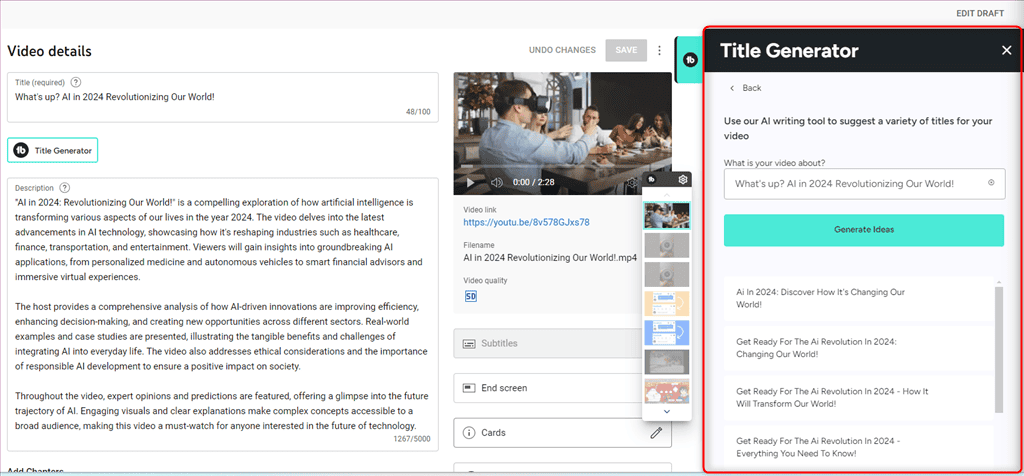
After testing, I’d say that TubeBuddy generated pretty good long-tail video titles and worked almost similarly to Hypothenuse AI.
However, these AI-generated titles might prioritize keyword inclusion over a natural language feel.
42. Chapter Editor
TubeBuddy’s Chapter Editor tool is used to add timestamps to your video and mainly targets long-tail keywords.
However, you must follow these conditions while defining your video’s chapter:
- Add at least three chapters
- All chapters must have titles
- All chapters must be at least 10 seconds
To test it, I added 5 chapters to one of my YouTube videos that was ready to publish.
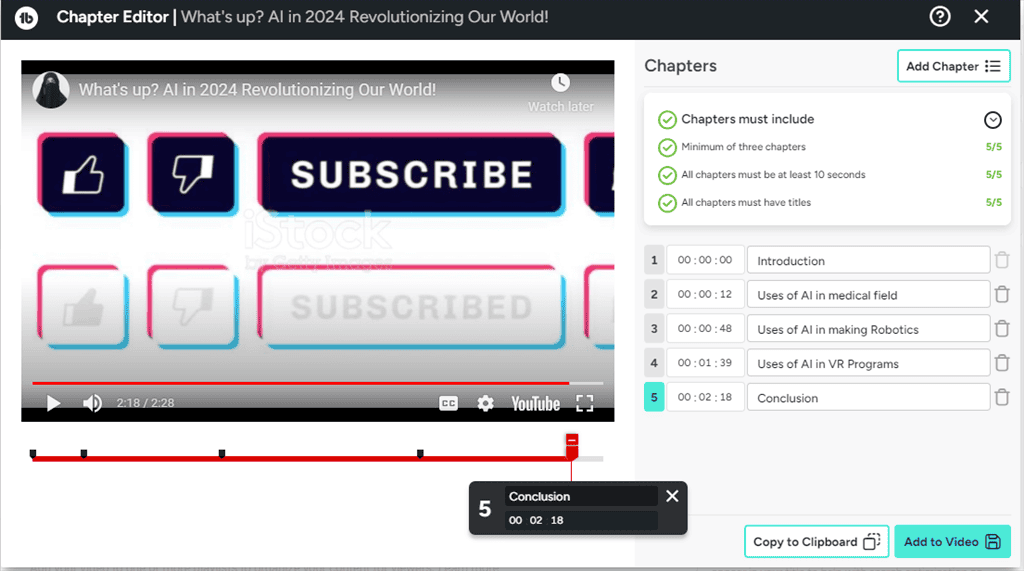
Overall, TubeBuddy quickly added the chapters to my video as specified. Especially, its video slider helped me to select the required video frames efficiently.
43. Vid2Vid Promotion
TubeBuddy’s Vid2Vid Promotion feature lets you promote your newest or most liked videos across all your other videos. For this purpose, TubeBuddy adds it to each video’s description method as a promotion.
To use Vid2Vid Promotion:
- Open YouTube Studio and navigate to the Content tab
- Select the video that you want to prompt and hover over it
- Click on the TubeBuddy’s icon to open a popup window
- Select the Vid2Vid Promotion option, under the Promotion section
- Click CONTINUE
- Select if you want to insert the video promotional message at the beginning or end of the description
- Click CONTINUE and hit START PROMOTIONS! button.
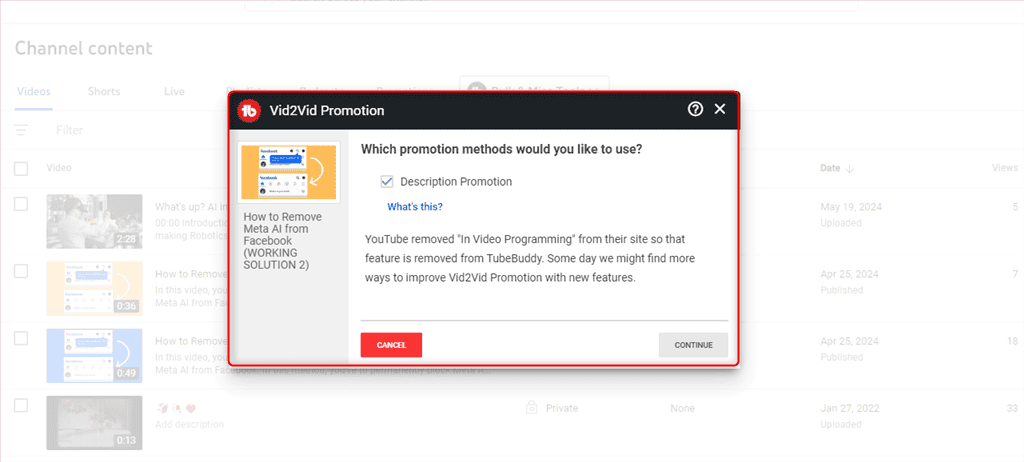
Consequently, the YouTube algorithm more likely recommends the added video to new audiences, when it receives enough watch time, view, and engagement.
44. A/B Tests
This tool allows you to execute an A/B test on the titles, tags, thumbnails, and descriptions to analyze which video performs better in comparison. More specifically, it analyzes the watch time per impression, CTR, engagement rate, etc.
To use this feature, navigate to the A/B Tests section within your TubeBuddy dashboard. Then, click on the + Create AB Test button.
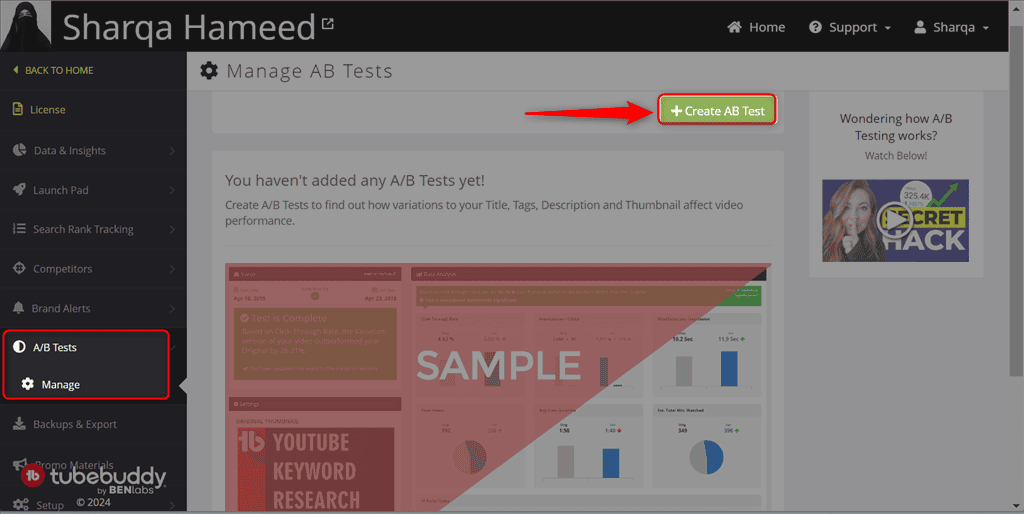
As a result, the A/B Tests tool displays one variation after every 24 hours.
Using this feature, you can improve the CTR and watch time of your YouTube videos. Moreover, it helps you find out what’s working and what’s not on the channel.
However, keep in mind that setting up and analyzing A/B tests effectively might require additional knowledge and practice.
45. Channel Access
As your channel grows, you may hire a team to help you out. For this, you need to share channel access with them. However, it might not be appropriate to share login credentials with every team member.
TubeBuddy’s got a solution to overcome this risk. It allows you to grant access to the tools rather than giving them admin access to the channel.
Using TubeBuddy’s Channel Access feature, you can:
- Let your employees manage the YouTube content creation strategy
- Show clients the channel progress
- Give access to someone to view the Health Report
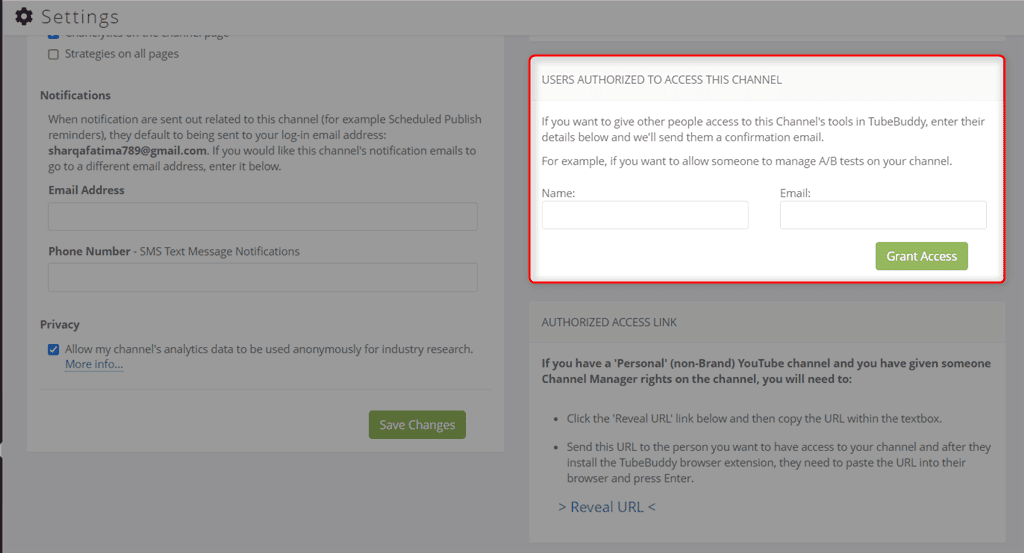
To give someone access to your channel through TubeBuddy:
- Visit your TubeBuddy’s dashboard
- Open Settings from the left side panel
- In the USERS AUTHORIZED TO ACCESS THIS CHANNEL input fields, enter the Name and Email address of the required person.
46. Scheduled Publish
This feature helps you schedule unlisted videos. This feature is especially helpful for YouTubers running a private membership community, like Patreon.
Using TubeBuddy, you can switch the privacy of your video and then share it with your members on the specified schedule.
To do so, open up YouTube Studio, and switch to the Content tab from the left-side panel. Then, hover your cursor over the unlisted video, select the Scheduled Publish options, and enter a schedule.
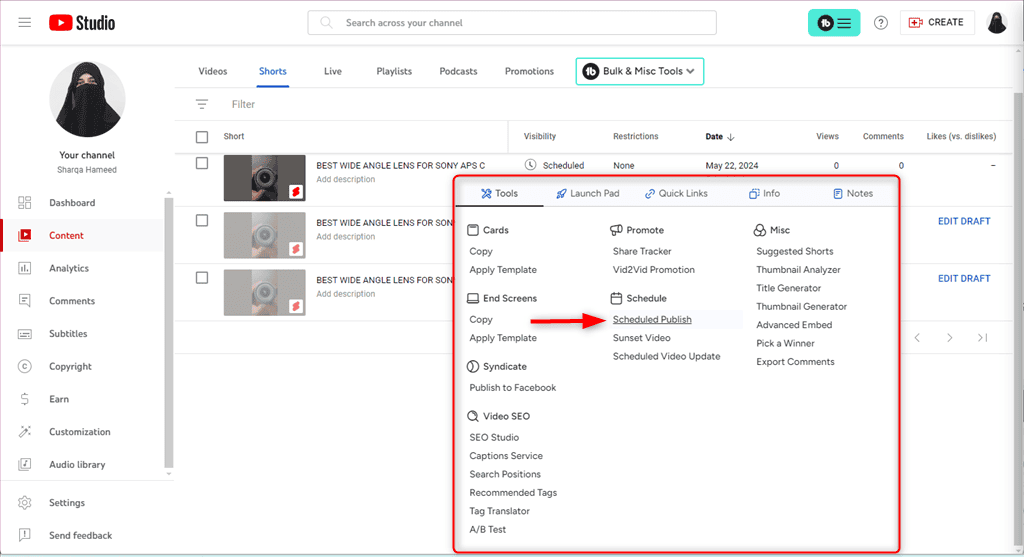
However, it may require you to remain logged into YouTube for scheduled publishing to occur. Also, keep in mind that the Scheduled Publish feature is a part of Tubebuddy’s Legend Plan only.
47. Scheduled Video Update
In case you want to schedule some changes to an already-published video, utilize TubeBuddy’s Scheduled Video Update feature. It lets you modify the video title, thumbnail, description, tags, and privacy settings.
Moreover, it permits you to remove or add videos to a particular playlist at a specified time.
In terms of scheduling a title update, TubeBuddy enables you to:
- Append text at the end of the original video title
- Insert text before the beginning of the original title
- Replace or overwrite the existing title
For scheduling a description update, you can:
- Add text to the end of the video’s description
- Insert text at the beginning of the description
- Removes text from the description
- Replace the existing description with a new one
Other than this, you can schedule:
- A tag update by adding a comma-separated tags list
- A privacy update by scheduling the video privacy from public to private
- A thumbnail update by replacing it with a new one.
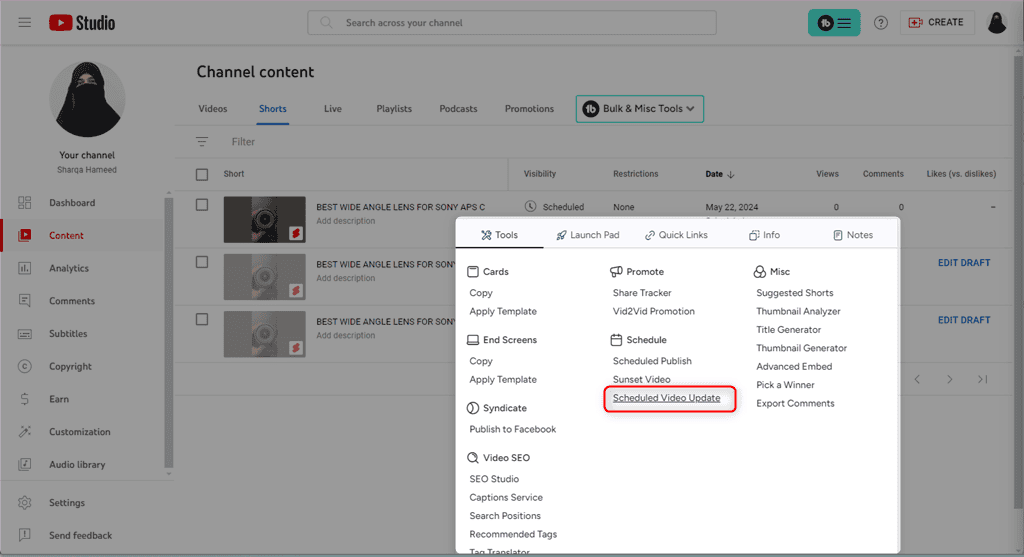
Similar to the Schedule Publish feature, Schedule Video Update comes under TubeBuddy’s Legend plan. Moreover, changes might require manual review before going live, which potentially delays the updates.
48. Sunset Videos
Sunset Videos is another premium feature of TubeBuddy used to modify a video’s privacy to unlisted or private at a specific time. You can utilize it in different situations, such as:
- Seasonal promotional content, you need to keep up for a short duration
- Giveaway announcements
- Limited-time promotional videos
- Making live stream replays available for sometime
- Remove outdated videos
- Setting a time-specific regulation for a video.
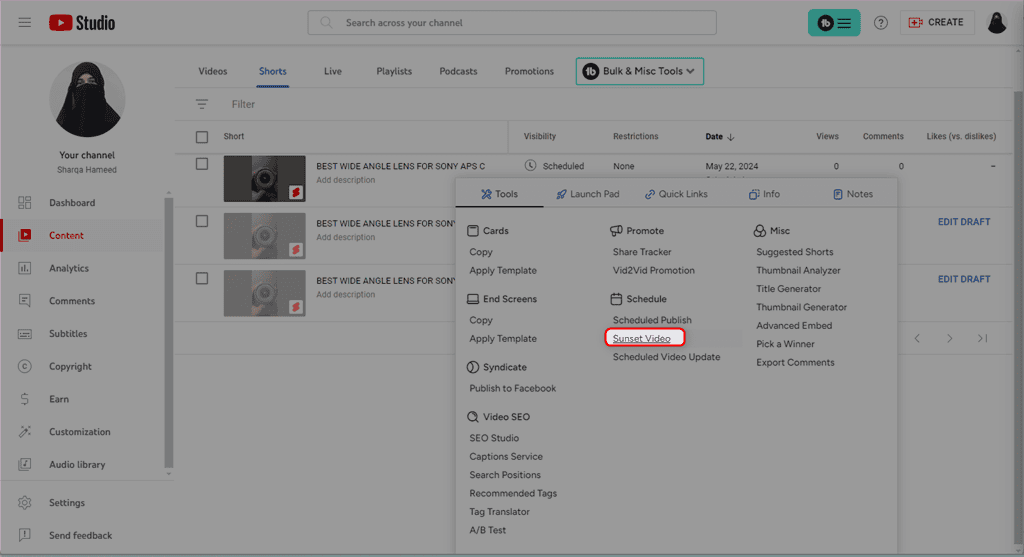
However, it may not offer precise scheduling down to the minute for unlisting or making video private.
49. Bulk Processing Tools
TubeBuddy’s Bulk Processing Tools are of great use when you’ve got numerous videos uploaded on your channel and want to make changes across the entire video library.
These tools let you perform the following tasks in bulk:
- Find & Replace Text: Used to find, insert, delete, append, or even replace text in the title and description of multiple selected videos
- Thumbnail Overlays: Adds a custom watermark to an infinite number of video thumbnails
- Copy Cards: Copies all cards or existing card templates
- Update Cards: Updates all cards or existing card templates
- Delete Cards: Deletes all cards or existing card templates
- Copy End Screens: Copies all end screens or existing end screen templates
- Update End Screens: Updates all end screens or existing end screen templates
- Delete End Screens: Deletes all end screens or existing end screen templates
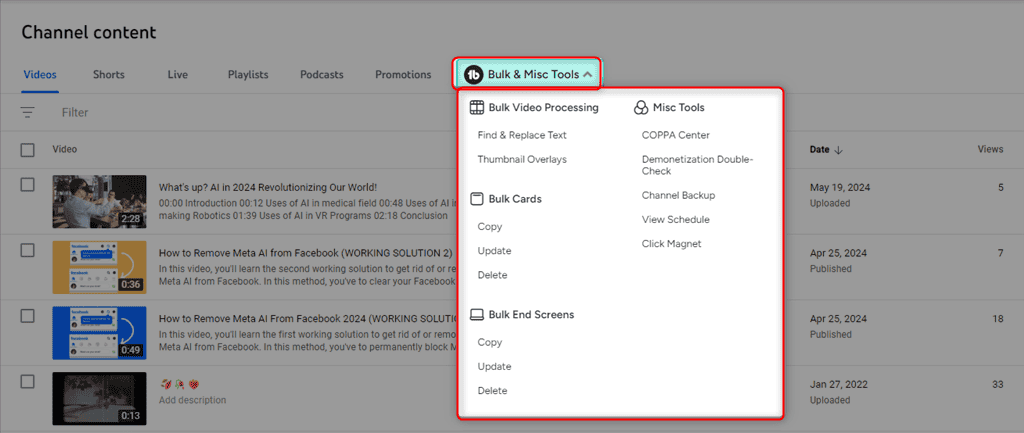
Notably, these Bulk Processing tools are available in TubeBuddy’s Premium plan.
Moreover, while bulk editing videos, there’s a risk of accidental mistakes which can impact multiple videos at once.
50. Channel Valuation
TubeBuddy’s Channel Valuation feature is primarily utilized to establish a baseline for how much you’d charge brands for a dedicated shoutout or a video. It also acts as a benchmark tool to observe how your channel valuation keeps changing over time.
The Channel Valuation feature is only available to those who pay for a Social BLUEBOOK subscription. It costs $29.95 per month.
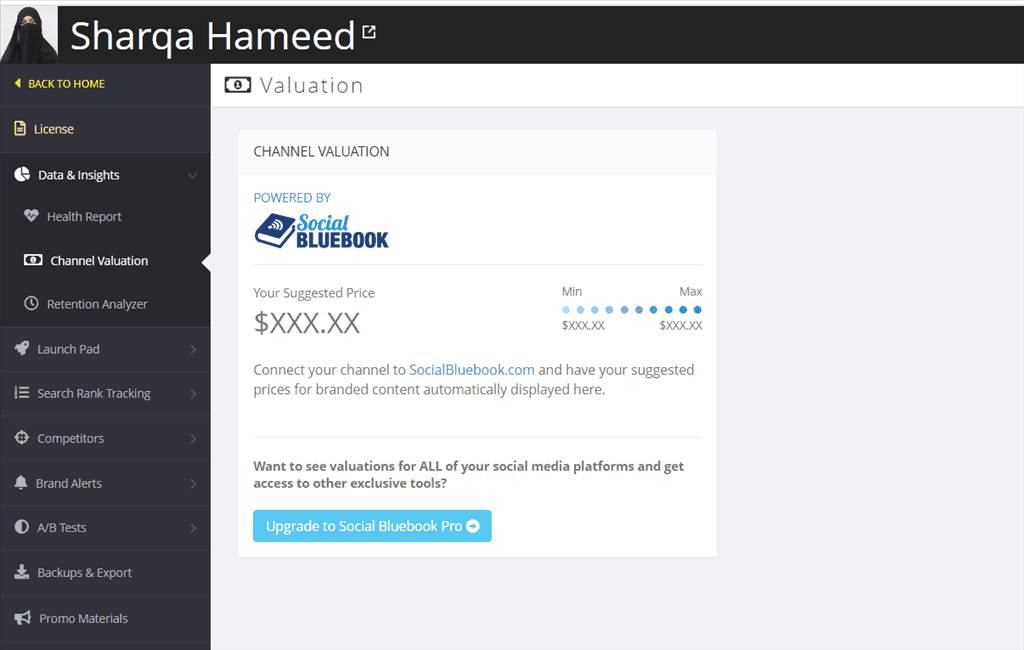
However, in my opinion, it’s much better to do your own research and learn the method to calculate video ad quotes rather than paying for the Social BLUEBOOK subscription.
51. Brand Alerts
TubeBuddy’s Brand Alerts help you find out who’s talking about you on YouTube. This feature also notifies you whenever someone uses your content without your permission.
To use Brand Alerts:
- Switch to the TubeBuddy’s dashboard
- From the left side panel, navigate to the Brand Alerts category
- Click on the + Create Brand Alert button
- Enter the search phrase that you want to monitor at the top
- Choose an option between receiving Weekly or Daily reminders
- Finally, click Save.
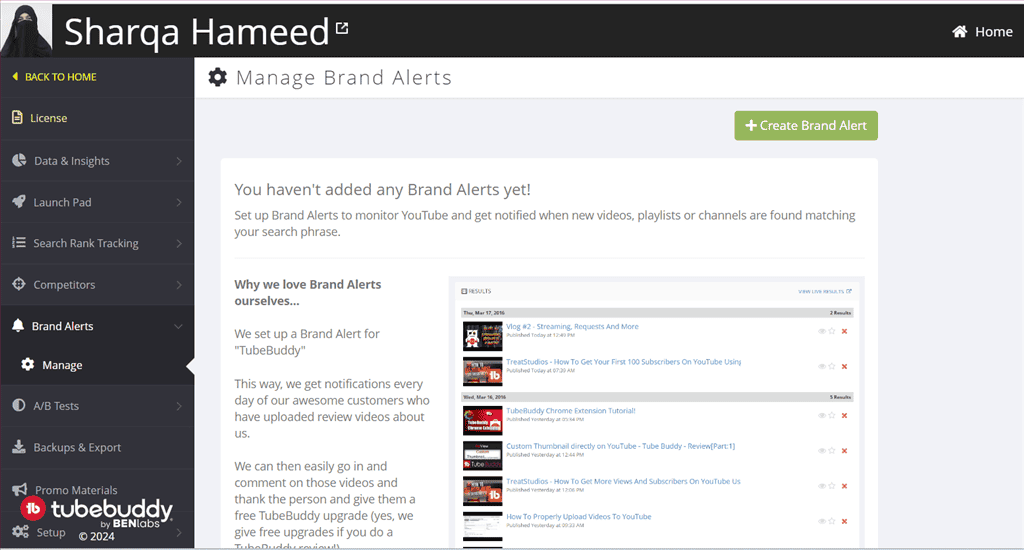
Likewise, to review your Brand Alerts, visit the Overview page that displays all matching videos that TubeBuddy fetched using YouTube search.
Keep in mind that Brand Alerts sometimes flag irrelevant mentions.
52. Competitor Scorecard and Upload Alerts
TubeBuddy’s Competitors Scorecard feature lets you know about your competitors’ video uploads, views, subscribers, and overall engagement. It also supports the option to print out the relevant report to ponder over later.
To use TubeBuddy’s Competitors Scorecard:
- Open TubeBuddy’s Quick Links menu from the top of the YouTube Studio window
- Click on Competitors, under the Website Tools
- Add the URL of your Competitor’s channel and switch to the Scorecard tab.
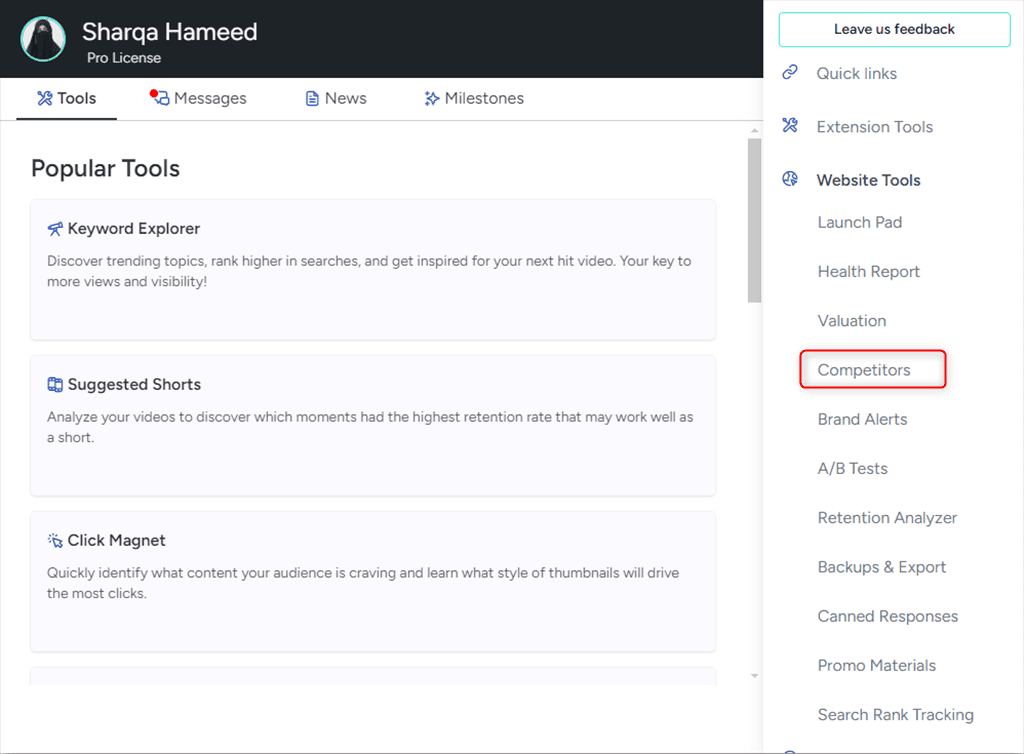
On the other hand, the Upload Alerts enables you to set up automatic upload alert notifications for your competitors’ channels via email SMS, or TubeBuddy’s notifications.
This feature generates alerts with the following information:
- Time since the last upload
- Current subscriber count
- Current views count
- Current upload count
- Views gained since the last upload
- Subscribers gained since the last upload
Remember, external data sources for competitor analysis might not always be 100% accurate and require additional verification through research.
53. Click Magnet
Click Magnet uses AI to categorize the content of each of your video thumbnails. It then gives a report regarding which videos are performing best in terms of CTR.
Moreover, it uses machine learning algorithms to classify video thumbnails and videos into different categories. This helps to know which videos are worthy enough for an update.
To use TubeBuddy’s Click Magnet feature:
- Navigate to the Content page of your YouTube Studio
- Click on the Bulk & Misc Tools icon
- Choose the Click Magnet option, under the Misc Tools section.
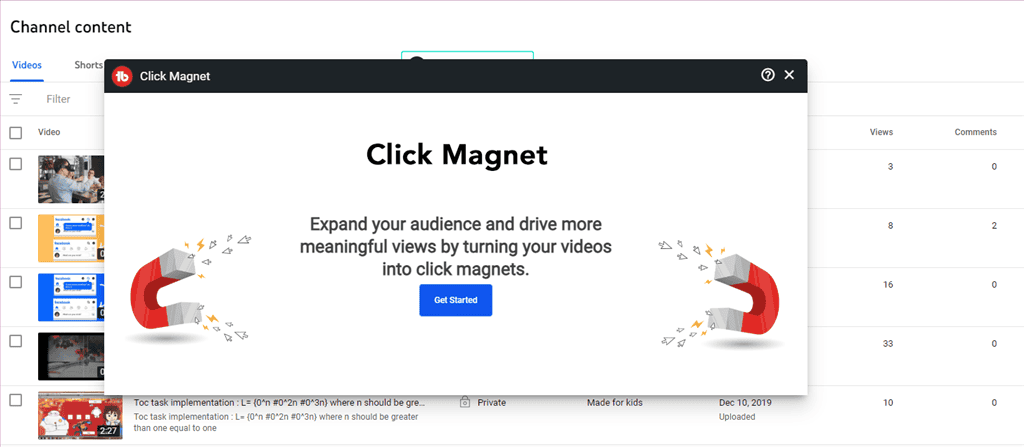
On the Click Magnet Dashboard, you’ll see the following tools:
- Power Rankings: Displays CTR, watch time, total number of clicks, and overall performance for all of your videos
- Element Inspector: Uses AI and analyzes all video thumbnails by breaking them down element by element
- CTR Opportunities: Identifies videos that performed well but have low CTR
- Advanced Analytics: Filters videos by source, timeframe, minimum impressions, etc.
However, TubeBuddy’s Free and Pro plans offer limited data on thumbnail performance beyond CTR.
54. Retention Analyzer
The YouTube algorithm tends to recommend videos with higher audience retention.
TubeBuddy’s Retention Analyzer is used to review the behavior of your video viewers. This includes how much of the video did they watch and if they watched another video after that or not.
To try TubeBuddy’s Retention Analyzer:
- Open your TubeBuddy’s dashboard
- Navigate to the left side panel and expand the Data & Insights category
- Click on Retention Analyzer from the list
- Use the left side panel to filter by videos, video length, and live streams
- Or, sort videos based on retention minutes or percentages from the right side panel.
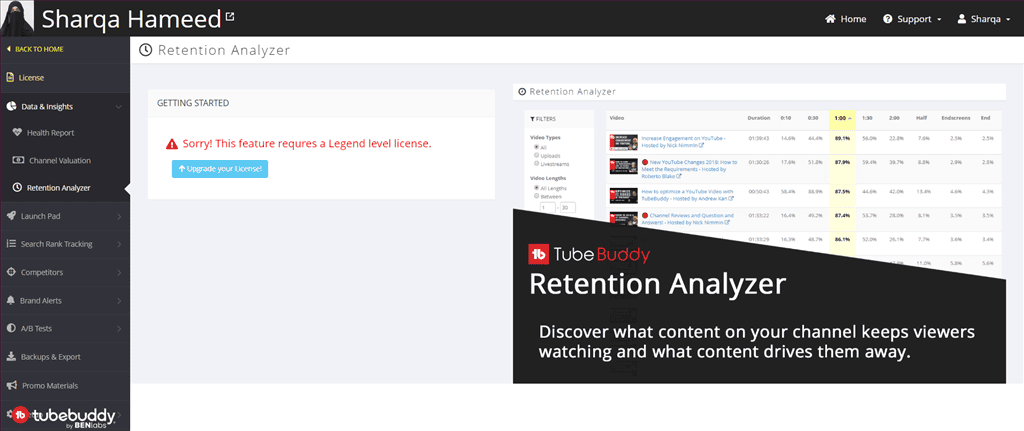
This feature is quite useful for reviewing the best-performing videos with respect to watch time.
However, sometimes the root cause of low retention might lie in other reasons, which require broader content strategy adjustments other than data analysis.
55. Best Time to Publish
YouTube’s built-in analytics feature predicts the best time for publishing a video based on your current timezone and subscribers’ geography.
However, TubeBuddy makes this search more optimal and tells you the time at which most of your subscribers are online.
You can find the Best Time to Publish under the Audience section of your channel Analytics tools. So, experiment with this must-try feature, if your videos are not getting enough views.
However, sometimes the optimal publishing time is influenced by external factors, such as live events or trending topics, which TubeBuddy might not always consider.
56. Comment Filters
The Comment Filters feature of TubeBuddy goes one step ahead of YouTube and helps you organize your comments efficiently. This is beneficial when you receive loads of comments and want to track them.
It lets you sort comments into the following categories:
- Comments with links
- Comments that you haven’t yet replied to
- Fom new subscribers
- With heart or no heart
- With a question
- Containing some particular keywords.
How To Use TubeBuddy
To get started with TubeBuddy, follow these steps:
1. Visit the TubeBuddy’s official website and click the Install Free Now button.
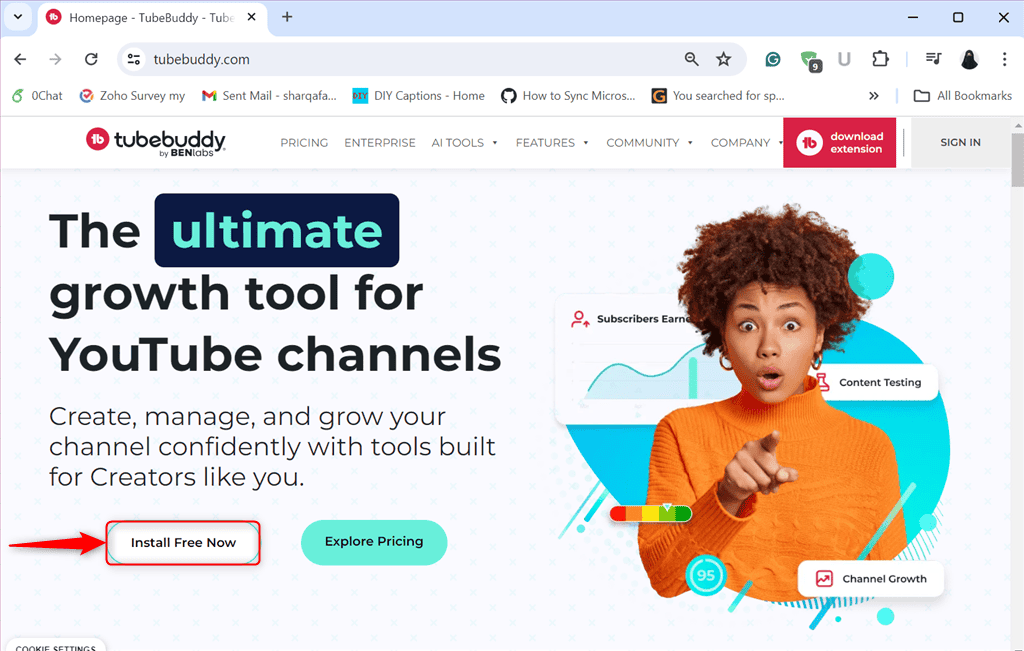
2. Then, click on Add to Chrome.
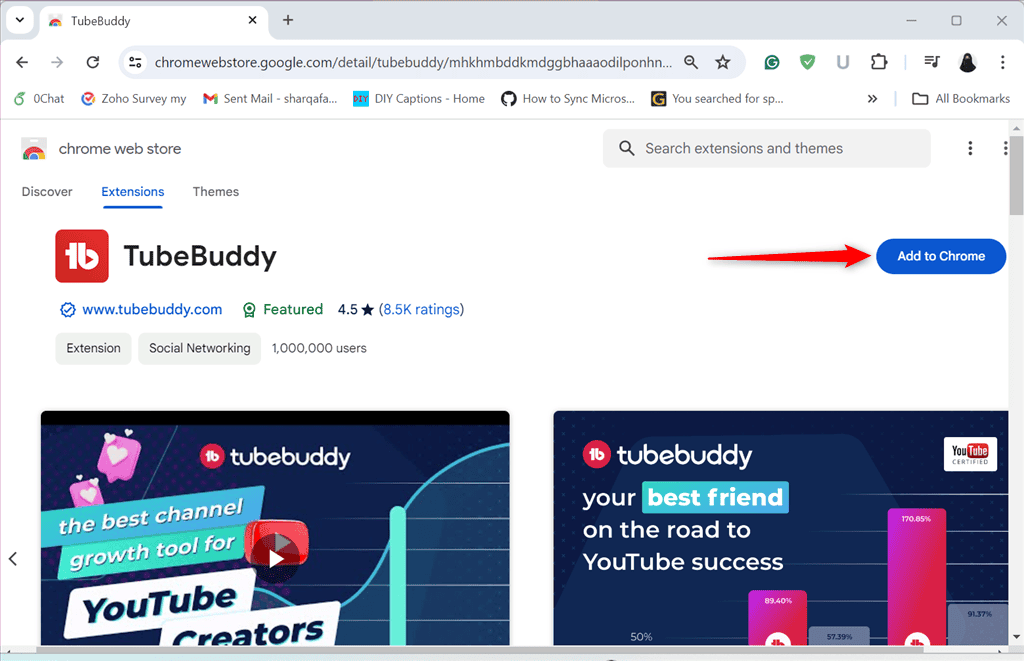
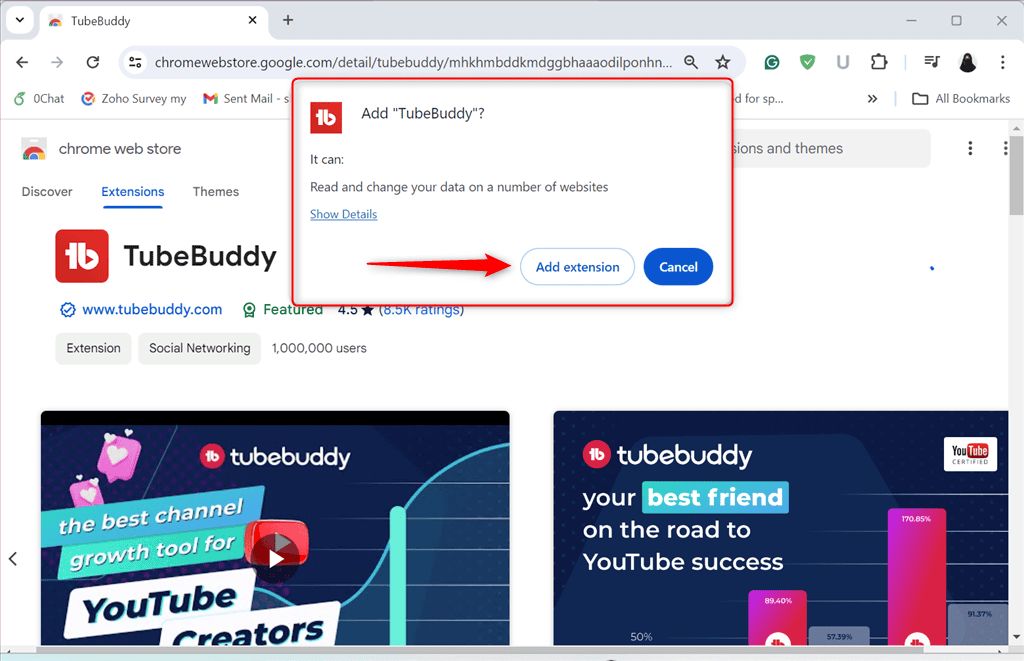
3. From the pop-up notification, click on the Add extension button.
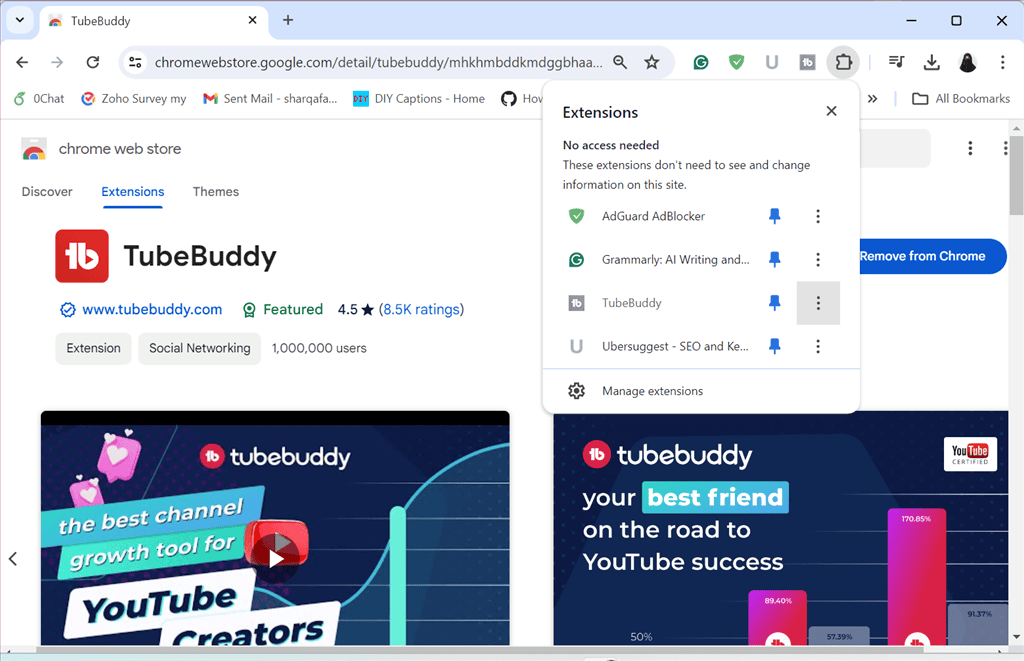
4. Click the Extensions icon and pin TubeBuddy to the address bar.
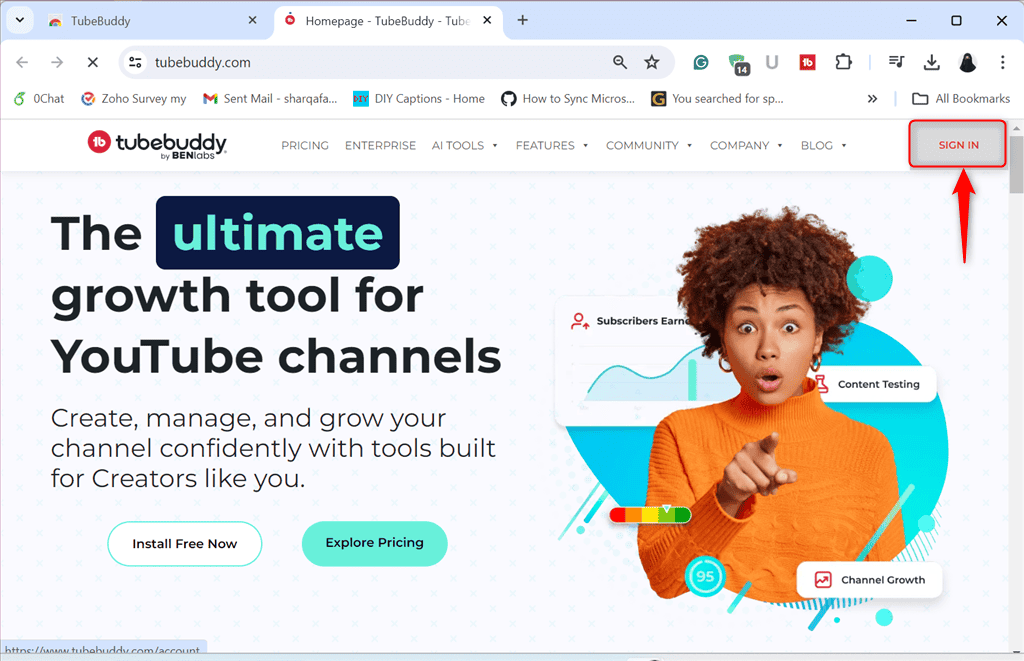
5. Next, click on the TubeBuddy extension. Consequently, you’ll be navigated towards its main website. Here, click SIGN IN.
6. Choose an account to continue to TubeBuddy.
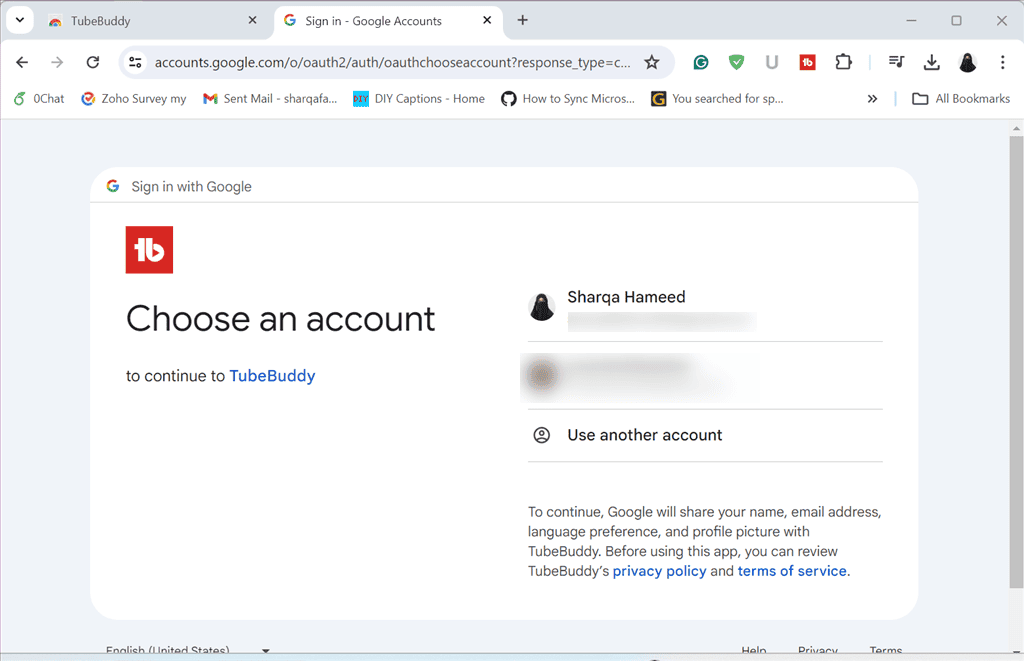
7. Click Continue as a confirmation.
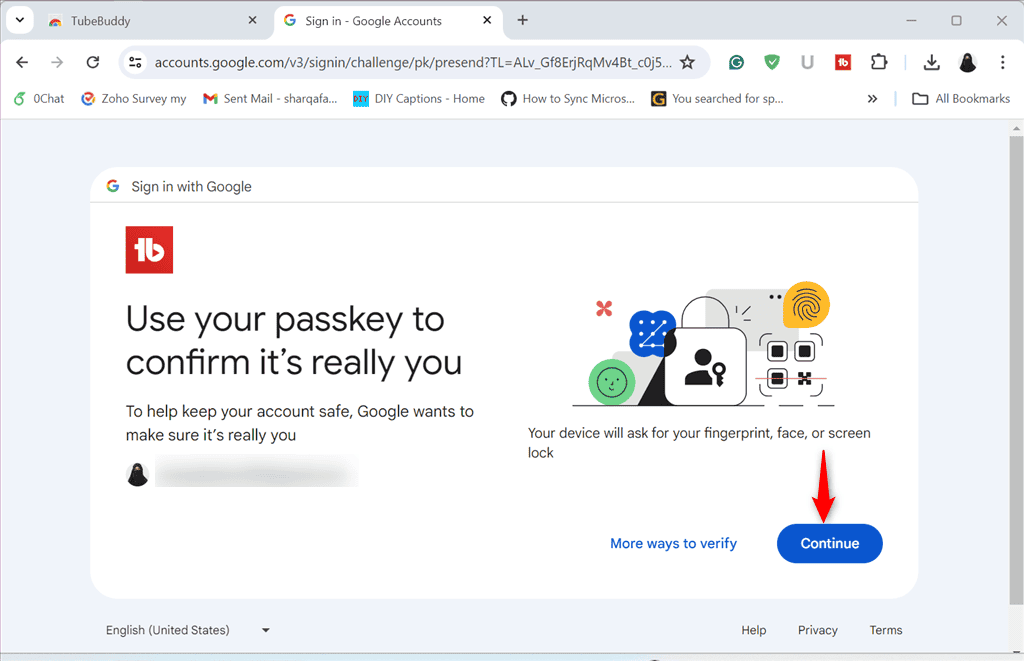
8. Click Continue to sign in to TubeBuddy.
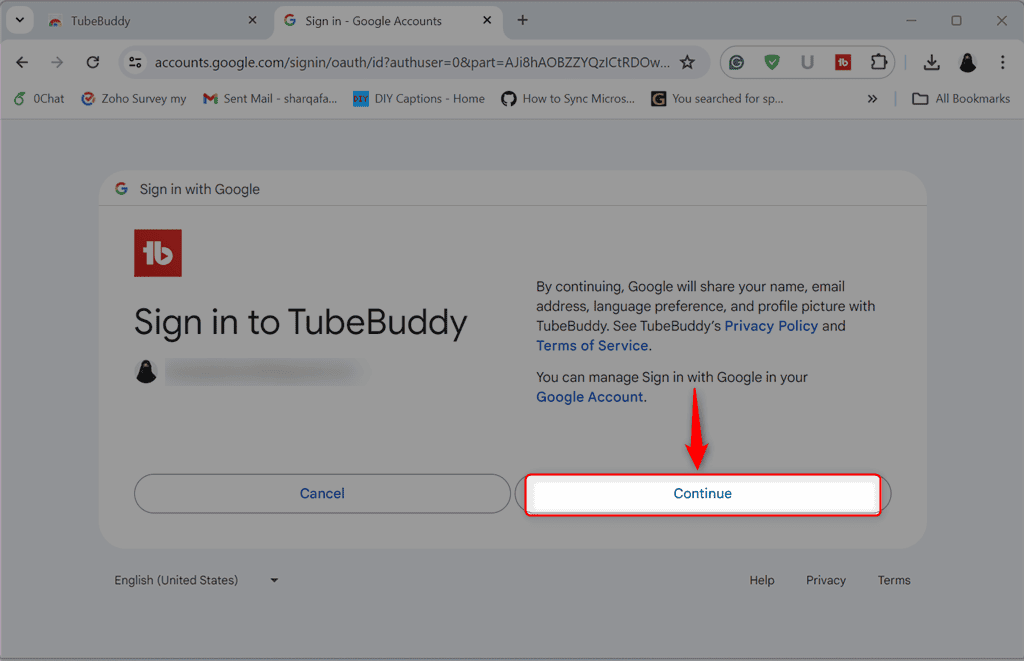
9. Here’s what the main dashboard of TubeBuddy looks like.
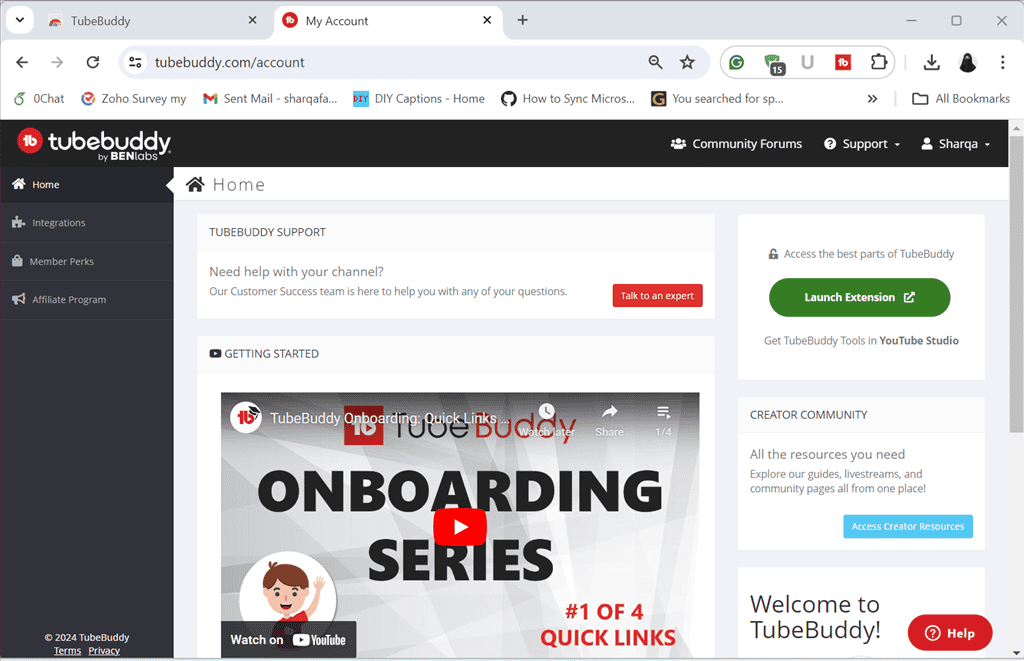
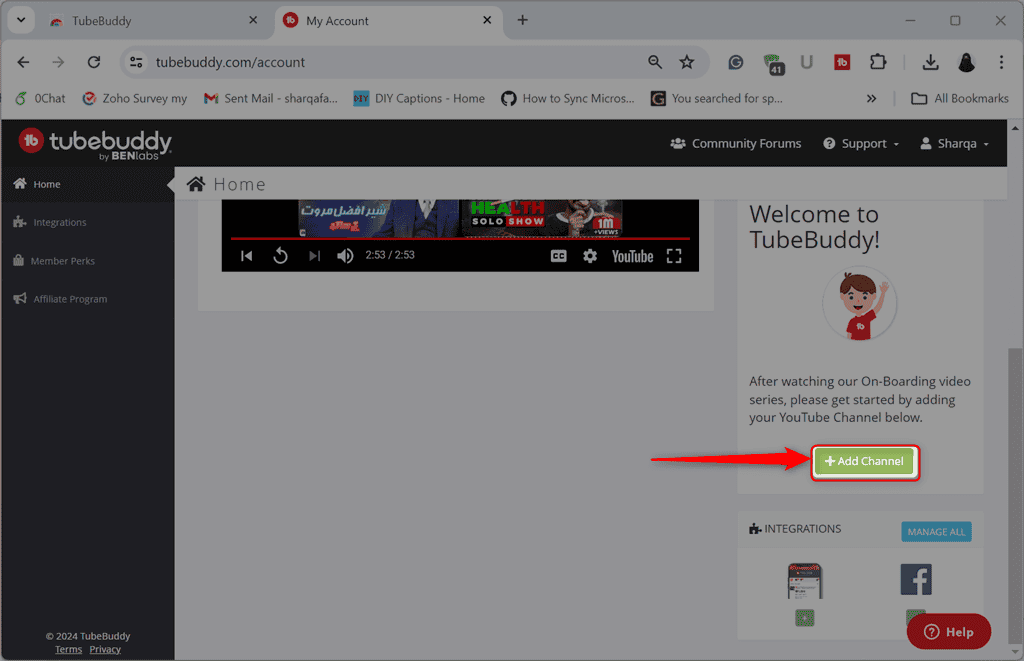
10. After watching the onboarding short video series of TubeBuddy, click the +Add Channel button.
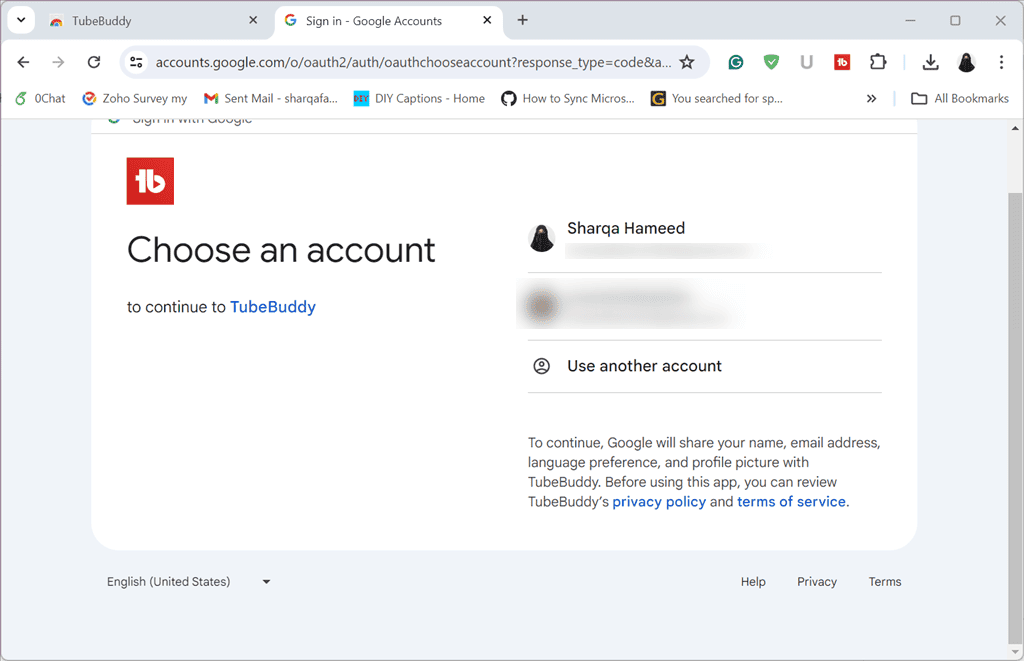
11. Select the Google account associated with your YouTube channel.
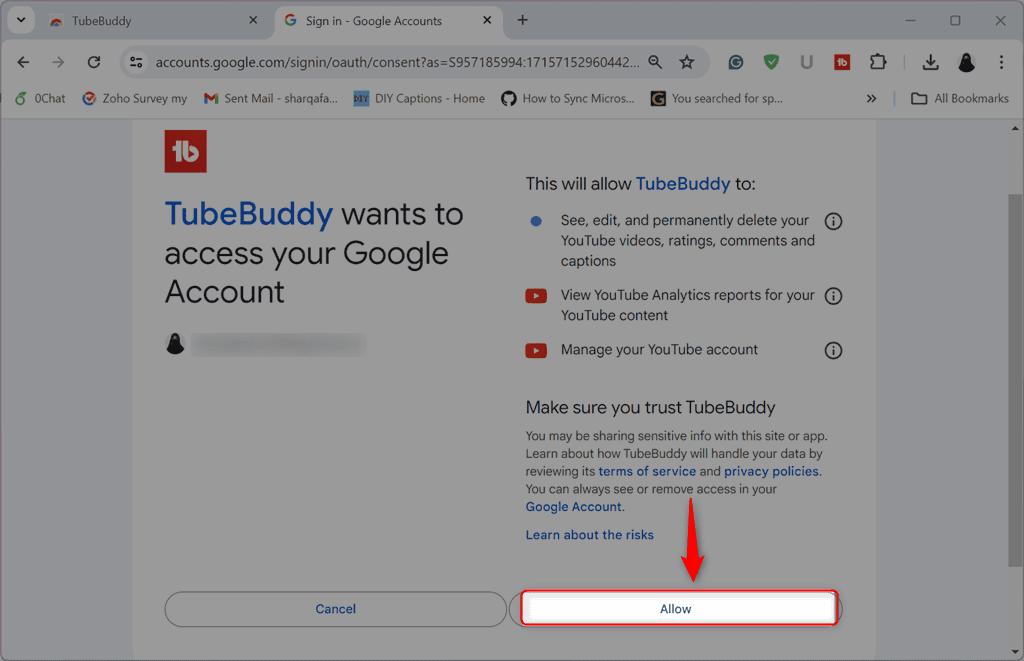
12. Click Allow to give access to TubeBuddy for using your Google account.
13. Activate TubeBuddy’s free trial or activate to upgrade version. In my case, I activated the Free Pro Upgrade trial.
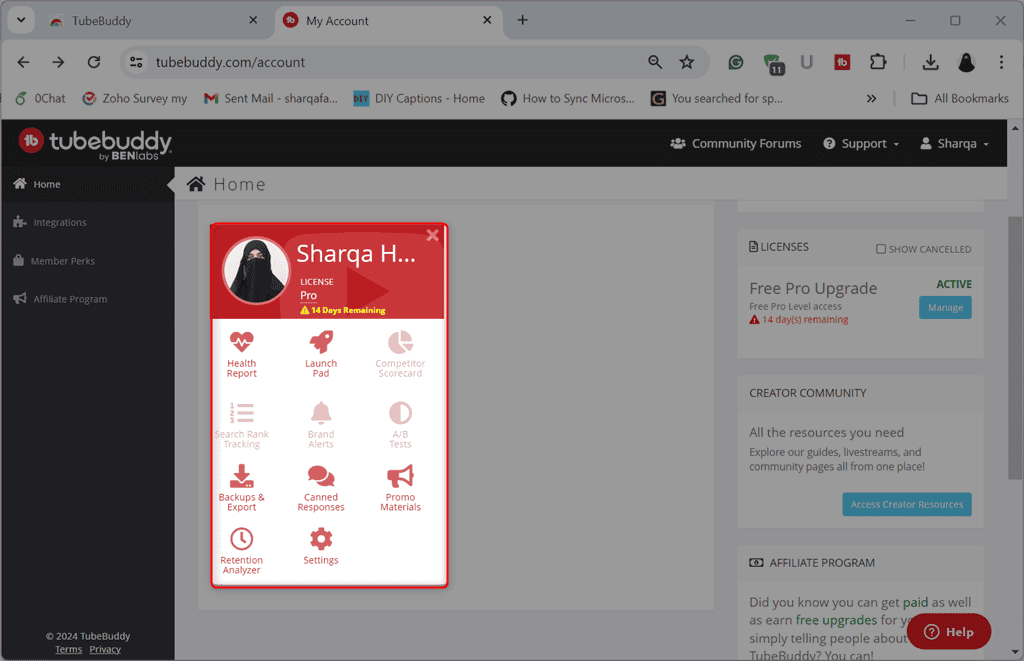
14. Open your YouTube account, click the TubeBuddy icon, and select Extension Tools from the right-side panel. Here, I selected the Keyword Explorer tool.
15. Next, I typed Meta AI as my keyword and clicked the Explore button.
16. As a result, the Keyword Explorer tool generated a Summary related to the searched keyword. This includes:
- Overall Score
- Score Analysis
- A graph showing interest over time
- Related searches, and more.
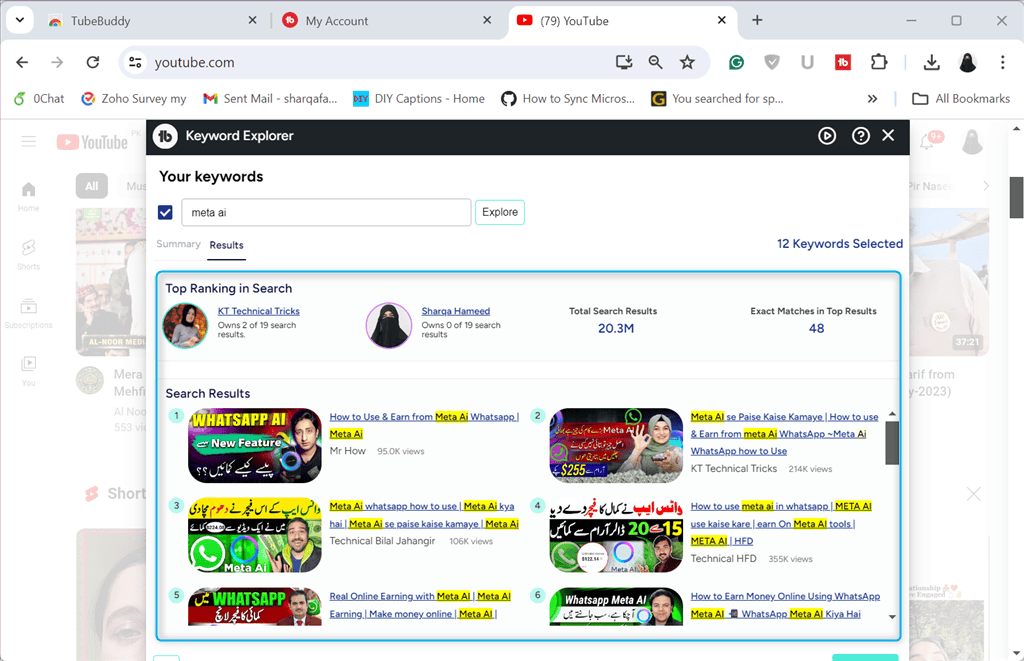
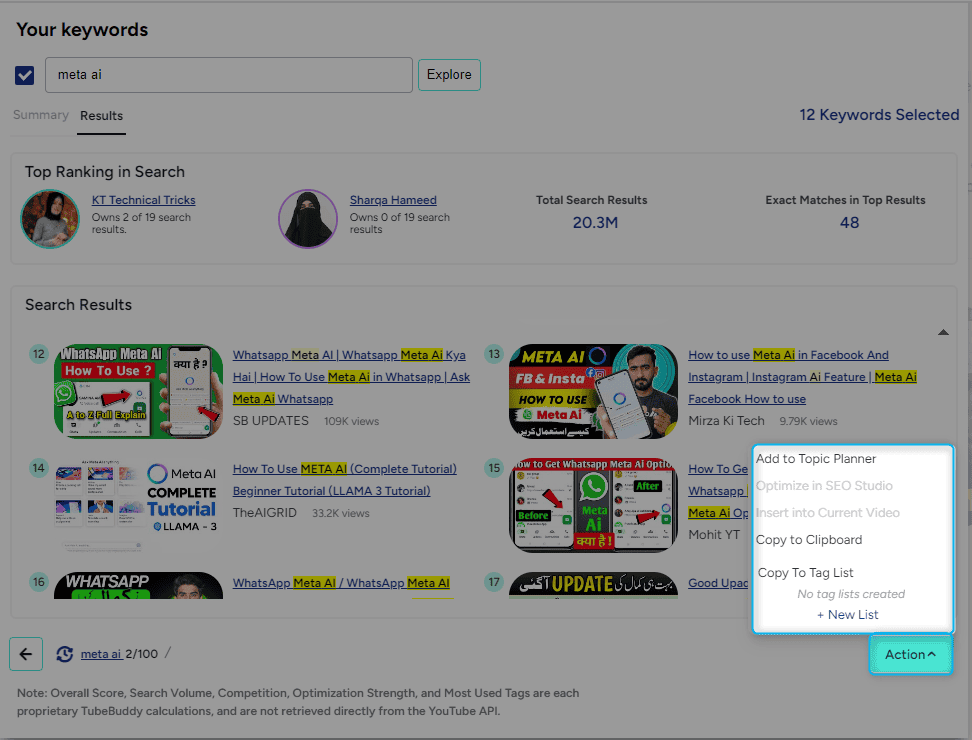
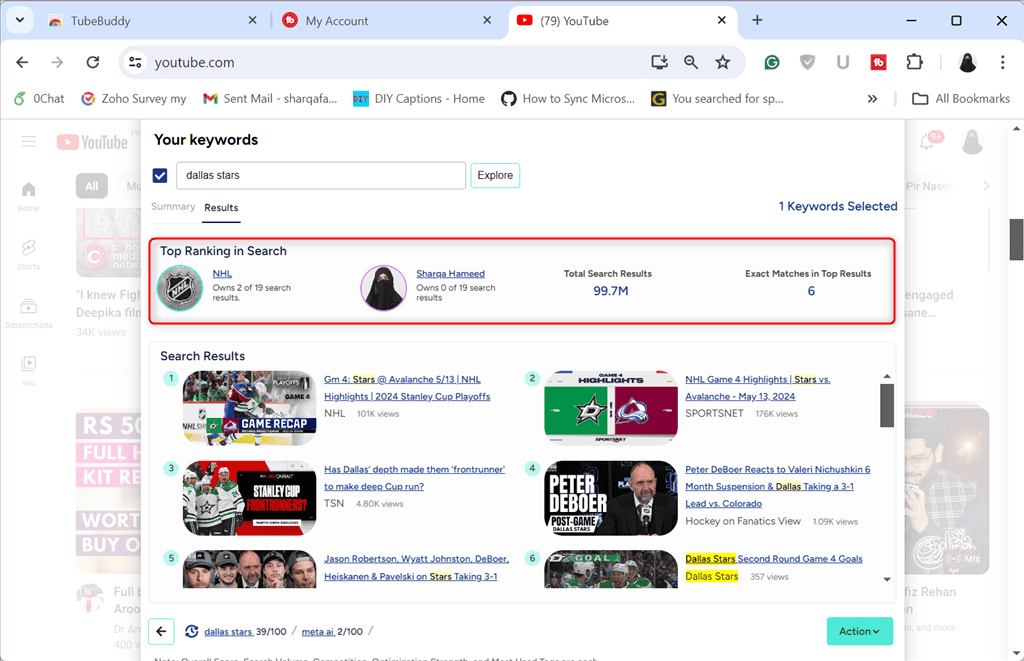
17. In the Results tab, you may see other information, such as Top Ranking in Search and other Search Results.
18. After exploring a keyword, click the Action button from the bottom right side. Then, select a desired action which you may need to perform.
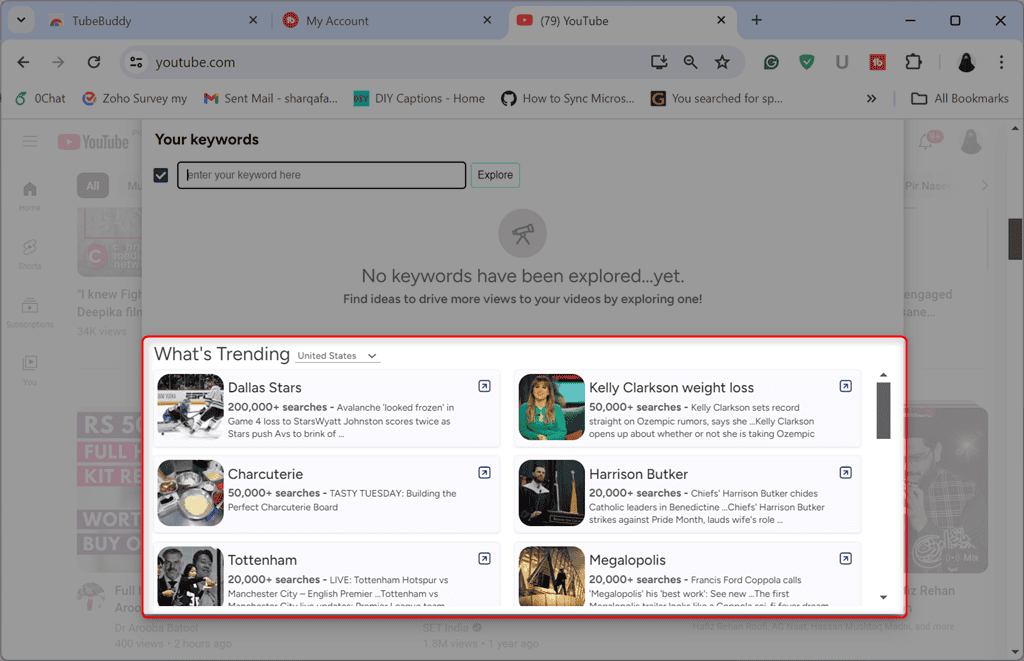
19. On the other hand, you can explore a trending topic from the What’s Trending section.
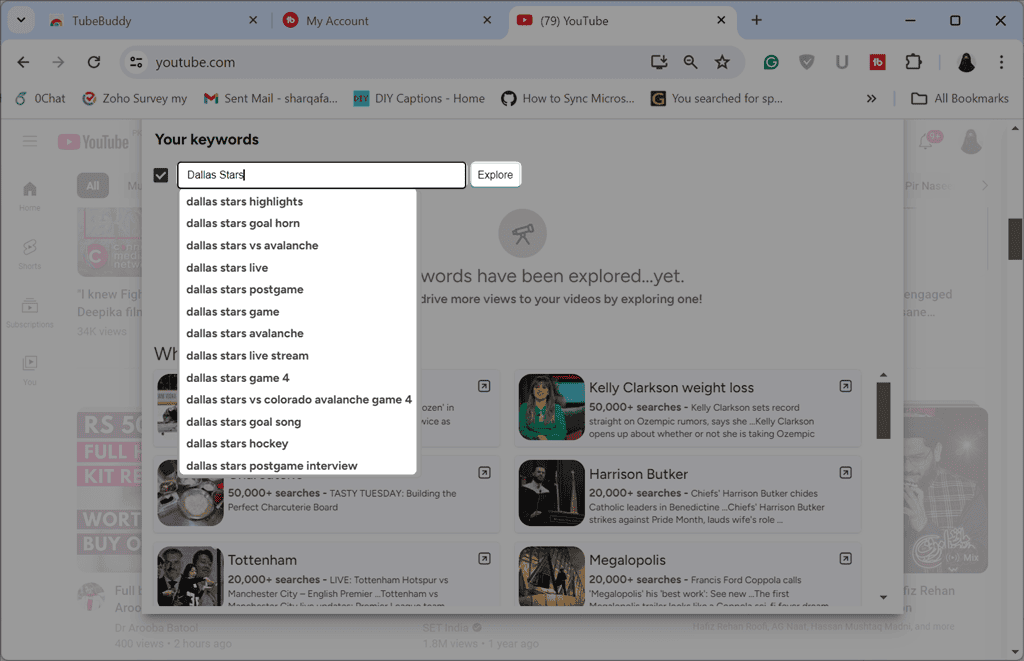
20. For instance, I entered Dallas Stars and clicked Explore.
21. Check out the Summary of the searched topic or keyword.
22. Also, view the relevant Results as follows.
Pricing
TubeBuddy offers different pricing models for both monthly and yearly subscriptions. Here’s an overview:
| Package | Price | Suitable for |
| Free | $0.00 | Creators who want to test TubeBuddy before subscribing to its paid plans |
| Pro | $4.50/mo $2.25/mo, if you pay for a year upfront | Creators ready to start their YouTube journey and want to access new tools for growth |
| Legend | $28.99/mo $14.50/mo if you pay for a year upfront | Creators looking for the maximum competitive edge for expanding their reach and making data-driven decisions |
Now, let’s further compare the features of each TubeBuddy’s plan:
| Features | Free | Pro | Legend |
| Videolytics | Limited | Yes | Yes |
| Channelytics | Yes | Yes | Yes |
| Health Report | No | Yes | Yes |
| Channel Backup | No | Limited | Yes |
| Channel Access | No | No | Yes |
| Search Insights | Yes | Yes | Yes |
| Click Magnet | No | No | Yes |
| Language Analysis | Yes | Yes | Yes |
| Competitors Scorecard | No | No | Yes |
| Demonetization Audit | Yes | Yes | Yes |
| Competitors Upload Alerts | No | No | Yes |
| Comment Word Cloud | Yes | Yes | Yes |
| Export Comments | No | No | Yes |
| Channel Valuation | Yes | Yes | Yes |
| Retention Analyzer | No | No | Yes |
| Brand Alerts | No | No | Yes |
| Publish to Facebook | No | No | Yes |
| Vid2Vid Promotion | Yes | Yes | Yes |
| Milestones | Limited | Yes | Yes |
| Pick a Winner | Yes | Yes | Yes |
| Best Time to Publish | Yes | Yes | Yes |
| Member Perks | No | Yes | Yes |
| TubeBuddy Mobile App | Limited | Yes | Yes |
| Auto Translator | No | No | Yes |
| Video A/B Tests | No | No | Yes |
| Search Rank Tracking | No | No | Yes |
| View and Copy Video Tags | Yes | Yes | Yes |
| Suggested Shorts | Limited | Yes | Yes |
| Tag Sorter | Yes | Yes | Yes |
| Tag Translator | No | Limited | Yes |
| Tag Rankings | Yes | Yes | Yes |
| Tag Lists | Limited | Yes | Yes |
| Title Generator | No | No | Yes |
| Opportunity Finder | No | No | Yes |
| Search Explorer | Limited | Yes | Yes |
| Best Practices Audit | No | Yes | Yes |
| Keyword Explorer | Limited | Yes | Yes |
| SEO Studio | No | Yes | Yes |
| Instant Suggestions | Limited | Yes | Yes |
| Search Positions | No | Yes | Yes |
| Scheduled Publish | No | No | Yes |
| Thumbnail Analyzer | Limited | Limited | Limited |
| Scheduled Video Update | No | No | Yes |
| Quick-Edit Toolbar | Yes | Yes | Yes |
| Sunset Videos | No | No | Yes |
| Quick Links Menu | Yes | Yes | Yes |
| Canned Responses | Limited | Yes | Yes |
| Emoji Picker | Yes | Yes | Yes |
| Default Upload Profiles | Limited | Yes | Yes |
| COPPA Center | Yes | Yes | Yes |
| Playlist Actions | Limited | Yes | Yes |
| Comment Formatting | Yes | Yes | Yes |
| Thumbnail Generator | Limited | Yes | Yes |
| Advanced Video Embed | Yes | Yes | Yes |
| Video Topic Planner | Limited | Yes | Yes |
| Bulk Find, Replace, & Append | No | No | Yes |
| Bulk Delete Comments | No | No | Yes |
| Bulk Thumbnail Overlays | No | No | Yes |
| Bulk Card Editor | Limited | Limited | Limited |
| Demonitization Double-Check | No | No | Yes |
| Bulk End Screen Editor | Limited | Limited | Limited |
TubeBuddy’s Free plan provides access to all of the basic features you may need to run a YouTube channel. In addition, there’s a 14-day free trial of the Pro plan to experiment with advanced features, such as Search Positions, SEO Studio, Search Explorer, Health Report, etc.
However, both plans have their own set of limitations. For instance, its Free and Pro plan restricts you from using Click Magnet, Auto Translator, Schedule video updates, and more.
TubeBuddy charges you a subscription fee plus any applicable taxes at the beginning and each period thereafter. It renews your subscription automatically when the specified period ends until you cancel it.
Moreover, if you cancel the final purchase or subscription, you won’t receive a refund of your initial subscription fee or one-time payment at any time.
To subscribe to any of the paid plans of TubeBuddy, you can use PayPal, Visa, Discover, American Express, Maestro, and Mastercard. This tool also provides a 50% discount on annual subscriptions.
TubeBuddy Review – Verdict
TubeBuddy is a great SEO tool to optimize YouTube videos and grow your audience. It offers several handy features, which include Keyword Explorer, Videolytics, Channelytics, Health Report, Channel Valuation, Best Time to Publish, and others.
They all work as advertised and have various use cases.
However, its Free and Pro plans restrict you from using advanced tools like Video A/B Testing, Bulk Processing Tools, Sunset Videos, Schedule Video Update and Publish, and more. In addition, sometimes its tools load very slowly within the YouTube dashboard.
Overall, I’d rate it a solid 8.5/10 because it’s a truly all-in-one solution for YouTube SEO.
I hope this TubeBuddy review has helped you make up your mind about using the tool. If so, let me know in the comments below!
Read our disclosure page to find out how can you help MSPoweruser sustain the editorial team Read more


User forum
0 messages