How to Fix Taskbar Not Working In Windows 11 [9 Easy Ways]
8 min. read
Updated on
Read our disclosure page to find out how can you help MSPoweruser sustain the editorial team Read more
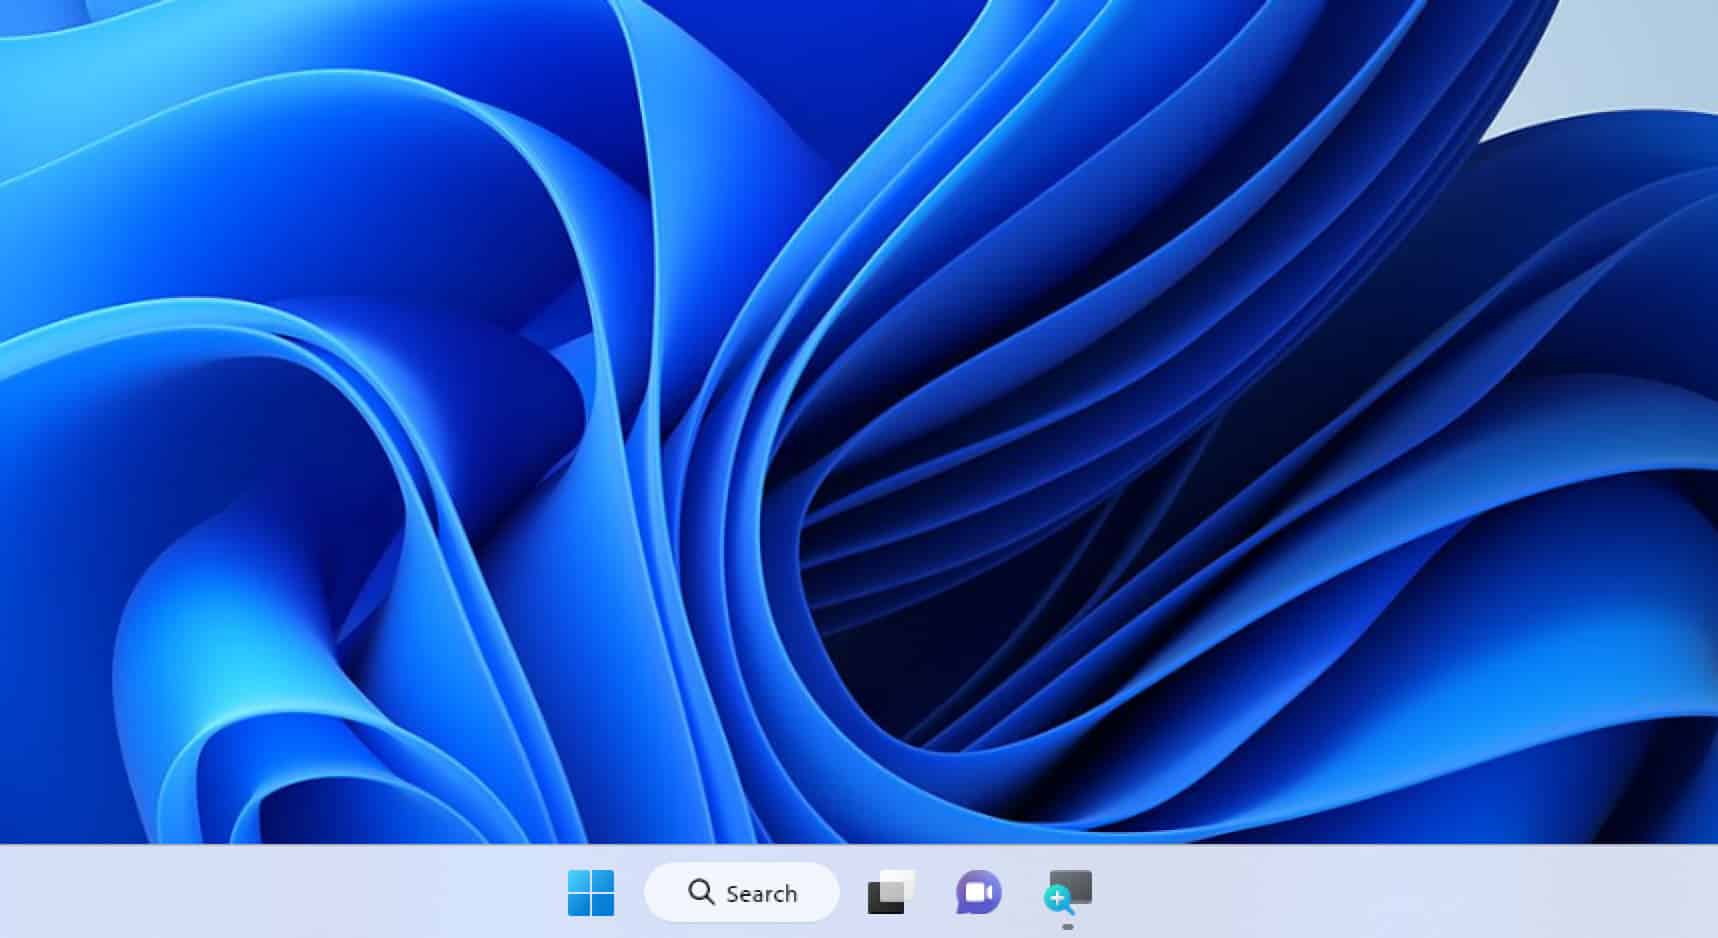
The Taskbar of your Windows 11 PC is a critical user interface (UI) element to access open apps and File Explorer windows, especially when multitasking on your PC. It’s also the home for the Start menu, System tray icons, and the Notifications tool.
When you’re facing the Taskbar not working problem on your Windows 11 PC, it could be inconvenient to use the PC for work or entertainment. Therefore, read this article until the end to find the best troubleshooting ideas to fix your Windows 11 Taskbar hassle-free.
Why Is My Taskbar Not Working?
When you’re unable to interact with the Taskbar, it means it’s broken. It could be frozen, apps on the Taskbar may not reopen when you click them or the Start menu may become nonfunctional.
All these are an indication that the Windows Taskbar isn’t functioning as it should. Find below the common causes behind this problem on a Windows 11 PC:
-
- The Windows Explorer process (explorer.exe) is responsible for the Taskbar’s functionality. So, any issues with it can lead to various Taskbar problems.
- High CPU or RAM usage by background processes can also make the Taskbar interface unresponsive.
- Damage or corruption to system files can cause the Windows Taskbar tool to stop functioning normally.
- Certain third-party applications or software can interfere with the Taskbar’s functionality, causing it to freeze or not respond.
- In some cases, Windows 11 updates from Microsoft can lead to compatibility issues with the Taskbar.
- Malicious software can disrupt various system functions, including the Taskbar.
- Changes to system settings or customization options can sometimes lead to Taskbar problems.
- A corrupted user profile can affect the Taskbar’s behavior for that specific user.
- Issues with the graphics card or display drivers can cause taskbar issues, especially if you’re using multiple monitors.
Also read: Fix Your PC Ran Into A Problem Error on Windows 11
How to Fix Windows 11 Taskbar if It’s Not Working?
After delving into the potential causes of this issue, here are the best ways we found to fix it:
Solution 1: Check Taskbar Settings
It could be possible that someone changed a few settings of the Taskbar from the Taskbar settings, causing it to behave differently.
Follow these steps first:
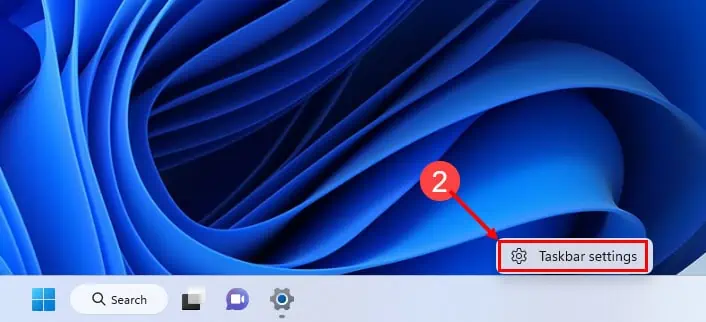
- Right-click on the Taskbar on the Home Screen.
- Click on the Taskbar settings button.
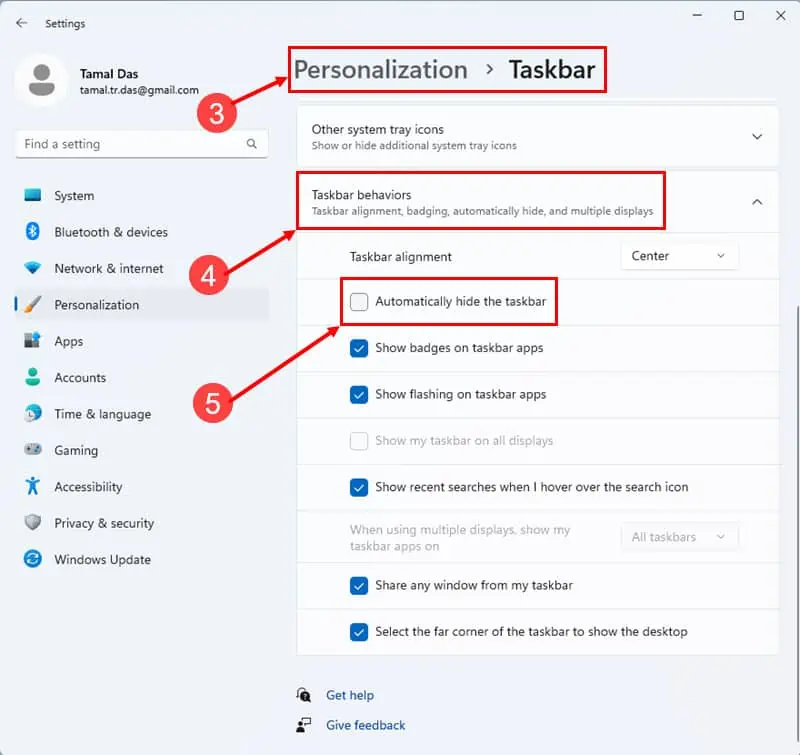
- On the Personalization > Taskbar dialog box, scroll down to find the Taskbar behaviors menu.
- Click Taskbar behaviors.
- If the Taskbar hides after a few seconds, uncheck the Automatically hide the taskbar checkbox.
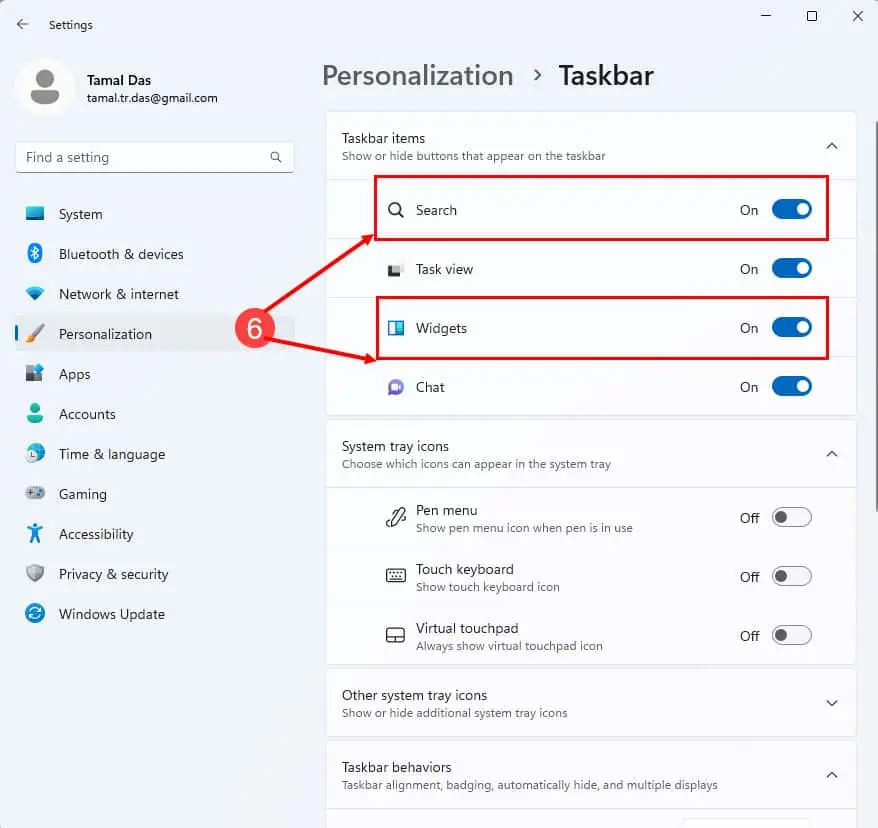
- If any of the following items on the Taskbar are missing, activate them as well from the Taskbar items menu:
- Search
- Task view
- Widgets
- Chat
If all the above are already there as they should, continue with the following fixes.
Solution 2: Reboot the Windows File Explorer App
To verify that the Windows File Explorer is working properly:
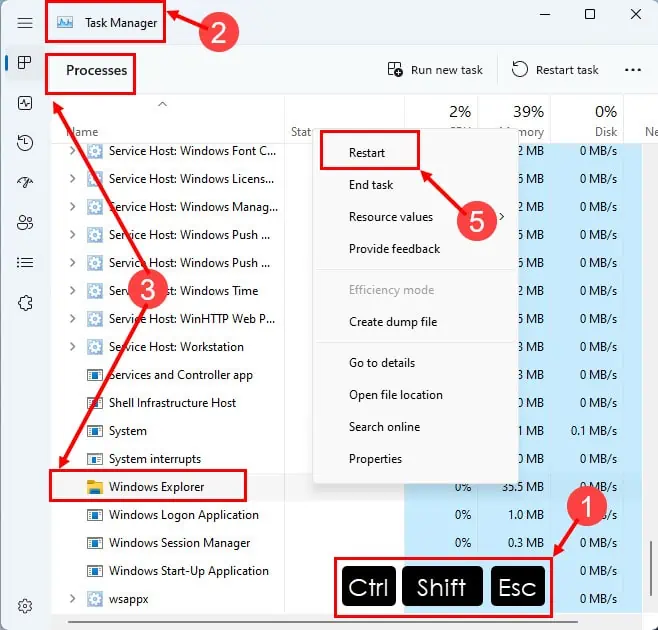
- Press the Ctrl + Shift + Esc keys on your keyboard.
- This key combination will open the Task Manager directly
- Scroll down to find Windows Explorer under the Processes tab on the Task Manager window.
- Windows Explorer is a yellow-shaded folder icon.
- Right-click on the Windows Explorer app, and then click the Restart option from the context menu.
This will effectively reboot the Windows File Explorer app, refreshing its functionality without the need to restart your entire computer. This action should also fix the Taskbar functionalities.
Solution 3: Uninstall Recently Installed Third-Party App
If you’re facing the Taskbar freezing or not responding problems right after installing an application, follow these steps to remove the app:
- Click on the Windows icon in the taskbar to open the Start menu.
- Click on the gear-shaped Settings icon on the left side of the Start menu.
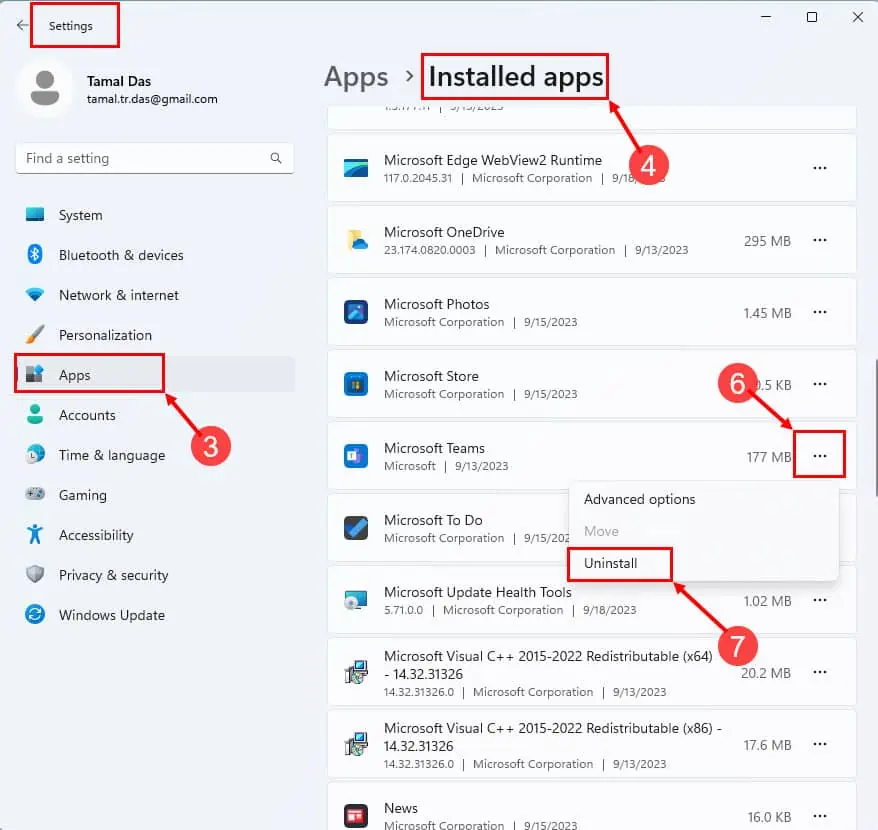
- In the Windows Settings window, select Apps from the left-hand menu.
- Click on the Installed app menu in the Apps settings.
- Scroll down the list of installed apps and locate the recently installed third-party app you want to uninstall.
- Click on the ellipsis icon on the app you want to delete.
- Click the Uninstall button.
- Follow the on-screen prompts to confirm the uninstallation.
Solution 4: Uninstall Recent Windows 11 Updates
Often Microsoft releases updates in a hurry. These contain bugs that may interfere with UI components like the Taskbar tool. Your Windows 11 auto-update schedule will automatically apply updates as soon as Microsoft pushes them to your system.
So, you must uninstall such recent updates by following these instructions:
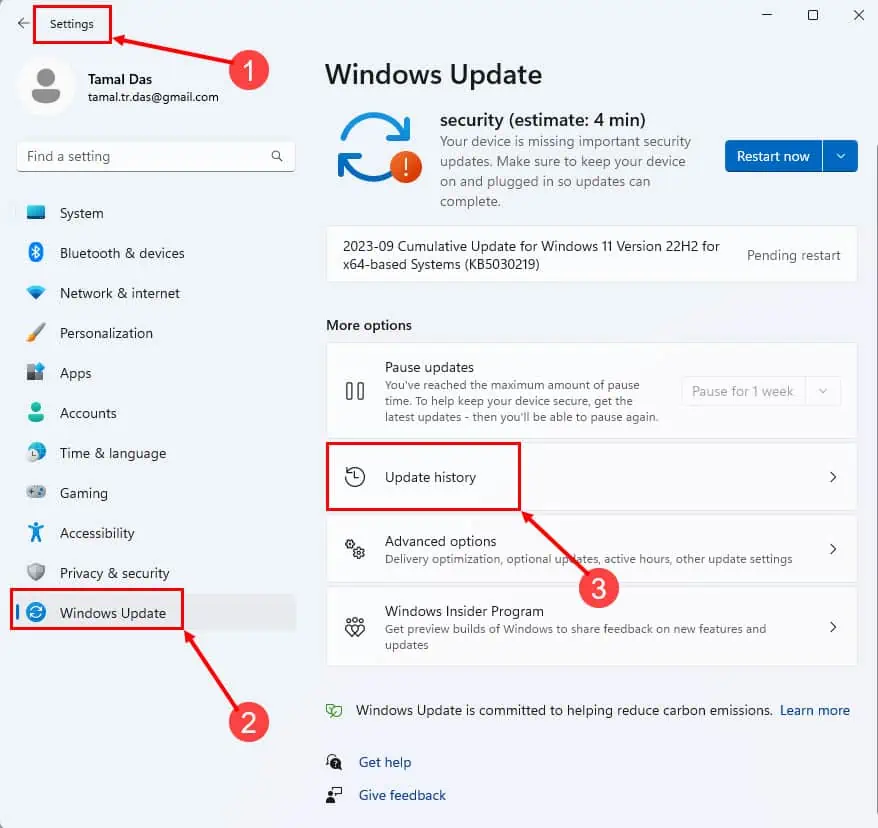
- Press the Windows + I keys to launch the Windows 11 Settings app.
- In the Windows Settings window, select Windows Update from the left-hand menu
- Click on View update history on the Windows Update settings.
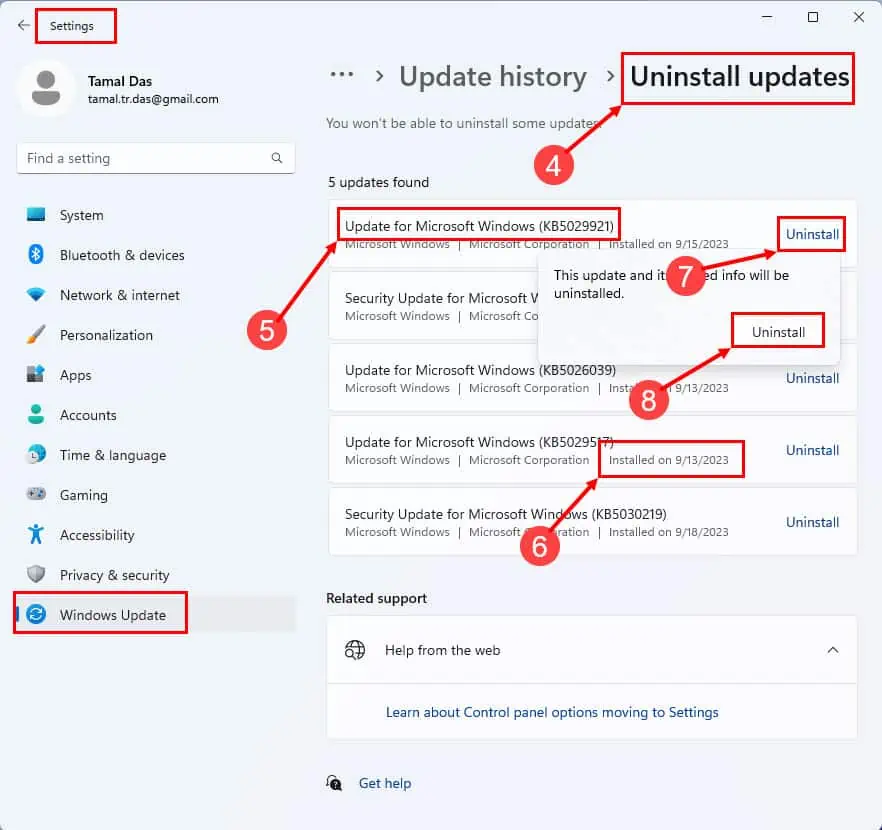
- Click on Uninstall updates.
- A list of installed updates will appear. Find the update you want to uninstall.
- You can determine which update to uninstall according to their date of installation mentioned as Installed on 9/15/2023 stamp.
- Select the Uninstall on the right side of the name of the update.
- Click Uninstall again on the context menu to confirm.
Now, reboot the device and the Taskbar should be working appropriately.
Solution 5: Scan the System for Malware and Viruses
You can use any third-party antivirus software or the Windows Security tool to scan for viruses and malware.
Here’s how:
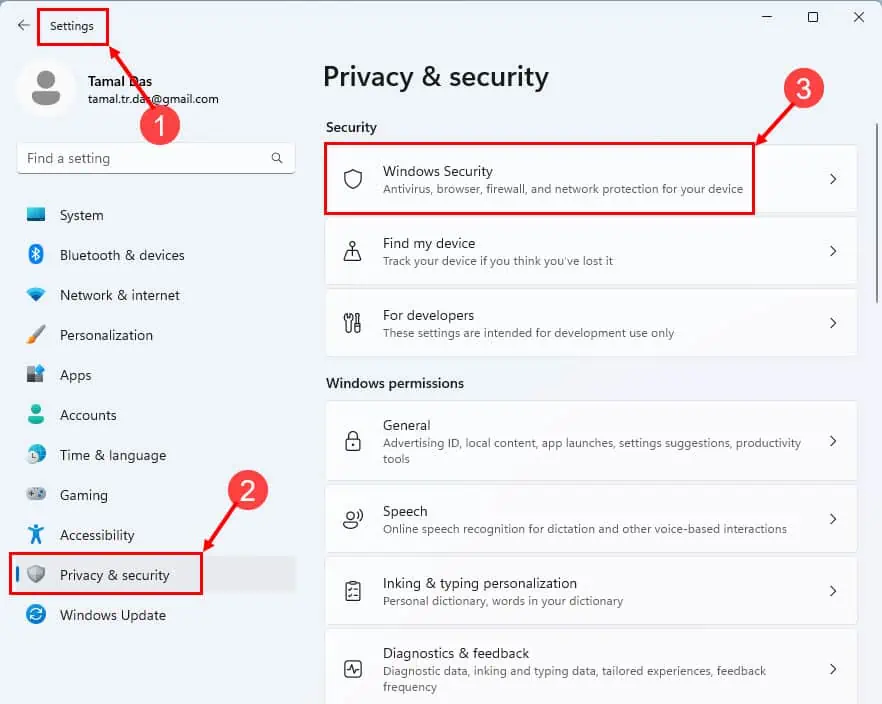
- Go to the System tool on Windows 11 Settings by pressing the Windows + I keys.
- Select the Privacy & security option on the left-side navigation pane.
- Click the Windows Security menu just below the Security section.
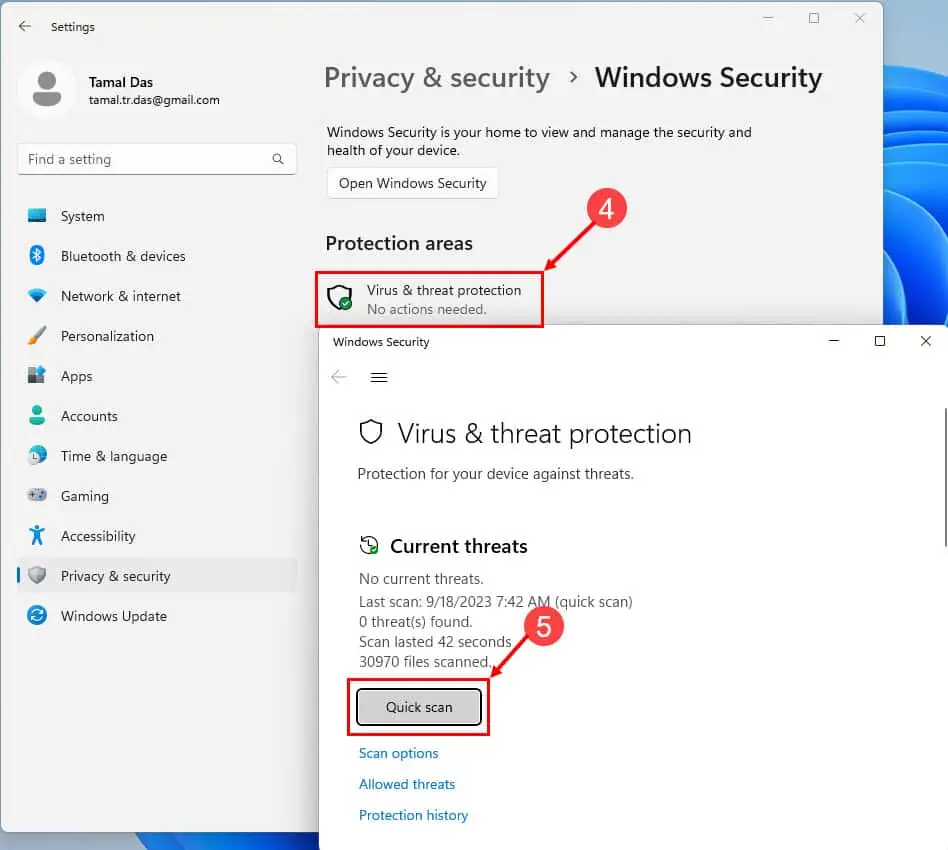
- Click the Virus & threat protection button.
- Click Quick scan and wait for Windows Security to scan and destroy malware and viruses.
Don’t forget to restart the PC to fix the Taskbar tool affected by the malware programs.
Solution 6: Repair Windows System Files
If the issue isn’t fixed so far, it’s indicating that the Windows 11 system files are corrupted.
Here’s how you can repair these system files:
- Open the Quick Link menu by pressing the Win + X keys on your keyboard.
- Select Windows Terminal (Admin) or Command Prompt (Admin) to open the Command Prompt with administrative privileges.
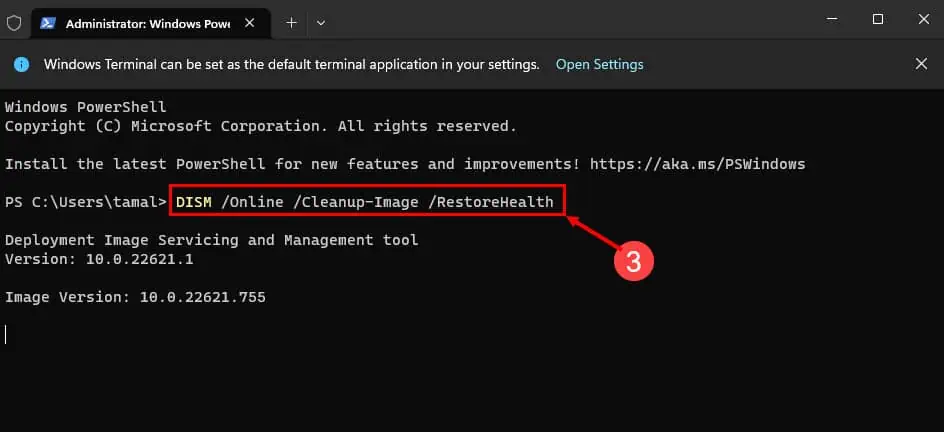
- Type the following command code and press Enter on the Command Prompt console:
DISM /Online /Cleanup-Image /RestoreHealth - Allow the DISM tool to run. It will scan for and attempt to repair any corrupted or missing system files. This process may take some time, so please be patient and let it complete.
After the DISM command has finished repairing the system files, it will provide a report of the actions taken. Once the process is complete, restart your computer to ensure that the repairs are applied.
Solution 7: Create a New Windows 11 User Account
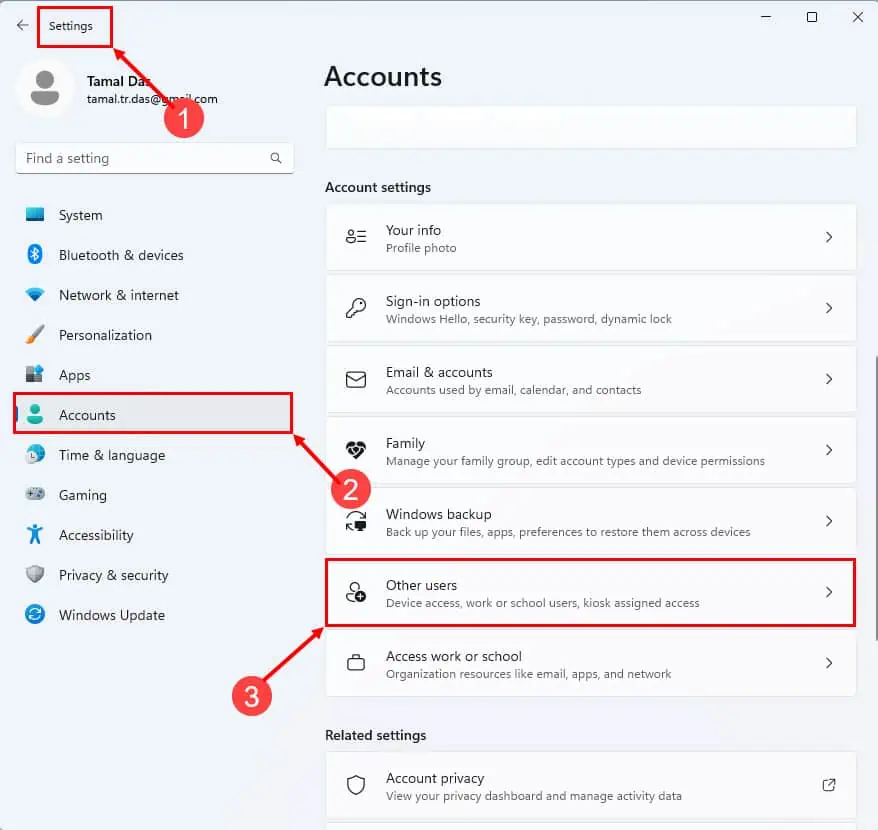
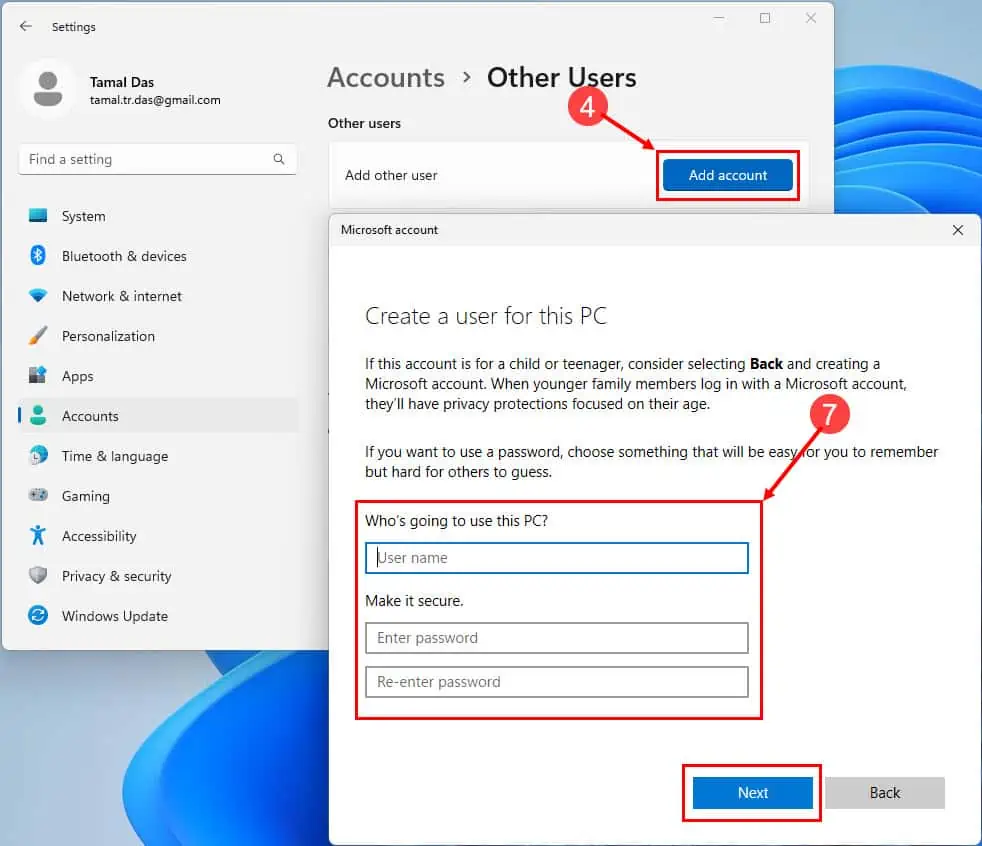
- Press the Windows + I keys together to open the Settings app.
- In the Windows Settings window, select Accounts from the left-hand menu.
- On the right side, click the Other users menu under the Account settings category.
- Now click on Add account.
- Click I don’t have this person’s sign-in information link on the sign-in dialog.
- Choose Add a user without a Microsoft account option.
- Follow the on-screen prompts to create a new user account, providing the necessary information, such as the username and password.
Solution 8: Disable and Enable XAML From Windows 11 Registry
The following action involves modifying the Windows 11 Registry library to push the XAML service to work properly, which in turn will fix the stuck Taskbar.
Note: Modifying data in Windows Registry is for advanced Windows users. If you’re confident enough, execute this method at your own discretion. Make sure you backup the Registry library before making the changes.
- Press Win + R on your keyboard to open the Run dialog.
- Type
regeditand press Enter. - This will open the Windows Registry Editor.
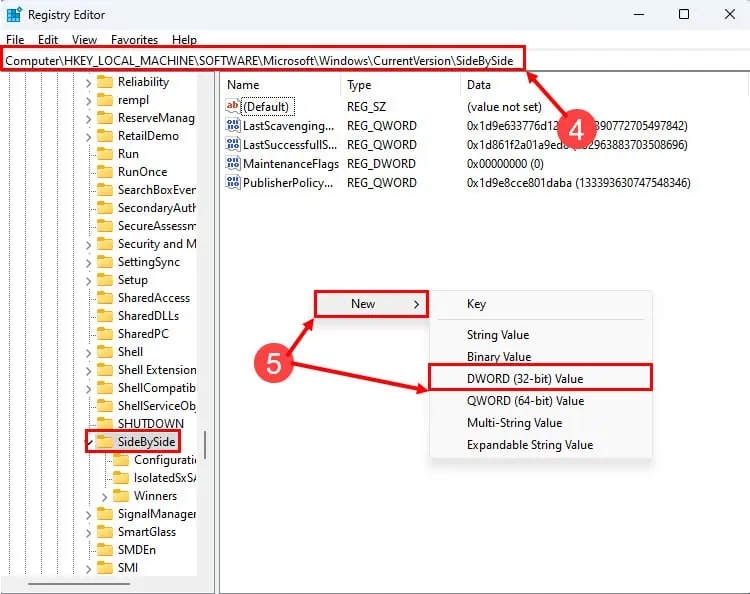
- In the Registry Editor, navigate to the following key:
HKEY_LOCAL_MACHINE\SOFTWARE\Microsoft\Windows\CurrentVersion\SideBySide - In the right pane, right-click and select New > DWORD (32-bit) Value.
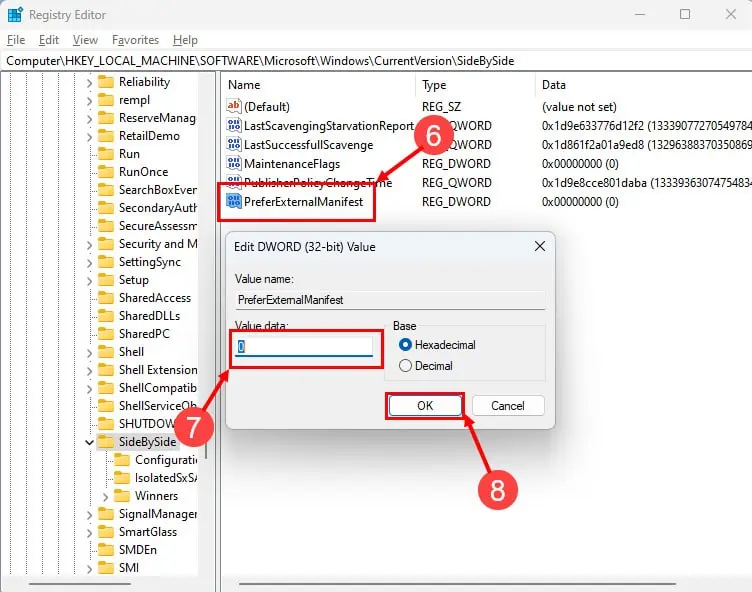
- Name the new DWORD value PreferExternalManifest.
- Double-click the PreferExternalManifest value and set its data to:
- 0: To enable XAML (default behavior)
- 0: To enable XAML (default behavior)
- Click OK to save the value.
- Close the Registry Editor.
- Restart your computer for the changes to take effect.
Solution 9: Restore Your PC
Finally, what you can do is restore the PC to the last known good configuration. Here’s how to do it:
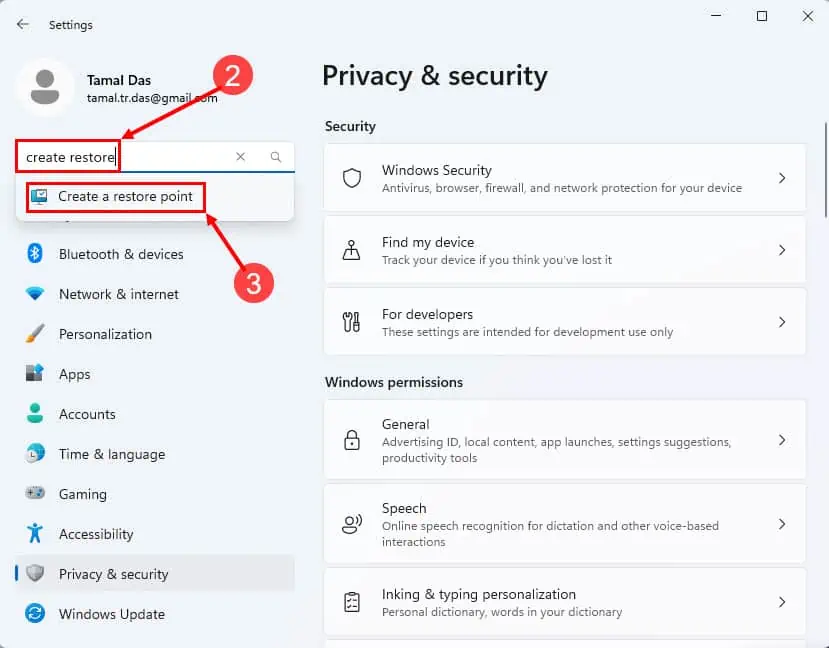
- Press Windows + I to open Windows Settings.
- In the Search field, type Create Restore.
- Click on the Create a restore point option.
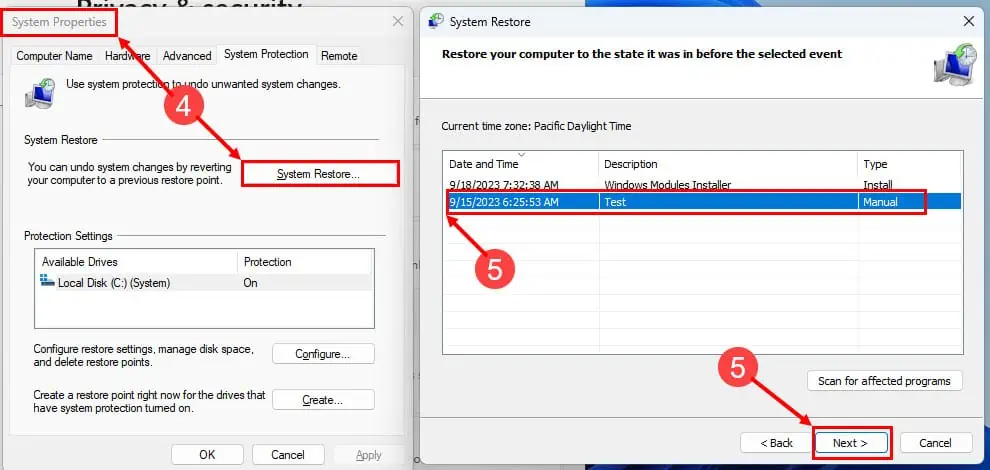
- On the System Properties window, click System Restore.
- Choose a restore point from the System Restore list and click Next.
- Click Finish to start the system restore process.
Conclusion
It’s imperative that you fix the Windows 11 Taskbar if it’s not working due to various system or third-party-caused reasons. You’ve discovered all the popular and easy ways to fix the Taskbar issue on Windows 11 desktops and laptops. Give the above methods a try in the order they appear to resolve the problem in the least possible time.
Did the article help? Do you know a better method that fixed the issue for you? Leave a comment below!




User forum
0 messages