Fix Your PC Ran Into A Problem Error on Windows 11
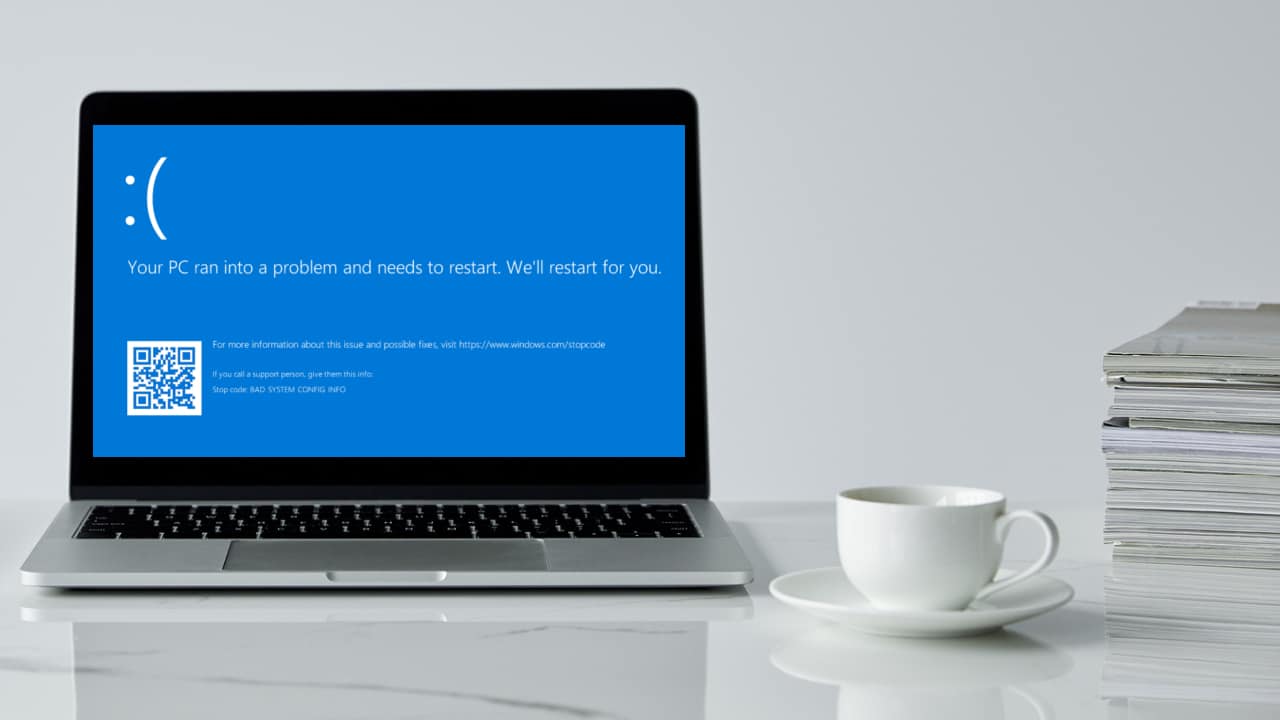
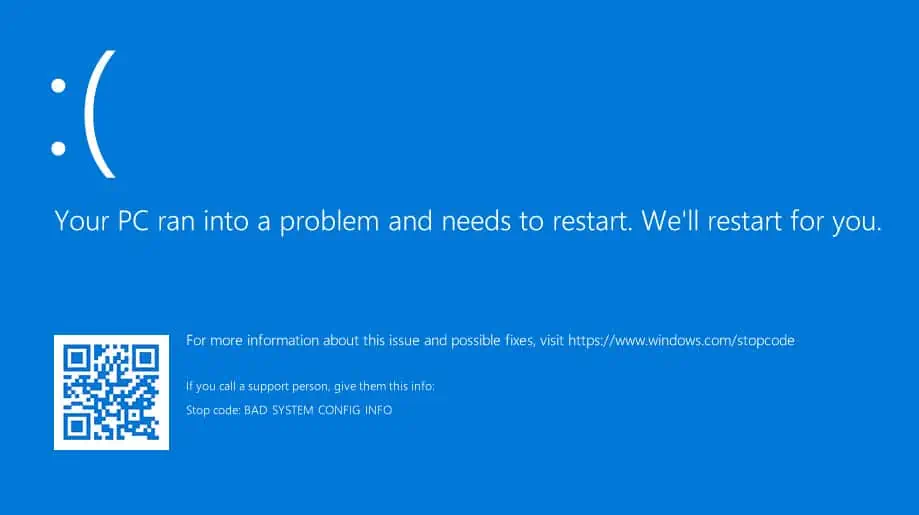
Windows 11 is the most effortless and sleek operating system for your desktop or laptop devices. However, being the most advanced Windows operating system, it isn’t free from occasional hiccups. One such issue is the “Your PC ran into a problem and needs to restart” error, commonly known as the Blue Screen of Death (BSoD) error.
The BSoD error is a system-level error message that appears on Windows 11 when the operating system encounters a critical issue that it cannot automatically recover from. This error is a protective measure, preventing further damage to your PC by initiating a system restart. While it may seem alarming at first, it’s designed to maintain the stability and integrity of your computer.
Why Does My Device Run Into a Problem and Need to Restart Windows 11?
The main cause of the Blue Screen of Death error in Windows 11 is a critical operating system crash related to hardware or driver conflicts. The Windows 11 OS automatically triggers this error screen when the OS faces a situation that it can’t fix automatically. To prevent damage to the hardware components, Windows 11 shows the BSoD screen, so you shut it down and restart it to troubleshoot.
Here’s a screenshot of the error:
Other reasons behind the “Your PC ran into a problem and needs to restart” error are as follows:
- Outdated or incompatible device drivers
- Corrupted system files or system files affected by malware
- Overheating due to inadequate ventilation or faulty hardware
- Hardware issues, such as faulty RAM, a failing hard drive, or a malfunctioning power supply
- Recent software installations or updates conflicting with the operating system
- Changes in system settings or configurations that disrupt normal operations
- Incompatibility between certain applications and the Windows 11 environment
Also read: Fix Clock Watchdog Timeout Error like This
How to Fix Your PC Ran Into a Problem Error
When you see the BSoD error, there is nothing much you can do on that screen except restart the PC. So, the first troubleshooting step is to reboot the computer.
After a reboot, if the computer powers on normally and goes to the login screen or desktop, the BSoD error is intermittent and is caused by recently installed software, hardware, or malware. Disk errors in hard disk drive (HDD) based PCs, issues with memory modules (RAMs), etc., can also cause the BSoD error. So, to fix the “Your PC Ran Into a Problem” error, follow this troubleshooting guide:
Solution 1: Uninstall Recently Installed Software
- Click the Start menu button on the taskbar.
- Type the name of the app you last installed just before the BSoD error.
- When the app shows up on the Start menu screen, click the Uninstall button.
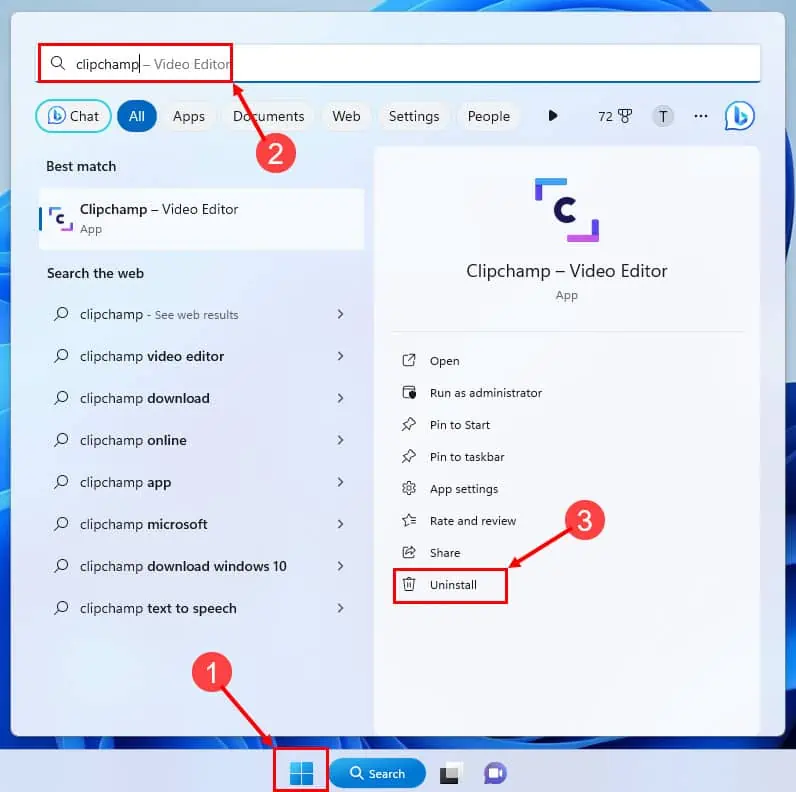
- Reboot your computer once again.
Solution 2: Uninstall Recently Installed Hardware
If you see the BSoD error after installing new hardware, follow these steps:
- Shut down the PC.
- Detach all cables from the PC.
- Open the side cover of the CPU tower or cabinet.
- Wear an anti-static wristband before you touch the inner parts of the CPU.
- Alternatively, you can ground yourself by touching a metal surface connected to the wall or floor.
- Now, remove the hardware component from its slot on the motherboard.
- Close the side cover of the CPU tower.
- Power ON your PC.
If your Windows 11 PC is a laptop, you can only attach external hardware through USB or HDMI ports. So, simply disconnect those cables of the new hardware and then power on your laptop.
Solution 3: Scan for and Remove Malware
- When you’re on the Home Screen, press the Windows + I keys together.
- Click the Privacy and security option on the left-side navigation panel.
- Choose the Windows Security menu on the right and click on the Open Windows Security button.
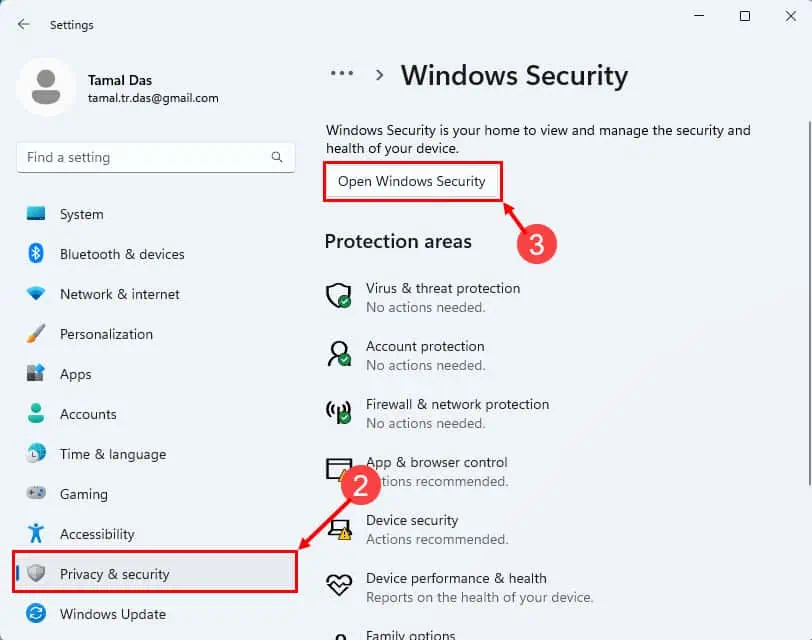
- Now, click the Virus & threat protection card under the Security at a glance section.
- Click on Scan options and then choose Full scan and finally click the Scan now button.
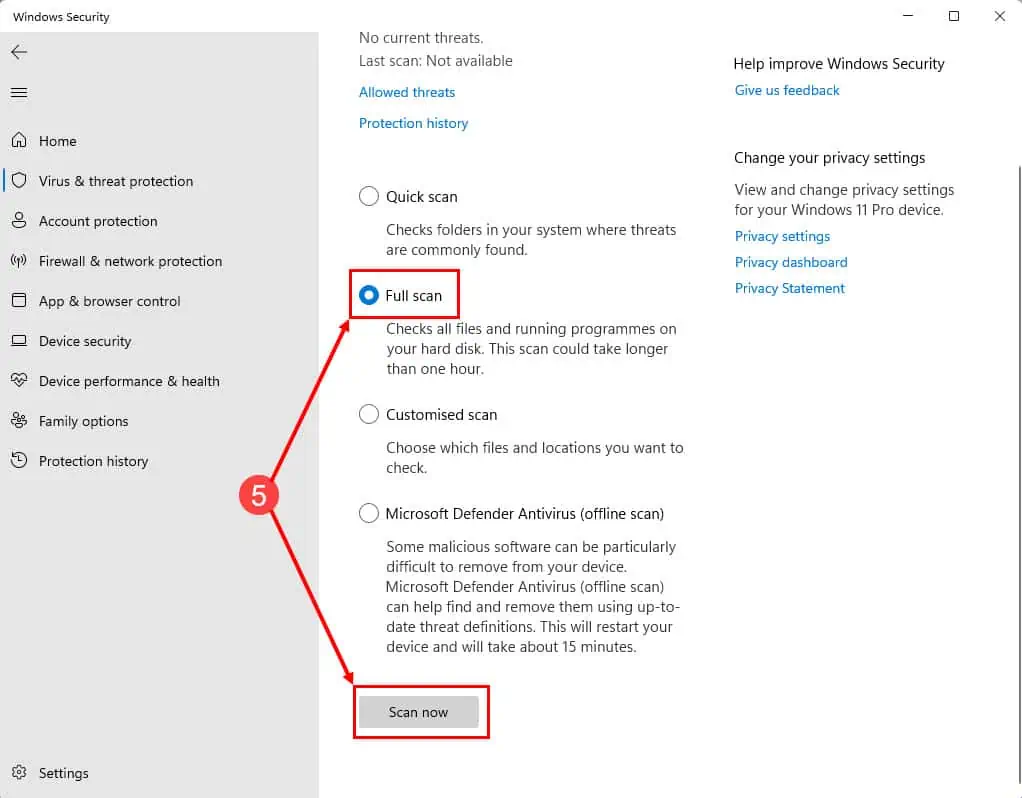
Allow Windows Security to scan the whole computer and delete any malware present on your PC. Restart to confirm if the BSoD error appearing again or not.
Solution 4: Check for Free Disk Space
The Windows 11 OS installation drive must contain 10% or more free disk space of the whole disk size. For example, if your C:/ drive’s total size is 200 GB, then there must be 20 GB of free disk space at all times. This ensures that the Windows 11 OS can perform automated repairing tasks by writing codes or files on the disk.
Read this 10 Best PC Cleaners for Windows 11 [Free & Premium] article to find the best tools you can use to free up disk space on your Windows 11 PC.
Solution 5: Use Windows Memory Diagnostic Tool to Fix RAM Issues
- Launch the Start menu.
- Type Windows Memory Diagnostic.
- Click on the Windows Memory Diagnostic app to open the RAM diagnostics tool.

- Choose between the options Restart now and check for problems (recommended) or Check for problems the next time I start my computer. Select an option.
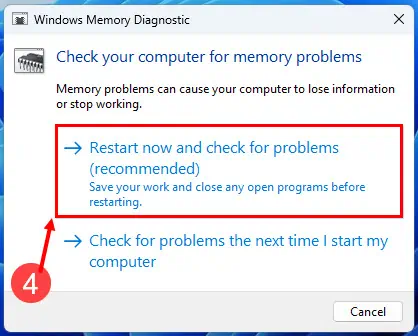
- If you select the first option, your computer will restart automatically. If you choose the second option, you’ll need to manually restart your computer when you’re ready to run the memory diagnostic.
- Windows Memory Diagnostic will start testing your RAM for issues during the restart process. This may take several minutes.

- After the memory test is complete, your computer will automatically boot back into Windows.
- Open the Start menu and type Event.
- Click on the Event Viewer app.
- Choose the System menu under the Windows Logs section.
- Locate the Memory Diagnostics Results under the Source column.
- Double-click to view recommendations.
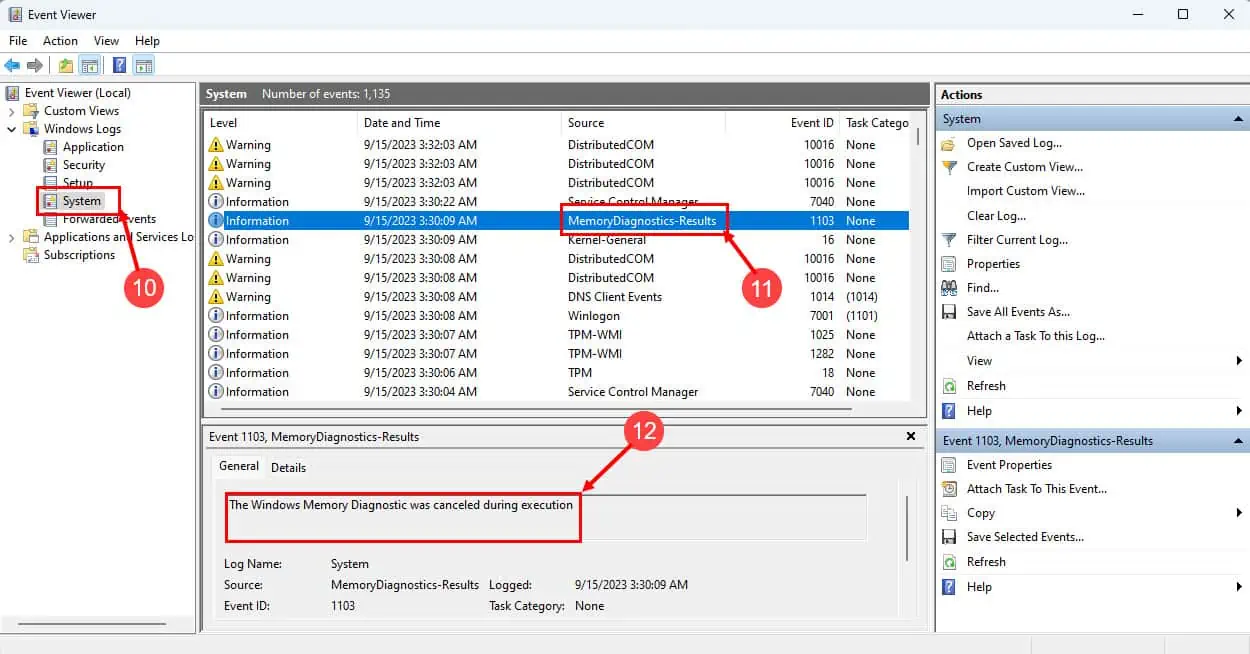
Depending on the results, you may need to replace faulty RAM modules or take other appropriate actions to fix the RAM issues on your computer. Once you’ve addressed any identified RAM issues, your computer should run more smoothly and without memory-related problems.
Solution 6: Find Disk Errors With the CHKDSK
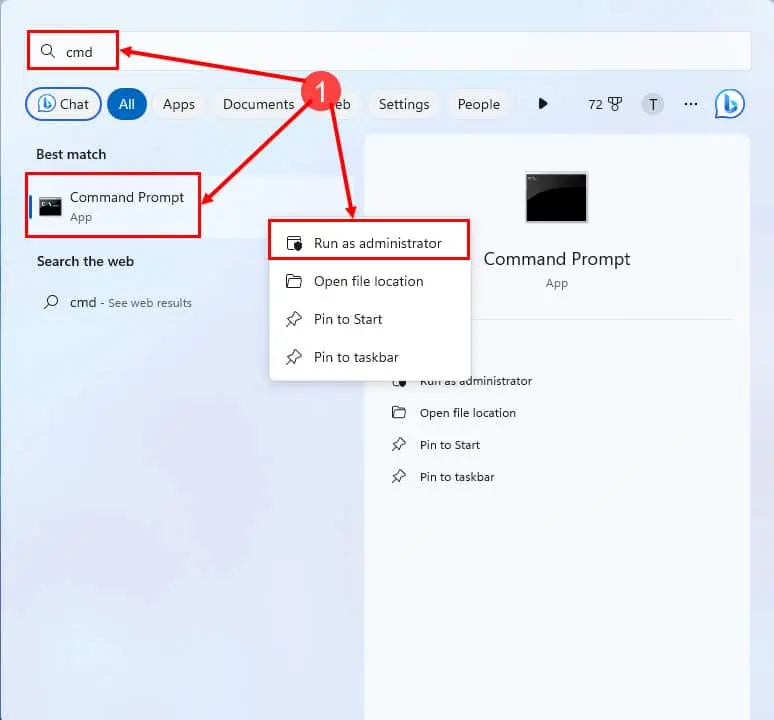
- Search for CMD in the Start menu, right-click on Command Prompt, and choose Run as administrator.
- On the CMD console, copy and paste the following command:
CHKDSK C: /F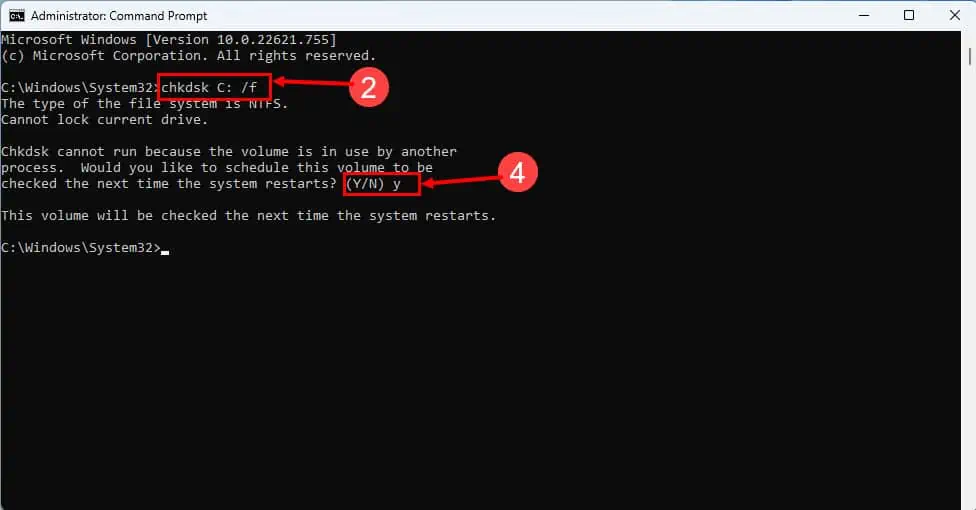
- Hit Enter to execute.
- Press Y for disk checking and fixing after a restart.
- Restart your PC.
- The CHKDSK process will show up below the Windows 11 logo on a black screen.

- Wait for the process to complete.
- Login to your Windows 11 desktop.
Solution 7: Check System File Errors Using SFC
- Open the Windows Command Prompt (CMD) tool with elevated rights as shown earlier.
- Type
sfc /scannowand press Enter. - The tool will perform the scan and repair system file errors, if any.
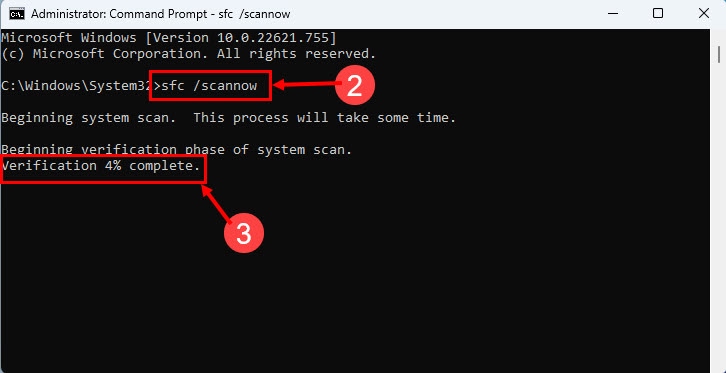
- After the fix, restart the computer.
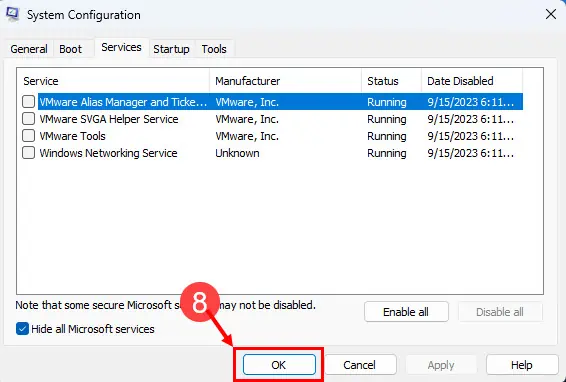
Solution 8: Perform a Clean Boot
- Press Windows + R to open the Run dialog.
- Open the System Configuration utility by typing
msconfigand pressing Enter. - In the System Configuration window, go to the Services tab, check Hide all Microsoft services, and then click Disable all.
- Click the Apply button.
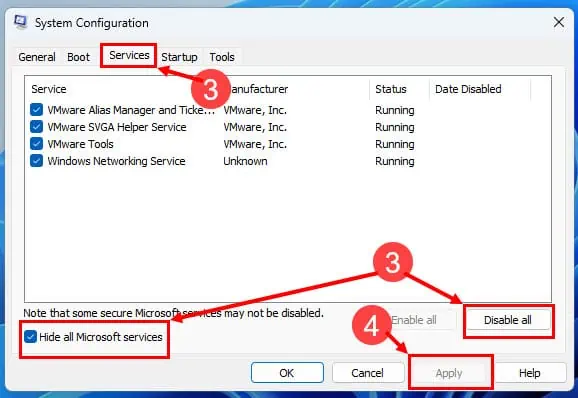
- Now, navigate to the Startup tab of the System Configuration window.
- Click Open Task Manager to manage startup items individually.
- Disable unnecessary startup items by right-clicking on them.
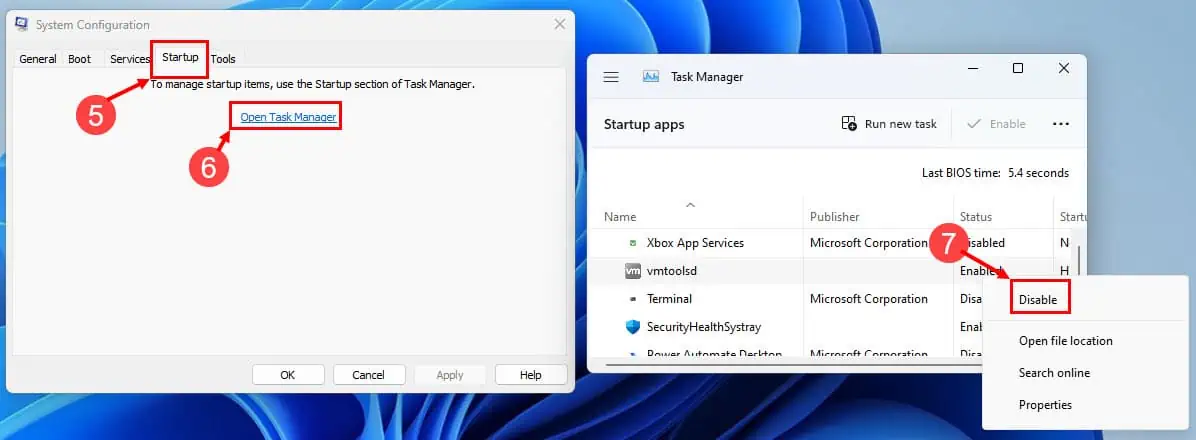
- Click OK in the System Configuration window, and when prompted, restart your computer to complete the Clean Boot process.
Solution 9: Check if Windows Update Is Available
- Press the Windows + I keys together to open Settings.
- Click on Windows Update.
- Click Check for Updates to search for available updates.
- Review the list of updates and click on the Install all or Download and Install button.
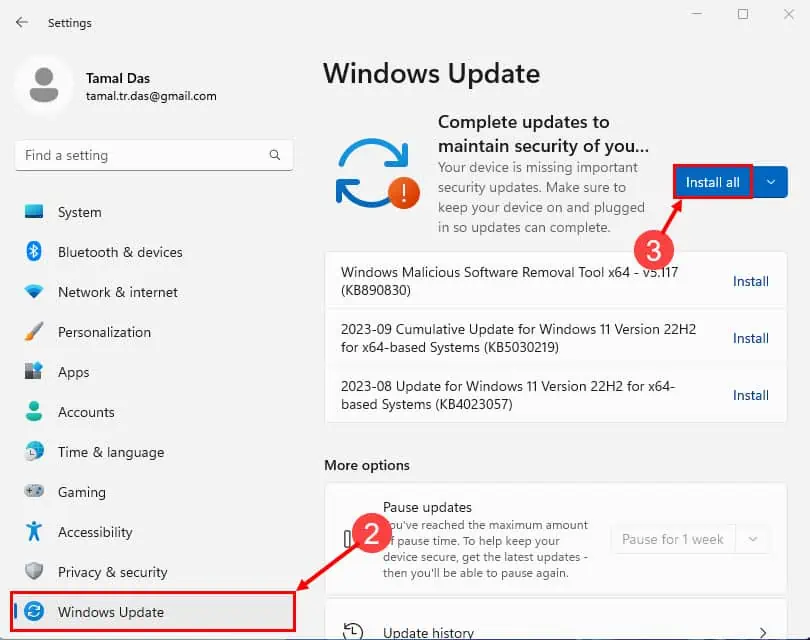
- Restart your computer if prompted.
- You can click on Check for updates again to check for additional updates.
- Repeat the update process as necessary.
Verify if the error is resolved after updating Windows 11 to the latest edition.
Solution 10: Keep Device Drivers Updated
- Open Device Manager by pressing the Windows + X keys.
- Select the device type for which you need to update the driver software.
- Expand the device to find the driver that needs to be updated.
- Right-click on the driver to choose the Update driver option.
- Now, select Search automatically for updated driver software.
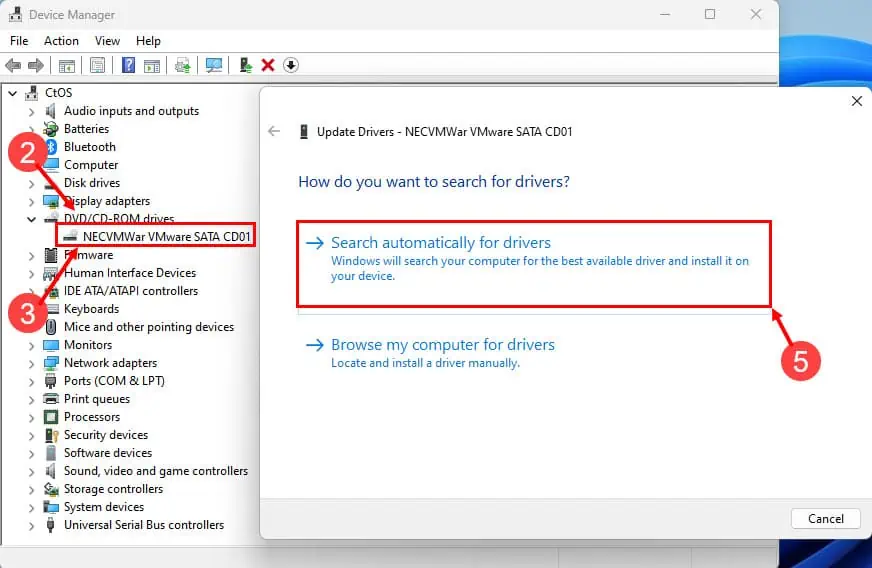
- Windows will install the latest driver after searching for it.
Now, reboot your PC. From now on, you shouldn’t face the “Your PC ran into a problem and needs to restart” error because of outdated driver issues.
Solution 11: Use the System Restore Tool
-
- Press the Windows + S keys to open the Start menu search bar.
- Type Create a restore point, and press Enter.
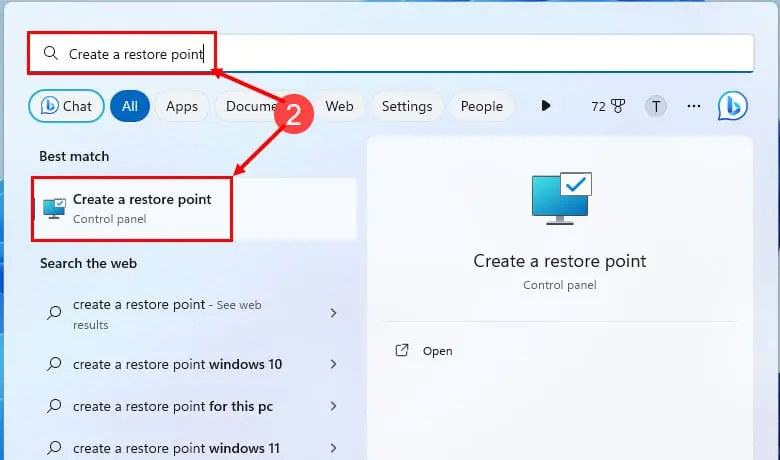
- In the System Properties window, click the System Restore button.
- On the Restore system files and settings dialog box, click Next.
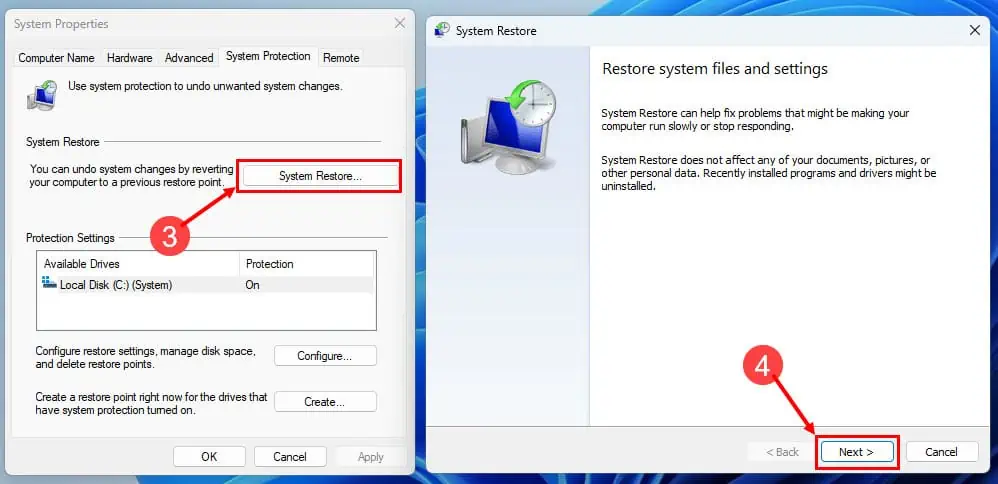
- Choose a System Restore point from the list in front of you.
- You must select by analyzing the dates and time stamps when the system was working just fine.
- Click Next to confirm.
- After pressing the Finish button, Windows 11 will complete the process.

- Your computer will restart and will be restored to the chosen state.
So far, you explored the ways to get out of the BSoD error if your PC goes to the desktop. However, if it doesn’t go to the login screen or desktop, follow these troubleshooting methods instead:
Solution 12: Remove Newly Connected Hardware
It’s highly likely that the hardware you installed in your desktop PC isn’t compatible or interfering with the Windows 11 OS runtime. Hence, to prevent any more damage to other hardware or software, Windows 11 entered the BSoD error screen.
Long press on the power key until the PC shuts down. Then follow the steps mentioned in Solution 2, earlier in this article.
Solution 13: Attempt to Run the PC in Safe Mode
- Shut down the PC by long pressing the power key on the CPU tower or laptop until the display turns black.
- Now, press the power button.
- When the motherboard manufacturer’s or Windows 11 logo appears long press the power button to shut down the PC.
- Repeat this step once more.
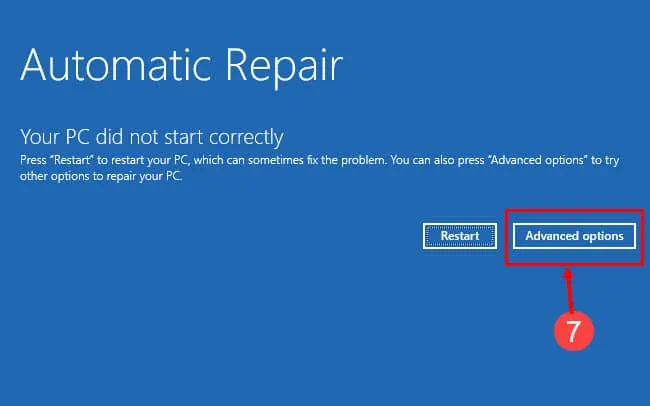
- You’ll see the Preparing For Automatic Repair screen.
- The Windows 11 PC should now enter the WinRe mode saying Automatic Repair.
- Click the Advanced options button.
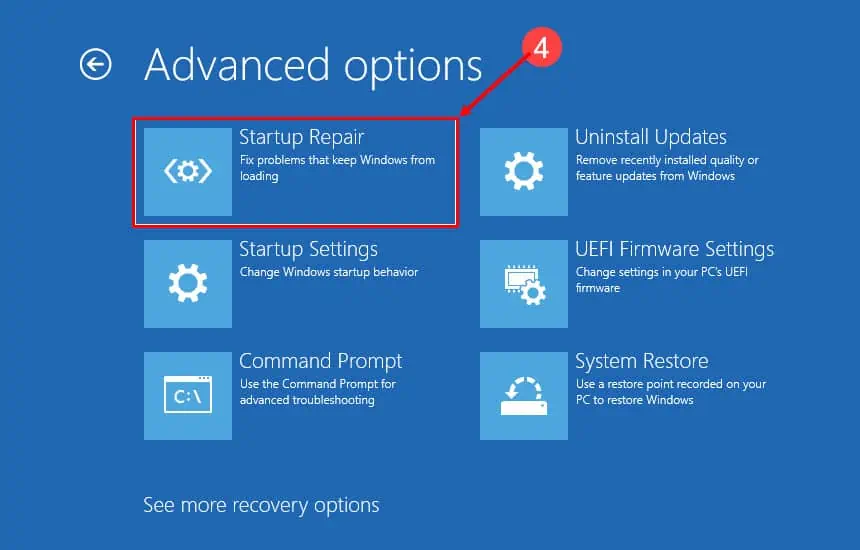
- On the next screen, click Troubleshoot.
- Now, click the Advanced options button.

- On the Advanced options screen, select Startup Settings.
- Click Restart on the Startup settings window.

- After the reboot, you should see the Startup Settings screen.
- Press 4 on the keyboard to reboot the device in Safe Mode.

If you’re able to log in to the Home Screen of the PC in Safe Mode, the issue is with any application recently installed. Uninstall that app by following the steps mentioned in Solution 1 earlier in this article.
Once you’ve uninstalled the suspected app, restart the PC to go back to normal mode.
Solution 14: Repair Windows Installation
If the Safe Mode doesn’t fix the issue, follow these steps:
- Repeat the steps 1 through 7 in Solution 13 to access the Automatic Repair screen.
- Click Advanced options now.
- From here click Troubleshoot > Advanced options to arrive at the Startup Repair card.
- Click Startup Repair.
Through various Windows 11 diagnoses, the operating system will automatically fix the loading issues of Windows OS. Once the repair is complete, you should see the login screen.
Solution 15: Perform a Clean Installation of Windows 11
If none of the above tricks work for you, you must try installing a fresh copy of Windows 11. If you possess a bootable Windows 11 OS stick follow these steps:
- Shut down the PC.
- Insert the bootable Windows 11 USB drive into any of the USB ports of the PC.
- Press the power button.
- When you see the prompt Press any key to boot from USB, press any key on the keyboard.
- The Windows 11 from the USB stick will load.
- Follow onscreen guidance to install a clean copy of the Windows 11 OS.
If you don’t have a bootable USB drive for Windows 11, you can create one yourself. Use another PC for this task. To proceed, you must gather the following items first:
Go to the above links and download these files. Then, follow these steps:
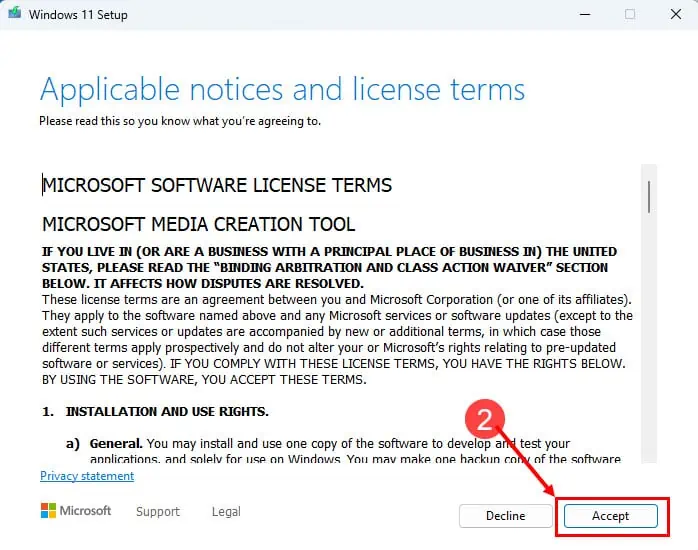
- Double-click the mediacreationtool.exe file that you downloaded.
- On the Windows 11 Setup dialog, click Accept.
- Click Next on the language selection step.
- Select USB flash drive and click Next if you want to create a bootable USB stick.
- Insert a USB stick of 8 GB or more before clicking Next.
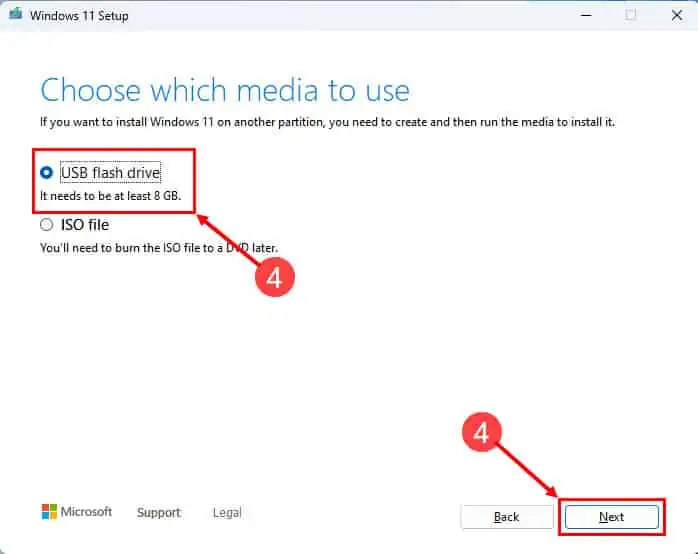
- Insert a USB stick of 8 GB or more before clicking Next.
- Or, click ISO file and click Next to burn Windows 11 image on a DVD.
- Insert a DVD of 8 GB or more before clicking Next.
- The tool will ask you to locate the Windows 11 ISO image that you downloaded earlier.
- Follow on-screen guidance to complete the process.
Solution 16: Contact Microsoft Support
For personalized assistance on BSoD errors in Surface devices by Microsoft or Windows 11 purchased from Microsoft, you can reach out to Microsoft Support as well.
Solution 17: Contact Hardware Manufacturer
If you bought the Windows 11 desktop or laptop PC from computer manufacturers, you can contact their technical support teams as well. For example, here are the URLs for popular brands:
Use a 3rd Party BSoD Fixer
If you find the above methods too manual and looking for an automated fix, you can try out the Fortect application. It’s an all-in-one Windows PC system repair tool. Here’s how it works:
- After downloading the application Fortect, install it.
- Click the Upgrade/Activate button at the bottom left corner of the app to activate the tool.
- Now, click the Start Full Scan button on the Dashboard.
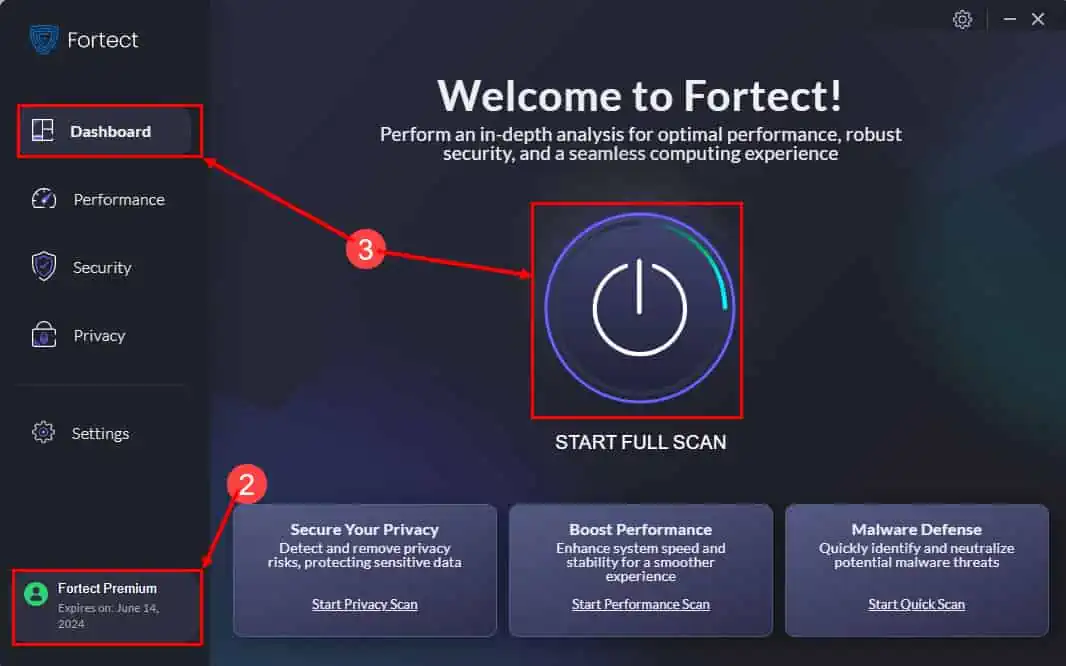
- Once the scanning process is over, Fortect will recommend the fixes needed to get rid of the BSoD error.
- If the BSoD error is caused by faulty drivers, incompatible DLLs, and Windows 11 bugs, it fixes those automatically.
- If there is any incompatible hardware in the system, it’ll also ask you to remove or replace that hardware.
However, you can only use this tool if you’re able to log in to the PC after a crash caused by the “Your PC ran into a problem” error.
Conclusion
So, now you know how to navigate your way on your Windows 11 desktop or laptop PC if the BSoD error shows up. You’ve learned the troubleshooting methods for both scenarios, that is, you can log in to the PC after the error and you’re stuck on the BSoD screen even after a restart.
If the article helped or you want to provide feedback/suggestions, write your comment below.
Read our disclosure page to find out how can you help MSPoweruser sustain the editorial team Read more


Improve this guide


User forum
0 messages