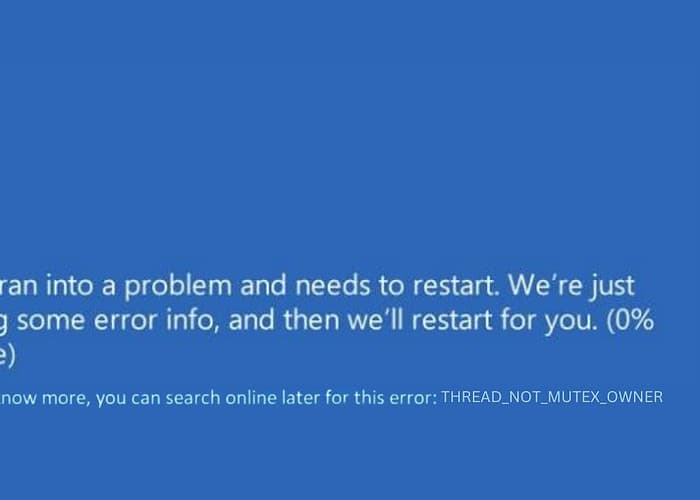
Resolved: 0x00000011 THREAD_NOT_MUTEX_OWNER BSOD
When my computer suddenly showed the 0x00000011 THREAD_NOT_MUTEX_OWNER Blue Screen of Death (BSOD), it broke my workflow. As someone who’s used to fixing computer problems, this was a new challenge for me. It wasn’t just a regular computer crash; it was a serious error that needed a deep dive into what was going wrong with my Windows system.
In this guide, I’m going to share the steps that actually worked for me so you can fix this issue if you ever face it, too.
What Is 0x00000011 Error?
The 0x00000011 error, known as THREAD_NOT_MUTEX_OWNER, is a BSOD that typically occurs when a thread tries to release a mutex it doesn’t own. This error usually signifies deeper system inconsistencies, such as issues in memory management or conflicts in the system’s internal processes.
Imagine a scenario where an employee tries to unlock a safe they never locked – it results in confusion and operational issues. Similarly, in Windows, this error points to a significant synchronization problem within the system’s processes.
What Causes THREAD_NOT_MUTEX_OWNER Blue Screen of Death?
The THREAD_NOT_MUTEX_OWNER BSOD can be attributed to several underlying causes:
- Faulty or Corrupted Drivers: Outdated or corrupted drivers can create system conflicts.
- Hardware Issues: Problems with hardware components, particularly RAM or the hard drive.
- Software Conflicts: Incompatibilities arising from recent software installations or updates.
- Corrupted System Files: Critical operating system files becoming corrupted or damaged.
- Malware Infections: Malicious software that disrupts normal system operations.
How Do I Fix the THREAD_NOT_MUTEX_OWNER Blue Screen Error?
If applying the following troubleshooting steps is difficult for you, try using a BSOD repair tool.
1. Preliminary Checks
Restart Your PC
- Ensure all open files are saved.
- Use the Start menu to reboot your PC.
- Observe if the BSOD reappears after the restart.
Unplug and Plug the External Hardware
- Power off your PC.
- Unplug all external devices (USB drives, printers, etc.).
- Turn on your PC without the external devices attached. If the error doesn’t recur, reconnect each device one at a time to pinpoint the cause.
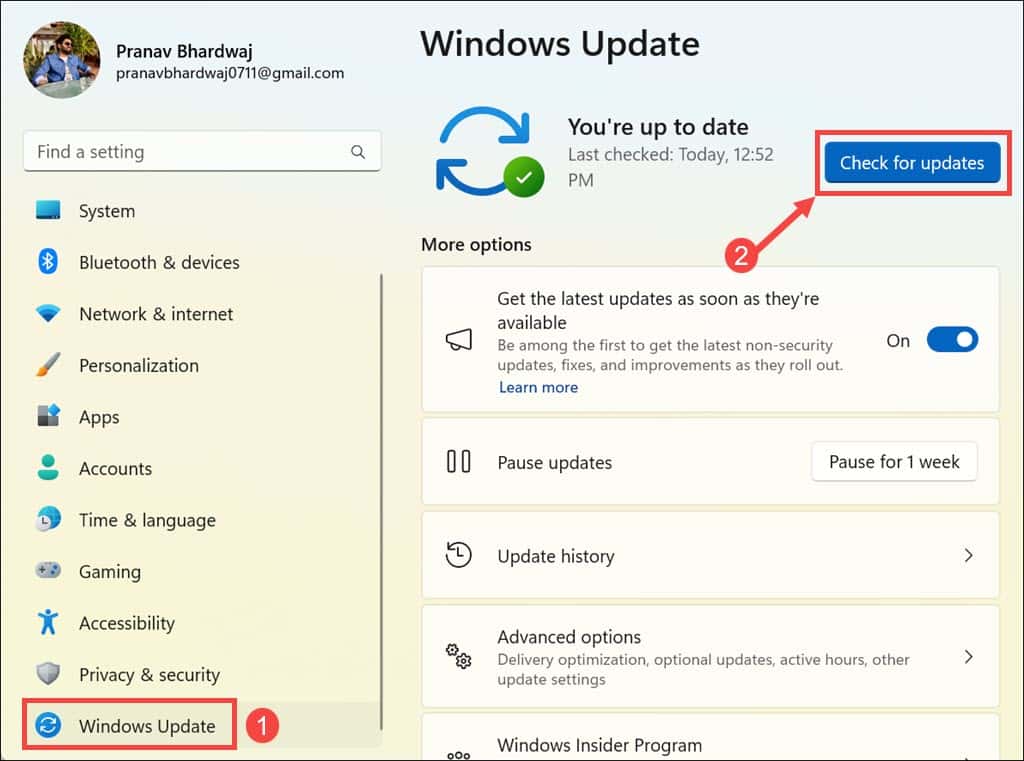
2. Update Windows
Keeping Windows updated is crucial for system stability and security. Updates often include patches that fix known bugs and vulnerabilities, potentially resolving BSOD issues.
- Click on the Start button and open Settings from the Start Menu.
- In Settings, navigate to the Windows Update section in the left pane.
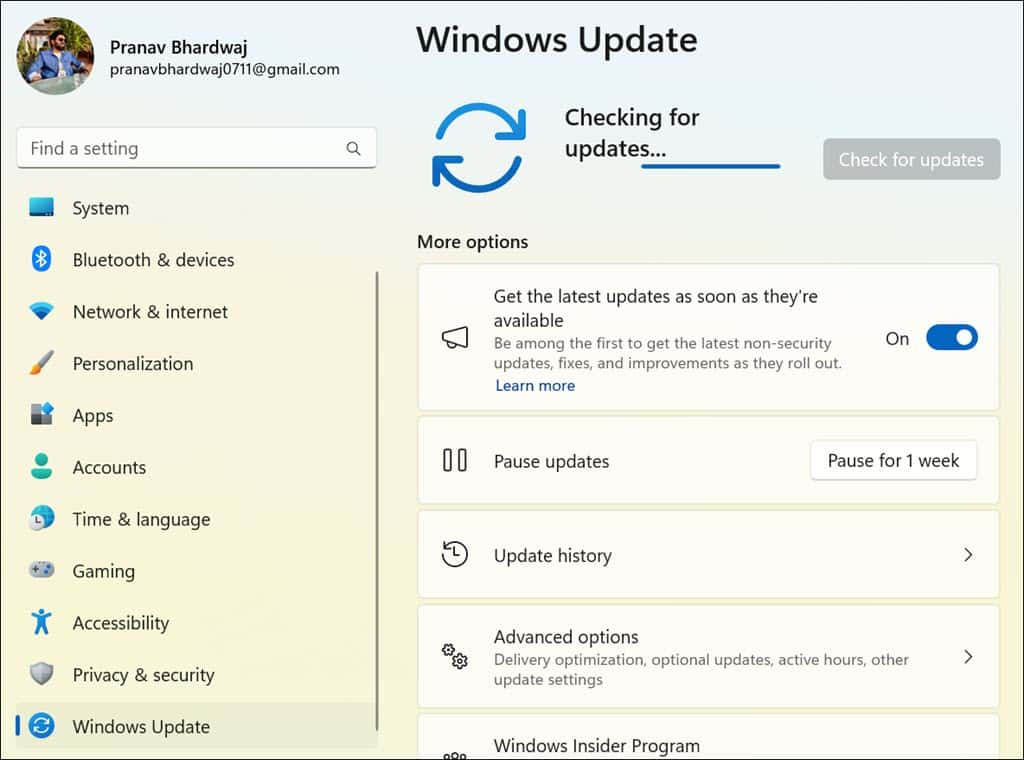
- On the right side, click Check for updates.
- Windows will then search for any available updates for your system.
- If updates are available, they will be downloaded. Click Install all.
- Once the updates are installed, restart your system and check if the issue has been resolved.
3. Start Windows in Safe Mode
Booting in Safe Mode starts Windows with a minimal set of drivers and programs. This mode can help determine if the BSOD is caused by software or driver conflicts.
- Continuously force restart your PC until it boots into Automatic Repair Mode.
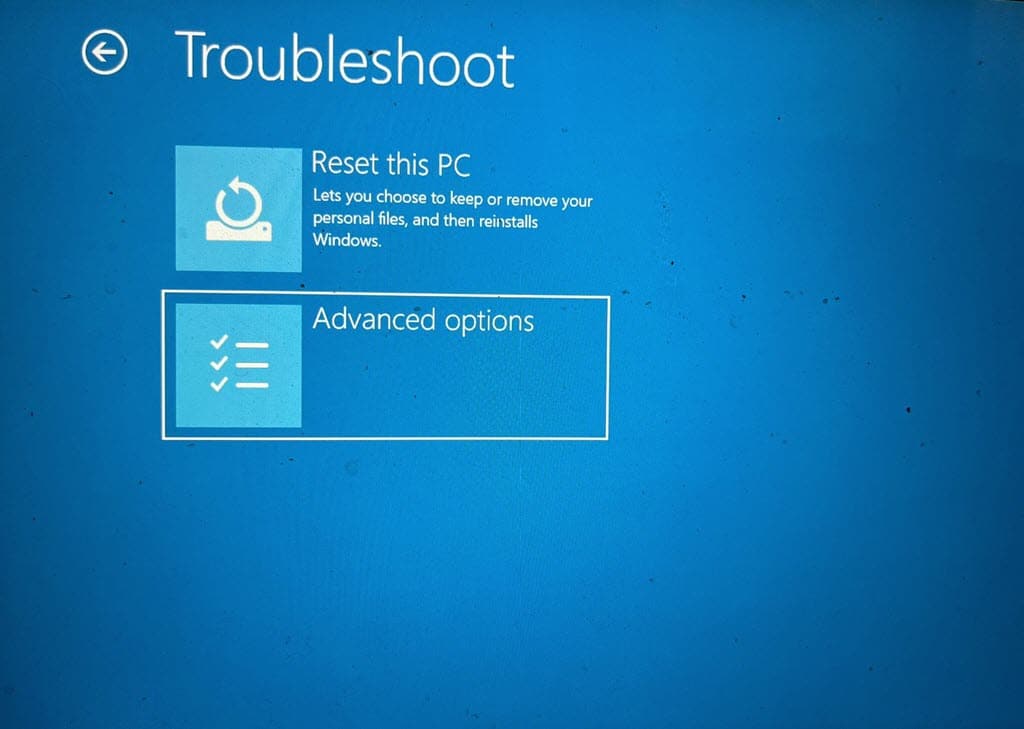
- In Automatic Repair Mode, select the Troubleshoot option.
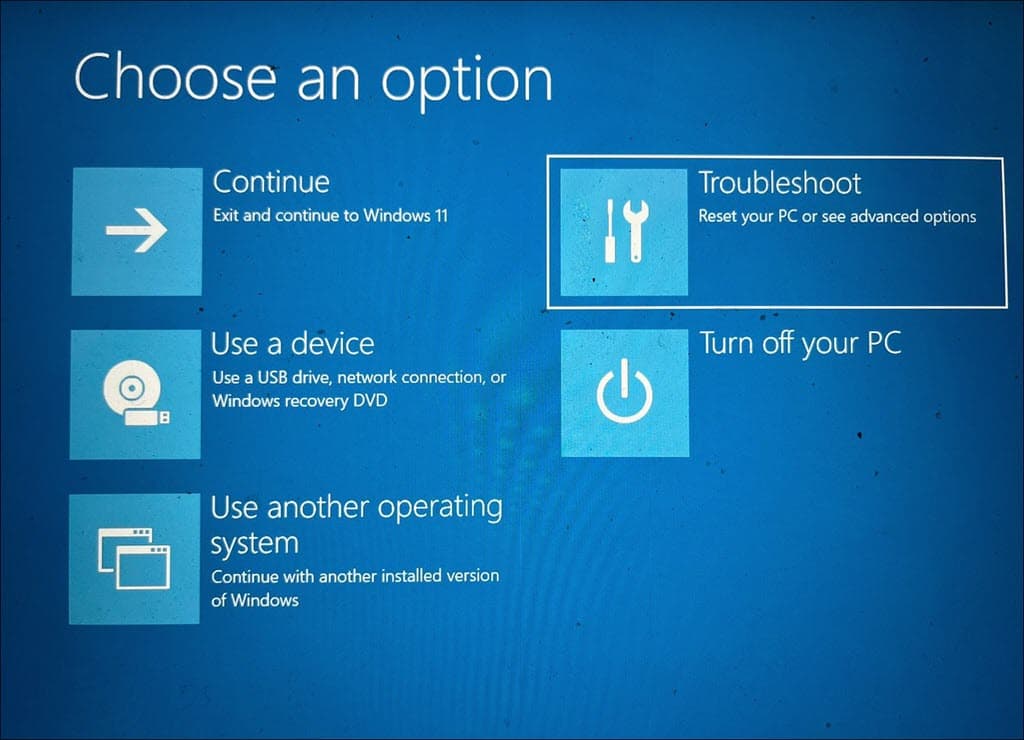
- Under “Troubleshoot,” go to Advanced options.
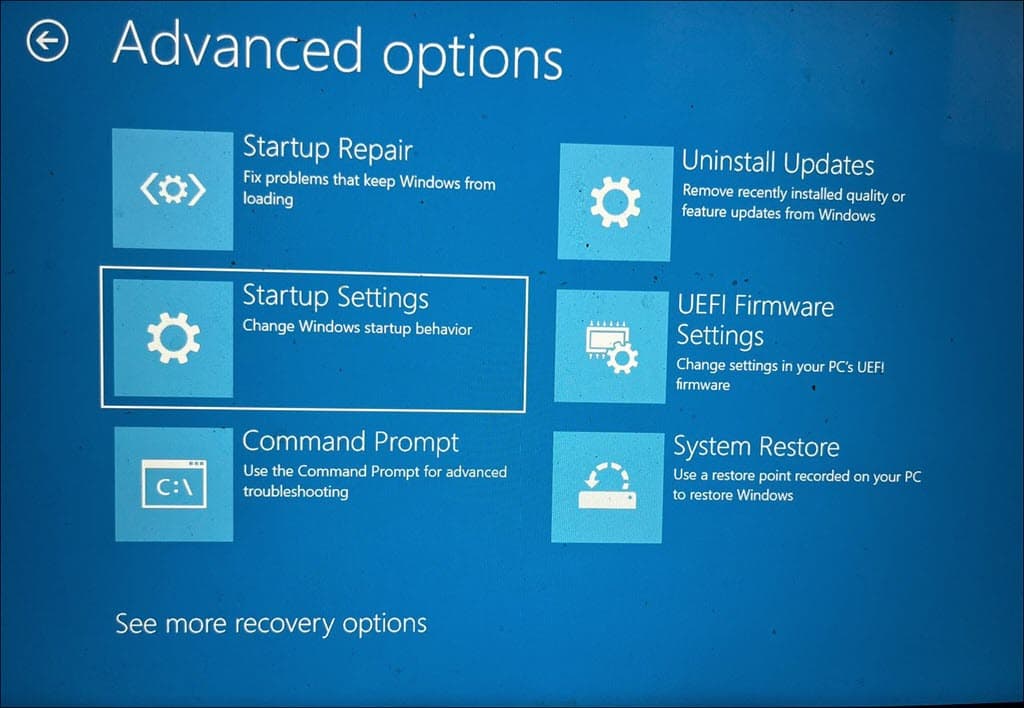
- Then select Startup Settings.
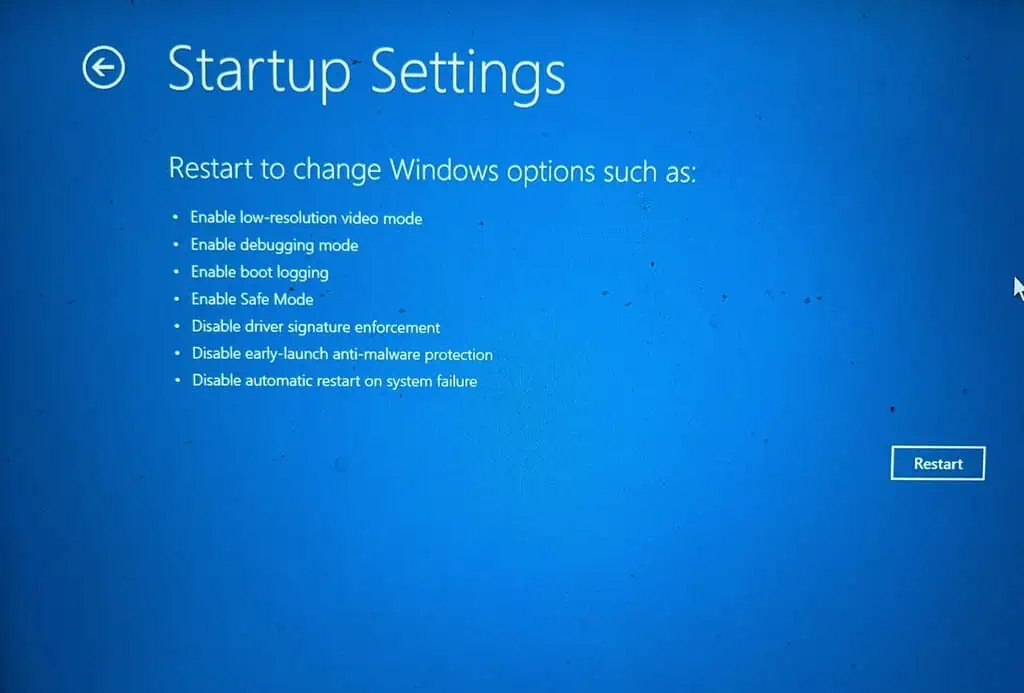
- Click the Restart button on the next screen.
- Once your system restarts, press F5 on your keyboard to boot Windows in Safe Mode with Networking.
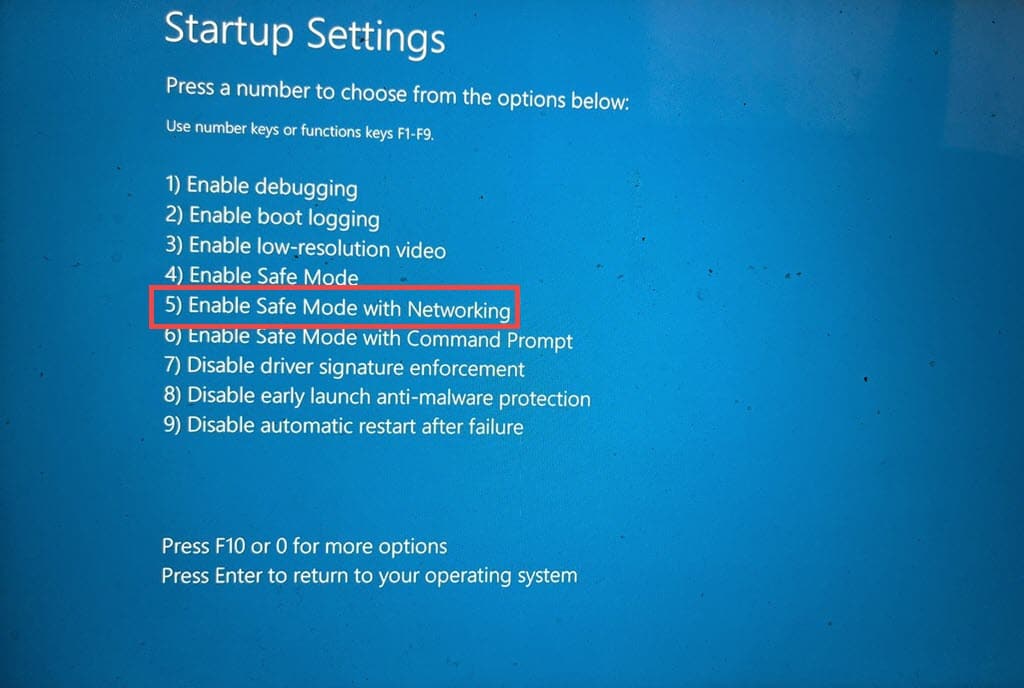
- Your system will now be in Safe Mode, ready for further troubleshooting.
4. Uninstall Corrupted Drivers
Faulty or outdated drivers can cause various system issues, including BSODs.
- Right-click on the Start button and select Device Manager from the menu.
- In the Device Manager window, look for drivers that are marked with yellow exclamation or warning signs.
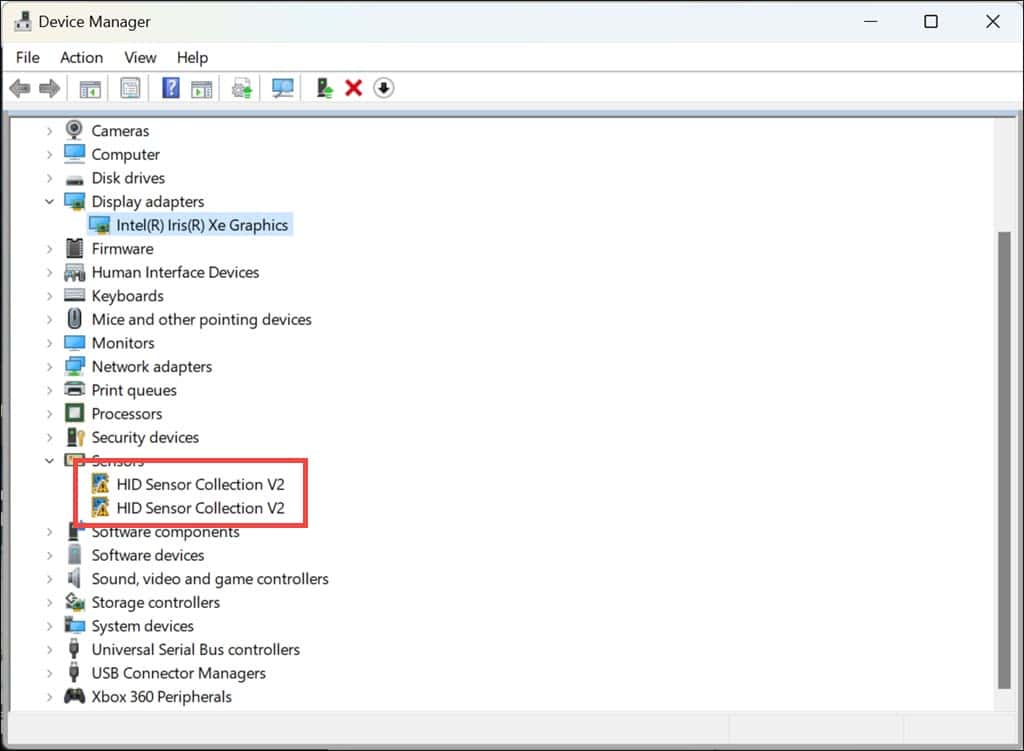
- Right-click on each of these drivers and choose Uninstall device.
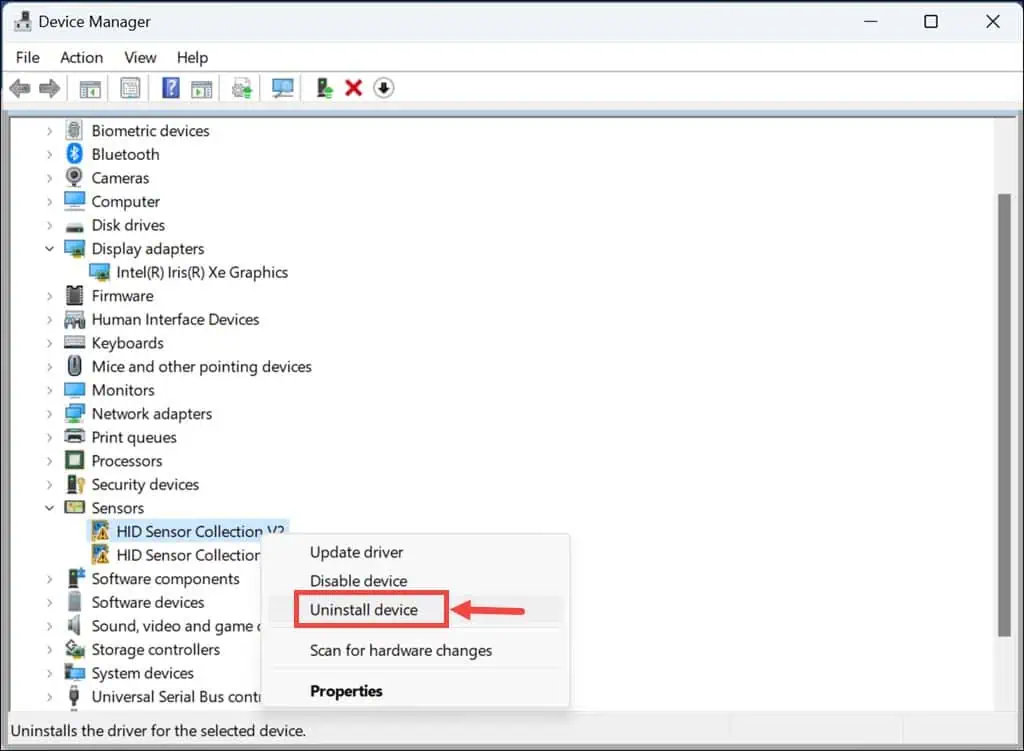
- Confirm the uninstallation when prompted.
- Once you have completed these steps, restart your PC.
5. Update System Drivers
Up-to-date drivers ensure hardware components communicate effectively with the operating system, reducing the likelihood of BSODs.
- Right-click on the Start button and select Device Manager.
- In the Device Manager window, locate key drivers like those for display, firmware, and disk drives.
- Right-click on each significant device and choose Update driver.
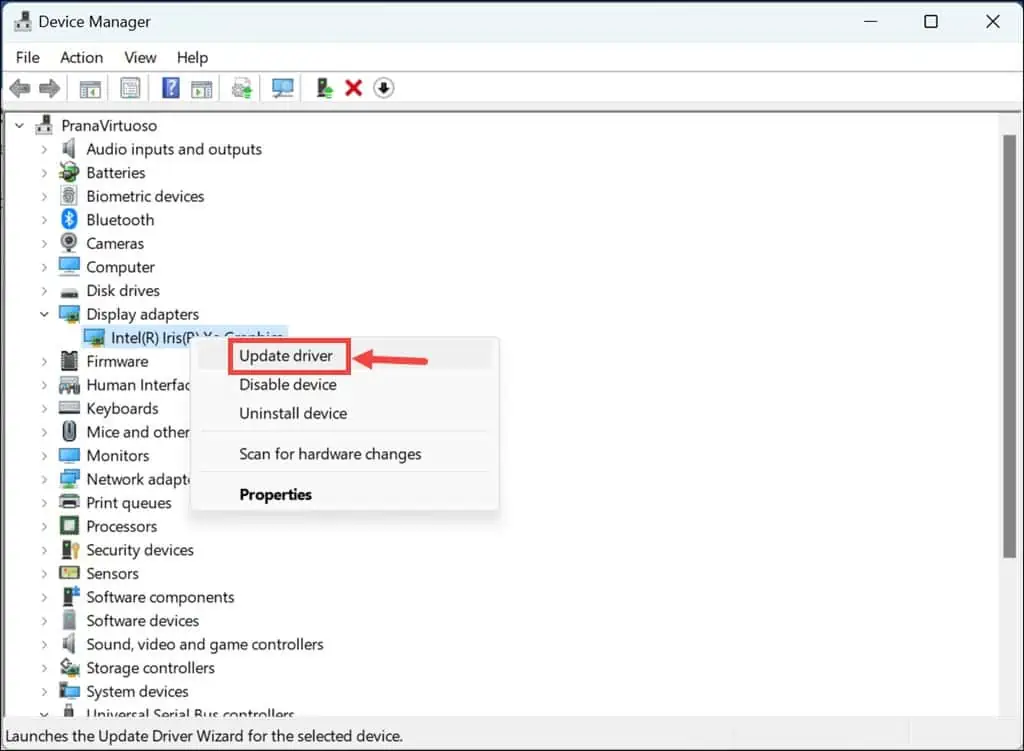
- Select “Search automatically for drivers.”
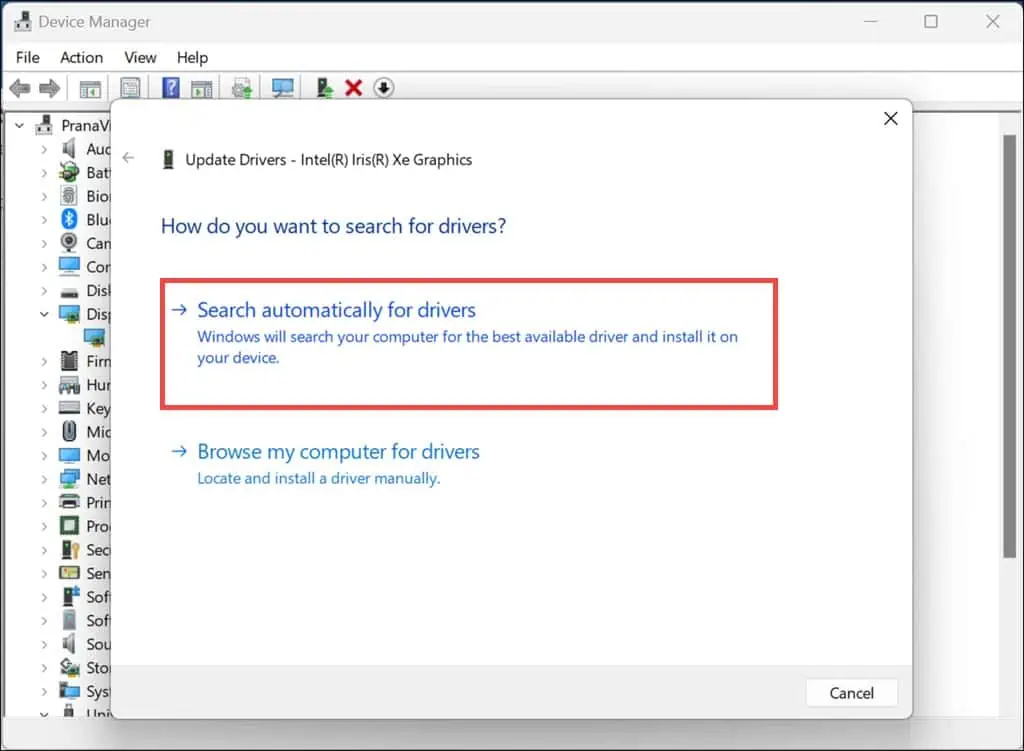
- Apply this process to all major drivers, and then restart your computer to ensure the updates take effect.
6. Run DISM and SFC Commands
System File Checker (SFC) and Deployment Image Servicing and Management (DISM) are Windows utilities that repair corrupted system files, which can be the source of BSODs.
- Right-click on the Start button and choose Terminal (Admin) from the menu.
- In the Terminal, type
DISM.exe /Online /Cleanup-image /Scanhealthand press Enter to execute the DISM command. - After the DISM command completes, type
sfc /scannowand press Enter. - Allow the scan to complete.
- It’s important to restart your computer after running these commands to apply the changes.
7. Uninstall Recent Windows Updates
New Windows updates, while important, can sometimes conflict with existing system configurations, leading to BSODs.
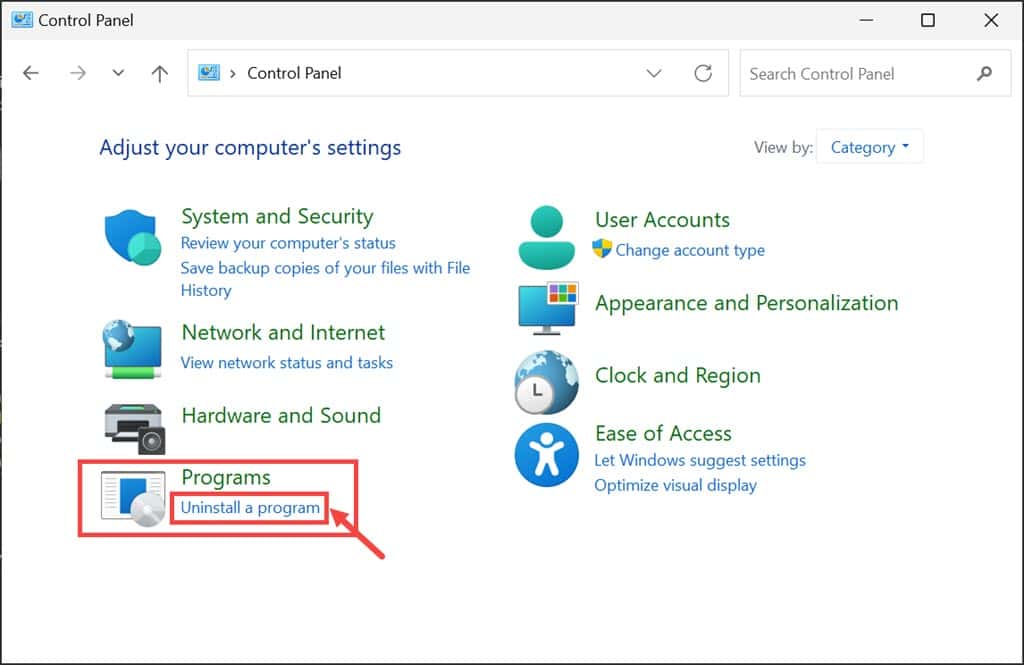
- Open the Control Panel by searching for it in the Windows search box.
- Go to the “Programs” section in the Control Panel and click Uninstall a program.
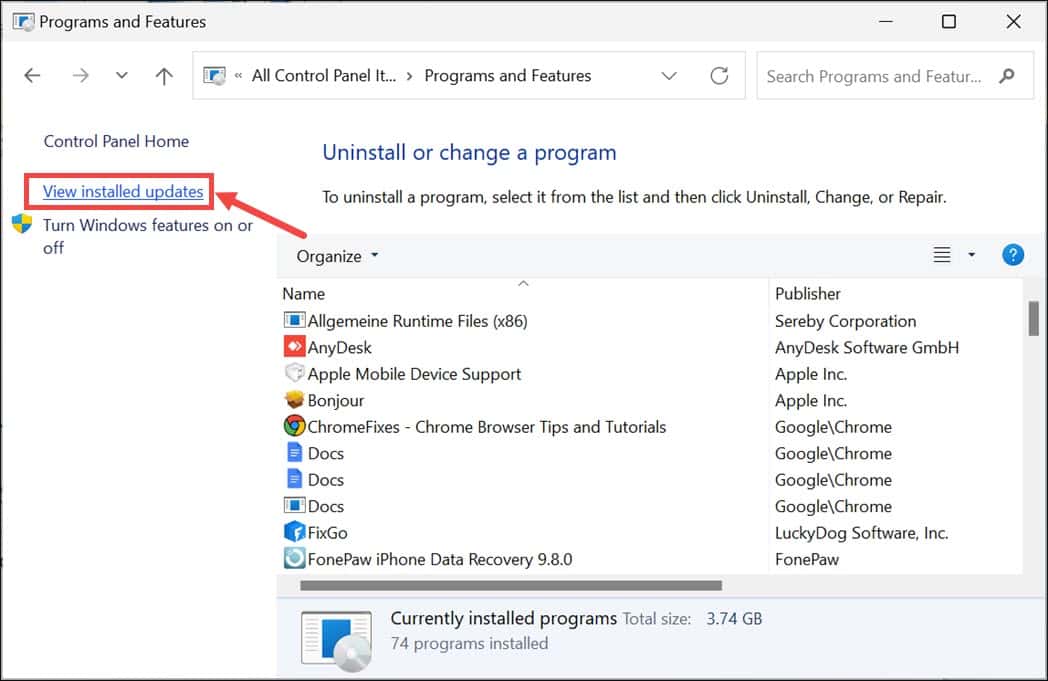
- Select View installed updates on the left side to access Windows update settings.
- Locate and select the recently installed Windows updates, then click the Uninstall button.
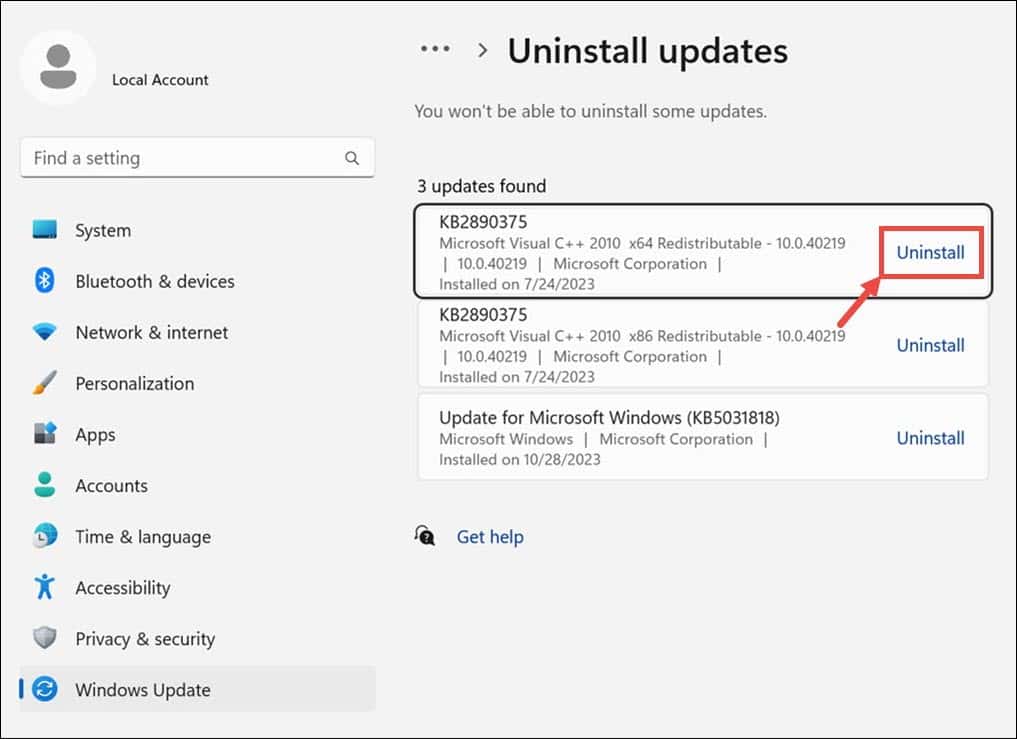
- Click Uninstall again.
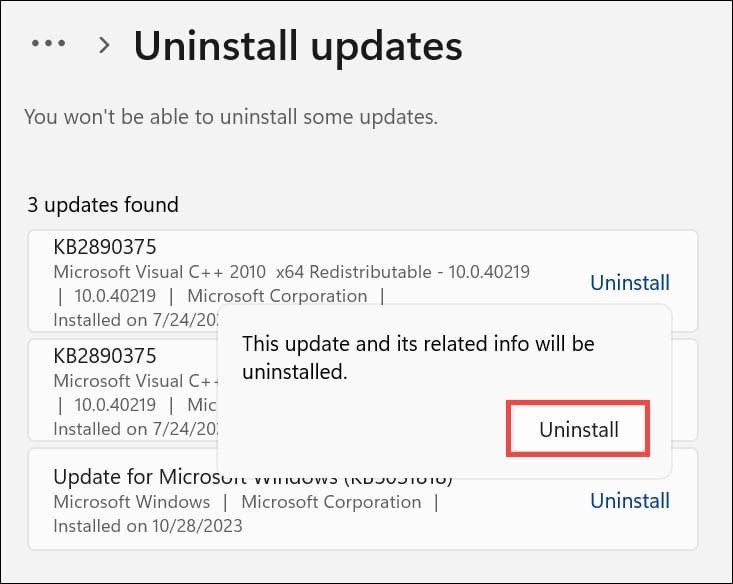
- After completing these steps, restart your system to check if the error has been resolved.
8. Uninstall Recently Installed Applications
Applications installed just before the BSOD occurred might be causing system conflicts.
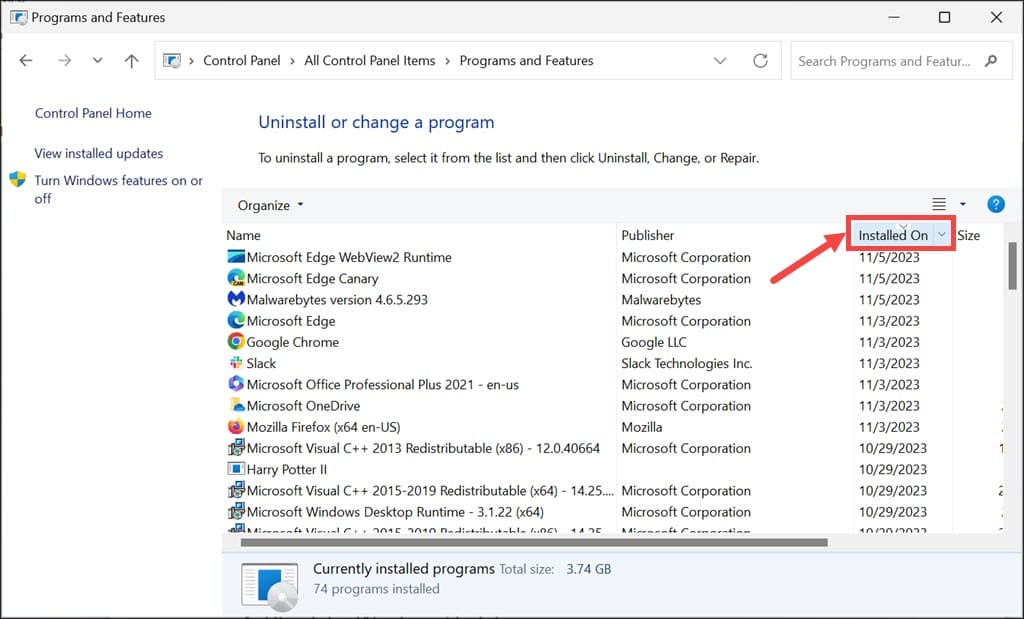
- Open the Control Panel.
- Click on Uninstall a program, which is located under the “Programs” section.
- Arrange the programs by installation date, with the latest ones first, by clicking on the Installed on column header.
- Select the most recently installed application and click the Uninstall button.
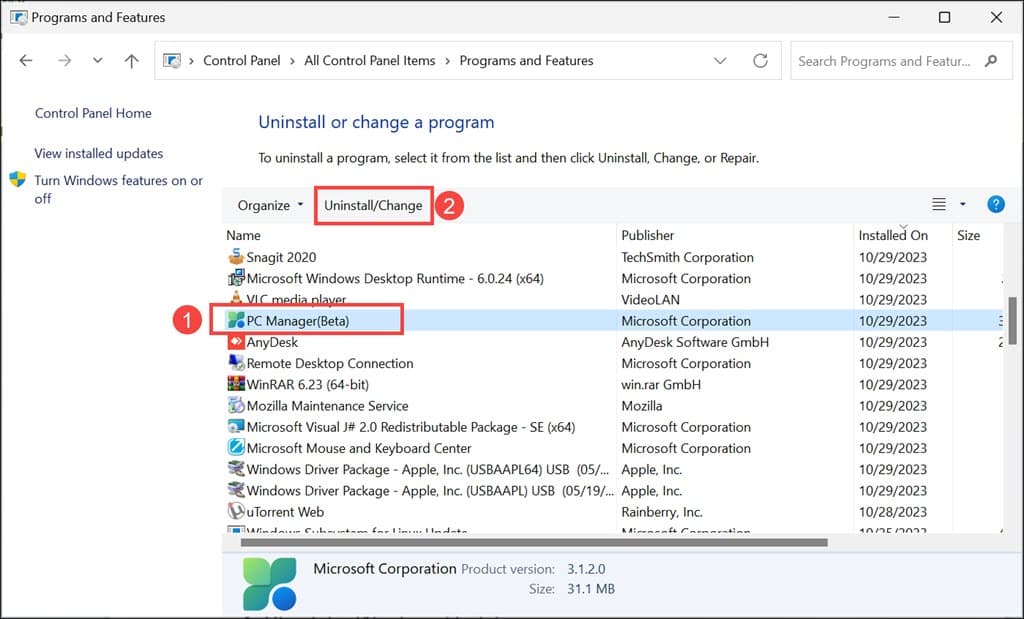
- Confirm the uninstallation when prompted.
- Apply this same process for each application.
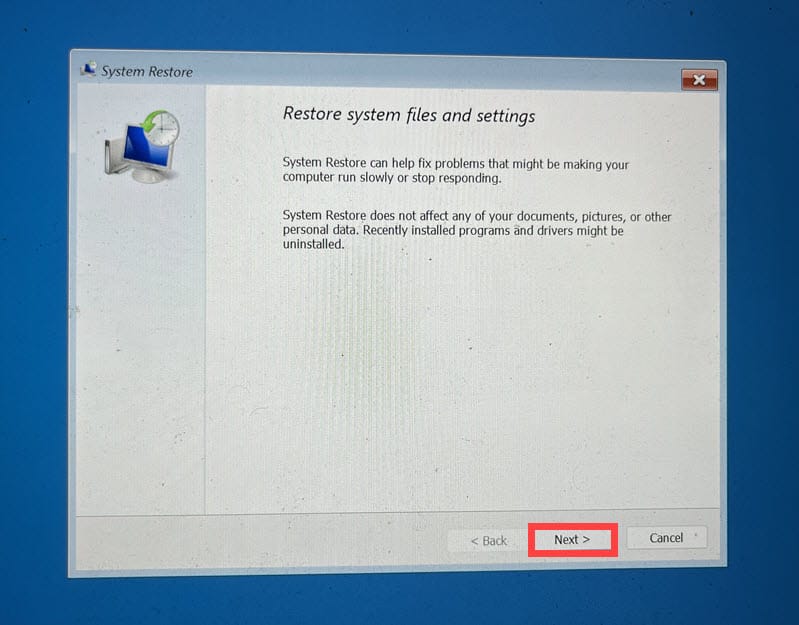
9. Restore Windows to a Previous State
System Restore can revert your system settings to a prior state without affecting personal files.
- Restart your system several times until it launches into Automatic Repair Mode.
- In Automatic Repair Mode, choose the Troubleshoot option.
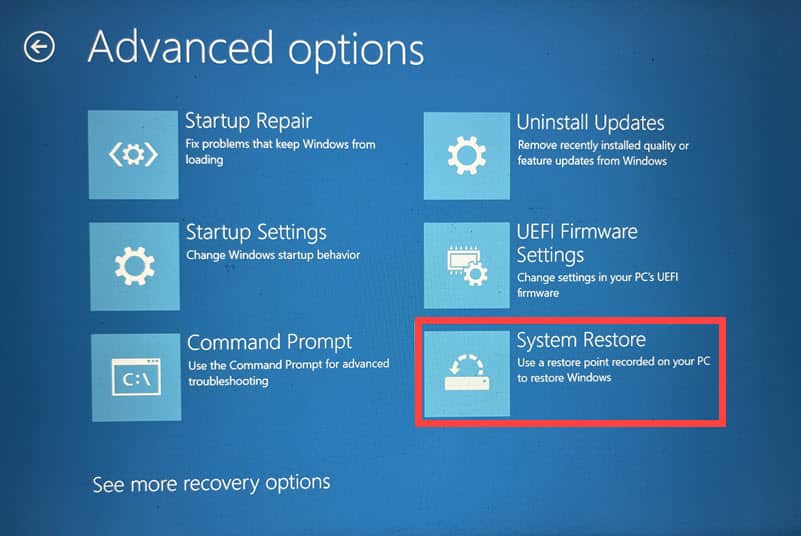
- Then, navigate to Advanced options under “Troubleshoot.”
- Select the System Restore option.
- Click Next to commence the restoration process.
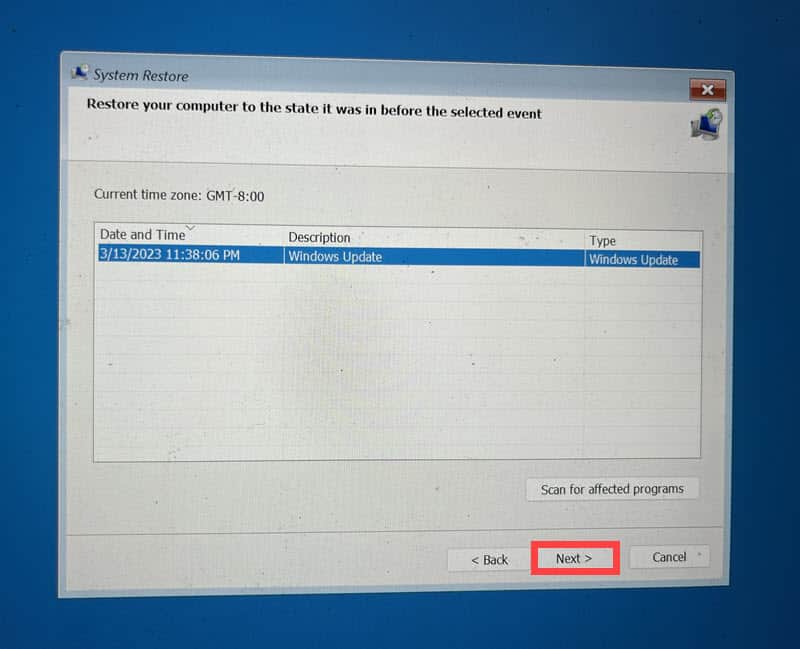
- Pick a previously saved restore point. If there are multiple restore points available, select the oldest one.
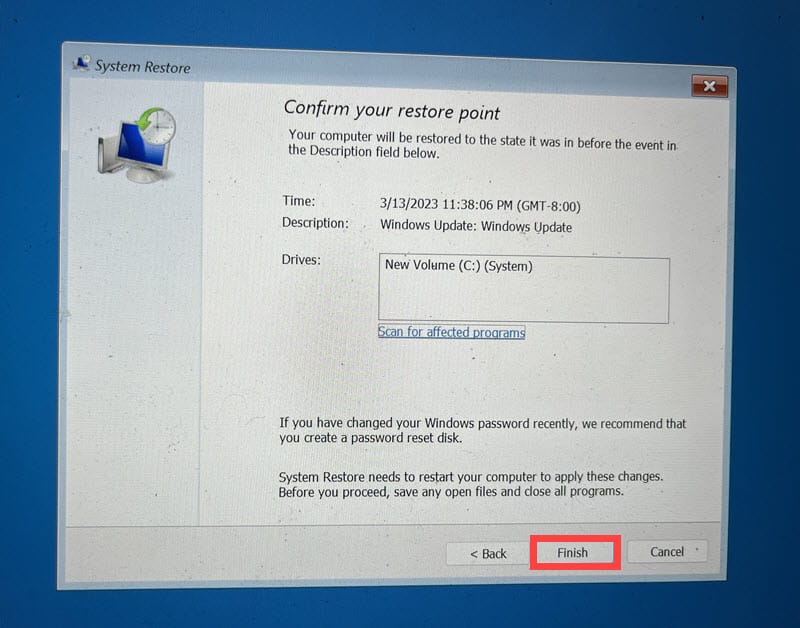
- Confirm your choice by clicking the Finish button.
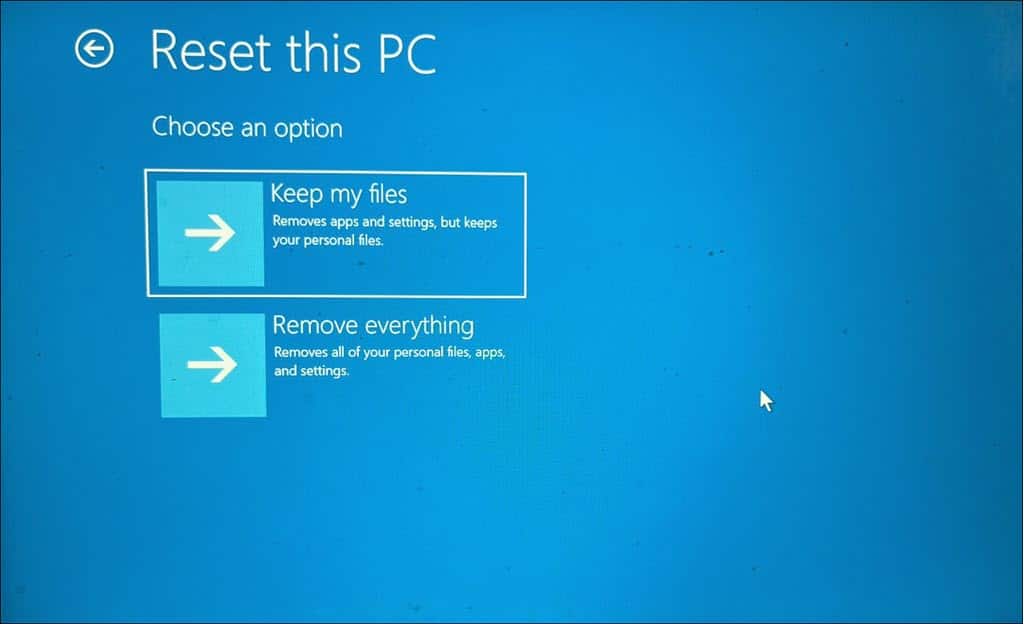
10. Reset Windows
If all other solutions fail, resetting Windows can offer a fresh start, resolving the major system issues.
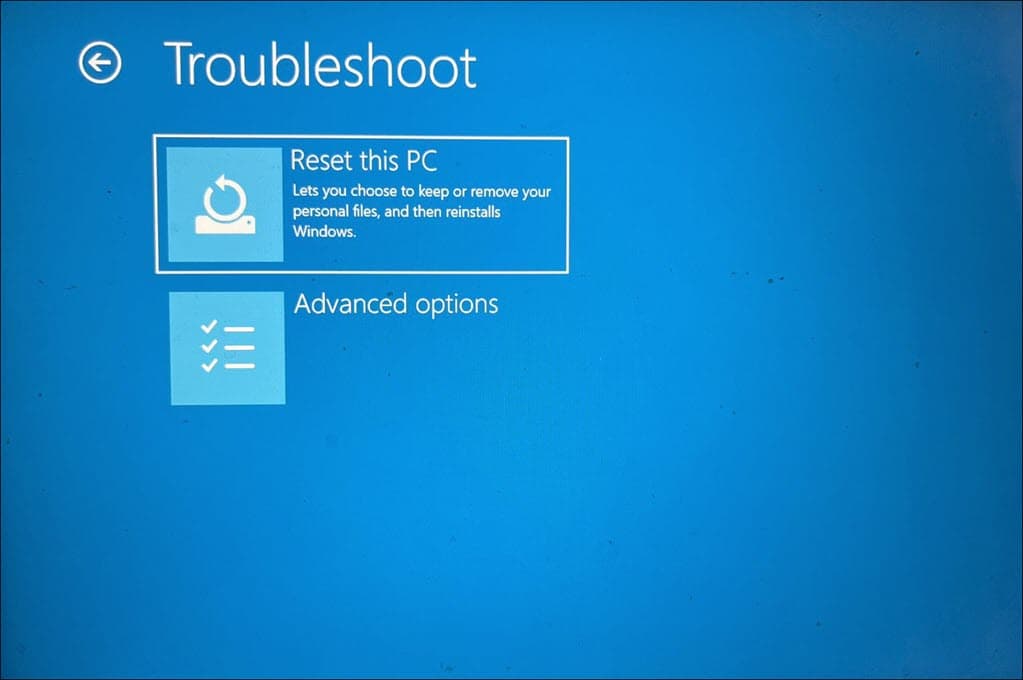
- Trigger Automatic Repair Mode by restarting your system several times.
- Once in Automatic Repair Mode, choose the Troubleshoot option.
- Under “Troubleshoot,” select Reset this PC.
- Choose whether to keep your files or remove everything. For a complete reset, especially to minimize the chance of recurring errors due to corrupt files, it’s recommended to select Remove everything.
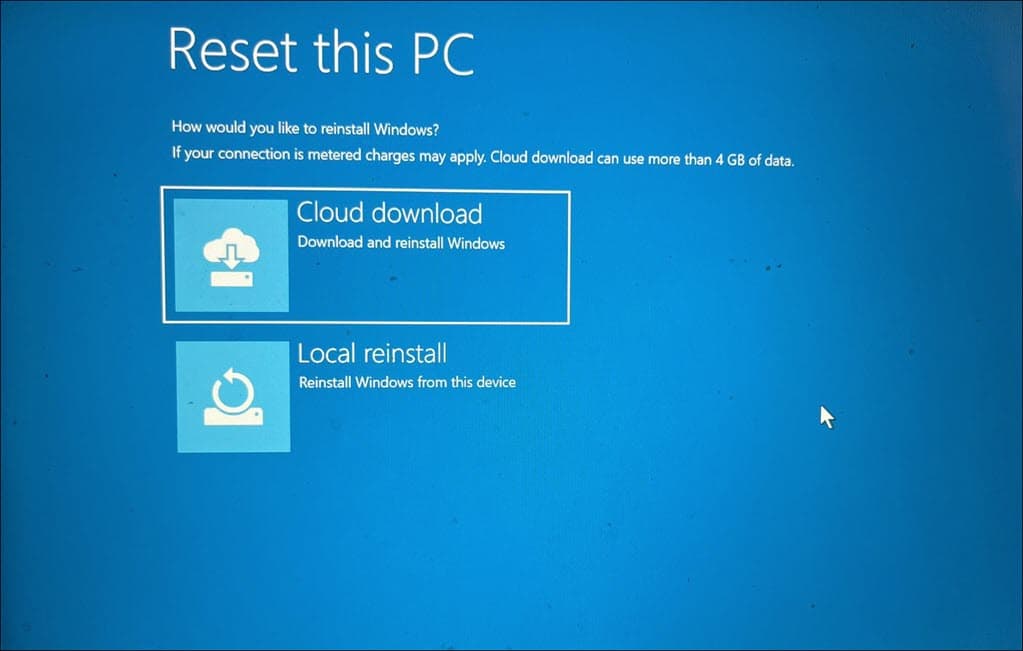
- Choose your preferred method for reinstalling Windows, either ‘Cloud download’ or ‘Local reinstall.’
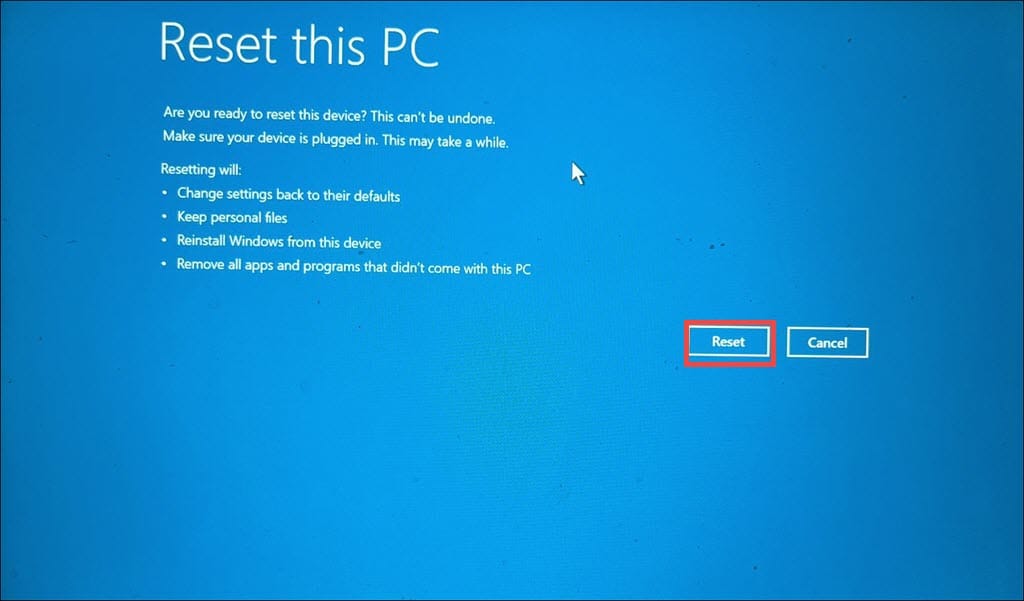
- Click the Reset button on the final page to start the reset process.
You may also be interested in:
- STATUS_CANNOT_LOAD_REGISTRY_FILE Error 0xC0000218
- 0x00000111 RECURSIVE_NMI BSOD
- INVALID_PROCESS_ATTACH_ATTEMPT
Summary
Addressing the 0x00000011 THREAD_NOT_MUTEX_OWNER BSOD requires a methodical approach, as detailed in this guide. From simple restarts and driver updates to more advanced solutions, these steps are designed to cover each cause of the issue.
Read our disclosure page to find out how can you help MSPoweruser sustain the editorial team Read more


Improve this guide


User forum
0 messages