Steam Games Won't Launch Windows 11 - 10 Simple Fixes
Key notes
- If Steam games won’t launch on Windows 11, check if your PC meets the minimum system requirements for the game, try restarting it, disable your firewall and antivirus, and more.
- If that doesn’t help, run Steam and the game as admin, update your graphics drivers, verify and repair the game files, and follow the other steps.
- If all else fails, try reinstalling Steam and the affected titles.
It’s frustrating when your favorite Steam games won’t launch on Windows 11.
Steam is a great game client, but it’s not without the occasional glitch. Read on to find out how to fix this annoying issue for good.
Preliminary Checks
- Ensure your PC meets the minimum system requirements for the affected game(s).
- Restart the game and your PC.
- Temporarily disable firewall and antivirus software.
- Temporarily turn off VPN, download accelerators, and P2P software.
- Update Windows 11 to the latest version.
If the problem persists, do the following:
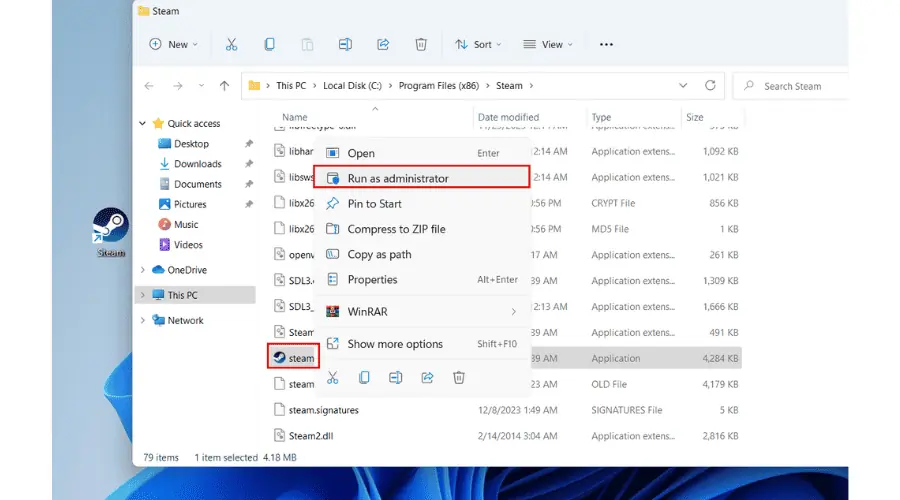
1. Run Steam Client as Administrator
1. Right-click on the Steam client shortcut on the desktop and select Open file location.
2. Scroll down the Steam folder and find the Steam exe file.
3. Right-click on the Steam.exe and select Run as administrator.
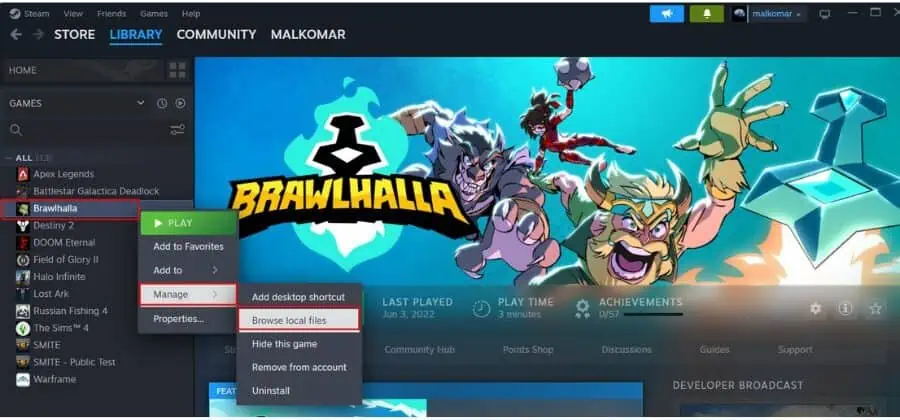
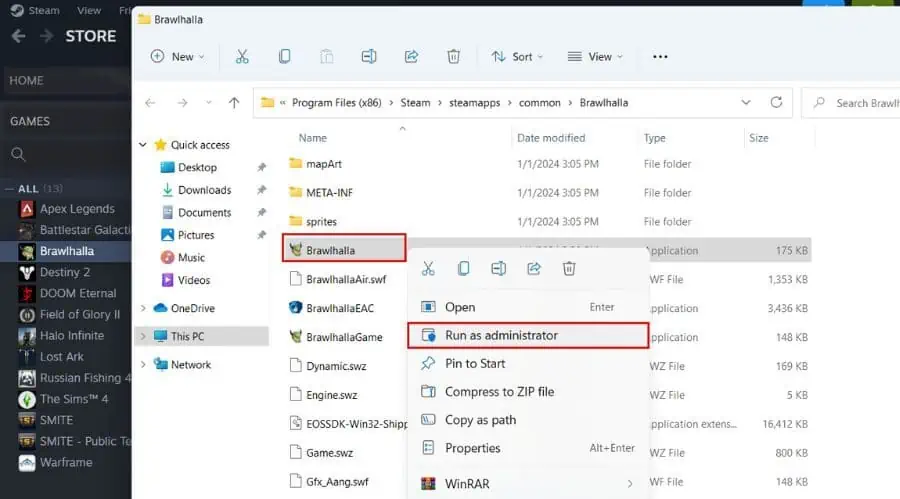
2. Set the Steam Game to Run with Administrator Rights
1. Open the Steam client and navigate to your games library.
2. Locate the affected game, right-click on it, and choose Manage > Browse local files.
3. In the game folder, locate the game’s exe file, right-click on it, and choose Run as administrator.
3. Update Graphics Driver
You can update your drivers by checking Windows Update or manually downloading the latest ones from your GPU manufacturer site (like NVIDIA, AMD, or Intel).
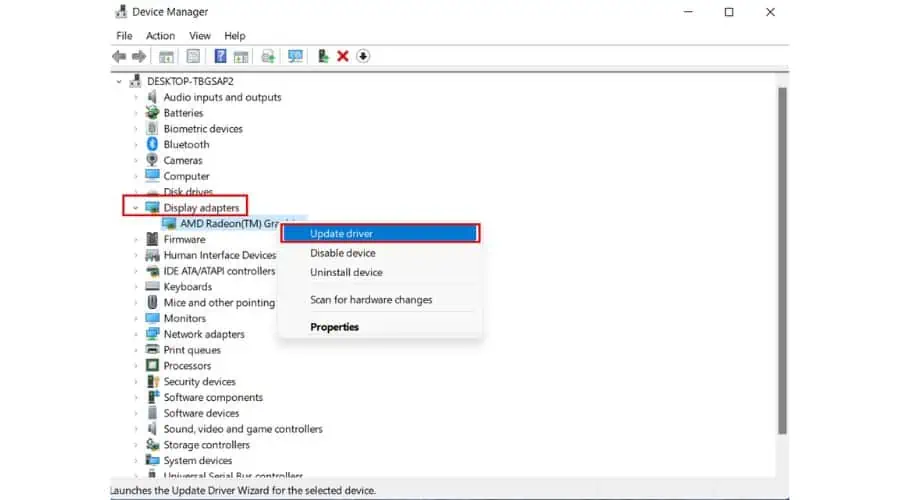
1. Right-click on the Start menu and choose Device Manager.
2. Double-click on the Display adapter category to expand it.
3. Right-click on your graphic card name and select Update driver.
4. Now, you can choose “Search automatically for drivers” or “Browse my computer for drivers.”
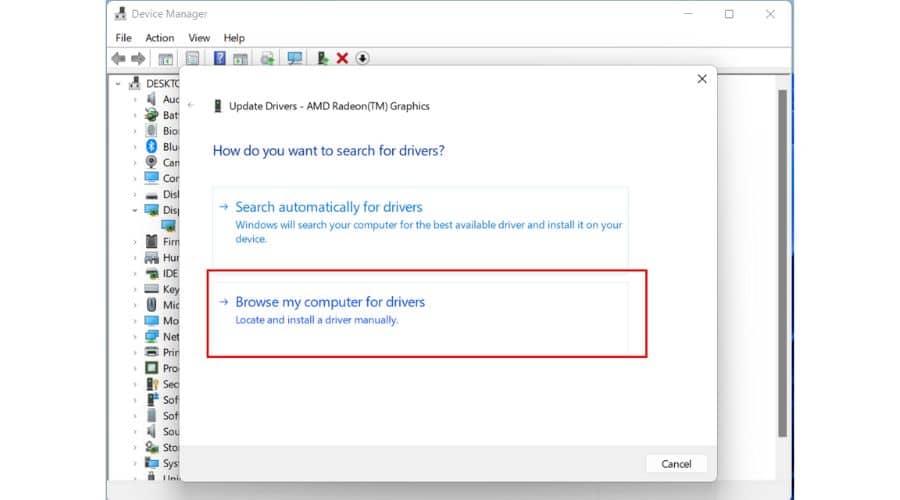
5. Either way, follow the on-screen guide to complete the update process and reboot your PC.
If the above method doesn’t work for you, we also recommend a light driver updater. This tool will simply automate the whole process and you’ll never have to worry about any driver issues while enjoying your favorite Steam games.
4. Run the Game in Compatibility Mode
1. In the game folder, locate the game’s exe file, right-click on it, and choose Properties.
2. Click the Compatibility tab on the Steam game’s properties window.
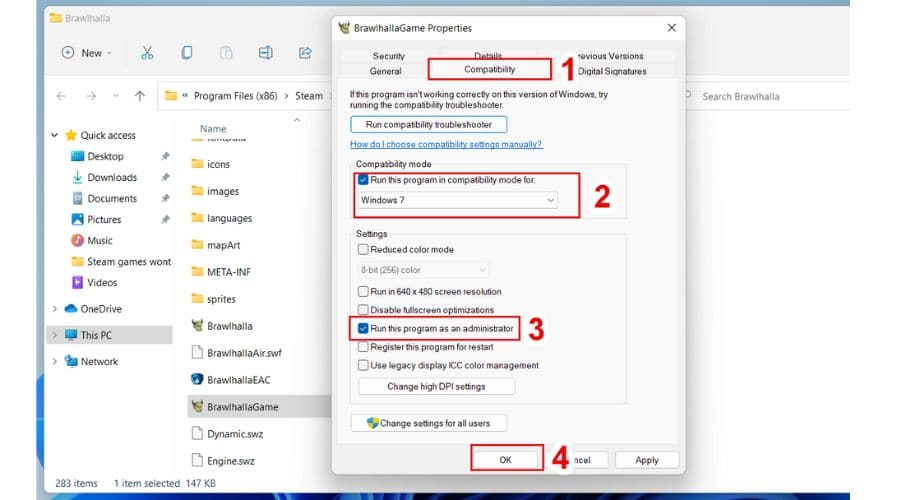
3. Select the checkbox labeled “Run this program in compatibility mode for” and then choose Windows 8 or Windows 7 from the compatibility drop-down menu.
4. Also select the checkbox labeled “Run this program as an administrator.“
5. Click on Apply and OK and try to run the game from the games folder.
5. Update the Steam Client
1. Open the Steam client, and click on Steam > Check for the Steam Updates.
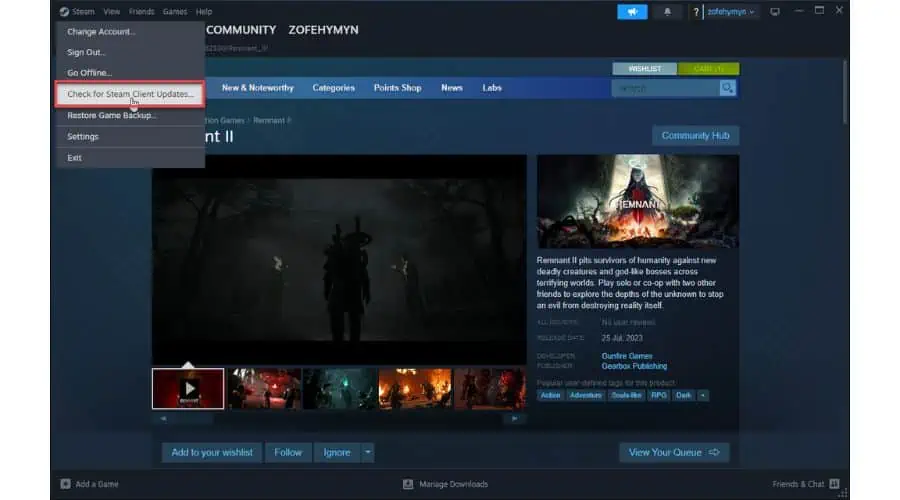
2. If there’s a new client version, click Download and wait for Steam to update.
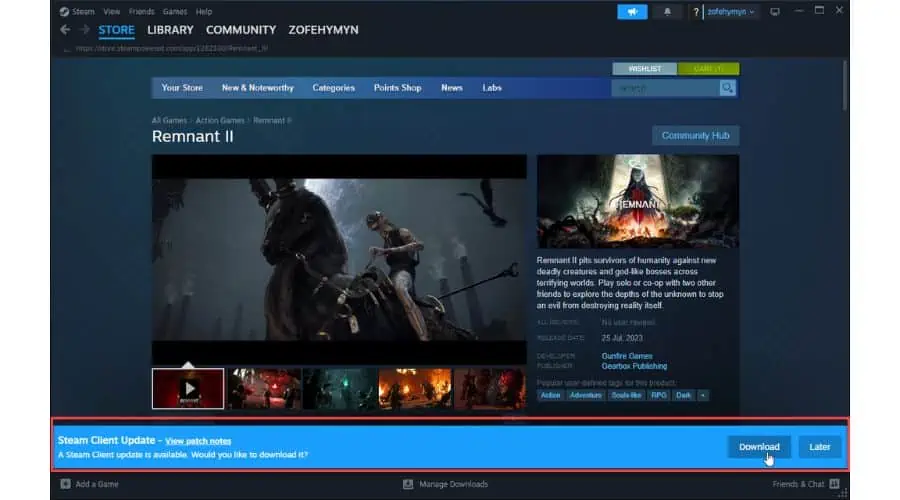
3. After updating, log in to your Steam account and try running the game to check if the issue is resolved.
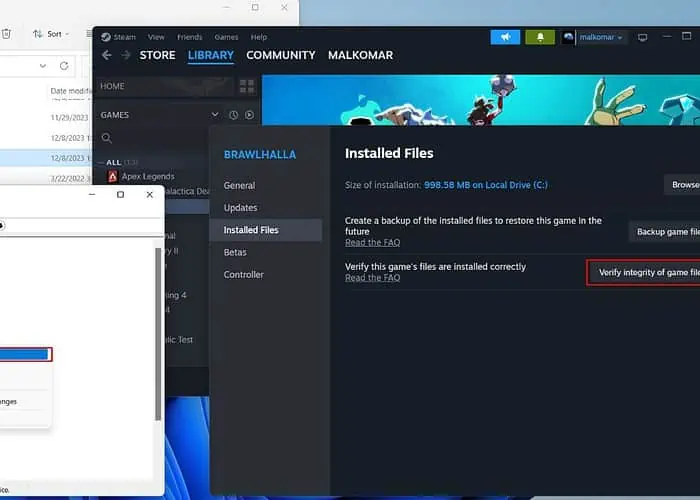
6. Verify and Repair Game Files
1. Launch the Steam client and navigate to the LIBRARY.
2. Right-click the game in your Library and select Properties.
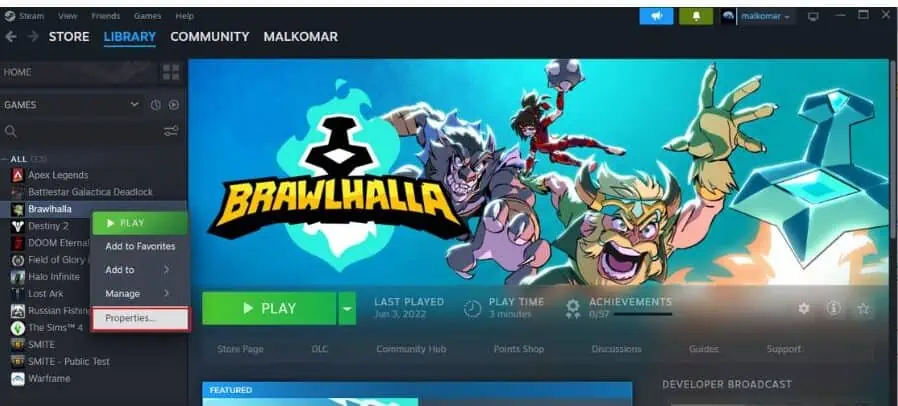
3. Select Installed Files from the left pane and click the Verify integrity of game files.
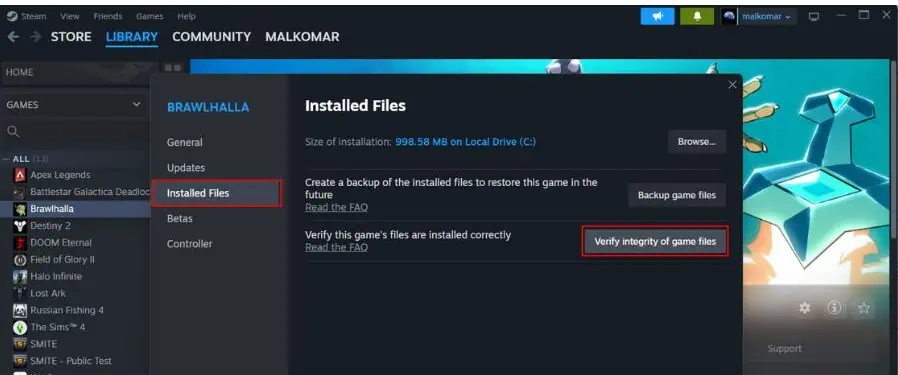
4. Now, Steam will verify the game’s files. Be patient; this process may take several minutes, depending on the size of the game.

5. After completing the verification process, restart Steam and launch your game to ensure it runs without issues.
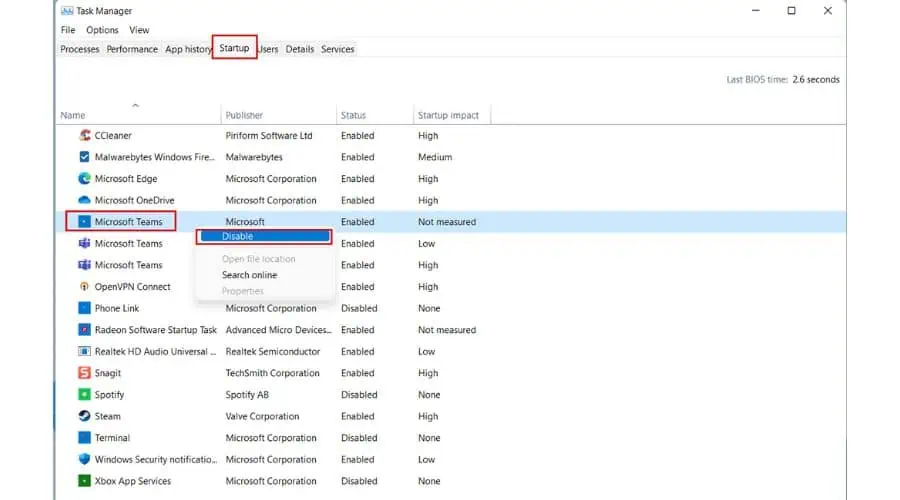
7. Disable Background Apps
1. Press the Ctrl + Shift +Esc keys simultaneously on the keyboard to open Task Manager.
2. Click on the Startup tab to view all apps that start with Windows. Then, right-click on any unnecessary third-party startup items and select Disable.
3. Exit Task Manager and press the Win + R keys to open the Run dialog box.
4. Type “msconfig” and press Enter to open the System Configuration window.

5. On the Services tab of System Configuration, check “Hide all Microsoft services” and uncheck all other services by selecting “Disable all.”
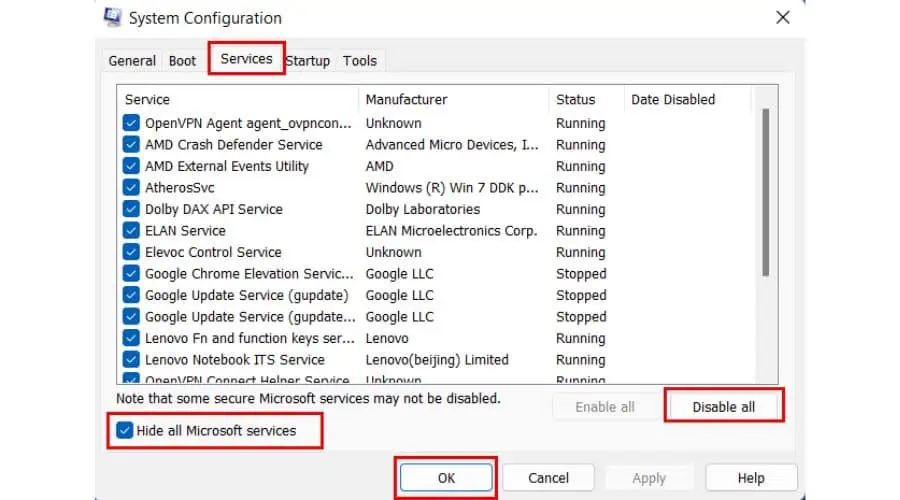
6. Click OK. After that, restart your PC. Once your device has finished restarting, try relaunching your Steam game.
8. Clear Game Cache
1. Open the Steam client, and from the main menu, choose Steam>Settings.
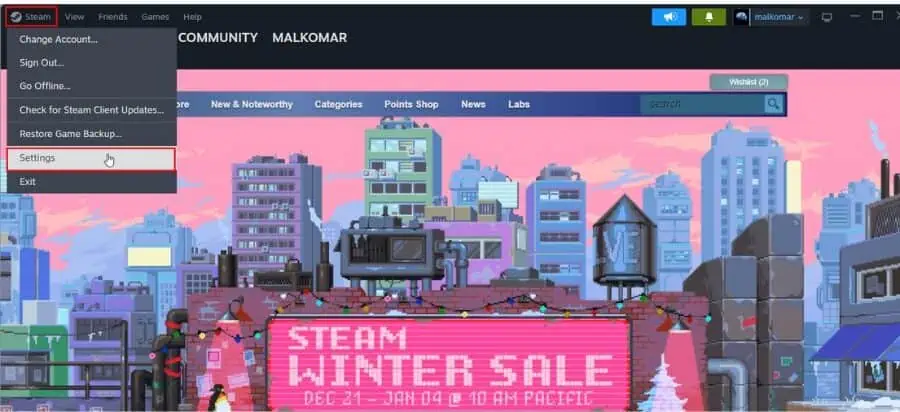
2. Select Downloads from the left pane and click the “Clear Cache” button under the “Clear Download Cache” options.
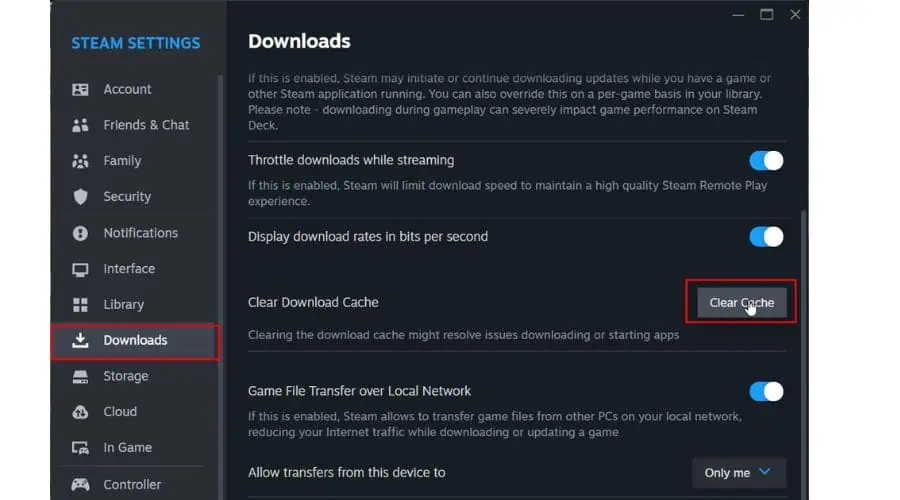
3. Confirm the action and relaunch the Steam client (you must log in to your Steam account again).

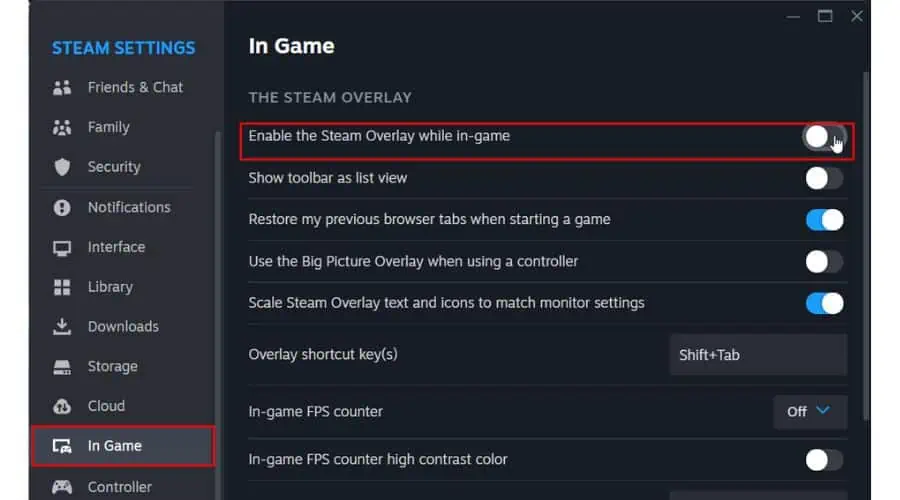
9. Disable Steam Overlay
1. Open the Steam client and choose the Steam> Settings option from the menu.
2. Choose “In Game” from the left pane and disable the “Enable Steam Overlay while in-game.”
10. Reinstall the Steam Client or Affected Game
If all else fails, you might want to try uninstalling and reinstalling the games causing issues. This can help solve problems arising from a faulty installation process or missing/corrupted files that Steam can’t fix.
If this doesn’t work, I recommend uninstalling and reinstalling the Steam client as a last resort. However, remember that this might involve downloading your games again.
You may also be interested in:
So, now you know what to do when Steam games won’t launch on Windows 11. If the steps I’ve provided don’t work for you, try reinstalling Steam as a last resort. Remember that doing so will also remove all games installed with the client unless you move the steamapps folder (C:\Program Files (x86)\Steam\steamapps) to another location.
Read our disclosure page to find out how can you help MSPoweruser sustain the editorial team Read more


Improve this guide

User forum
0 messages