Easy Fix To PC Stuttering While Gaming on Windows 11
![]() 7 min. read
7 min. read
![]() Updated on
Updated on
Share this article

Improve this guide
Read our disclosure page to find out how can you help MSPoweruser sustain the editorial team Read more

Are you an avid gamer who has recently made the leap to Windows 11, only to be greeted by the infuriating and, frankly, awful experience of game stuttering? If so, you’re not alone.
Many gamers have been facing the same frustrating issue since the release of Windows 11. Specifically, the Windows 11 22H2 update causes the most game stuttering.
The problem has become so widespread that it has garnered attention and discussion across various online forums and tech communities.
In this blog post, we’ll delve into the vexing world of PC sttutering while gaming on Windows 11 and shed light on what causes this annoyance. And, more importantly, we’ll provide you with an easy fix to regain your smooth gaming experience.
Why Is My Computer Stuttering Windows 11?
When you experience the PC stuttering issue while gaming on Windows 11, you can link the reasons to any or all of the following common problems:
- A known bug in the Windows 11 22H2 feature update.
- Activation of NVIDIA FrameView SDK feature.
- GeForce Experience edition lower than 3.26.0.131 on NVIDIA-based gaming PCs.
- Outdated graphics drivers and game apps.
- Multiple background processes running on the PC.
- Overheating of PC components like CPU, GPU, NVMe SSD, etc.
To help you enjoy the best games on Windows 11 with optional performance, we’ve tested more than 15 different troubleshooting methods to find the effortless and easiest solutions. Find below the fixes that you can try to resolve the issue right away.
How Do I Fix Stuttering on Windows 11?
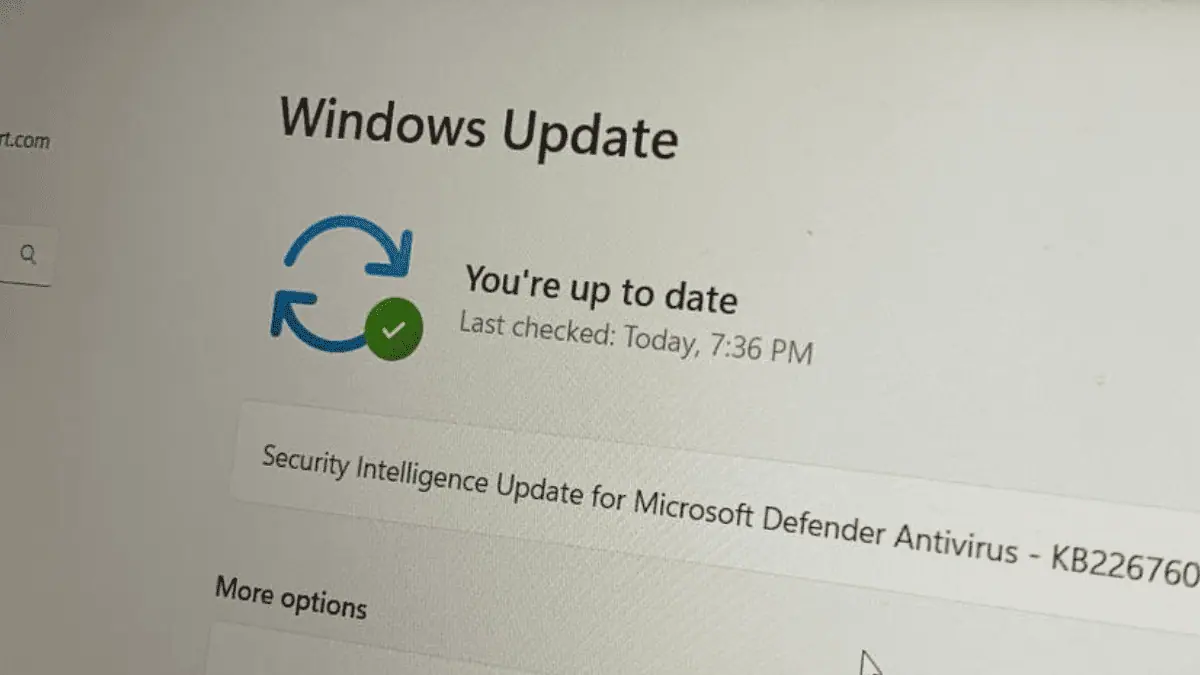
Solution 1: Update Windows 11 to the Latest Edition
Gaming performance issues after upgrading to Windows 11 22H2 from 21H2 are known issues. Microsoft released the KB5020044 update to fix this issue on affected PCs.
As you’re also facing intermittent stuttering, flickering, and freezing issues when playing games on Windows 11, it’s possible that your PC hasn’t received the update yet.
Here’s how you can push to get that update:
- On your Windows 11 PC, press the Windows + I keys together.
- You should see the System window.
- Click the Windows Update menu on the left-side navigation panel.
- Under the Windows Update section on the right side, you should see available updates for the PC.
- Click the Install all button to download and install all the pending updates.

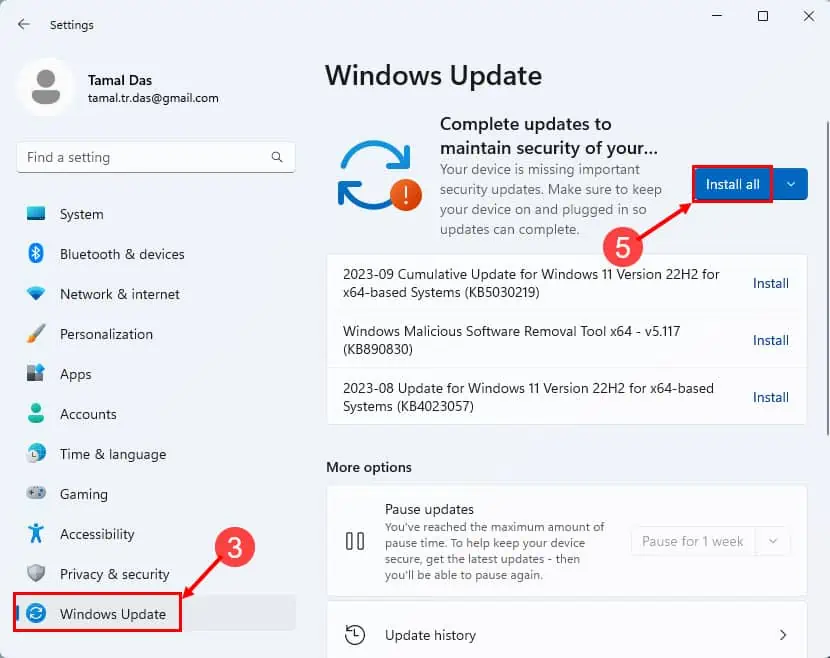
Once your PC is updated, restart it once more. Now, start playing the same games on which you were facing the stuttering issues and see if that has been resolved.
Keep in mind that you may have some background processes that are causing your computer to slow down. You can use an optimization tool to stop unnecessary processes from running in the background. These kind of processes are preventing your computer from performing efficiently.
Fortect is a PC optimizer that can assists you in locating and stopping these processes. Furthermore, Fortect will uncover a slew of issues that have accumulated over time.
Solution 2: Update the Graphics Card Driver
Since the stuttering issue is specific to Windows 11 update 22H2, various GOU manufacturers are addressing this by updating their graphics card drivers.
For example, NVIDIA suggests that you must install GeForce Experience v3.26 or better to experience smooth and high-end graphics when playing games on a Windows 11 PC.
Also, you could use the Intel UHD Integrated graphics software if you’re relying on built-in graphics processing on your Intel Core CPUs. So, you need to accordingly update the Intel UHD graphics app.
Here’s a common way to update your graphics adapters on a Windows 11 PC:
- Press the Windows + X keys on the keyboard simultaneously.
- Click the Device Manager option on the context menu that pops up.

- You now see the Device Manager dialog box.
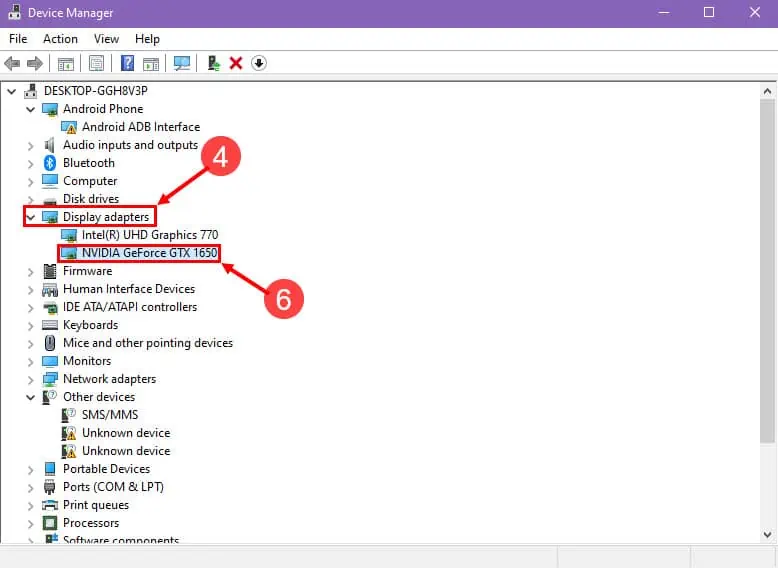
- Locate the Display adapters item on the list of devices inside Device Manager.
- Double-click to expand the Display adapters devices list.
- Now, select the individual display adapter that you use from the expanded list.

- If you see two or more items, like Intel(R) UHD Graphics, NVIDIA Geforce GTX, AMD Radeon RX 7000, etc., you’re likely using NVIDIA or AMD, and not the Intel UHD graphics.
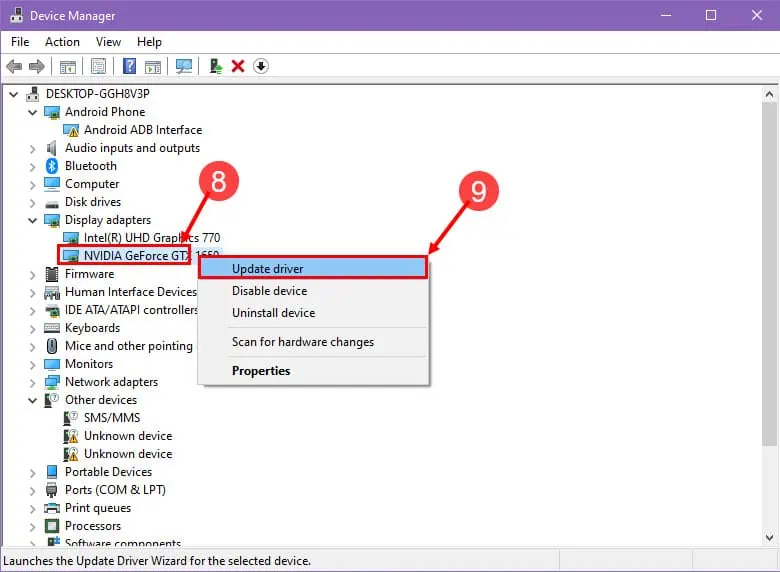
- So, select the appropriate graphics card and right-click.
- Click the Update option on the context menu that shows up.

- You should now arrive on the Update Drivers wizard.
- There, choose the Search automatically for drivers option.

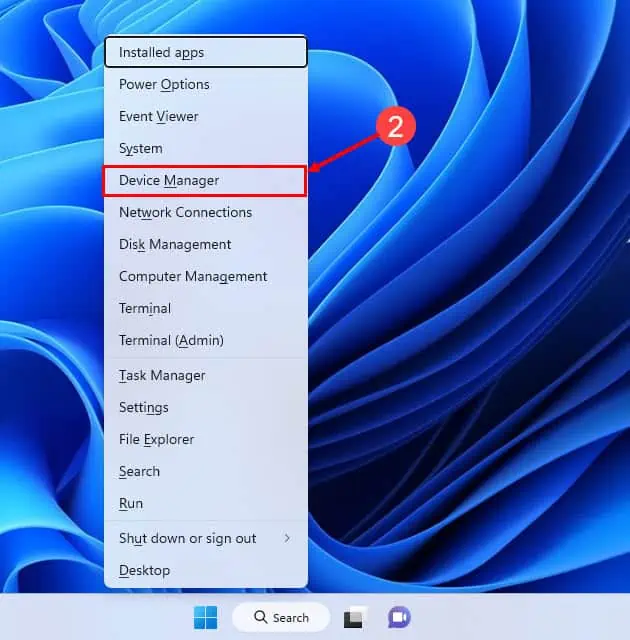
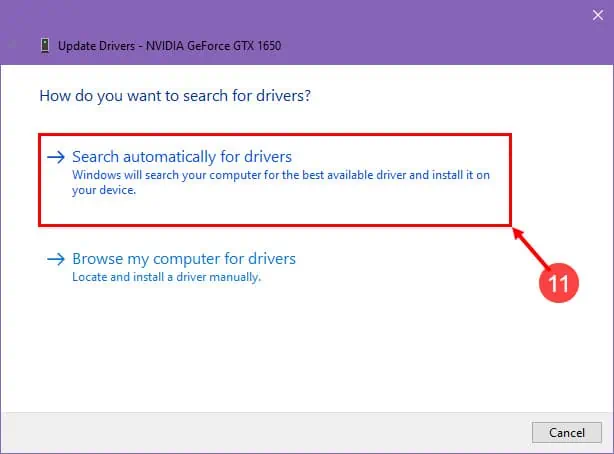
Windows 11 will guide you through installing the latest graphics driver from here on. You must restart the PC at the end to make the update effective.
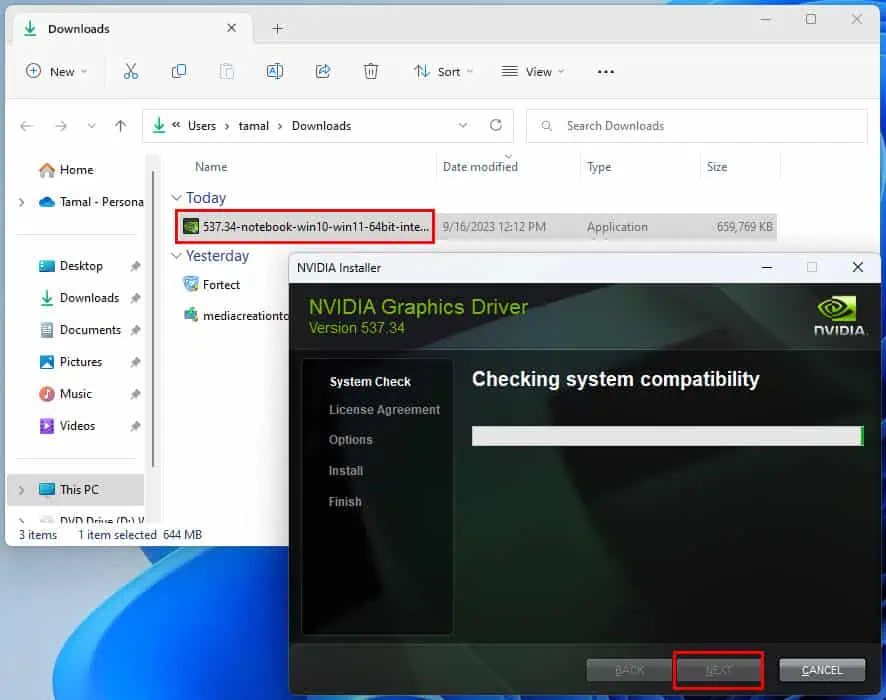
Alternatively, you can directly download the latest graphics driver and GPU console apps from the respective manufacturers. Find below the latest driver downloading resources for the popular GPU chip manufacturers:

All the above resources will let you download EXE files to install the latest drivers. Just double-click the downloaded app and follow the on-screen instructions to install the required GPU driver updates. Don’t forget to restart the PC to enforce the updates across the whole Windows 11 OS.
Solution 3: Disable Xbox Game Bar
Since Xbox Game Bar runs in the background automatically when Windows 11 detects a game app launched on the system, you need to turn it off to fix the stuttering issue.
The Xbox Game Bar mostly causes intermittent stuttering and FPS drops due to incompatibility with certain game apps.
Here’s how to remove it:
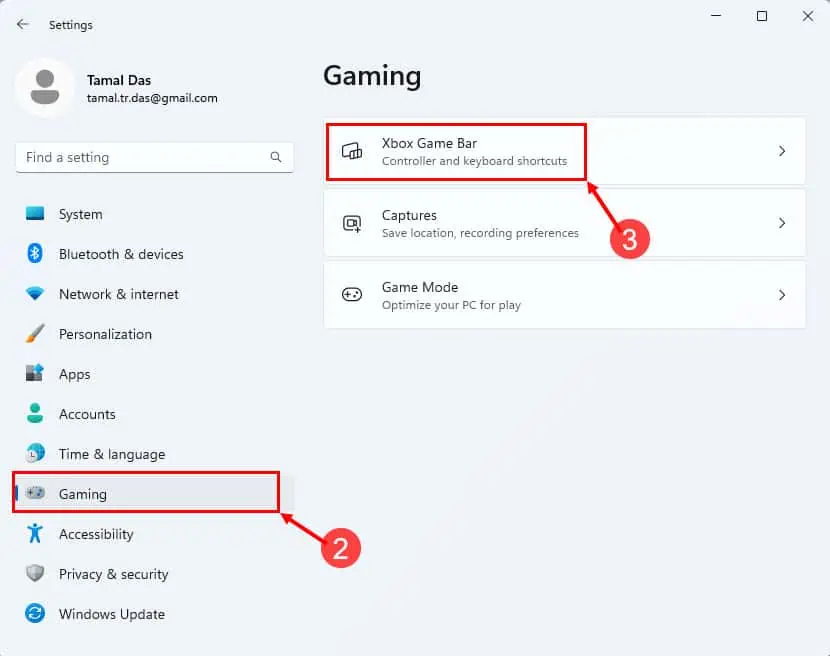
- Open the Settings app on Windows 11 by pressing the Windows + I keys together.
- Click the Gaming menu on the left-side navigation pane.
- Click on the Xbox Game Bar option.

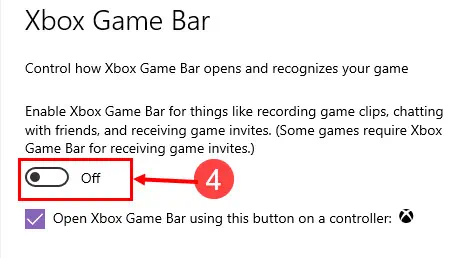
- Disable the Xbox Game Bar by sliding the On button to the left.

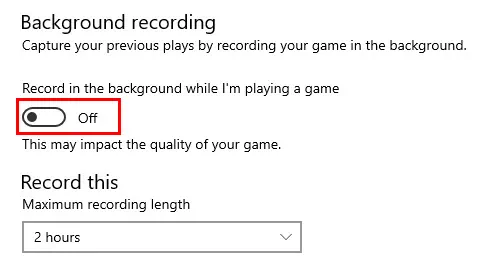
- Now, go to the Captures menu by going back one step from the Xbox Game Bar menu.
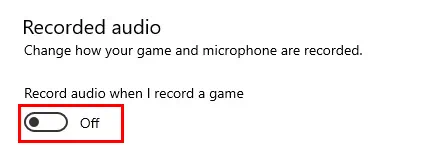
- Inside the Captures menu, disable the following settings:
- Background recording

- Recorded audio

- Capture mouse cursor in recordings

- Background recording

Solution 4: Tweak the Power Plan Settings
As you probably know, power consumption has a noticeable effect on your PC’s performance.
Here’s how to optimize it:
- Click the Start button and type Edit Power.
- Click on the Edit power plan app in the search results.
- Now, click on the Change advanced power settings link.
- You should now see the Power Options dialog box with Advanced settings as the selected tab.

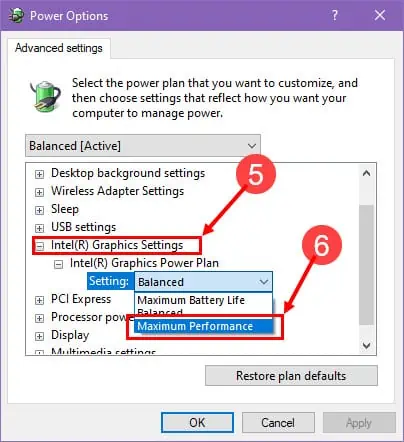
- There, go to the Intel(R) Graphics Settings and expand it if you’re using the Intel UHD Integrated Graphics solution for gaming.
- Click the Settings drop-down menu and change it to Maximum Performance.

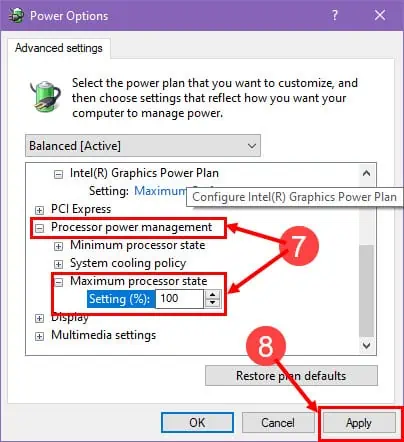
- Similarly, click Processor power management > Maximum processor state > set Setting to 100.
- Click the Apply button.
- Click Save changes on the Edit Plan Settings dialog.

Solution 5: Disable Dynamic Tick
Dynamic Tick is a great power-saving feature, but it can sometimes cause gaming performance issues.
Here’s how to disable it:
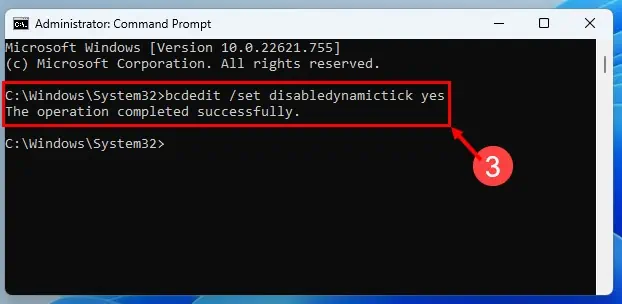
- Click the Start menu button and type CMD.
- Click the Run as administrator link.
- On the Command Prompt interface, enter the following command and hit Enter:
bcdedit /set disabledynamictick yes
- Now, execute the following commands as well one by one:
bcdedit /set useplatformclock true
bcdedit /set tscsyncpolicy Enhanced - Don’t forget to hit Enter after pasting each command mentioned above.
- Restart the PC.
Solution 6: Disable Background Apps
Before launching your game, close all other applications to push all the CPU and GPU resources to the game.
There could be automatic background apps and services so close those apps from the Task Manager app as well. Press Ctrl + Shift + Esc to launch the Task Manager. Then, scroll through the Background processes list and close unnecessary ones like the following:
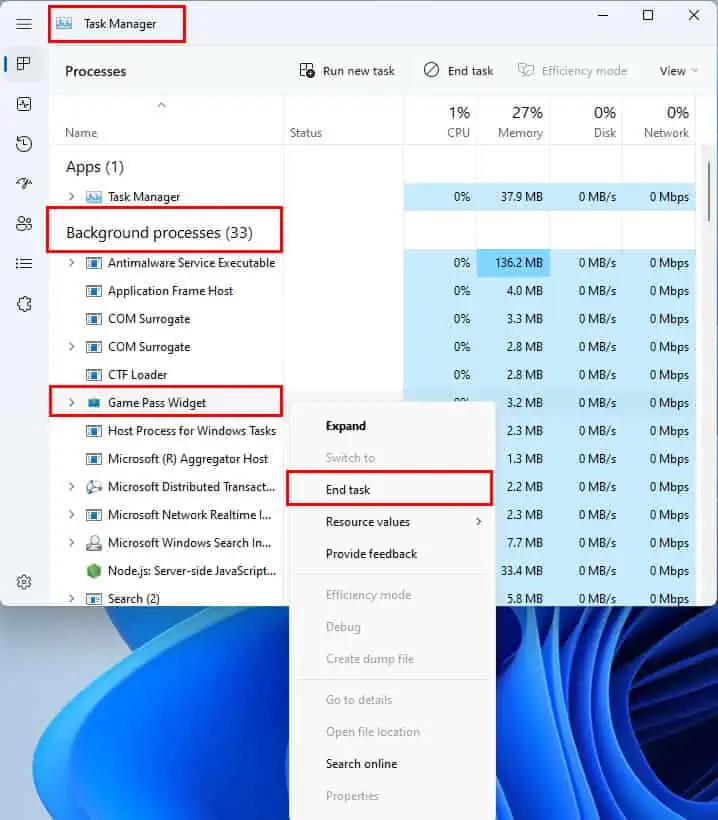
- Game Pass Widget
- Teams app
- Third-party antivirus
- Third-party PC cleaning tools
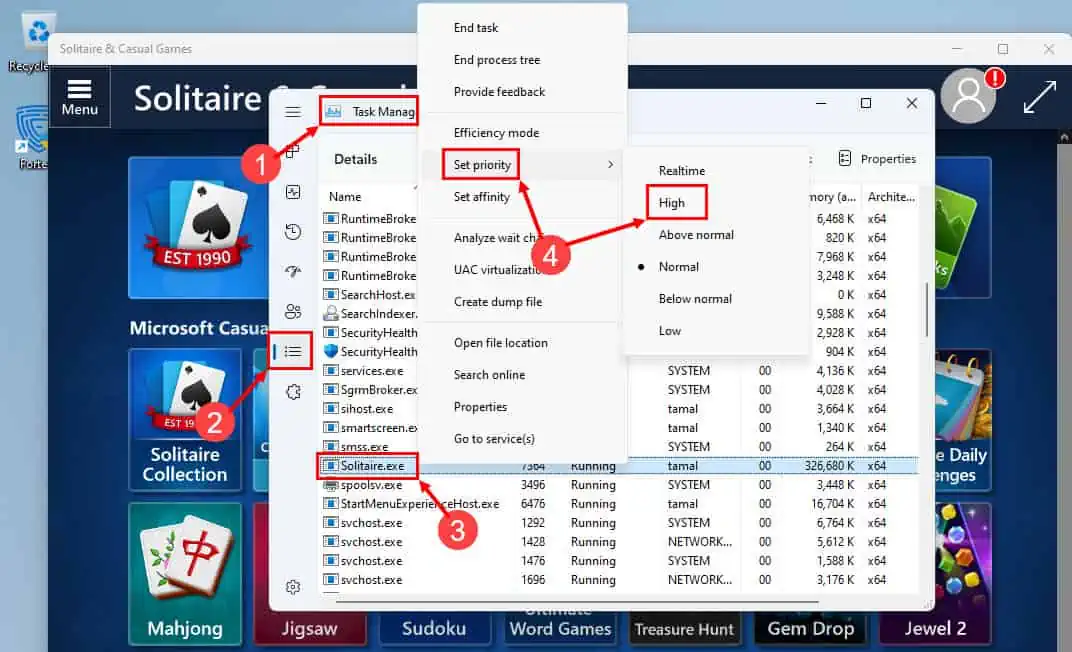
Solution 7: Set Priority High
In order to maximize your hardware’s output for the specific game you’re playing, you should boost it’s priority in the Task Manager:
- Press Ctrl + Shift + Esc to open the Task Manager.
- Click the Details tab on the left.
- Find the game EXE or name in the list.
- Right-click and choose Set priority to High.

- Click the Change priority button.
Conclusion
Now you know how to fix the intermittent stuttering issues when playing PC games on a Windows 11 PC. Try the above methods in the order they appear to resolve the fault in the least possible time. Also, if the article helped you mention that in the comment or write about any secret method you know to fix game stuttering on Windows 11.