NVIDIA Graphics Card Not Detected Windows 10: 9 Quick Fixes
Is the NVIDIA graphics card not detected on your Windows 10 PC? They’re widely favored on Windows PCs due to their impressive performance in graphics processing. However, several users have encountered situations like this.
From my experience, it usually boils down to software issues but may also be linked to hardware problems. In this article, I’ll show you how to address this problem.
NVIDIA Graphics Card Not Detected in Windows 10 – Fixes
1. Restart Your PC
You can clear temporary glitches by restarting your computer. I suggest trying this solution before attempting any other fixes.
2. Check if the Graphics Card is Enabled in Device Manager
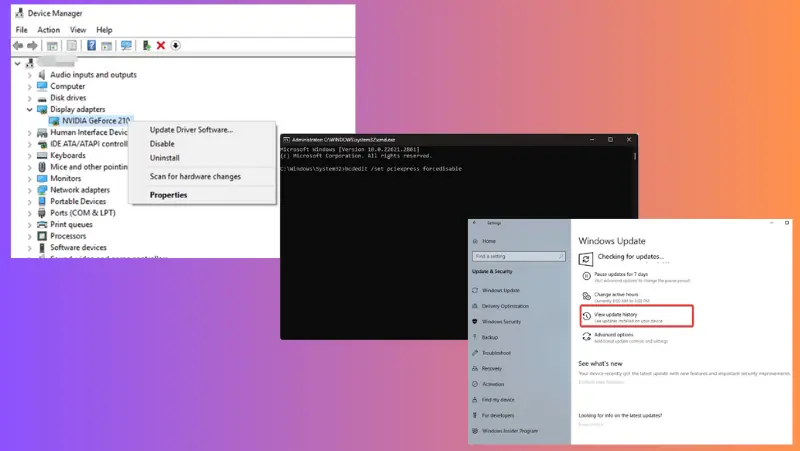
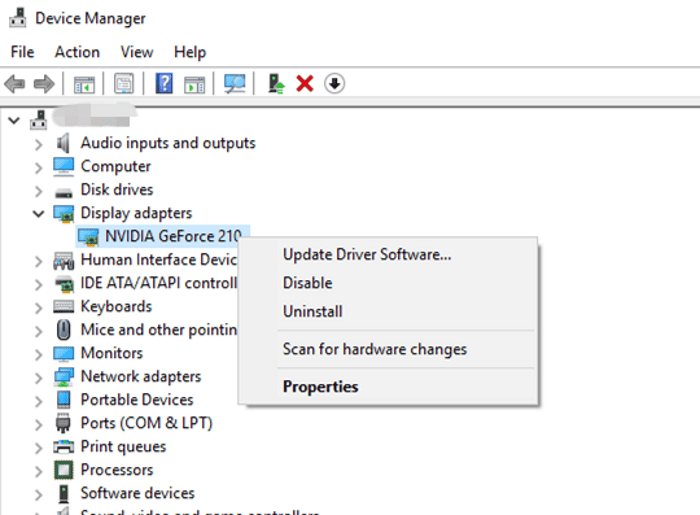
1. Press Windows + X to open the Start menu.
2. Select Device Manager from the menu.

3. On the Device Manager window, navigate to Display adapter and double-click it.
4. From the drop-down menu, you should see the Nvidia graphics device on your computer.
5. Right-click the Nvidia GPU and select Enable device.
6. Now restart your computer.
If the Device Manager doesn’t display the Nvidia GPU, it suggests that the system doesn’t detect it. In such a scenario, consider exploring other solutions provided in the article.
3. Update BIOS
To update your PC’s BIOS, start by identifying your motherboard’s manufacturer and model. Next, visit the manufacturer’s website to download the specific BIOS update for your motherboard model. You can find instructions for the BIOS update in the manufacturer’s manual.
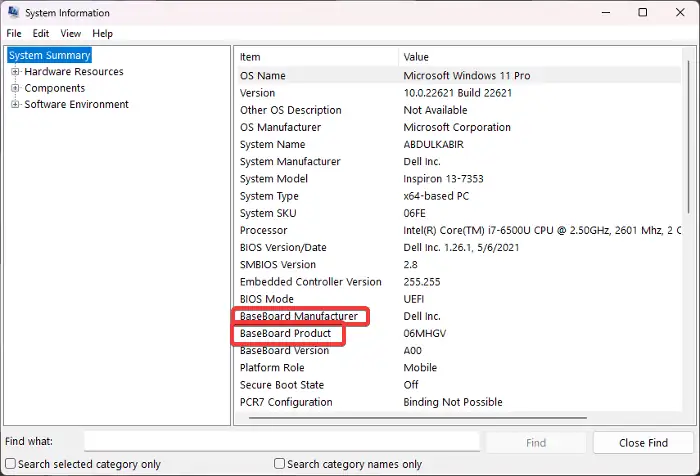
Here’s how to check for your motherboard details on a Windows PC:
1. Press Windows + S to open the Window Search.
2. Type msinfo in the search box and open the System Information result.
3. On the System Information window, navigate to the Baseboard Manufacturer and Baseboard Product and take note of their values.
4. Enable Discrete GPU (NVIDIA) in the BIOS
1. Reboot your computer and open BIOS by pressing F2 or Del when the manufacturer logo appears. The keys to use to enter BIOS depend on your PC model.
2. When in the BIOS environment, navigate to Chipset, then select dGPU configuration.
3. Set the dGPU option to Enabled.
4. Now Save & Exit.
Note: The process of accessing the BIOS to configure preferences varies depending on the PC manufacturer. Therefore, refer to the PC manufacturer’s website or consult the PC manual for guidance.
5. Update Driver
You can achieve this either manually or by using driver updater software such as DriverFix.
To manually update it:
1. Press Windows + X to open the Start menu
2. Select Device Manager.
3. Double-click the Display adapters option to expand your graphics driver.
4. Right-click on the graphics adapter in use and select Uninstall device.
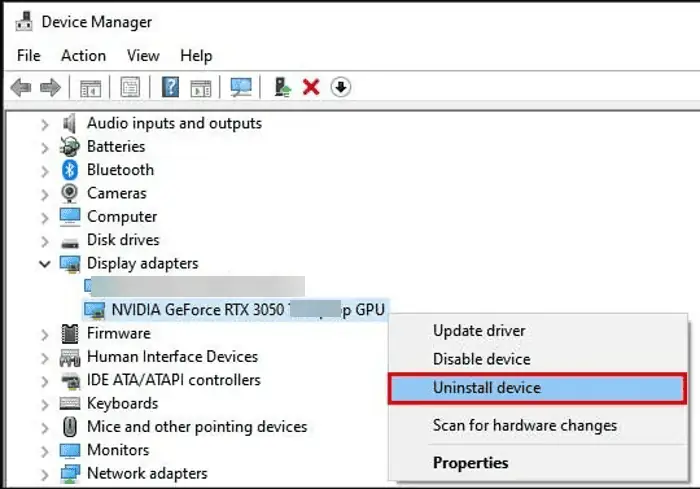
5. Checkmark the “Attempt to remove the driver for this device”, and click the Uninstall option.
6. After the process is completed, restart your PC and open the Device Manager again.
7. Open the Display adapter section and note the name of your display driver
8. Go to the display driver’s website and download an updated version.
9. Now, go back to Device Manager and right-click your display driver.
10. On the resulting drop-down menu, tap on the Update driver option.
11. Select Browse my computer for drivers and follow other on-screen prompts to select the driver package you downloaded earlier.
6. Enable the Graphics Card with the Command Prompt
1. Press Windows + R to open the Run dialog box
2. Type cmd into the box, and press Ctrl + Shift + Enter to open Command Prompt as an admin.
3. On the command prompt, type the command below and press Enter:
bcdedit /set pciexpress forcedisable
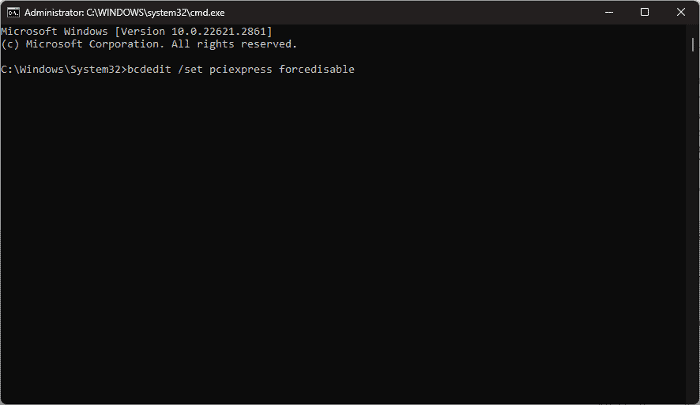
After that, you can restart your computer and see if Windows 10 can detect your Nvidia graphics card.
7. Uninstall/Rollback Recent Windows Update
A recent Windows update could be interfering with the Nvidia GPU. Here’s how to uninstall it:
1. Press Windows + I to open Windows Settings.
2. Click on Update & Security, then select View update history.
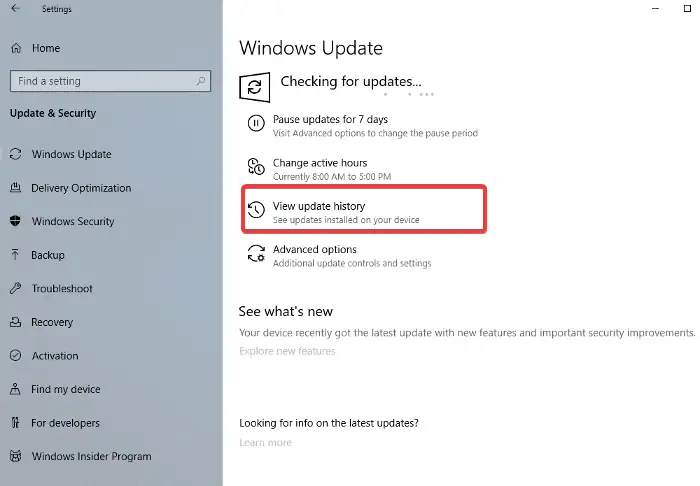
3. Click Uninstall update on the resulting page.
4. Now select the latest update installed and click Uninstall to remove it.
8. Repair Corrupt System Files
1. Press Windows + R to open the Run dialog box
2. Type cmd into the box, and press Ctrl + Shift + Enter to open Command Prompt as an admin.
3. On the command prompt, type sfc /scannow.
4. When the scan completes, type dism /online /cleanup-image /scanhealth to check Windows image health.
5. When that completes, type dism /online /cleanup-image /restorehealth to repair Windows image health.
9. Unplug and Plug in the NVIDIA Graphics Card
Lastly, you can unplug the Nvidia graphics card and plug it in again. This can help reset the Nvidia graphics and make sure it’s properly connected.
Also Read:
- Test GPU Health — Simple Step-by-Step Guide
- FIXED: Windows 11 2022 update causes performance issues to NVIDIA GPU users
Wrap Up
So, now you know how to fix Nvidia graphics card not detected in Windows 10. First, you should verify that the graphics card is enabled on your PC and ensure the integrity of its driver. Additionally, if the problem persists, consider the graphics card could be faulty.
Read our disclosure page to find out how can you help MSPoweruser sustain the editorial team Read more
Improve this guide


User forum
0 messages