How to Transfer/Move Outlook to a New Computer
Trying to move Outlook to a new computer? This comprehensive step-by-step guide will show you how to do it hassle-free.
I’ll give you various ways to migrate your Outlook account securely and without losing any of your settings and data.
Let’s get into it:
Before you Migrate Outlook to a New Computer
Before going about the actual migration, you first need to be sure what email protocol you are using – whether you’re using POP, IMAP, or Exchange.
How do you find out?
- Open the Outlook application. Click on the File option.
- In the Account Information window, you’ll see the Your Outlook Account section.
- There, it’ll display whether you’re running on POP, IMAP, or Exchange.
That’s important because you need to make sure your accounts on both PCs are using the same version.
With that out of the way, it’s time to start moving your Outlook to a new computer.
How to Move an Outlook Account to a New Computer
Transferring your Outlook POP account to a new computer or laptop involves backing up and moving your stored emails, contacts, tasks, appointments, calendars, settings, and other vital Outlook data.
These methods work for both POP and IMAP accounts:
1. Export and Import the PST File to a Different Computer
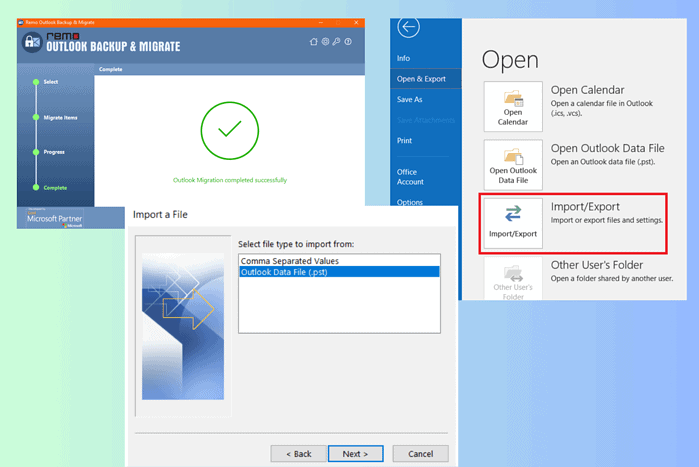
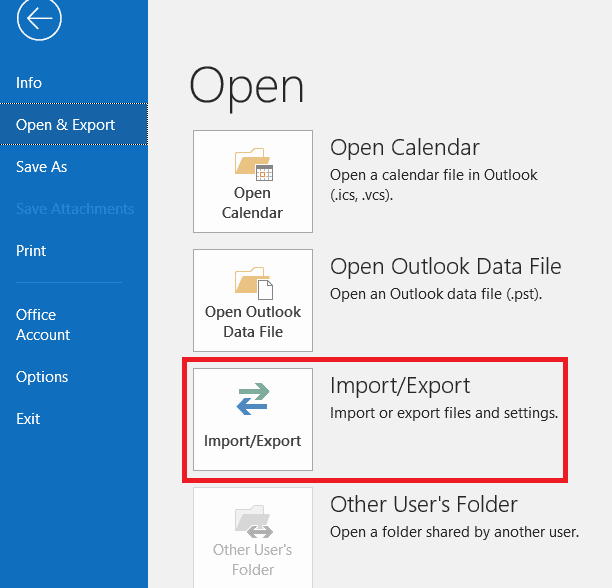
- Open Outlook and click on the File tab.
- Click the Open & Export option and select the Import/ Export option.
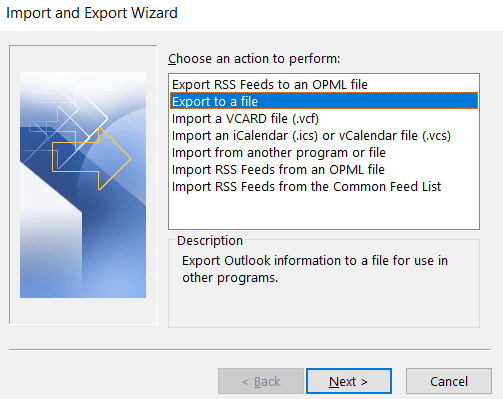
- Select Export to a file in the Import and Export wizard and click Next.
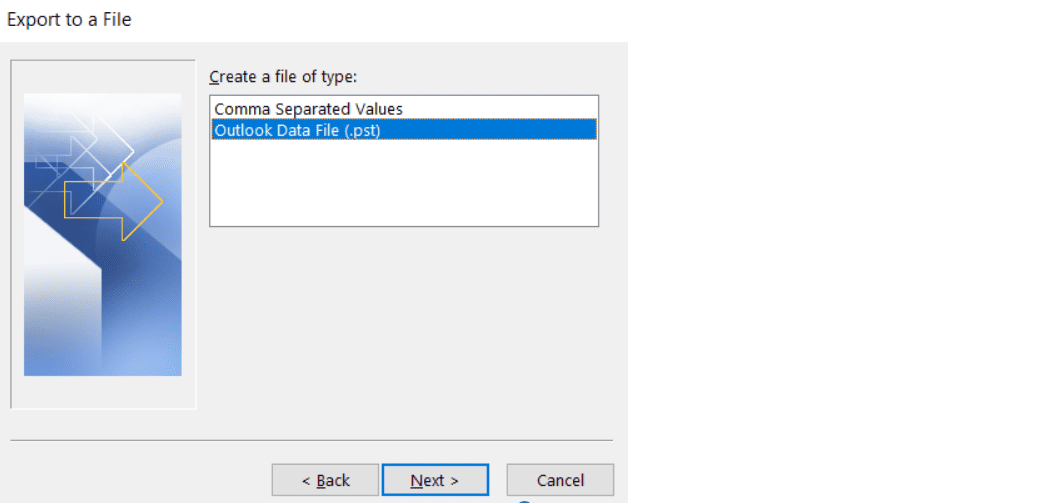
- Choose Outlook Data File (.pst) and click on Next.
- Select the Outlook profile that you need to transfer and click on Next.
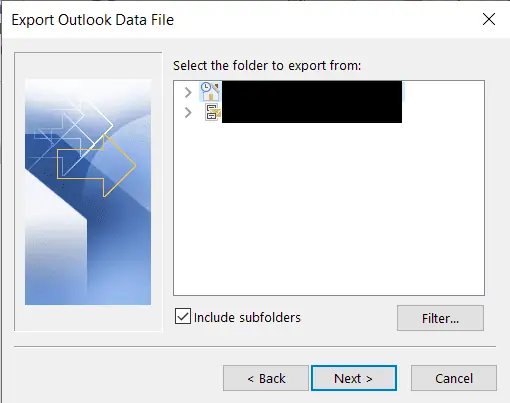
- Now click on Browse to select a location for the PST file and click on Finish.
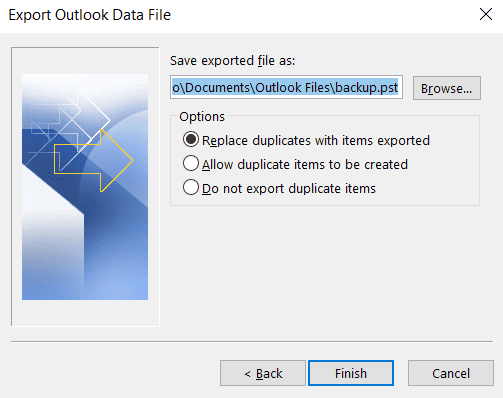
Pro tip: For safety and to avoid the trouble of finding it again, take a backup of the PST file and transfer a copy to the new computer.
Now it’s time to import the file on the new PC:
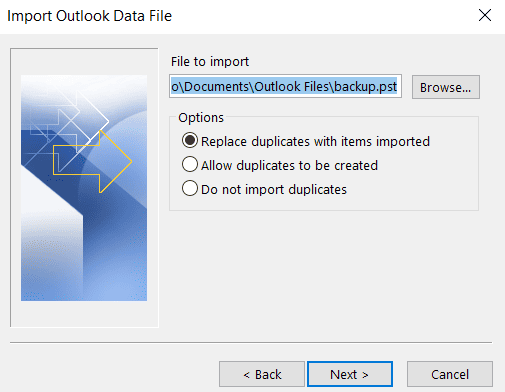
- Open Outlook, click on File, select Open & Export, and choose Import/ Export.
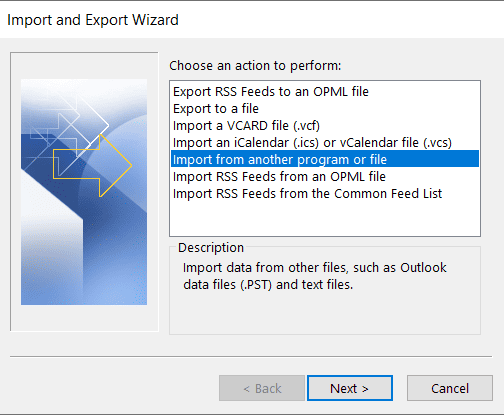
- Choose Import from another program or file and click on Next.
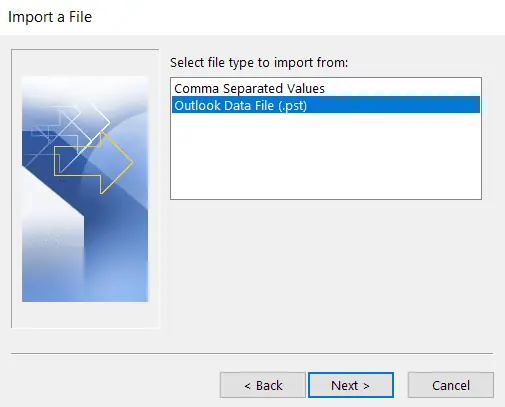
- Select Outlook Data File (.pst) and click Next.
- Now, Browse for the saved (.pst) file to import Outlook data and click Next.
Once this is done successfully, you must replicate the previous computer settings on your new computer to access the Outlook data.
2. Export the Registry Key
Another nifty way to migrate your Outlook account to a new computer is via the registry key
To locate and transfer it to the new PC, do the following:
- Press Windows + R to open Run, type regedit in the box, and press Enter.
- This opens the Registry Editor. Now navigate to HKEY_CURRENT_USER/Software/Microsoft/Office/16.0/Outlook/Profiles
- Right-click on the Profile and select Export.
- Browse a location to save the exported Registration Files(.reg) and Save it.
- Copy this file to the new computer and add it to the registry.
To add it to the registry: Double-click on the registration file and run it on the computer. Click Yes on the confirmation prompt and confirm the changes. If it prompts you to restart, restart the PC for the changes to take effect.
3. Use Remo Outlook Backup and Migrate Software
The Remo Outlook Backup and Migrate software is among the best migration tools on the market and it also the whole process seamless.
Here’s how to go about it:
- You must first download and install the Remo Outlook Backup and Migrate tool on your older system.
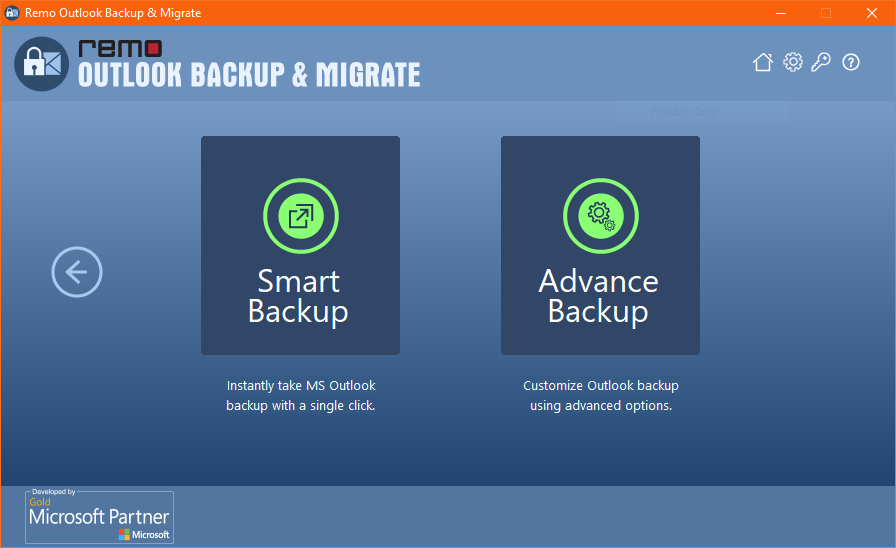
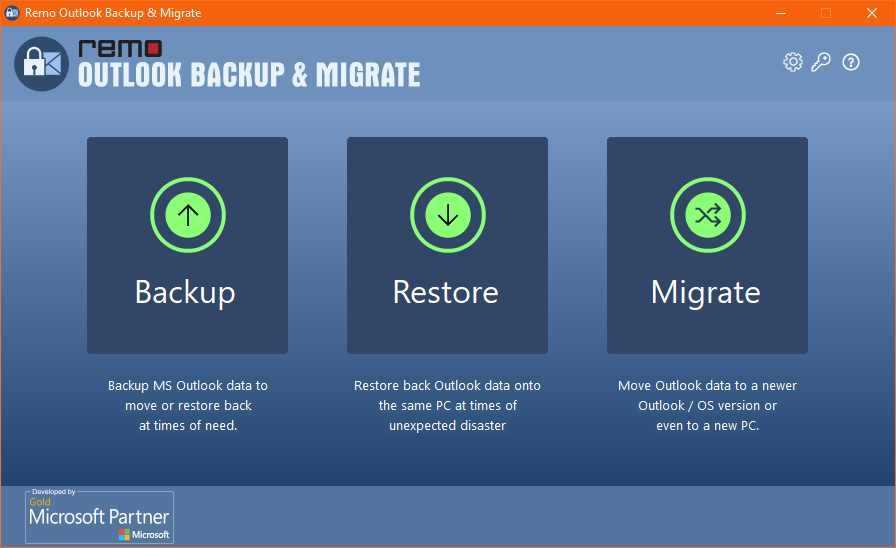
- Open the software from the main screen. You need to click on the Backup option.

- Remo has two backup options – Smart Backup and Advance Backup. The first lets you take a complete backup of your Outlook data and configuration files immediately with a single click. The second allows you to manually choose the Outlook items and data you want to move.
- Whichever you choose, Remo will start to back up the Outlook Items. Once done, you can see the View Report to verify the files or items Remo has backed up.

- Save the backup file on any external drive.
- Connect the drive to your new system.
- Now, Download the Remo Outlook Backup and Migrate tool on your new computer, launch the tool, and click on the Migrate option.
- Browse and select the location of your Outlook Backup file, enter other required details, like version and password, and click on the Next button.
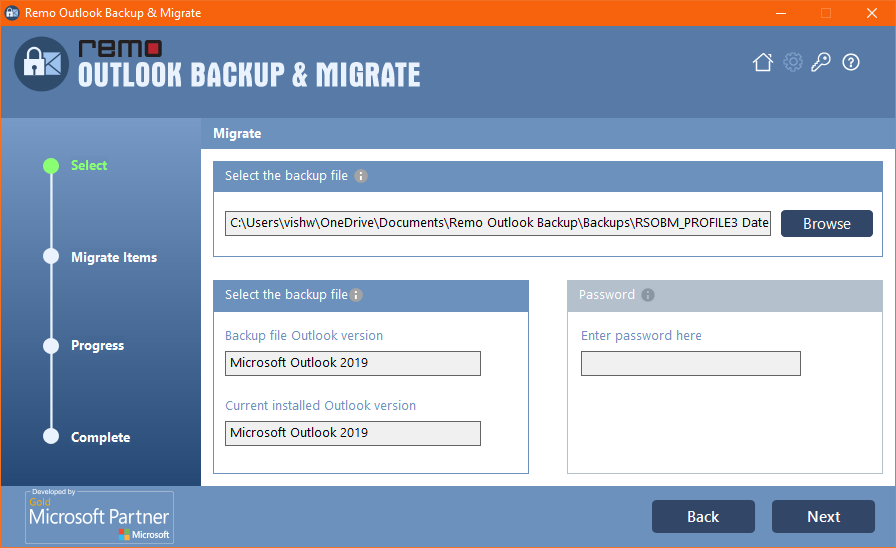
- In the next screen, select the Items you want to restore and click on the Next button; the tool will start migrating Outlook to your new computer.
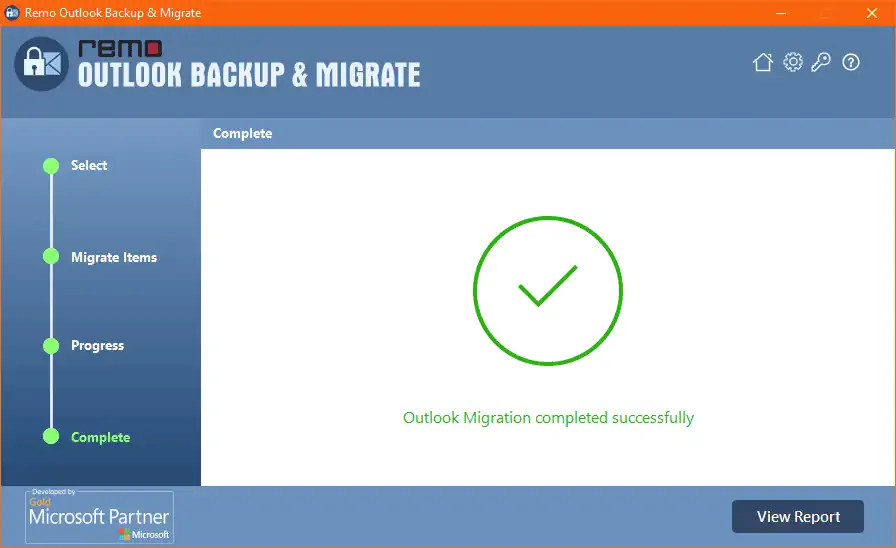
Once the process is complete, you can open your Outlook application and check if all your Outlook data files were migrated.
Now, let’s check out a couple of bonus methods for transferring an Outlook Exchange account and moving your accounts between Macs.
4. Move Outlook Exchange Account Using Outlook Anywhere
Microsoft Outlook Anywhere is an option in the Microsoft Exchange Server that lets you remotely access your mailbox from any device with an internet connection.
It creates a safe connection between the computer and the Exchange Server and doesn’t require you to transfer your Outlook data. You only have to enable the Outlook Anywhere option.
Here’s how to do it:
- Install Outlook on your new computer and ensure the system has a steady and reliable internet connection.
- Configure your Outlook Exchange Account and enable the Outlook Anywhere access option for your account on your Server. This option lets you connect to your mailbox remotely.
- In Outlook on the new computer, go to the File –> Account Settings ? Manage Profiles. Click on the Show Profiles option, and click on the Add button.
- Click on the Exchange option and follow the on-screen instructions to set up your Outlook Exchange Account using the Outlook Anywhere URL.
- Open Outlook and see if you can access your emails, calendars, contacts, and other data.
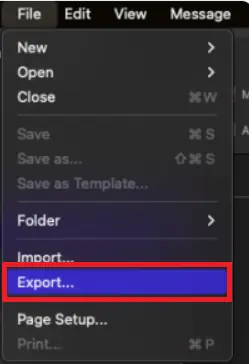
5. Move Outlook to Another Mac Computer
This works the same as the first method – exporting and importing the PST file.
To export Outlook profile from an old computer:
- Open Outlook, click on File, and select Export.
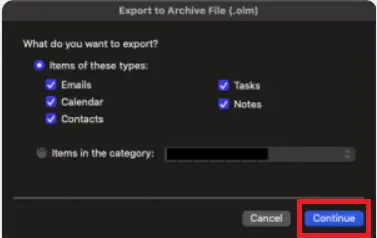
- Check the items you wish to export, and click on Continue.
- Name the file on the Save As box, choose a folder, and click Save.
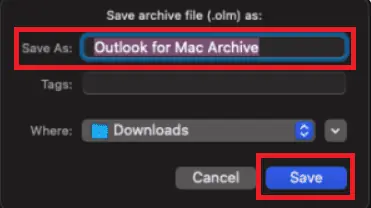
- Save the archive file as a .olm. Once the data is exported, you can see a notification and click Finish.
To import Outlook profile to the new Mac:
- Click on File and Import.
- Select Outlook for Mac archive file (.olm) and click on Continue.
- Choose Import archive file as .olm.
- Select the .olm file on your Mac, and then click on Import.
Now, you can check all your imported Outlook items while migrating the Outlook profile to the new computer.
Wrapping up
Now you know how to move your Outlook account to a new computer. It doesn’t matter if you’re running on POP, IMAP, Exchange, or if you’re on a Mac – we’ve got it all covered.
Which method did you choose? Let me know in the comments below.
Read our disclosure page to find out how can you help MSPoweruser sustain the editorial team Read more


Improve this guide


User forum
2 messages