Monitor Keeps Going Black: 11 Easy DIY Fixes
If your monitor keeps going black, you’re probably confused and frustrated. Keep reading as I explain the reasons and proven troubleshooting methods to fix this issue for good.
Why My Monitor Keeps Going Black?
Below, you’ll find the most common reasons for this problem:
- A loose or damaged display data cable connects the GPU or motherboard display output to the monitor’s input panel.
- A loose power cable.
- You’re using an AMD FreeSync monitor with NVIDIA G-SYNC hardware.
- The monitor’s power-saving feature is kicking in frequently.
- You’ve configured the PC to dim the display or go to sleep after a brief period of inactivity.
- The monitor’s PCB or the GPU card is overheating.
- Conflicting screen refresh rate between the PC and monitor.
- More than one display configuration for the primary and secondary display units.
- Unsolicited third-party apps, spyware, malware, and viruses.
- Outdated or corrupted graphics card drivers.
- Inadequate power supply to the PC.
- Insufficient video processing resources (GPU) in the PC.
- The monitor itself is faulty.
How To Fix the Monitor Going Black Problem
Preliminary Checks
- Test the mains power outlet with a different electronic appliance and see if that works.
- Snugly connect the power cord to the 3-prong input on the back or bottom of the monitor.
- Ensure the surface on which you’ve kept the display unit doesn’t shake when you type on the surface.
- Use an appropriate display cable of high quality to connect the monitor to the motherboard or GPU output (VGA, Display Port, or HDMI port).
Solution 01: Disable NVIDIA G-SYNC for AMD FreeSync Monitors
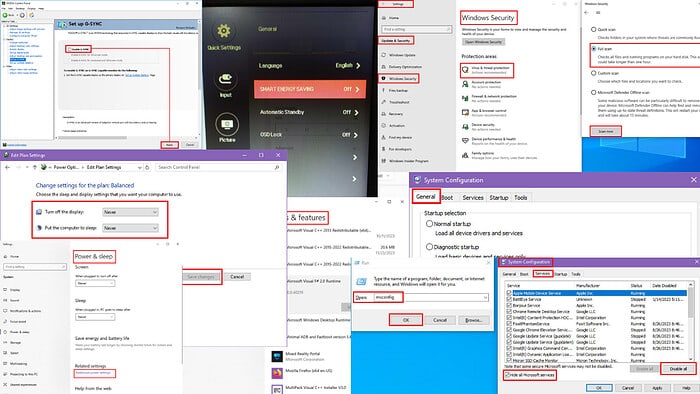
- Open the NVIDIA GPU configuration console by right-clicking on the PC Desktop and choosing NVIDIA Control Panel.
- On the control panel, you should see 3 columns of settings. These are 3D Settings, Display, and Video.
- Click the Display column to expand its settings.
- Now, click on the Set up G-SYNC hyperlink on the left-side navigation panel.
- On the right side menu, if you see a checkmark in the checkbox for the Enable G-SYNC option, uncheck it.
- Click on the Apply button at the bottom of the NVIDIA Control Panel app.
- Restart your PC.
Solution 02: Let the Monitor or PC Cool Down
Did the monitor start going black after playing a high-end PC game or running GPU-intensive software for long hours?
Take a coffee break! Let the PC and display unit cool down. Turn on the AC unit in your room or open the windows and doors for proper ventilation.
Solution 03: Disable Power Saving Mode on the Monitor and PC
Power saving mode makes your monitor and PC go to sleep after a few minutes of inactivity.
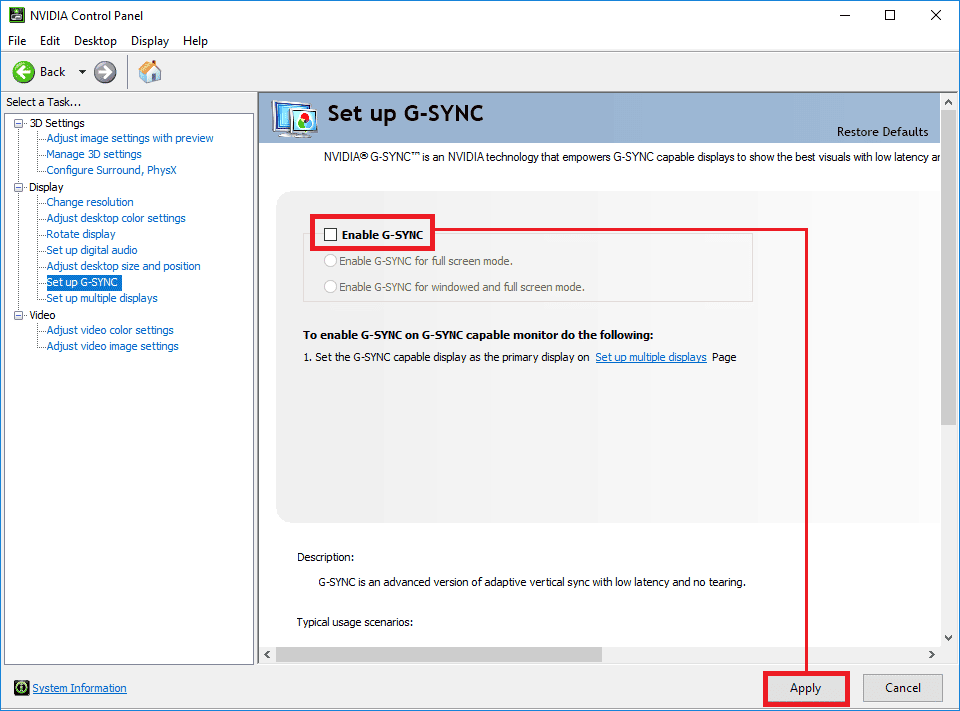
- Type “Power” in the Windows Search box and click on the Power & sleep settings option.
- On Power & sleep, scroll down until you find Related settings.
- Now, click on Additional power settings.
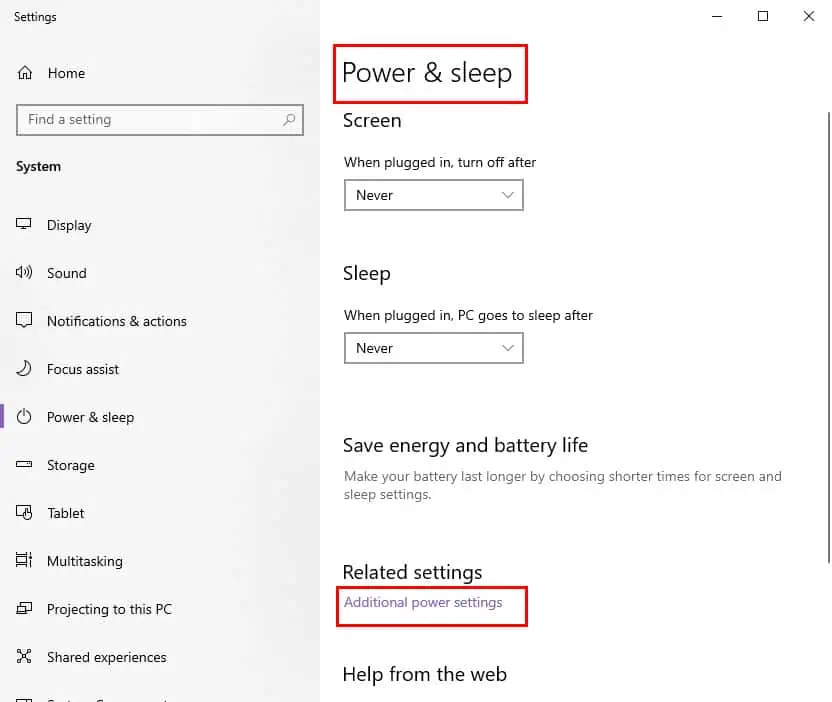
- On the Power Options dialog, click on the Choose when to turn off the display link.
- Set both options to Never on the next screen.
- Click Save changes.
To disable auto power-saving on your monitor:
- Press the settings or menu key on the monitor.
- Go to the Settings menu.
- Navigate to General.
- Choose Smart Energy Saving and tap on it. On some monitors, it could be Automatic Standby.
- Choose Off or Manual.

Solution 04: Reset Monitor Settings
- Access the configuration control from the monitor’s panel.
- Go to the General settings menu.
- Select Reset and follow the on-screen guidance to reset all monitor settings.
Solution 05: Scan PC for Viruses
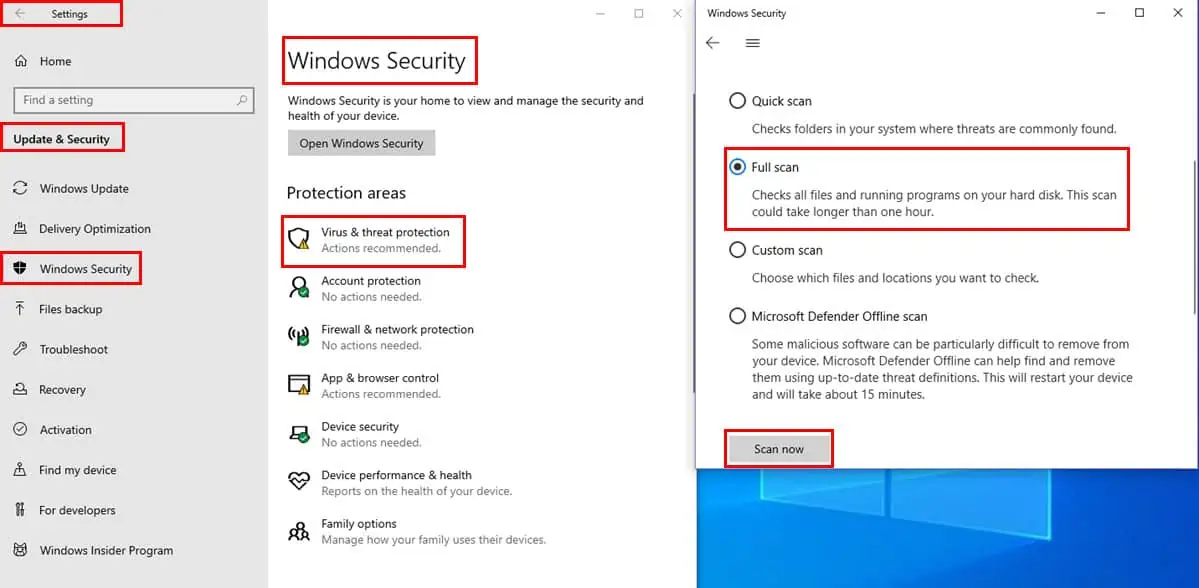
- Press the Windows + I keys to open the Settings options menu.
- Choose Update & security from the dialog that pops up.
- On Update & security, go to Windows Security.
- On the right, choose Virus & threat protection under the Protection areas section.
- Select Scan options below Current threats.
- Choose the Full scan option.
- Hit the Scan now button.
Windows Security should be sufficient for a detailed scan of the device for malware and viruses. However, you can also opt for third-party antivirus software. One of the best examples I fully trust is ESET HOME Security Essential – formerly known as ESET Internet Security – because it has powerful scanning features and provides complete protection against all types of cyber threats.
Solution 06: Perform a Clean Boot
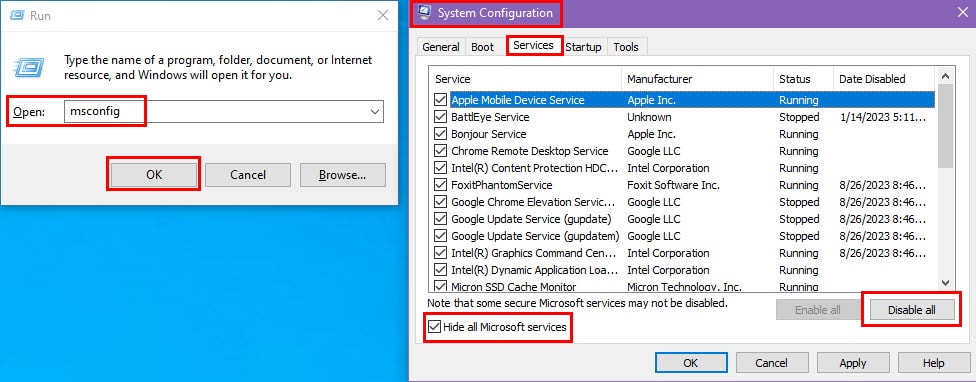
- Press Windows + R to launch the Run dialog.
- Type in msconfig into the Open field and hit Enter.
- Navigate to the Services on the System Configuration dialog.
- Checkmark the Hide all Microsoft services option and click Disable All.
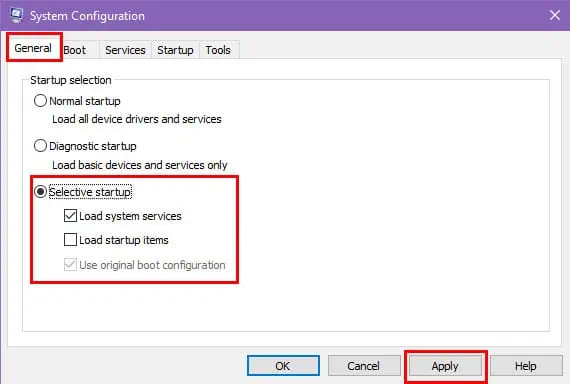
- Click on the General tab.
- Choose Selective startup and uncheck Load startup items.
- Hit the Apply button.
- A Restart dialog will show up.
- Reboot the PC.
If Clean Boot fixes the monitor issue, uninstall the recently installed third-party app that might be causing the interference.
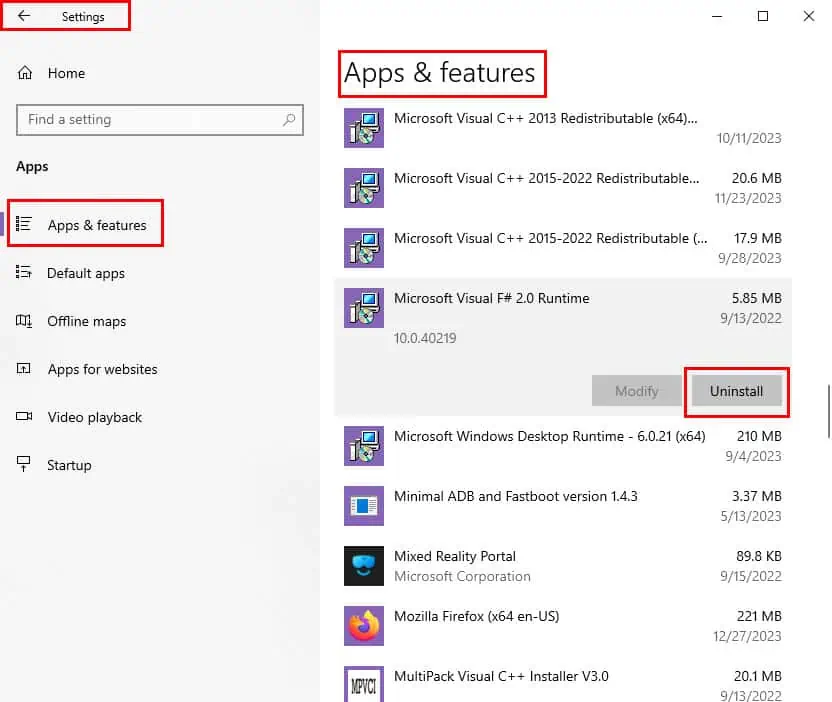
- Press Windows + I and choose Apps on the dialog that shows up.
- On the Apps & features menu, scroll down to find the recently installed app.
- Click on the app and hit the Uninstall button.
Solution 07: Use Uniform Display Configuration
- Right-click on Desktop and choose Display settings.
- Note down the current display resolution for the primary monitor from the Display resolution section.
- Now, expand the Multiple displays menu and select the secondary monitor.
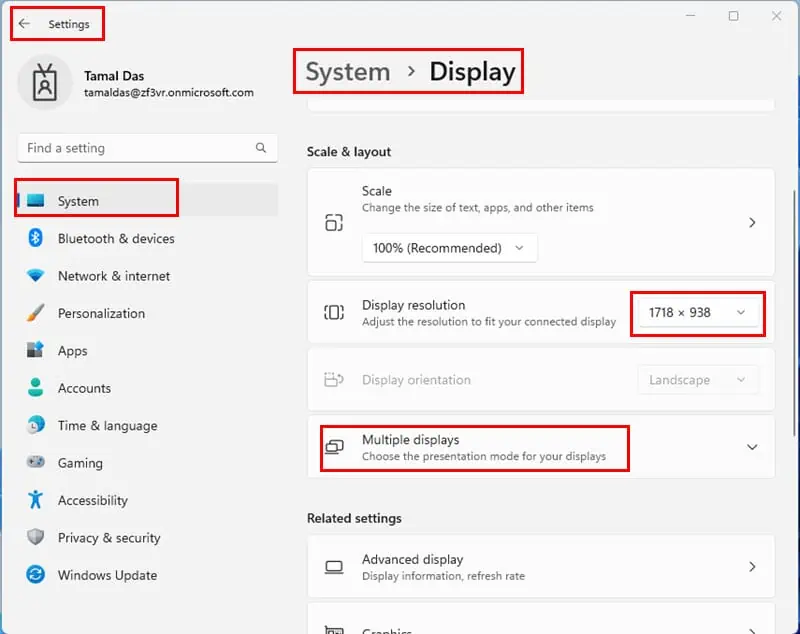
- When you see the Display resolution drop-down, change it to the same value as in the primary display device.
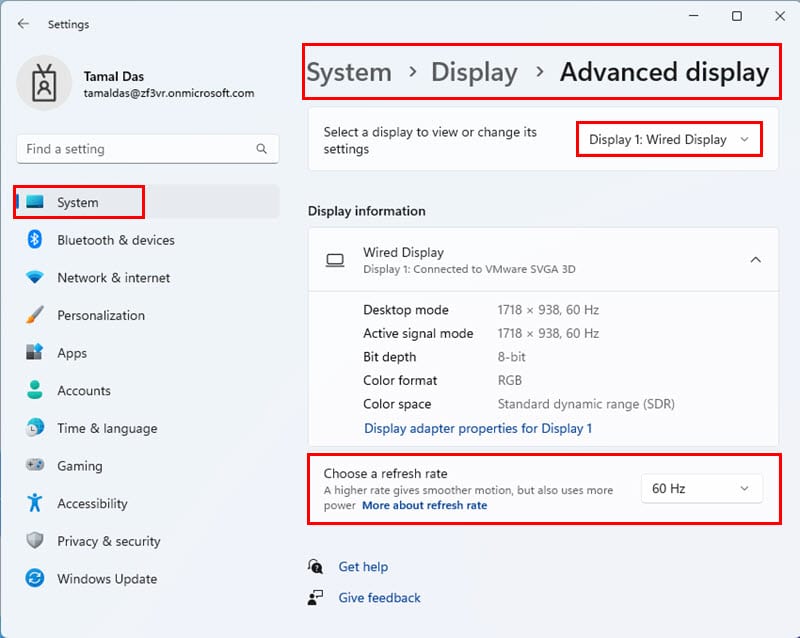
Now, go back to System > Display and do the following:
- Scroll down to Advanced display.
- Choose Display 1 from the top-right corner.
- Check the refresh rate of the primary display, like 60 Hz.
- Now, go to the top again and choose Display 2.
- Go to the refresh rate section and change it to 60 Hz if it’s not so.
Disconnect the secondary display cable and reconnect to fix the black screen issue on the secondary monitor.
Solution 08: Refresh the GPU
Simultaneously press the keys Windows + Ctrl + Shift + B once to initiate the background restart of your graphics driver.
During this process, your computer may exhibit a momentary screen flash, emit a beep sound, or briefly display a black screen as confirmation of the reset. Certain Windows 10/11 computers might not visibly reflect any changes on the screen during this operation
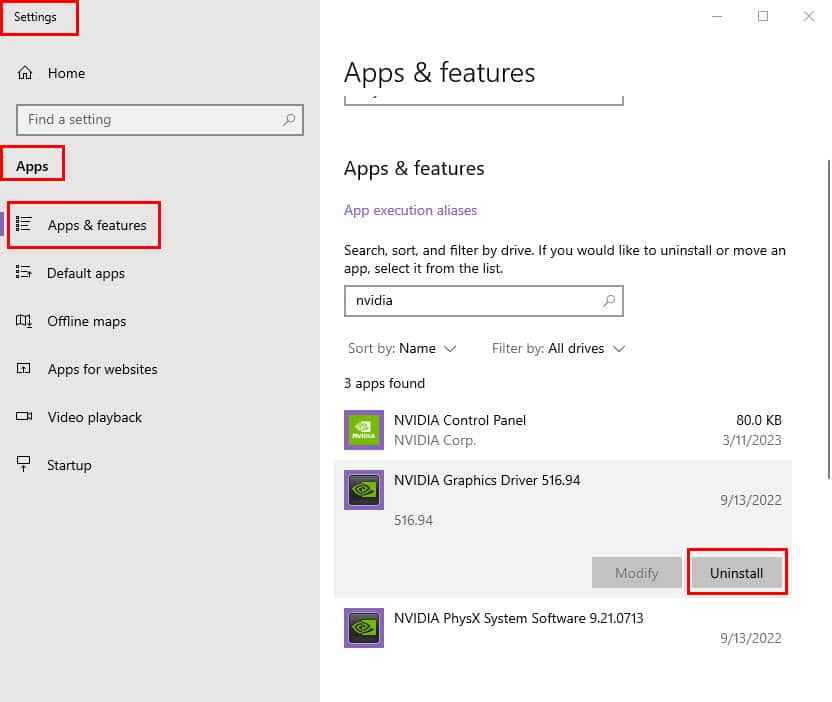
Solution 09: Uninstall and Re-Install the GPU Driver
Remove the existing graphics card driver from Settings > Apps > Apps & features. Find below a screenshot for removing the NVIDIA GPU driver:
If yours is different, like AMD Radeon or Intel UHD Graphics, the steps should be the same as above.
Now, go to the GPU manufacturer’s website and download the latest GPU driver. For NVIDIA Geforce, RTX, etc. you should go to the NVIDIA Driver Downloads portal. Contrarily, for AMD Radeon, go to AMD Drivers and Support.
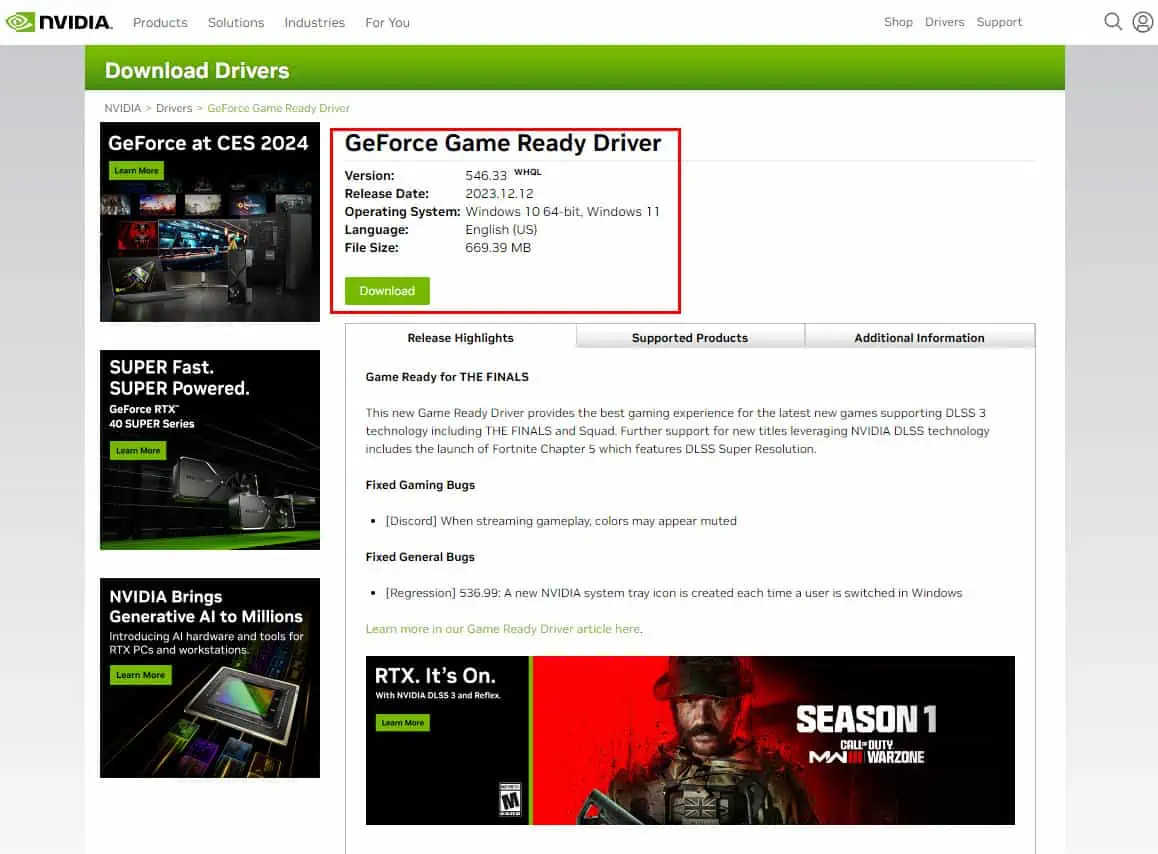
Install the latest driver by following the instructions that show up as you double-click the installation package. Reboot your PC so that the GPU driver update takes effect.
Solution 10: Fix the PC Power Supply
If the PSU of your PC is supplying less power than required, the GPU won’t work properly resulting in display blackouts.
First, go to this power supply calculator tool and feed in the following details to calculate an estimated wattage requirement:
- CPU brand, socket, and model
- Motherboard form factor
- GPU brand, model, and number of GPUs
- RAM capacity and number of RAM sticks
- SSD storage capacity and number of sticks
- HDD and optical drives if any
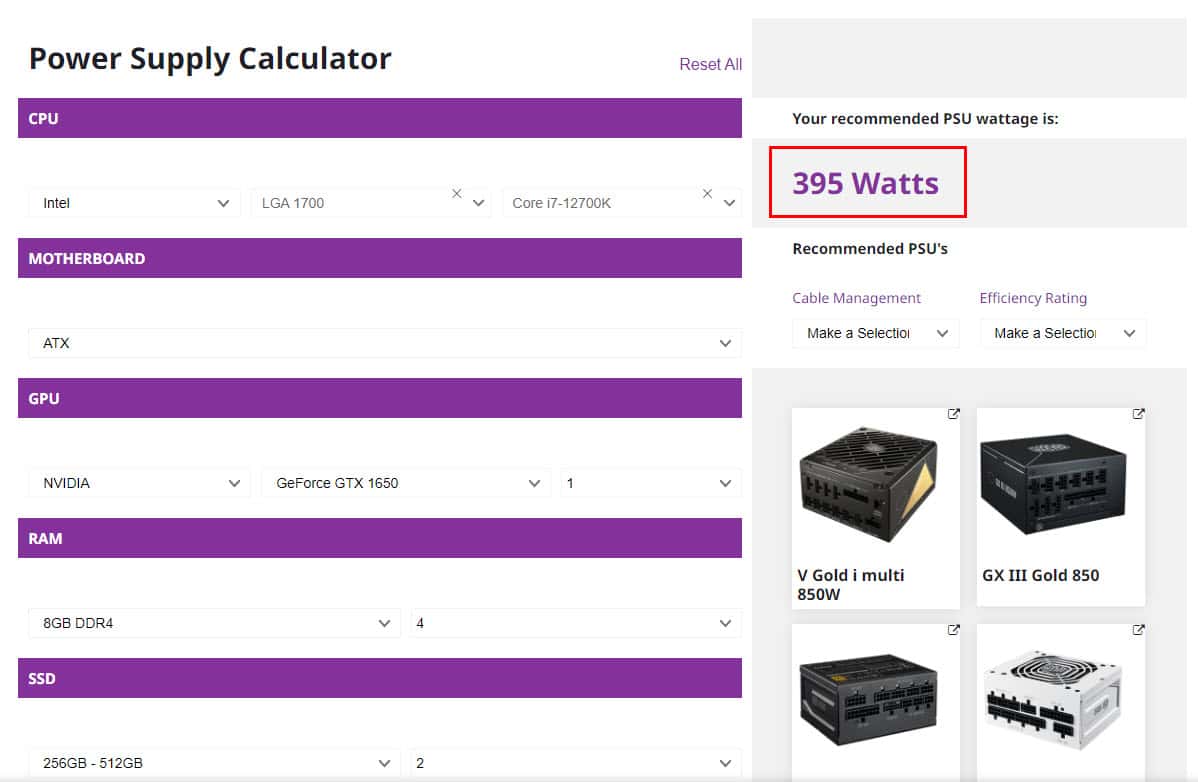
After you see the wattage you need, check the box of the PSU to find out its output. If it’s less than the wattage recommended by the tool, you must buy an appropriate power supply unit that delivers the required wattage.
Solution 11: Enable Low-Resolution Video From WinRE
- Press the Shift key and go to Start menu > Power menu > click Restart.
- Hold the Shift key until the device shuts down and restarts.
- When you see the Please Wait splash screen, release the Shift key.
- Click the Troubleshoot button on Choose an option screen.
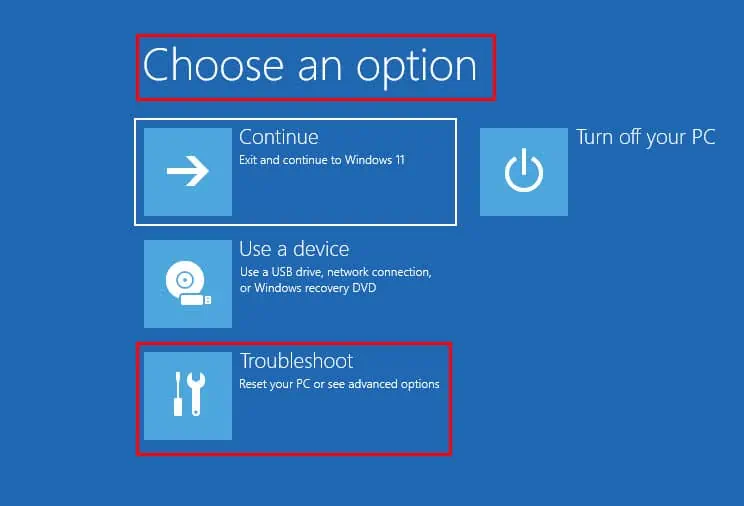
- Choose Advanced options on the next window.
- Now, choose Startup Settings.
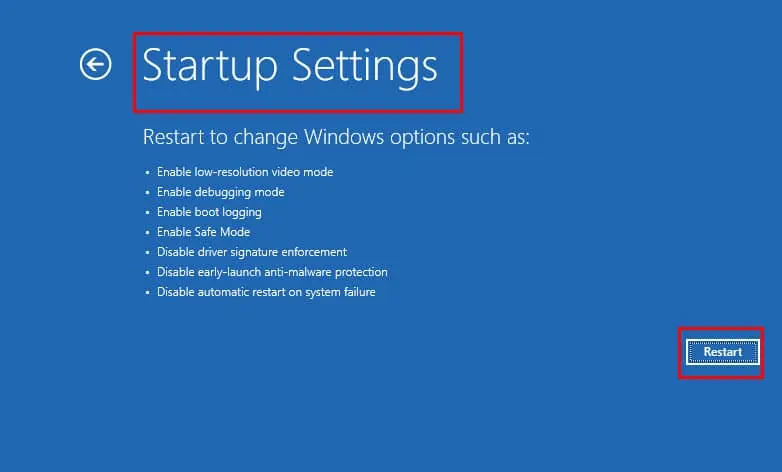
- Click on the Restart button.
- On the Startup Settings window, press numeric 3 located above the W key.
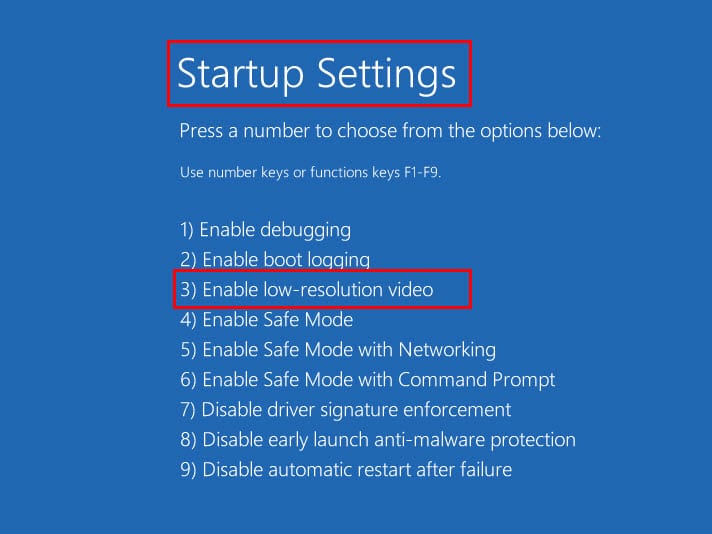
- Alternatively, try the F3 key.
- The PC will reboot into low-resolution video.
If you don’t see the issue in this mode, it’s time you replace the GPU of the PC or consider running less GPU-intensive apps and games.
Related readings:
If none of the above troubleshooting ideas work take your PC to an authorized service center.
Sometimes the monitor keeps going black on a laptop when the LED panel shakes. It could be due to a faulty cable connecting the LED panel with the PCB. You must take the laptop to a service center for repairs. When seeking professional technical help, don’t forget to claim warranty support if possible.
Did the article help? Am I missing something here? Do comment below!
Read our disclosure page to find out how can you help MSPoweruser sustain the editorial team Read more


Improve this guide

User forum
0 messages