Kernel Security Check Failure [10 Easy Fixes]
6 min. read
Updated on
Read our disclosure page to find out how can you help MSPoweruser sustain the editorial team Read more

The “Kernel Security Check Failure” on my PC took me by surprise. As a long-time Windows user, I was no stranger to occasional glitches, but this Blue Screen of Death (BSOD) was particularly alarming. Combining my own experience with a deep dive into technical forums, I pieced together several solutions to the problem.
In this guide, I’ll list those fixes with detailed steps to apply them.
What Is the “Kernel Security Check Failure” Error in Windows 10?
The “Kernel Security Check Failure” error is a type of BSOD that indicates a system file or memory issue. It’s often related to issues with system RAM or incompatible software/drivers.
It’s as if the computer tries to access important files or instructions and finds something out of place, leading to a system crash as a protective measure.
How To Fix the “Kernel Security Check Failure” Error?
1. Preliminary Checks
Restart Your PC
- Make sure to save any open files.
- Use the Start menu to reboot your PC.
- After rebooting, see if the BSOD reoccurs.
Unplug and Plug the External Hardware
- Completely power off your PC.
- Remove all external devices (USB drives, printers, etc.).
- Power on your PC without these devices. If the error doesn’t return, reconnect each device one by one to find the culprit.
2. Restart the PC in Safe Mode
Booting in Safe Mode allows Windows to run with minimal drivers and services. This can help you identify if a software or driver conflict is causing the BSOD.
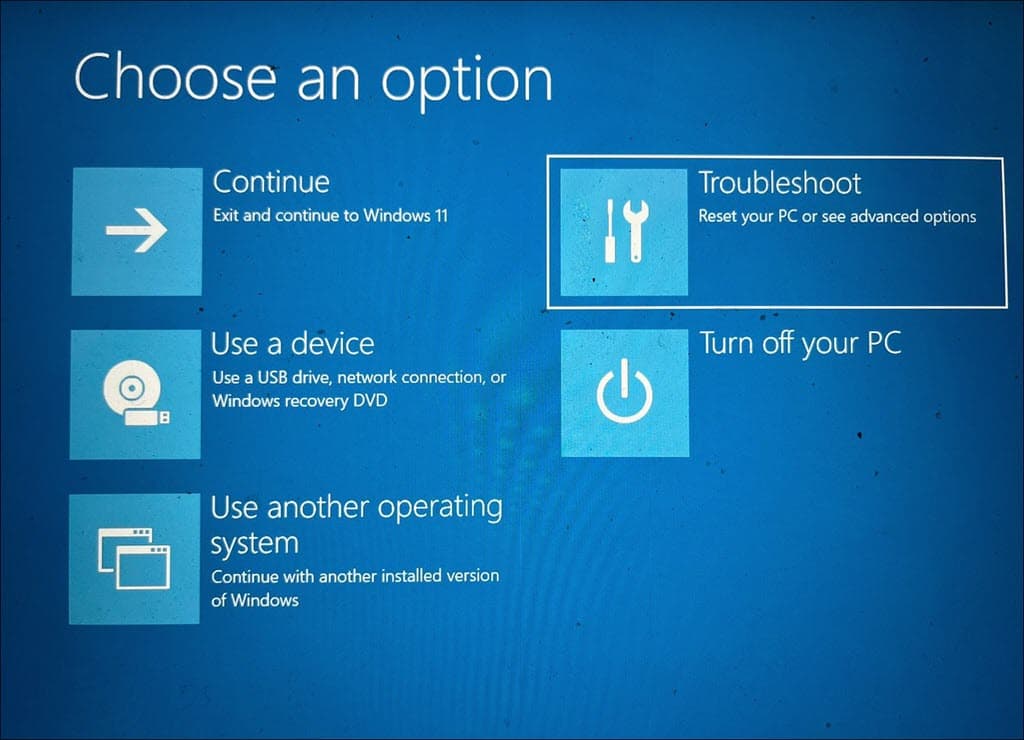
- Repeatedly force restart your PC until it enters Automatic Repair Mode.
- Choose the Troubleshoot option.
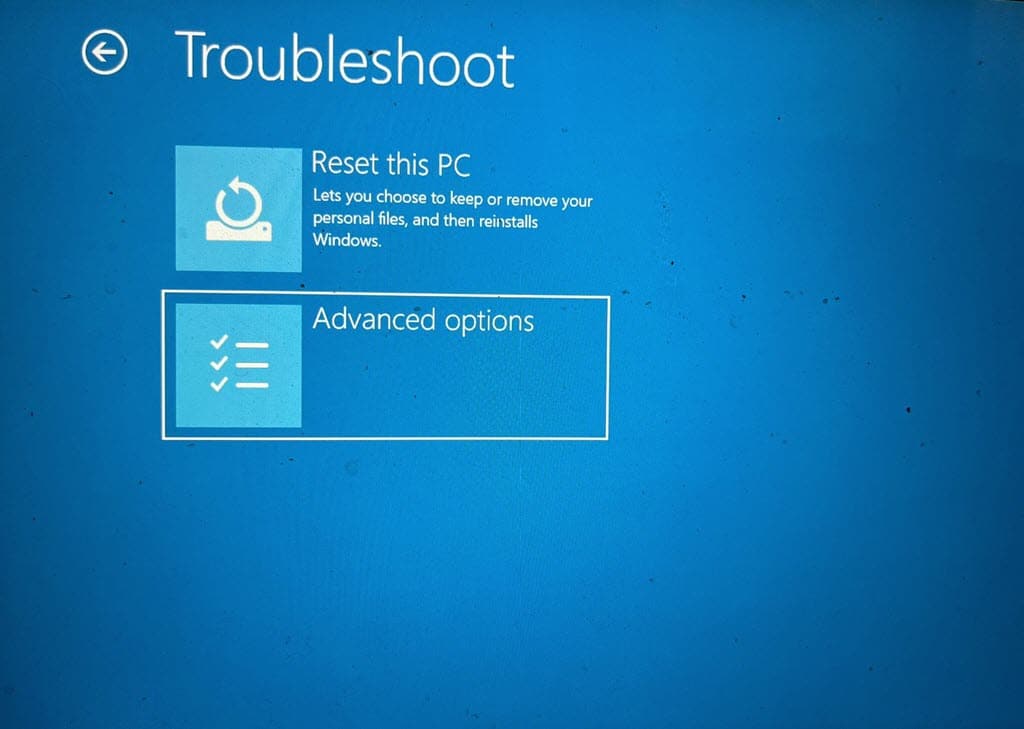
- Navigate to Advanced options.
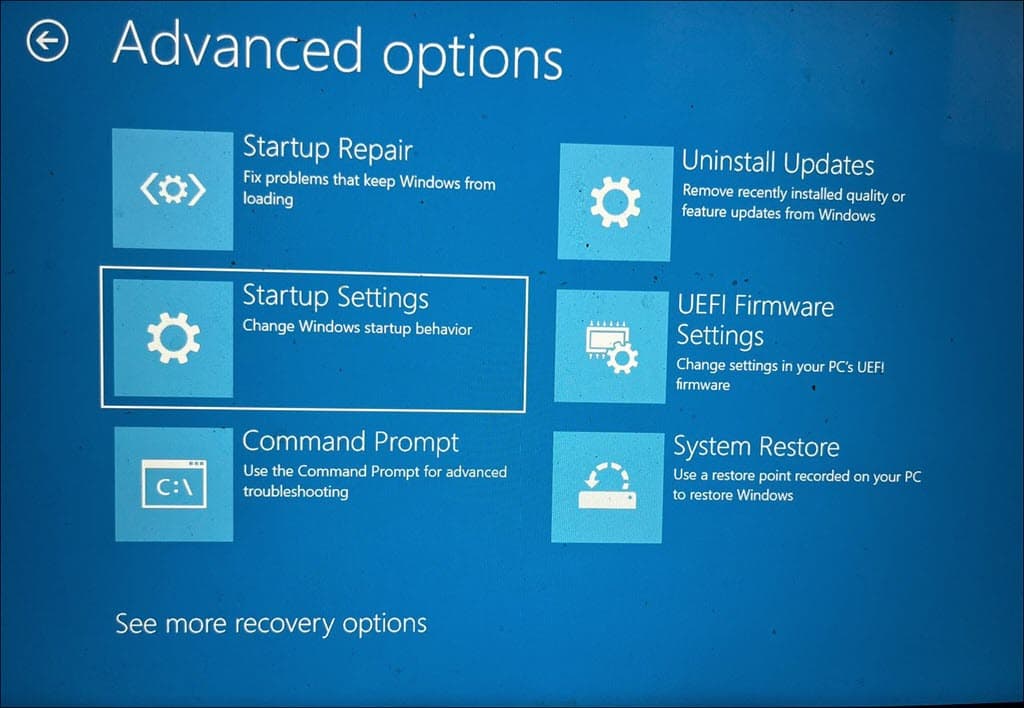
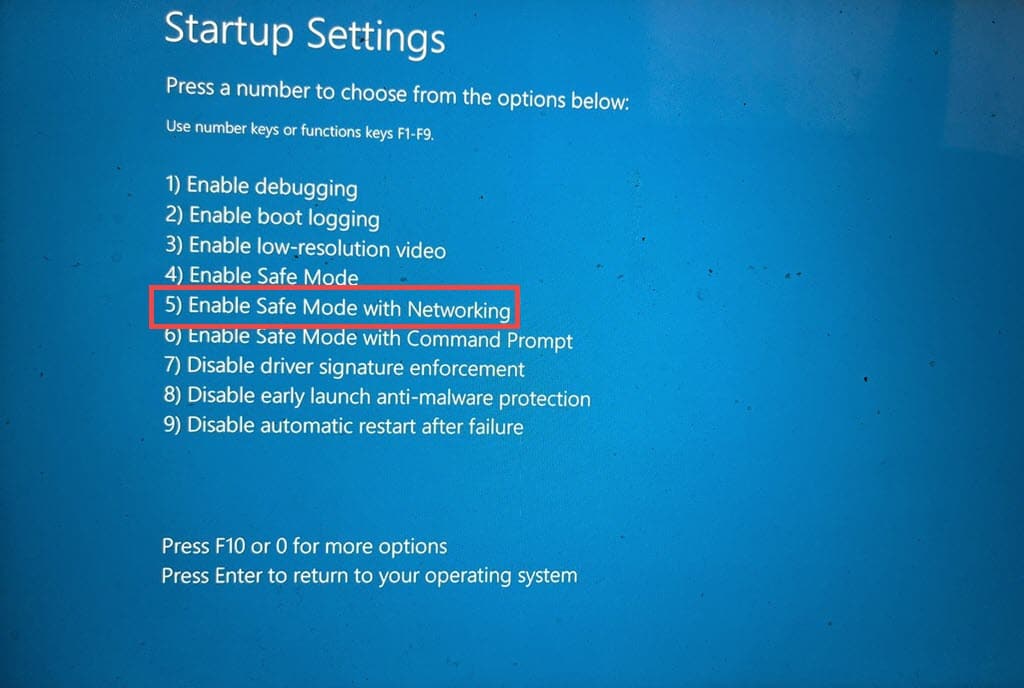
- Select Startup Settings.
- On the next screen, click the Restart button.
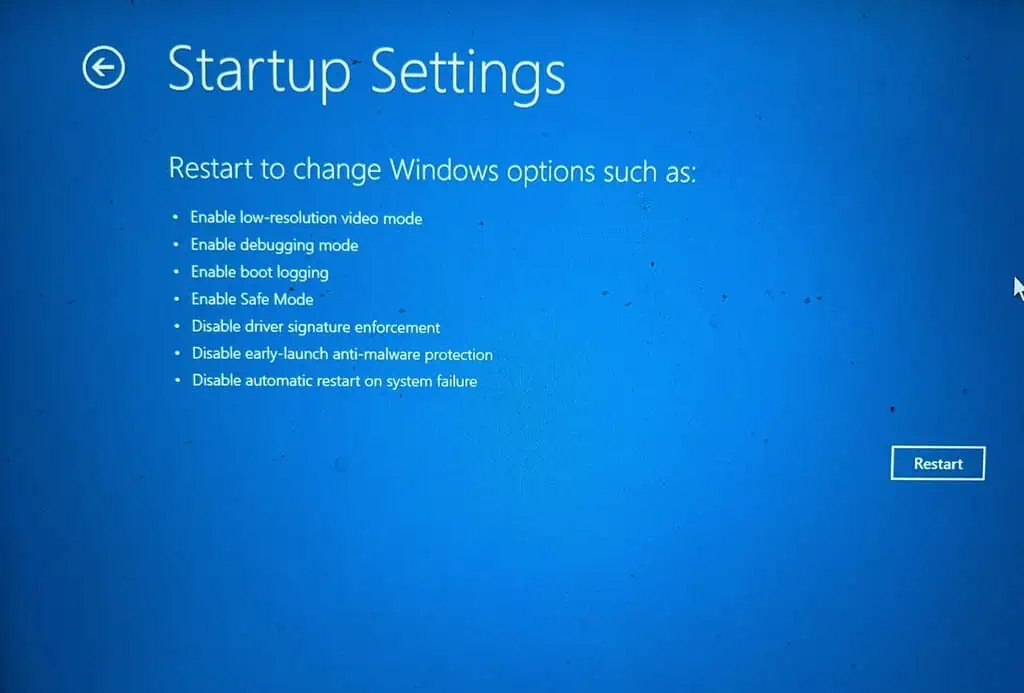
- After your system restarts, press F5 on your keyboard to boot Windows in Safe Mode with Networking.
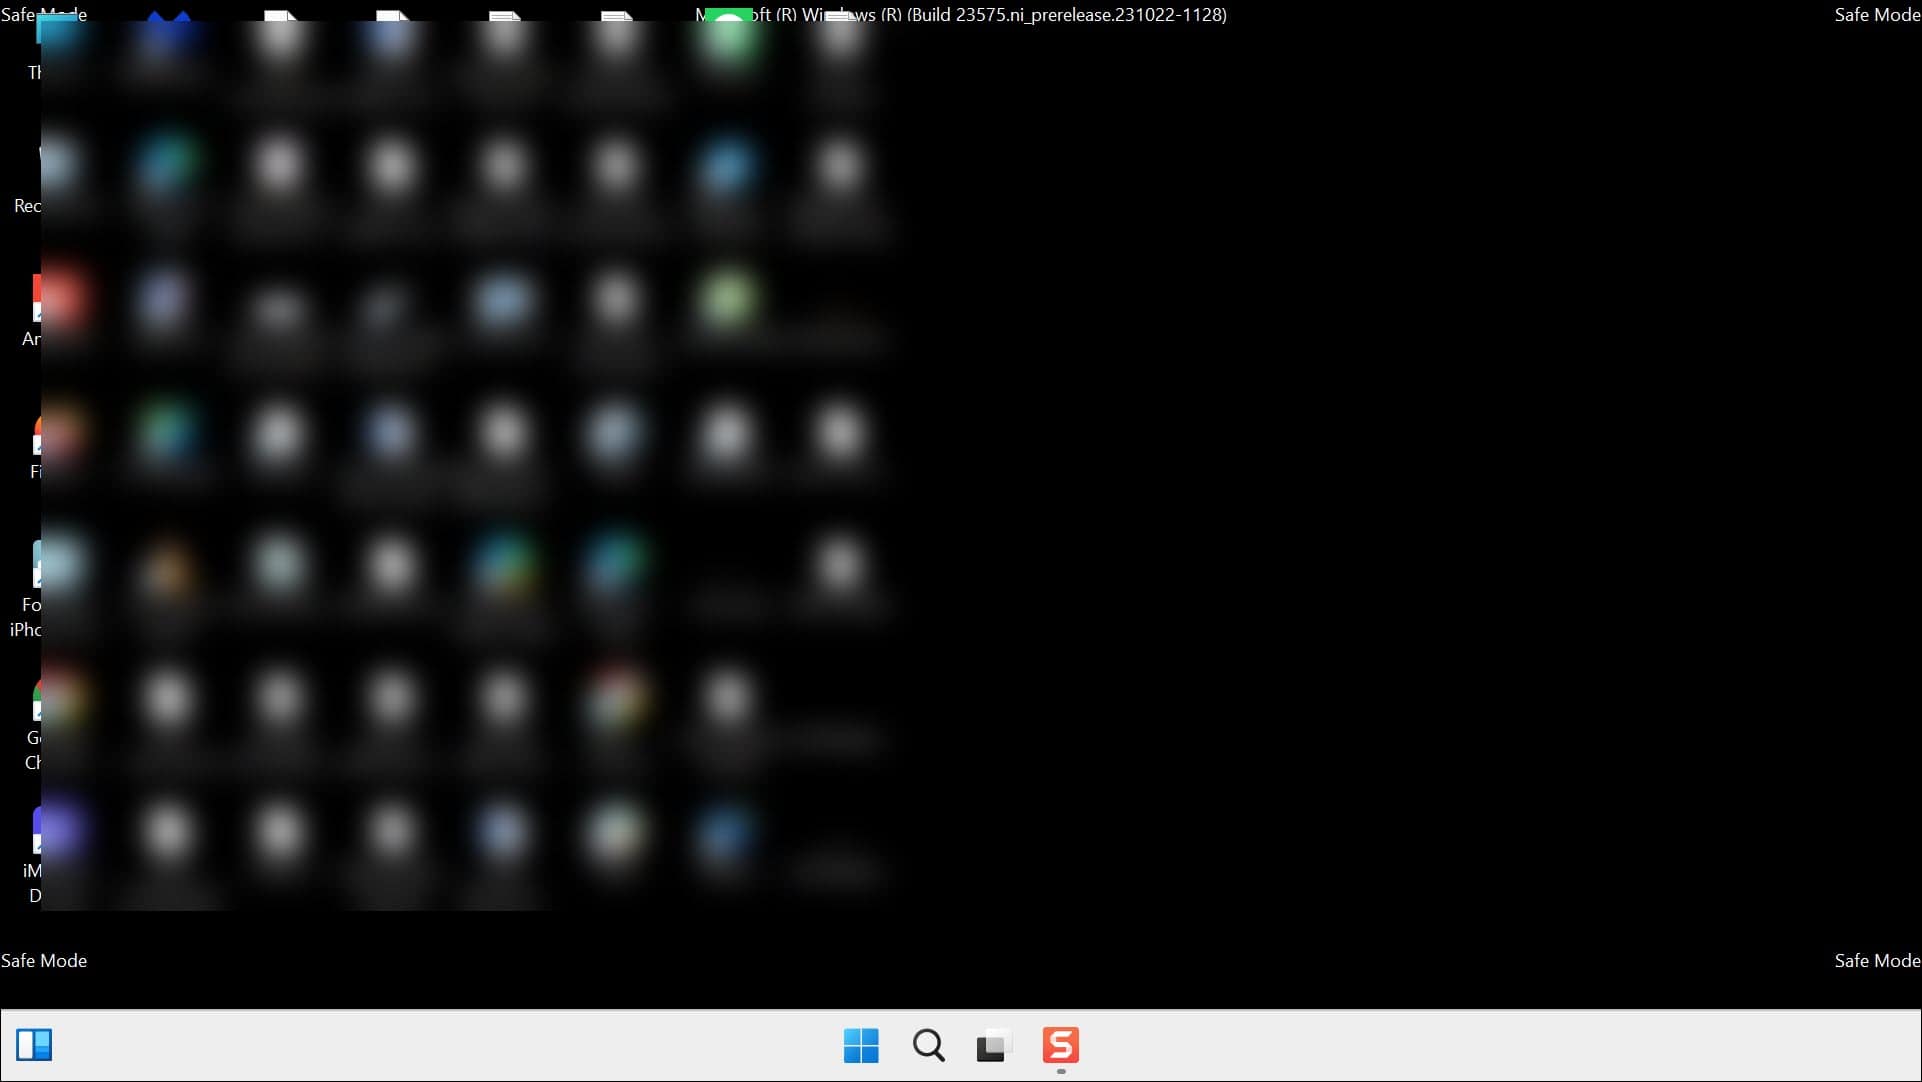
- Your system will now start in Safe Mode, allowing you to perform additional troubleshooting.
3. Run the Hardware and Device Troubleshooting Tool
Windows includes a built-in tool for diagnosing and fixing hardware-related issues.
- Press Windows + R to open the Run Command window.
- Enter the command
msdt.exe -id DeviceDiagnosticand press Enter.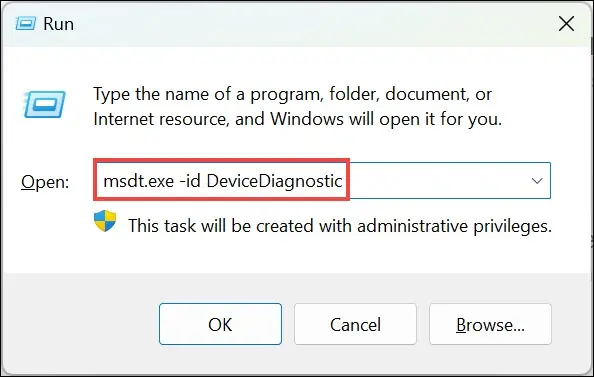
- Click Next to start the troubleshooting process.
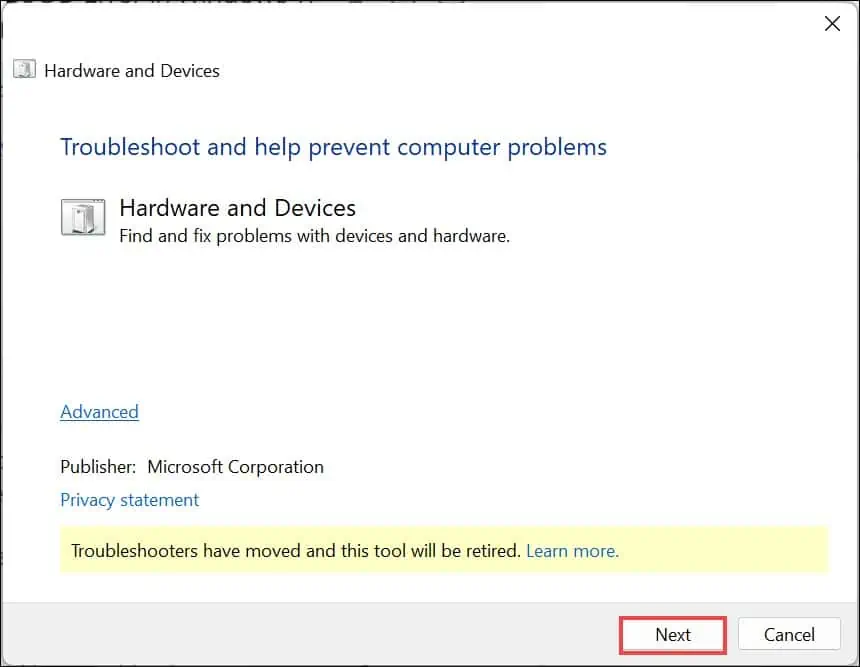
- Windows will then scan for hardware-related issues.
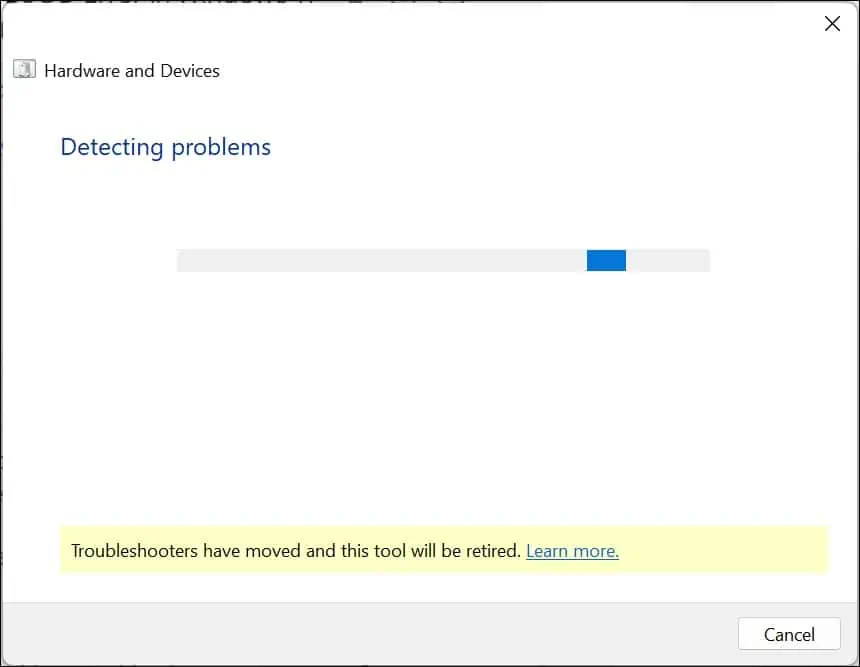
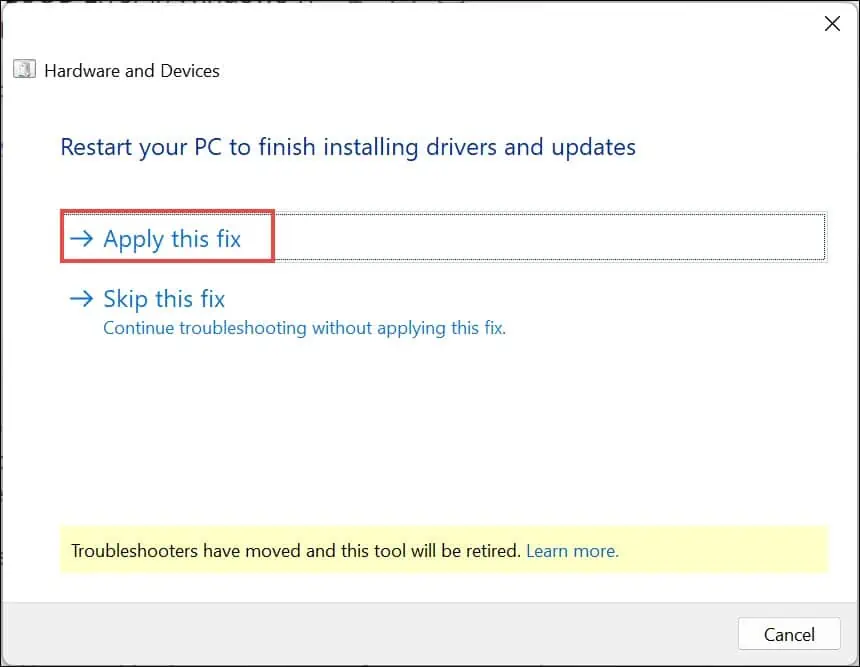
- If any issues are found, click Apply this fix.
4. Perform a Memory Test
Faulty or failing memory (RAM) can often cause BSODs. Running a memory test can help determine if this is the case.
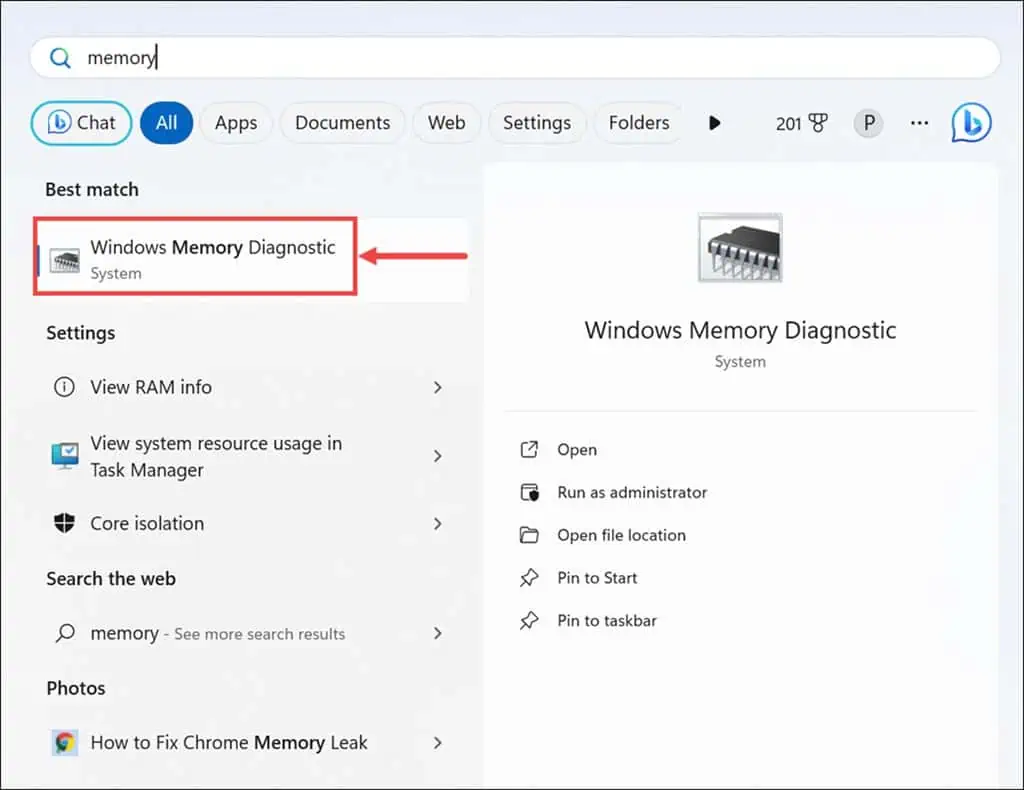
- Type “Windows Memory Diagnostic” in the Windows search bar and select it.
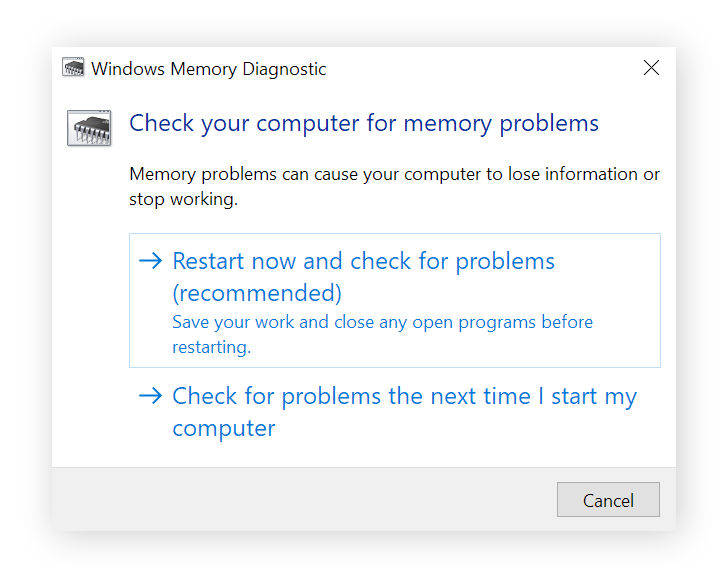
- Choose Restart now and check for problems. Save any open files, as your PC will reboot, and the test will begin.
- After the test, Windows will restart. Check the test results in the notification area on the taskbar for any detected issues.
5. Uninstall Corrupted Drivers
Corrupted or outdated drivers can be a significant cause of BSODs. Identifying and removing them can help resolve the Kernel Security Check Failure.
- Right-click the Start button and choose Device Manager from the menu.
- In the Device Manager window, look for drivers marked with yellow exclamation or warning signs.
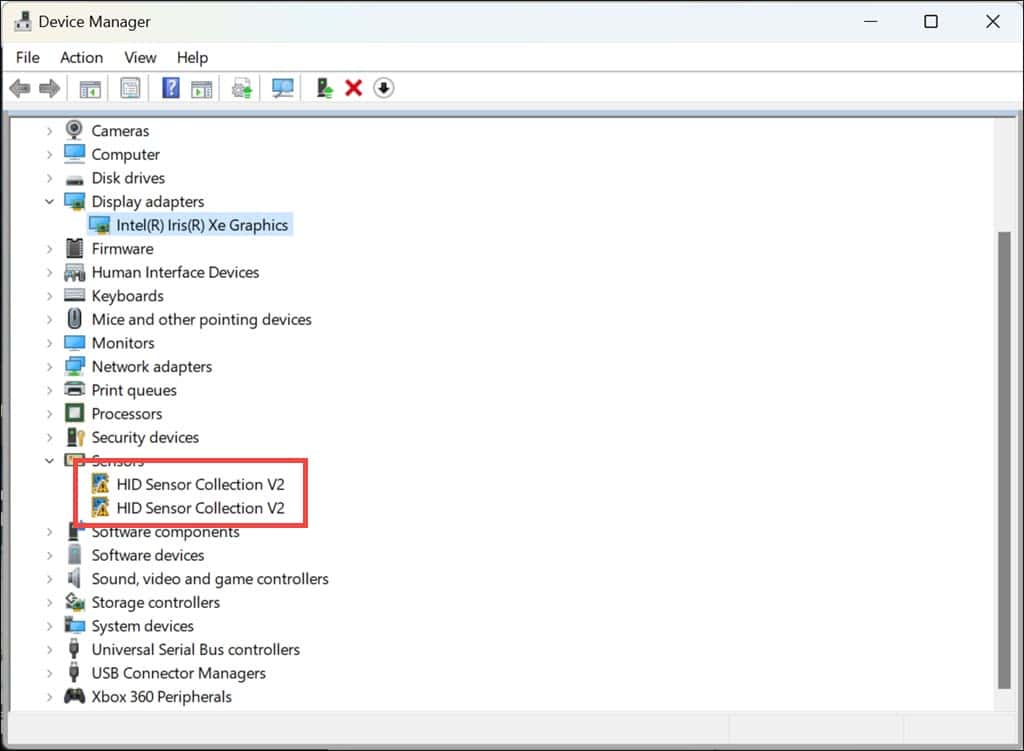
- Right-click on each problematic driver and select Uninstall device.
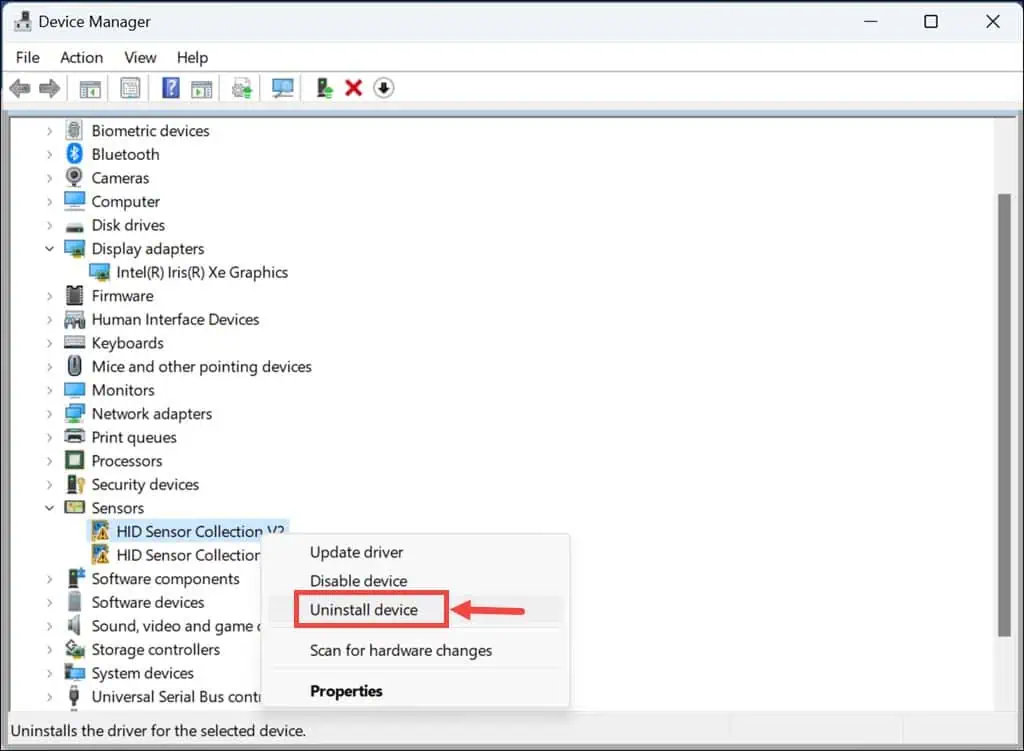
- Confirm the uninstallation when prompted.
- Once you have completed these steps, restart your PC to ensure the changes take effect.
6. Update Essential Drivers
Up-to-date drivers are crucial for hardware compatibility and system stability.
- Right-click on the Start button and select Device Manager.
- In the Device Manager window, locate essential drivers, including those for display, firmware, and disk drives.
- Right-click on each important device and choose Update driver.
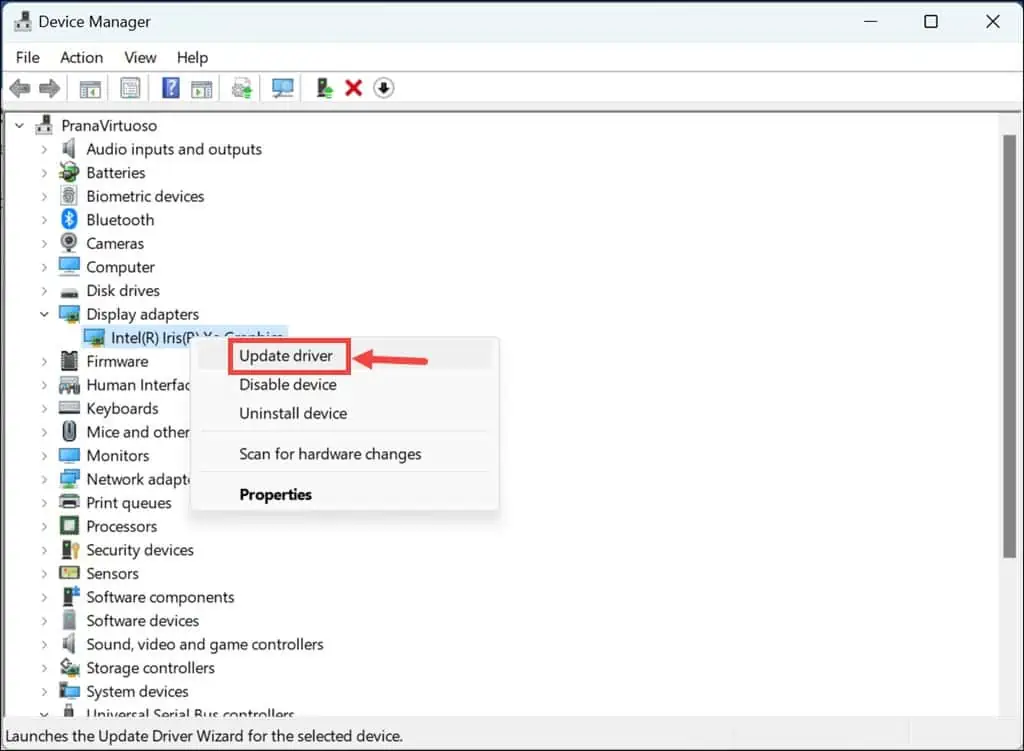
- Select Search automatically for drivers.
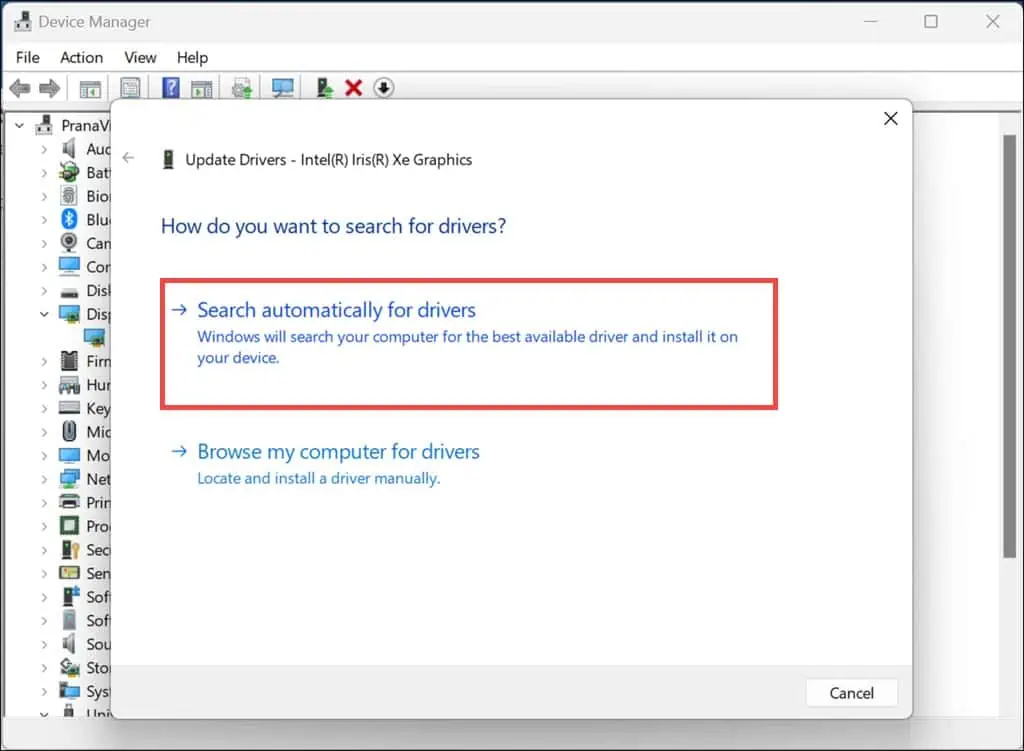
- Apply this process to all significant drivers, then restart your computer to ensure the updates take effect.
7. Run SFC and DISM Commands
The System File Checker (SFC) and Deployment Image Servicing and Management (DISM) are tools that fix corrupted system files.
- If Windows boots, open Command Prompt or Terminal with administrator rights and proceed to step 5. If Windows doesn’t boot, restart your computer multiple times until Automatic Repair Mode is activated.
- In Automatic Repair Mode, select the Troubleshoot option.
- Under “Troubleshoot,” choose Advanced Options.
- On the Advanced Options screen, find and select Command Prompt.
- In the Command Prompt window, first run the DISM command by typing
dism /online /cleanup-image /restorehealth. - Wait for the DISM command to finish successfully before moving on.
- Once DISM is completed, type
sfc /scannowin the Command Prompt window. - Let the scan complete, then restart your computer.
8. Uninstall Recent Updates
Some Windows updates can occasionally cause system conflicts, leading to BSODs.
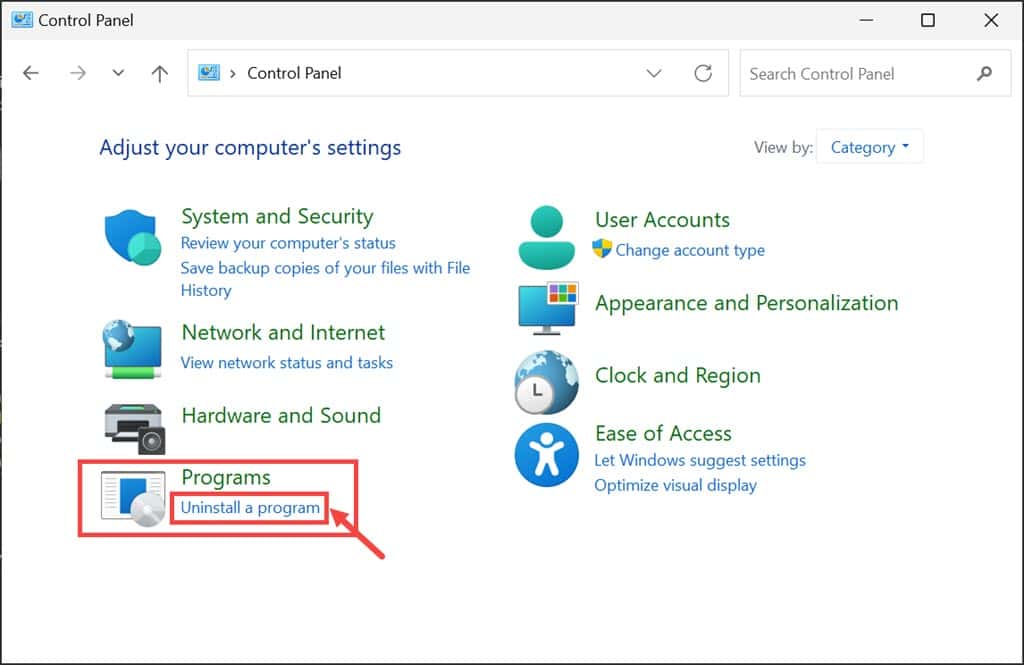
- Type Control Panel into the Windows search box and open it by clicking its icon.
- In the Control Panel, go to the “Programs” section and click Uninstall a program.
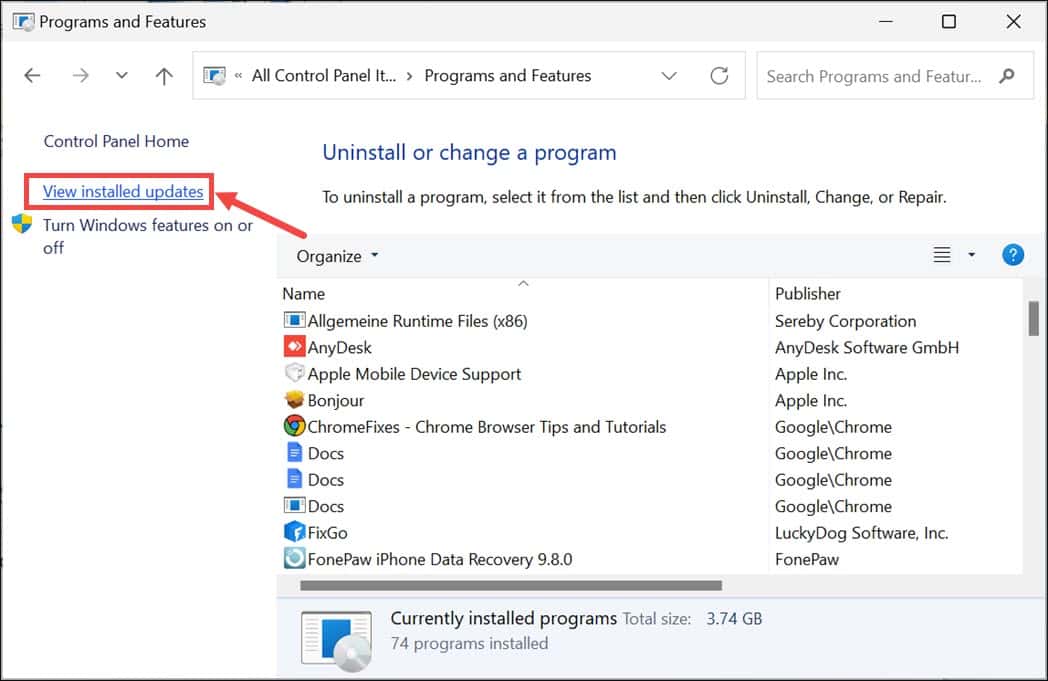
- Select View installed updates on the left side.
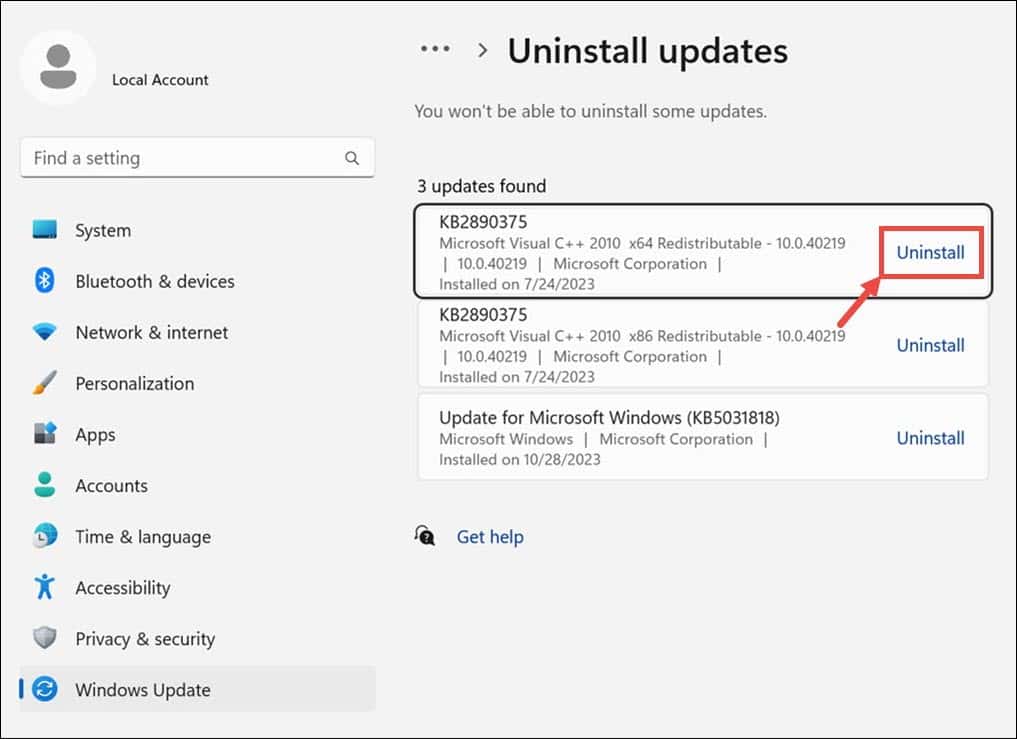
- Locate and select any recently installed updates, then click the Uninstall button.
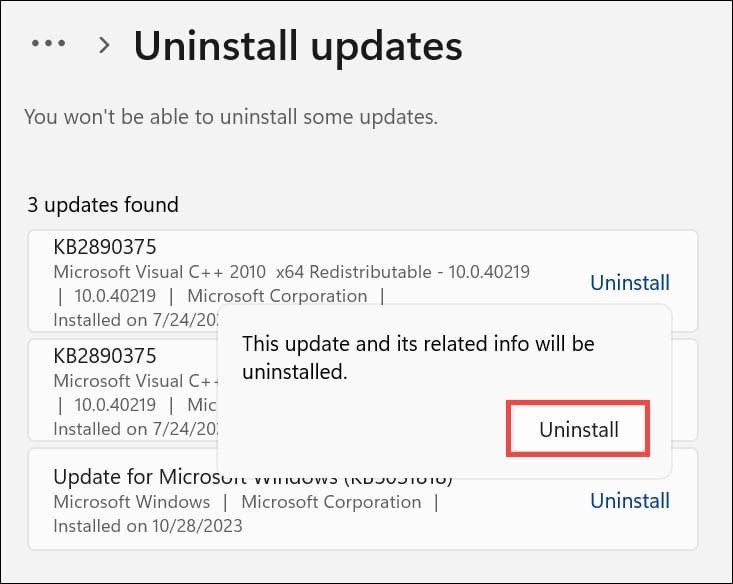
- In the confirmation pop-up, click Uninstall again to confirm.
9. Scan for Malware
Malware infections can cause various system issues, including BSODs.
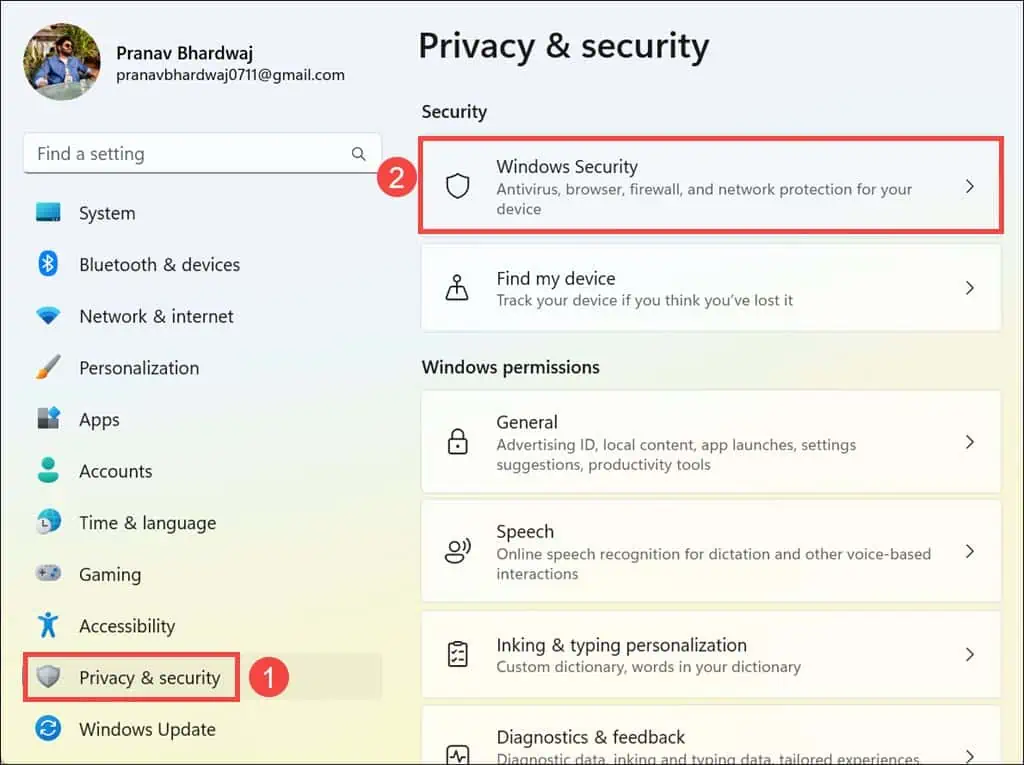
- Press Windows + I to open the Windows settings.
- In the settings, navigate to the Privacy & security section on the left and then click on Windows Security on the right.
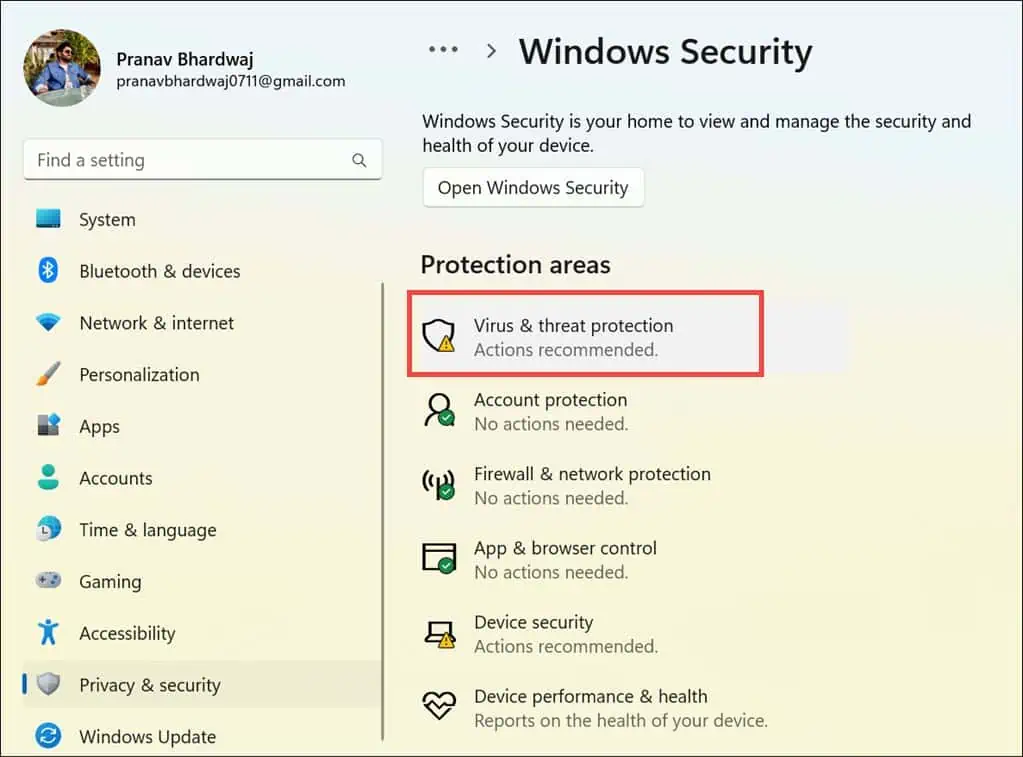
- In “Windows Security,” choose the Virus & threat protection option.
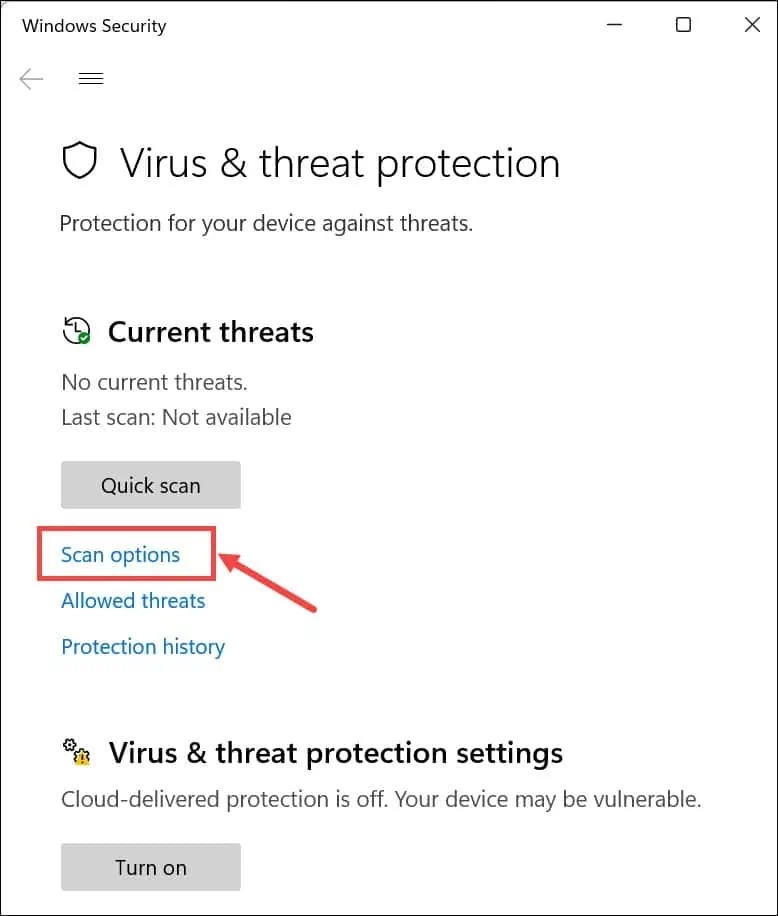
- Click on Scan options.
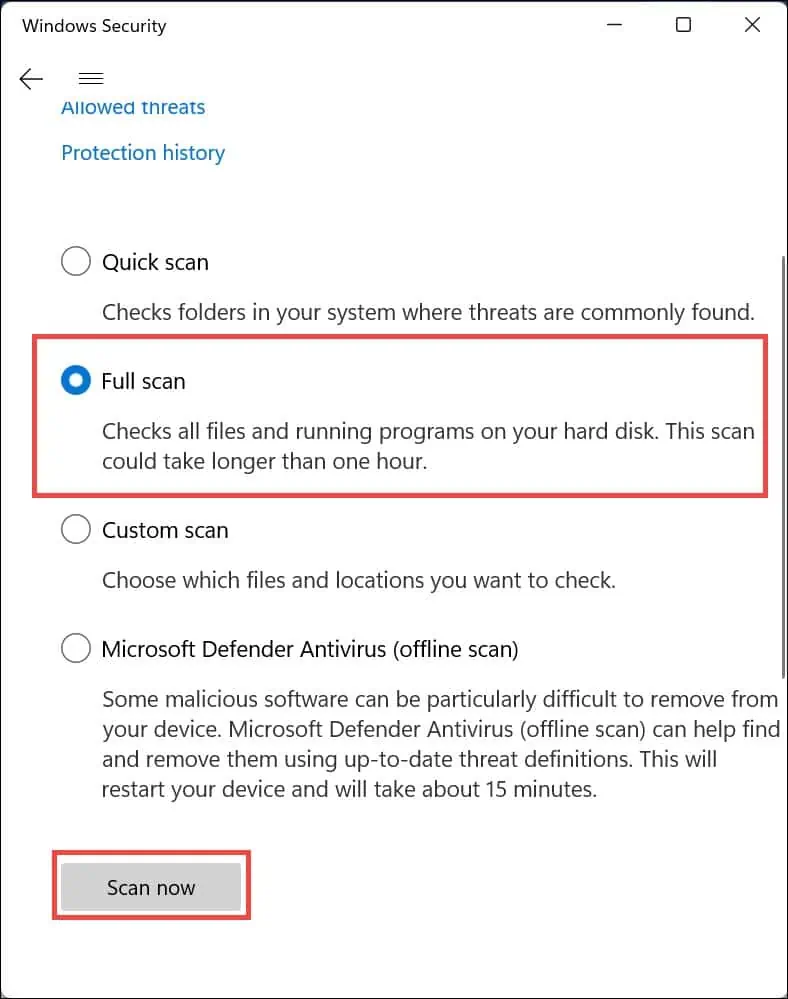
- Select Full scan and then click the Scan Now button.
10. Restore Windows
Using System Restore to revert your system back to a previous state can be effective in resolving BSODs caused by recent changes.
- Restart your system multiple times until it launches into Automatic Repair Mode.
- In Automatic Repair Mode, navigate to the Advanced options menu and choose System Restore.
- Click Next to initiate the restoration process.
- Choose a restore point from a time before the error occurred.
- Confirm your selection and click Finish.
- Complete the system restoration by following the on-screen instructions.
If none of the steps above worked, try the following:
- Install pending Windows updates – Go to Settings>Windows Update>Check for Updates>Install all. Restart your system to apply them.
- Reset Windows – Repeatedly restart your system until it enters Automatic Repair Mode. Then go to Troubleshoot>Reset this PC>Keep my files or Remove everything>Cloud Download or Local Reinstall>Reset.
What Causes the BSOD Kernel Security Check Failure?
The Kernel Security Check Failure is often caused by:
- Memory Issues: Problems with RAM or hard drive.
- Corrupted System Files: Essential system files that become damaged.
- Driver Conflicts: Incompatible or outdated drivers.
- Malware Infections: Viruses that disrupt system integrity.
- Hardware Failures: Issues with internal components like the motherboard.
You may also be interested in:
- 0x0000002F INSTRUCTION_BUS_ERROR
- 0x00000011 THREAD_NOT_MUTEX_OWNER
- “We couldn’t find a fingerprint scanner compatible with Windows Hello Fingerprint”
In this extensive guide, I’ve explored a range of solutions to tackle the Kernel Security Check Failure BSOD in Windows. Starting from basic preliminary checks to advanced steps like system restore and Windows reset, these methods are designed to address the root causes of the error systematically.




User forum
0 messages