DISM Offline Repair a Windows Image
There are different ways to repair a Windows image, and it depends on whether the image is offline or online. Repairing an offline Windows image is possible in a VHD or WIM file, while an online Windows image will try to repair itself first when it’s not functioning as intended. The repair source for this uses the same one as Features on Demand, and Group Policy settings determine it. When using DISM to try and repair an offline or online Windows image, you can specify the additional repair source locations by using the /Source argument alongside the /RestoreHealth argument. If you need to scan and repair an online image, you can also use the sfc /scannow command to do a quick check. On the other hand, you also have the option to do a more thorough check by using DISM /Cleanup-Image.
The first step is to make sure that an image is still repairable. Here’s what you need to do:
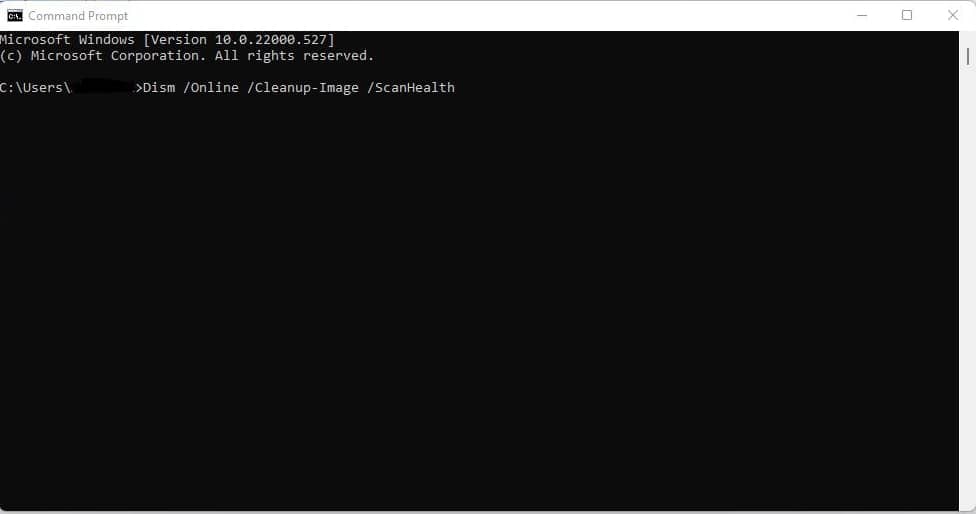
You must first do a quick scan to see if the image has been corrupted. Open the Command Prompt on your PC and enter Dism /Online /Cleanup-Image /ScanHealth. The scan should only take a few minutes.
You can use the command Dism /Online /Cleanup-Image /CheckHealth to see if your PC detects any corruption on the image. When using this sfc argument, the DISM tool will inform you if the Windows image is healthy, repairable, or non-repairable. If it’s the latter, you’ll need to get rid of the image and start from scratch. However, if it’s repairable, you can proceed to the /RestoreHealth argument to begin repairs.
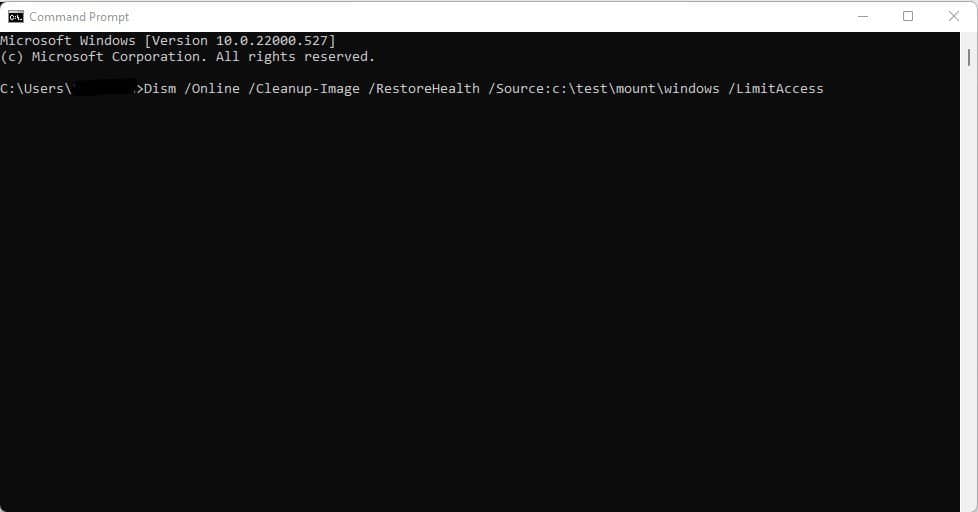
Repairing a Windows image follows the same process above. Open your PC’s Start menu, go to Command Prompt, and enter the right command. If you’re trying to repair an offline image with the help of a mounted image as a repair source, the proper command to use would be Dism /Image:C:\offline /Cleanup-Image /RestoreHealth /Source:c:\test\mount\windows. However, if you’re repairing an online image with your sources, enter this command instead: Dism /Online /Cleanup-Image /RestoreHealth /Source:c:\test\mount\windows /LimitAccess.
Note that the default location for repair files is the same as Features on Demand if you don’t specify a /Source. You can read more about it here. On the other hand, specifying two or more sources will ensure the same results, but only the files from the first location will be copied. If you want to ensure that the DISM tool doesn’t repair the images using Windows Update as a source, it’s important to use /LimitAccess.
Now, there are some instances wherein an image gets corrupted while the DISM tool tries to modify it. In such cases, you can use the command Dism /Cleanup-Mountpoints to fix it.
Learn more about repairing a Windows image with the DISM tool at Microsoft.com.
Read our disclosure page to find out how can you help MSPoweruser sustain the editorial team Read more


Improve this guide


User forum
0 messages