How to reinstall Realtek HD Audio Manager on Windows 10 & 11
Key notes
- You should reinstall Realtek HD Audio Manager if it’s missing or you keep getting related errors.
- First, you should uninstall it from Device Manager and then get a fresh version.
- Alternatively, you can use DriverFix to resolve driver-related errors.
Want to know how to reinstall Realtek HD Audio Manager? It’s worth trying if you recently found it missing on your Windows system, or you’re getting the no audio output device is installed error.
Follow this guide for step-by-step instructions!
Uninstall and then Reinstall Realtek Driver
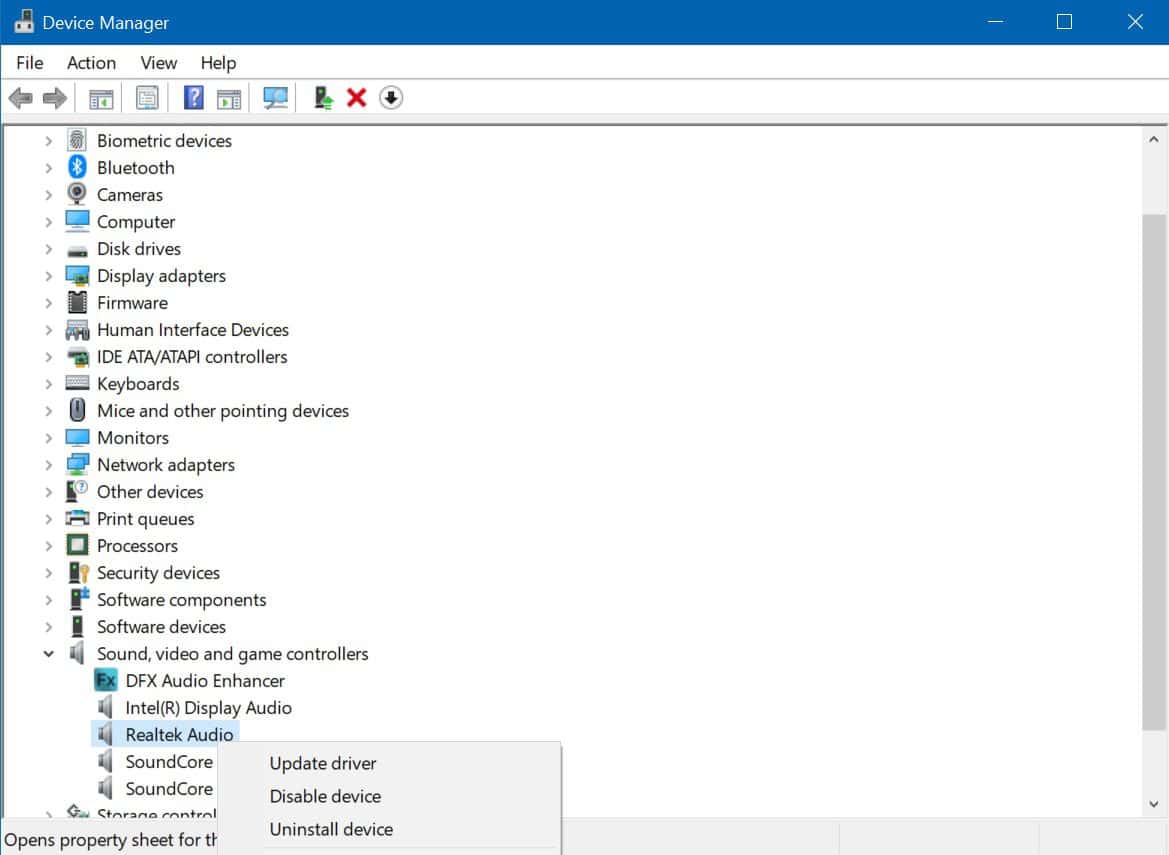
Most Windows machines come installed with Realtek HD Audio Manager or driver. You can check it by going to your Device Manager by simply right-clicking the Start button. After opening it, scroll down and look for the “Sound, video, and game controllers” option. Click it to expand the list of devices or drivers. If you find the Realtek High Definition Audio, it confirms that your machine indeed has the Realtek HD Audio Manager, and you are just probably encountering a problem with it. Updating Realtek HD Audio is a quick way to resolve your issue. Just right-click on it to get the “update driver” option, select “Search automatically for updated driver software,” and Windows will do the job for you. However, doing this does not guarantee the best results, so manually downloading and reinstalling Realtek HD Audio Manager in your Windows 10 or 11 is much more recommended.
The first step is to uninstall the Realtek High Definition Audio from the items under the Sound, video, and game controllers option within the Device Manager. It is an important step to ensure the success of the reinstallation of the Realtek HD Audio driver and prevent further problems. So, instead of selecting the update option for the Realtek High Definition Audio, choose “Uninstall device.” Confirm your decision by checking the box that says “Delete the driver software for this device,” and select OK. Follow the steps that will appear in the prompt to complete the process. After that, click the View tab at the top of the Device Manager and select “Show hidden devices” to uninstall other duplicate drivers.
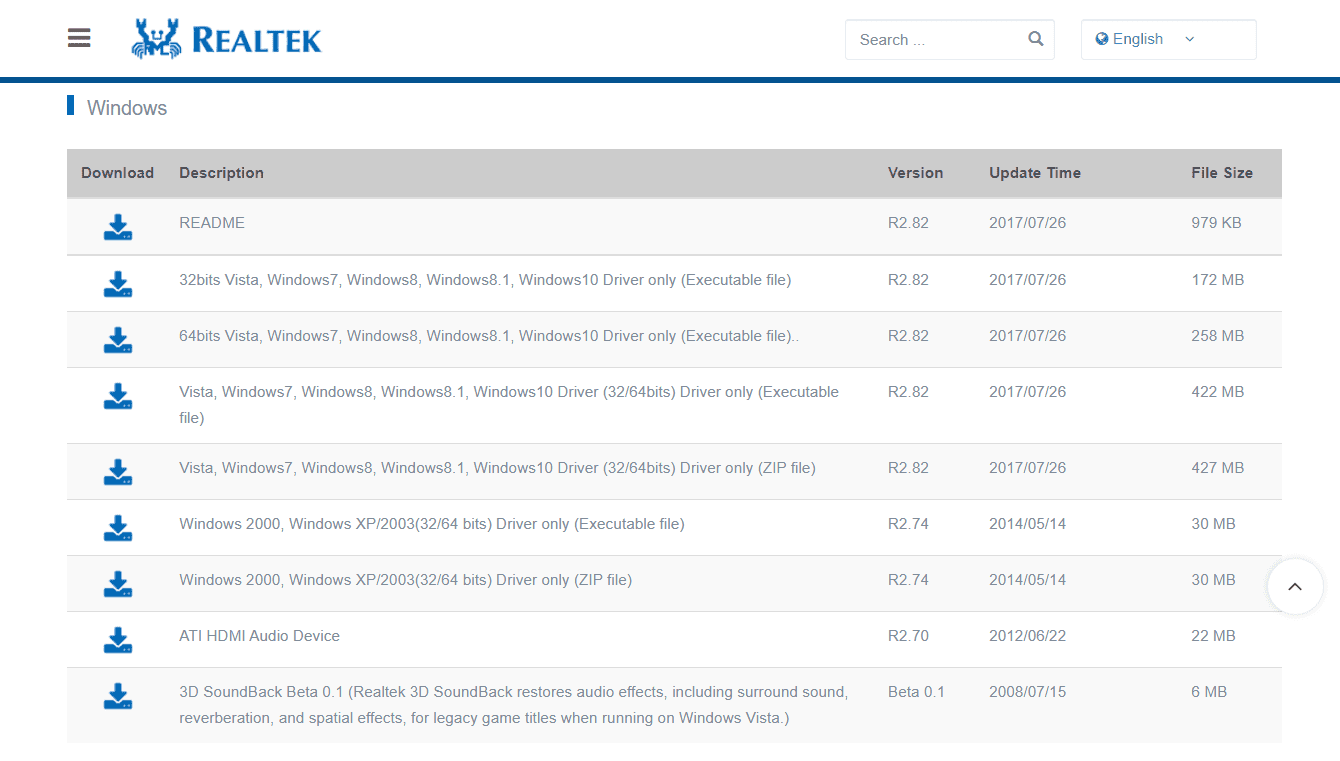
Once your PC is clean of the Realtek HD Audio driver, you need to get the suitable Realtek HD Audio driver for your system. Realtek provides a list of different versions of its HD audio codecs software on its download page, including ZIP and executable file versions. Find the one that fits your system and click the download icon beside it. If you are using Intel NUC8i7BE, NUC8i5BE, and NUC8i3BE products, you can check the Realtek High Definition Audio Driver for Windows 10 and Windows 11 on Intel’s site.
Intel also offers Realtek High Definition Audio Driver for Windows 10 64-bit and Windows 11 for the 11th Generation Intel NUC11PHKi7C products. You can also try to obtain the latest Realtek HD Audio driver via your motherboard manufacturer’s website. Just get your motherboard manufacturer brand and system model name details by pressing Windows + R and typing the msinfo32 command. After that, visit your manufacturer’s official website and download the Realtek HD audio manager using the information you have.
Once you have downloaded the file, locate it within your PC system and start the installation process (if you chose the ZIP version, unzip it first at an easy-to-access location). Run the downloaded file and select Next to confirm your actions. It might take some time, but once the Realtek HD Audio Manager is reinstalled, your PC will ask you for a restart. Do it to complete the steps. After restarting, you can check if the installation is successful by visiting the Device Manager again and looking for the updated Realtek High Definition Audio under the Sound, video, and game controllers options. If it is not there, you can simply repeat the process of running the downloaded file until the driver appears in the Device Manager.
Use DriverFix to resolve Realtek Drive Issue
If reinstalling Realtek doesn’t resolve the audio issues on your Windows 11 PC, you should consider going for a third-party premium tool. DriverFix is an effective tool that can find and fix the underlying causes within a system driver. Using this tool, you may even search for other device drivers that might have been corrupted or outdated. This software lets you find and resolve corrupt drivers in three simple steps and they are as follows –
- First of all, download and install the DriverFix application. After this installs successfully, double-click on its icon to launch DriverFix.
- This tool will launch and begin scanning your whole PC for available driver updates.
- Locate the update that requires an immediate fix. Once you decide on that, click Update All.
Note: You need to purchase this software before you may update all corrupt device drivers on your computer. Go for this method only when the other workarounds fail to address the audio issues on your Windows 11 PC.
Read our disclosure page to find out how can you help MSPoweruser sustain the editorial team Read more


Improve this guide

User forum
2 messages