How To Open Snipping Tool In Windows 11: A Step-by-Step Guide

Here’s how to open the Snipping Tool in Windows 11, a simple built-in way to capture anything on your screen.
Whether you need a quick snapshot or a precise window grab, it’s the fastest route to clear, useful screenshots.
What Are the Ways to Open Snipping Tool in Windows 11?
Here are several methods you can use to open the Snipping Tool in Windows 11:
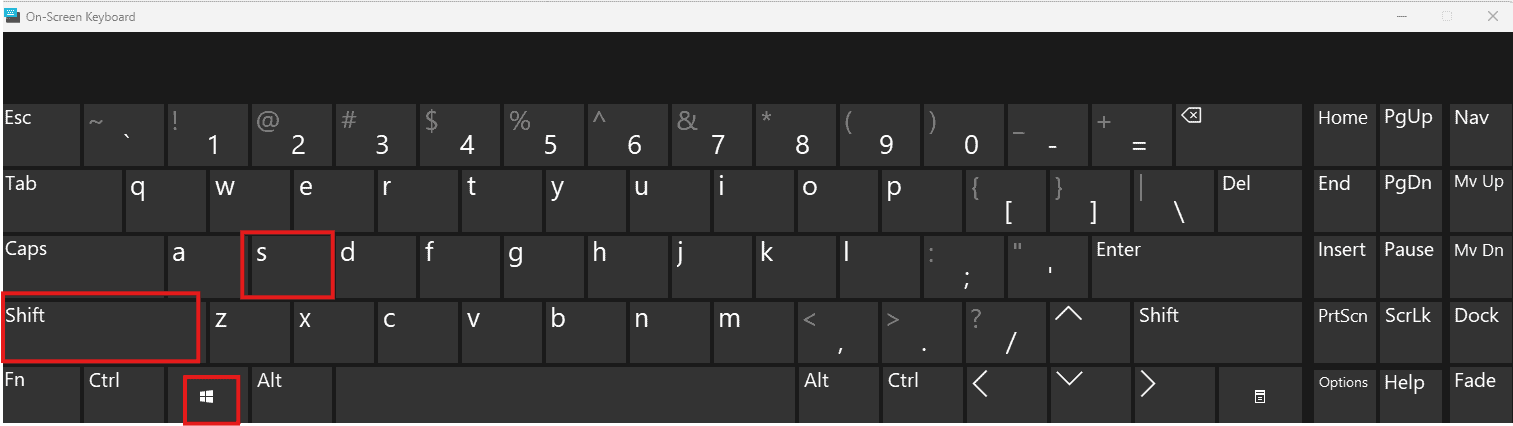
Method 1: Using the Keyboard Shortcut
The quickest way to open the Snipping Tool is by using a keyboard shortcut:
- Press the Windows key + Shift + S simultaneously.

- The screen will dim, and the Snipping Tool interface will appear at the top of the screen.
- Select your desired snip type (Rectangular Snip, Freeform Snip, Window Snip, or Fullscreen Snip).
Once you master this shortcut, you’ll save time when creating quick captures. You can then use tools like PC Audit Software to analyze system data alongside screenshots, especially if you document technical steps or reports.
Method 2: Through the Start Menu
You can also access the Snipping Tool through the Start Menu:
- Click the Start Menu icon on the taskbar.
- Type “Snipping Tool” in the search bar.

- Click on the Snipping Tool app from the search results to open it.

If you frequently search for tools this way, you might also want to learn how to perform advanced searches in Google to improve efficiency across your workflow.
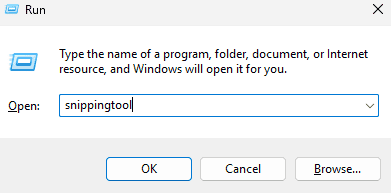
Method 3: Using the Run Command
The Run command provides another efficient way to launch the Snipping Tool:
- Press the Windows key + R to open the Run dialog box.
- Type “snippingtool” (without the quotes) in the text field.

- Press Enter or click OK.
This method works great for quick tasks, especially when testing or troubleshooting. If your workflow involves system tweaks, check out how to enable hardware acceleration in Windows 11 to make visual tools like Snipping Tool smoother and faster.
Method 4: Via the Quick Actions Menu
The Quick Actions menu offers a fast shortcut if you have it configured:
- Click the Notification icon in the bottom right corner of your screen (it looks like a speaker or a Wi-Fi icon). This opens the Quick Actions menu.
- If the Snipping Tool icon is present, click on it to launch the application. If not, you may need to customize your Quick Actions to add it.
Keeping your Quick Actions well-organized can boost overall usability. Similarly, managing your browser efficiently helps maintain spee, learn how to clear cache in Microsoft Edge to keep performance optimal when sharing screenshots online.
Method 5: Using Windows Search
Windows Search offers a direct way to locate and open the Snipping Tool:
- Click the Search icon on the taskbar (it looks like a magnifying glass).
- Type “Snipping Tool” in the search bar.
- Click on the Snipping Tool app from the search results to open it.
Search is one of the most underused features in Windows. You can apply similar principles when browsing for inspiration, see top free jewelry design software tools that also rely on visual precision, similar to how Snipping Tool captures details on screen.
Method 6: Pinning to Taskbar or Start Menu
For even faster access, consider pinning the Snipping Tool to your taskbar or Start Menu:
- Open the Start Menu and search for “Snipping Tool”.
- Right-click on the Snipping Tool app in the search results.
- Select “Pin to taskbar” to pin it to the taskbar, or select “Pin to Start” to pin it to the Start Menu.
Pinning your essential tools streamlines your setup. If you’re interested in organizing creative or visual workflows, read more about browser optimization or similar customization topics.
Tips for Using the Snipping Tool
- Customize Keyboard Shortcut: While the default keyboard shortcut is Windows key + Shift + S, you can customize it through the Accessibility settings if needed.
- Explore Snipping Modes: Familiarize yourself with the different snipping modes (Rectangular, Freeform, Window, Fullscreen) to efficiently capture the desired area of your screen.
- Use the Delay Feature: The Snipping Tool includes a delay feature, allowing you to capture screenshots of actions that might disappear quickly, such as drop-down menus.
- Annotation Tools: After taking a snip, use the built-in annotation tools to highlight, draw, or add notes to your screenshot before saving or sharing it.
Comparing Snipping Tool Access Methods
Here’s a quick comparison of the different methods for opening the Snipping Tool:
| Method | Speed | Complexity | Customization |
|---|---|---|---|
| Keyboard Shortcut | Fast | Low | Limited |
| Start Menu | Medium | Low | None |
| Run Command | Fast | Low | None |
| Quick Actions Menu | Fast | Medium | High |
| Windows Search | Medium | Low | None |
| Pin to Taskbar/Start | Fast | Low | Medium |
Quickly Accessing Screen Captures
With these methods, opening the Snipping Tool in Windows 11 becomes a breeze, allowing you to capture and share screenshots efficiently. Choose the method that best suits your workflow and enjoy the convenience of this built-in utility.
FAQ
How do I take a screenshot of a specific window?
Use the “Window Snip” mode in the Snipping Tool and select the window you want to capture.
Can I edit the screenshot after taking it?
Yes, the Snipping Tool provides basic annotation tools to highlight, draw, or add notes to your screenshots.
Where are the screenshots saved by default?
Screenshots are saved to your clipboard. You can paste them into an application, or save them as a file.
How do I change the default save location for screenshots?
The Snipping Tool itself doesn’t have an option to change the default save location. You can manually save the screenshots to your desired folder.
Is there a keyboard shortcut to directly save a screenshot?
No, the Snipping Tool doesn’t have a direct keyboard shortcut to save a screenshot. You need to manually save it after taking the snip.
Read our disclosure page to find out how can you help MSPoweruser sustain the editorial team Read more
Improve this guide


User forum
0 messages