How To Adjust Power And Sleep Settings In Windows 11: A Step-by-Step Guide
If your laptop battery drains too fast or your desktop keeps going to sleep at the wrong time, tweaking Windows 11’s power and sleep settings can fix that.
I’ll explain how to adjust them step by step, so you can save energy, boost performance, or keep your system awake when it matters.
Table of contents
Need to Change Your Power & Sleep Settings? Here’s How
Accessing Power & Sleep Settings
- Open the Settings app: Click on the Start button, then select the “Settings” icon (it looks like a gear).
- Navigate to System: In the Settings app, click on “System”.
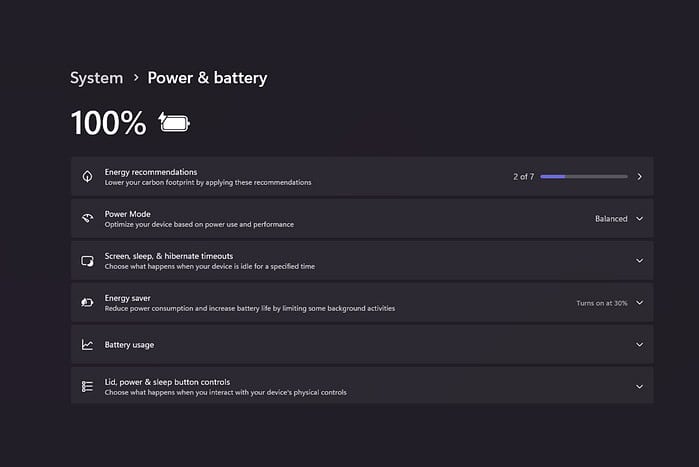
- Select Power & Battery: In the System menu, find and click on “Power & Battery”. On some systems, this may simply be called “Power”.


Configuring Screen and Sleep Timings
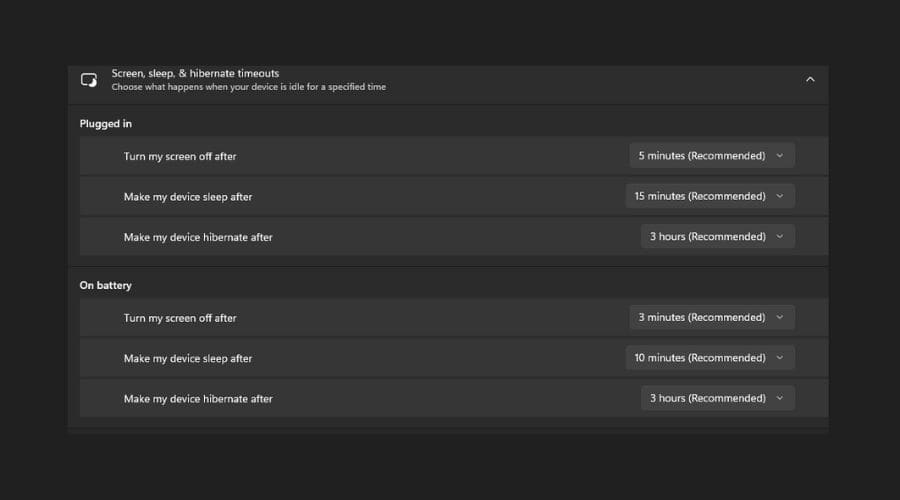
- Adjust Screen Timeout: Locate the “Screen and sleep” section. Here, you’ll find two dropdown menus related to screen timeout:
- On battery power, turn off my screen after: Choose how long your screen should remain on when running on battery power before turning off automatically.
- When plugged in, turn off my screen after: Choose how long your screen should remain on when your device is plugged in before turning off automatically.
- Adjust Sleep Timeout: Below the screen timeout settings, you’ll find two dropdown menus related to sleep timeout:
- On battery power, put my device to sleep after: Choose how long your device should remain idle on battery power before going to sleep.
- When plugged in, put my device to sleep after: Choose how long your device should remain idle when plugged in before going to sleep.
Customizing Advanced Power Settings

- Open Advanced Power Settings: In the “Power & Battery” settings, scroll down and click on “Screen and sleep”. Then, find and click “Advanced power settings” to open the classic Control Panel power options.
- Change Plan Settings: Find your active power plan (Balanced, Power Saver, or High Performance) and click “Change plan settings” next to it.
- Adjust Advanced Settings: Click “Change advanced power settings”. This opens a window with multiple power configuration options.
- Explore Settings: Expand categories like “Hard disk,” “Sleep,” “USB settings,” “Intel Graphics Settings,” and “Processor power management” to fine-tune how your system saves energy and performs tasks.
- Example: Hard disk: Set the hard disk to turn off after a period of inactivity to conserve energy.
- Example: Sleep: Adjust hybrid sleep, hibernate timeouts, and wake timers to suit your workflow.
- Example: USB settings: Enable or disable USB selective suspend to save power when peripherals are idle. For more on managing connected devices, see the best SD card formatting software for Windows.
- Example: Processor power management: Control minimum and maximum processor states to optimize performance versus power consumption.
- Apply Changes: After tweaking your preferences, click “Apply” and then “OK” to save your settings.
Tips for Optimizing Power and Sleep
- Monitor App Usage: Use Task Manager (Ctrl + Shift + Esc) to spot high-power apps. You can also explore tools from our guide on the best free podcast recording software for PC if you run performance-heavy audio apps.
- Adjust Display Brightness: Lowering your screen brightness extends battery life. The brightness slider in the Action Center (Windows + A) makes this easy.
- Enable Battery Saver: Activate Battery Saver mode when power runs low. It automatically reduces background activity and display brightness.
- Consider a Power Plan: Use “High performance” for demanding tasks, “Power saver” for extended battery life, or “Balanced” for daily use. If you create content often, check out the best video sharpening software for enhanced quality to pair with your optimized power settings.
Power customization goes beyond laptops. For productivity users, learning how to view word count on Google Docs helps you manage document length efficiently without wasting screen time. Similarly, online shoppers can benefit from how to find a registry on Amazon to organize purchases without keeping a PC awake unnecessarily.
Power & Sleep Control in Windows 11
Managing power and sleep settings in Windows 11 is simple yet powerful. With just a few adjustments, you can significantly improve battery efficiency, performance, and overall system longevity. Tailor each setting to match your workflow, and you’ll maintain both productivity and energy savings.
FAQ
How do I prevent my computer from going to sleep? Set the “Put my device to sleep after” option to “Never” under Power & Battery settings when plugged in.
How do I change the screen timeout on my Windows 11 laptop? Go to Settings > System > Power & Battery > Screen and sleep, then adjust the screen timeout values for battery and plugged-in modes.
What is the difference between sleep and hibernate? Sleep keeps your session in memory using minimal power, while hibernate saves your session to the hard drive and powers down completely, conserving more energy.
How do I enable or disable hibernation in Windows 11? Open Command Prompt as administrator and use powercfg /hibernate on or powercfg /hibernate off depending on your needs.
Why does my screen turn off even when I’m using my computer? Check your screen timeout in Power & Battery settings; background processes or incorrect timeout values may cause early screen-off behavior.
Read our disclosure page to find out how can you help MSPoweruser sustain the editorial team Read more
Improve this guide


User forum
0 messages