Static Noise on Windows 11 - 6 Easy Fixes
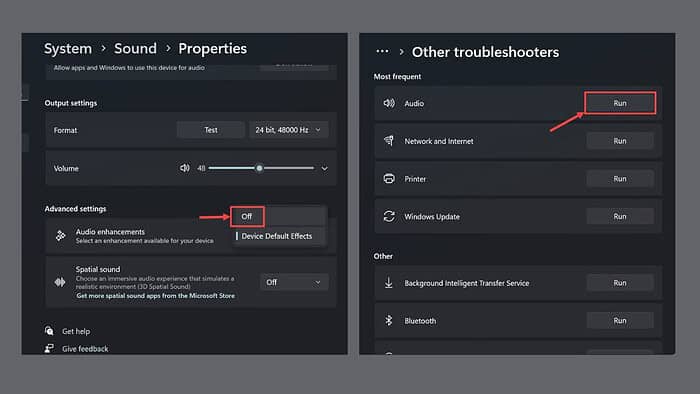
If you’re facing static noise on Windows 11 while using a speaker or headphones, I’ll help you fix it.
Static noise while using your PC can be unsettling and annoying. It can disturb your workflow or hinder your leisure time. It can happen for various reasons, such as loose connections, damaged audio devices, electromagnetic interference, misconfigured Windows settings, and more.
I faced a similar issue recently, and here’s how I fixed it.
1. Preliminary Steps
Before trying out complex solutions or making changes to system settings, perform these simple fixes first:
- Check for loose or misplaced connections: Examine all your audio-related connections, and unplug and re-plug the headphones/speaker even if they’re correctly placed.
- Check for electromagnetic interference(EMI): EMI from other electronic items like mobile phones or routers can interfere with the speaker and cause static noise. Avoid placing speakers next to electronic devices.
- Check for physical damage: Regular wear and tear isn’t much of an issue, but a frayed wire or a broken component inside the equipment can create static noise.
- Try on another device: This will let you know if the issue is with your audio device or the computer.
- Check for other apps’ interference: If you’re getting static noise only when running a specific app, close all other applications. Especially the services that utilize audio devices (media players or editing software).
- Check for Windows updates: An outdated Windows can lead to many issues, including static noise. Ensure that Windows 11 is up-to-date by navigating to Settings > Windows Update and clicking the Check for Updates button. This also automatically updates your drivers.
2. Run Audio Troubleshooter
Windows 11 comes with built-in troubleshooters that help solve common issues, including audio problems. If you continuously face static noise, follow these steps to run it.
- Click the Start button and select Settings.
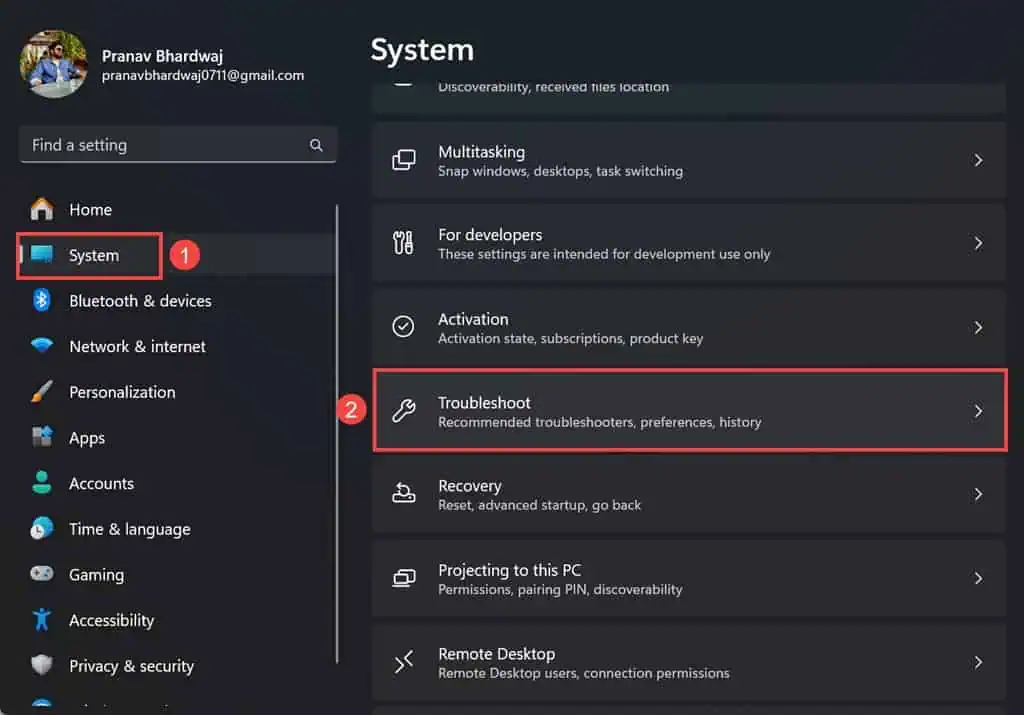
- On the left pane, switch to the System tab and select the Troubleshoot option on the right.
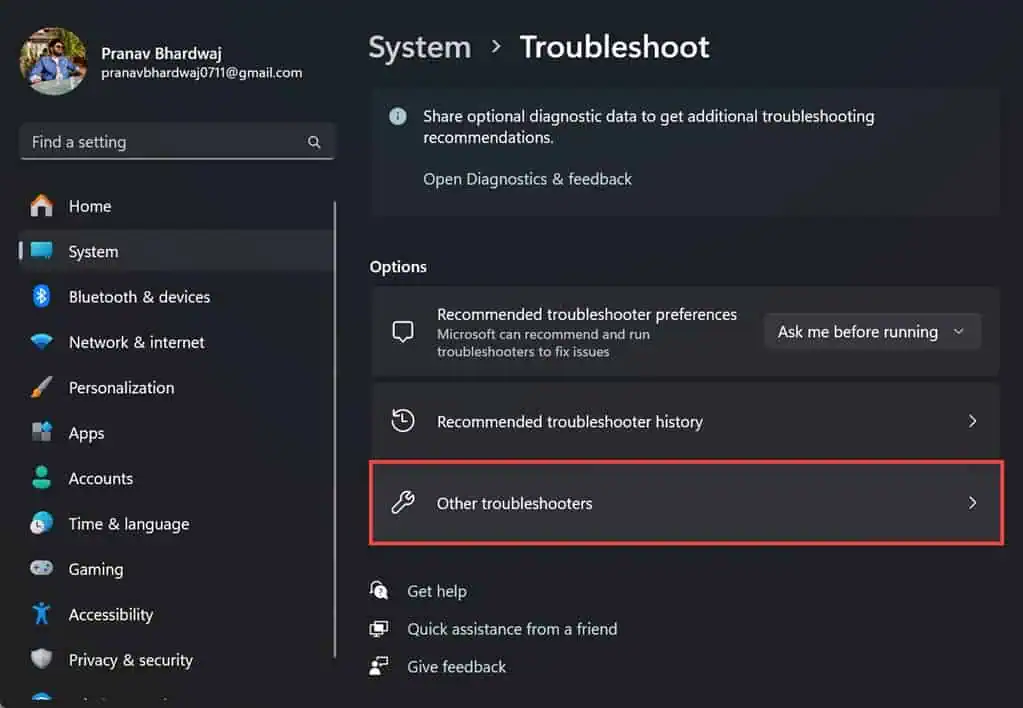
- Next, choose the Other Troubleshooters section.
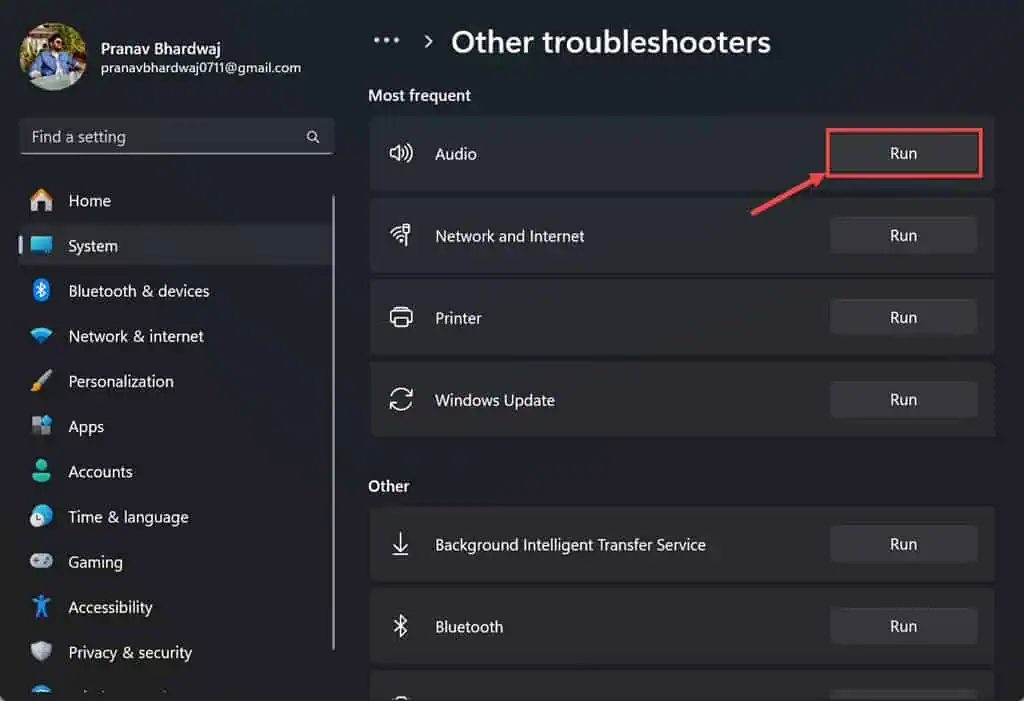
- Finally, click the Run button next to the Audio troubleshooter.
- Let it diagnose the issue and follow any instructions it suggests.
3. Roll Back, Update, or Re-install Audio Driver
Problems with the audio drivers can also lead to static noise on Windows 11. Start with rolling back the current audio driver.
- Right-click the Start button and select Device Manager from the Power Menu that appears.
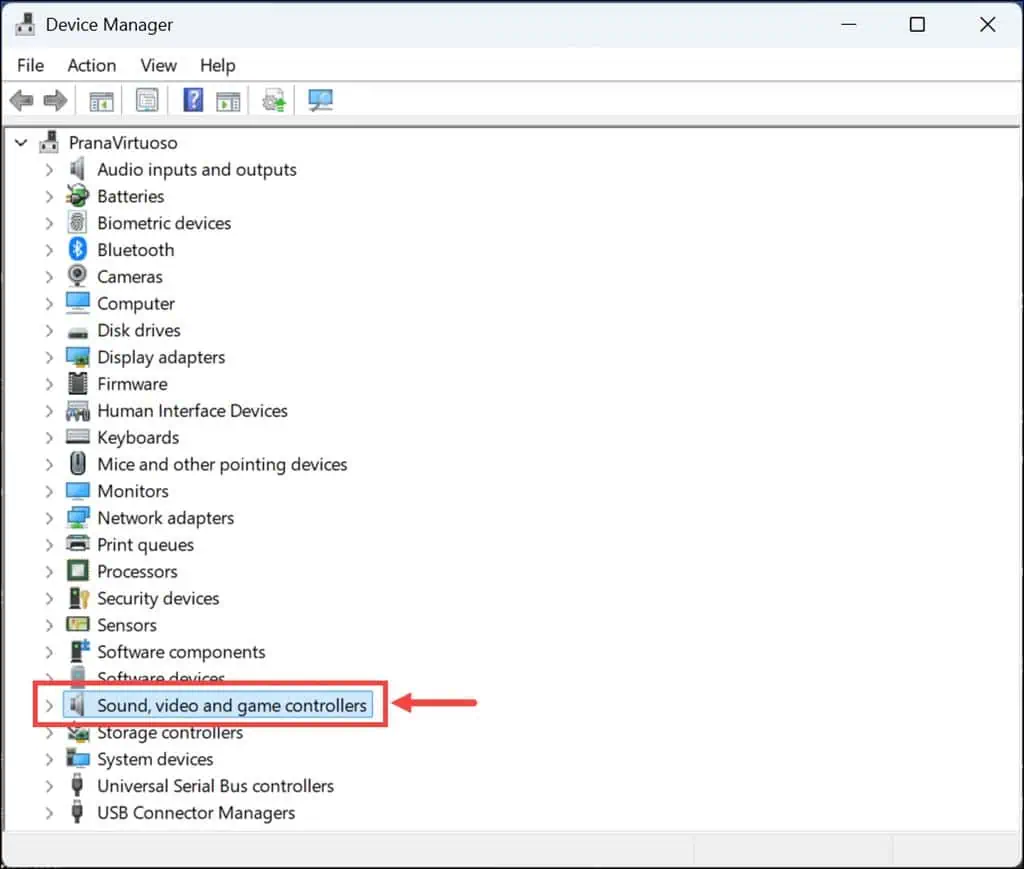
- Expand the Sound, Video, and Game Controllers section.
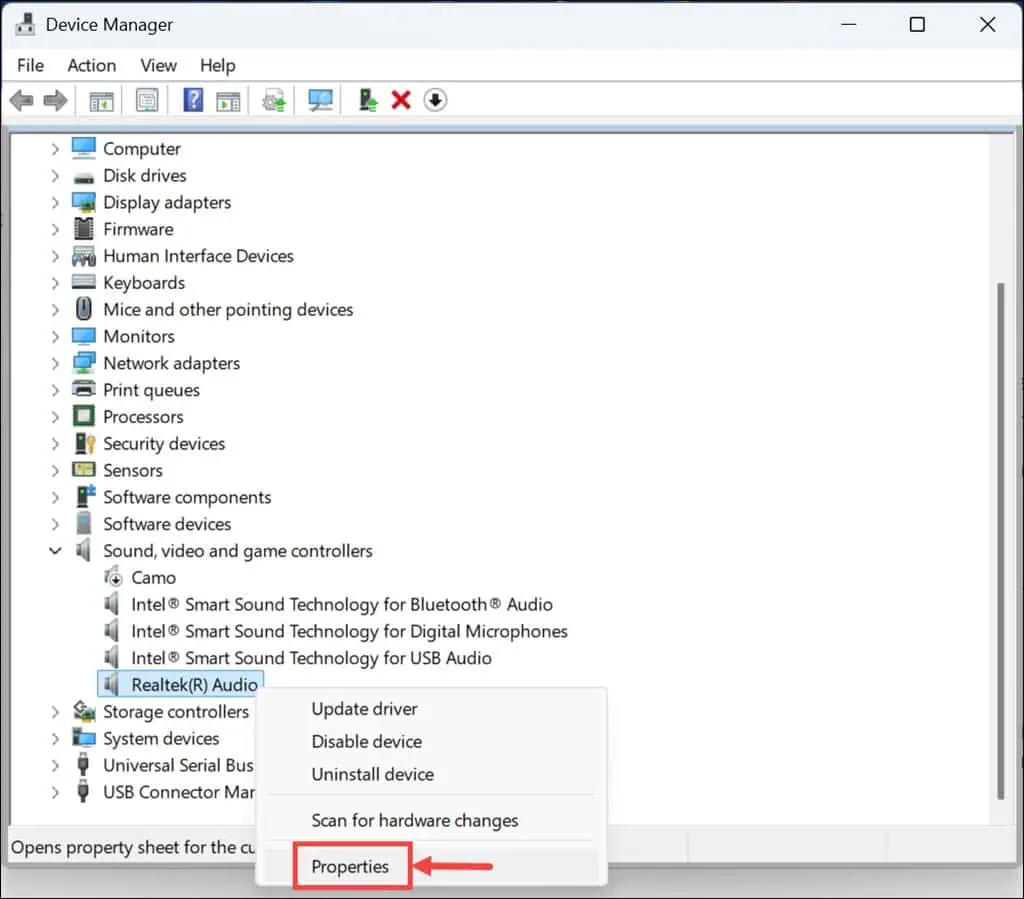
- Right-click on your audio driver and select Properties.
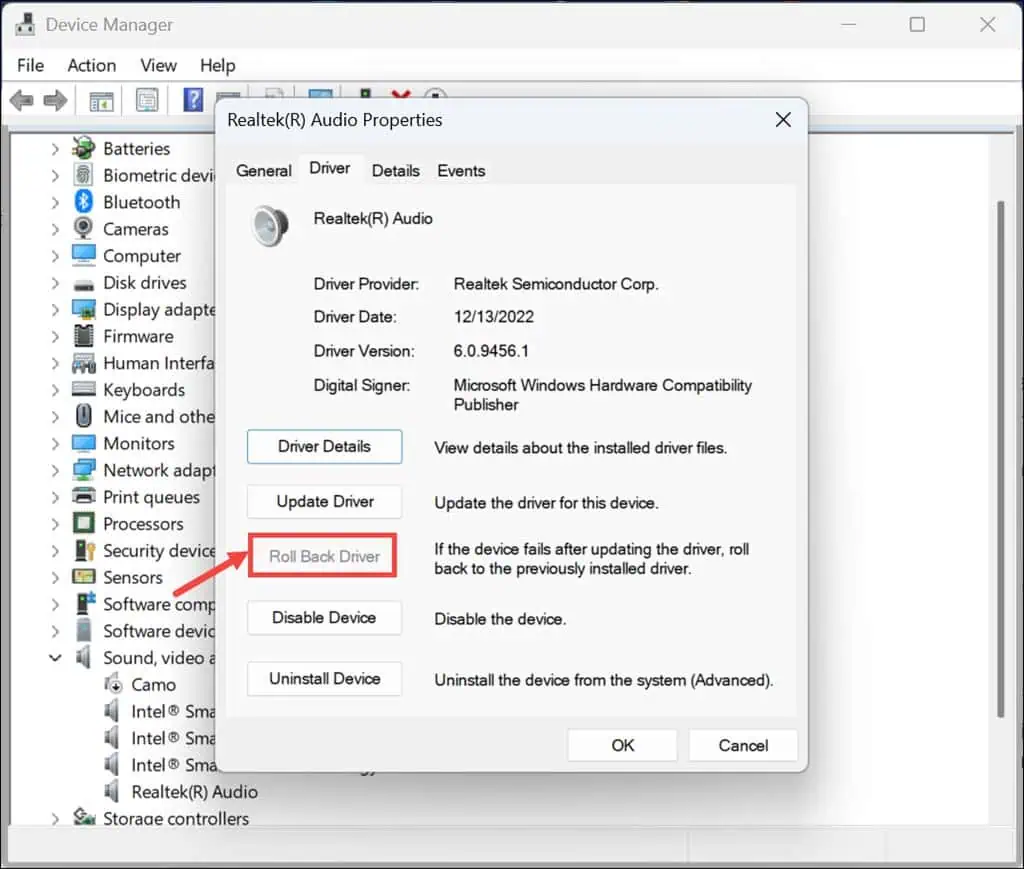
- Switch to the Driver tab and click the Roll Back Driver button.
- Follow the onscreen instructions to roll back the driver to a previous version.
If the Roll Back Driver option is greyed out, that means there are no previous version. In that case, move on to updating the driver.
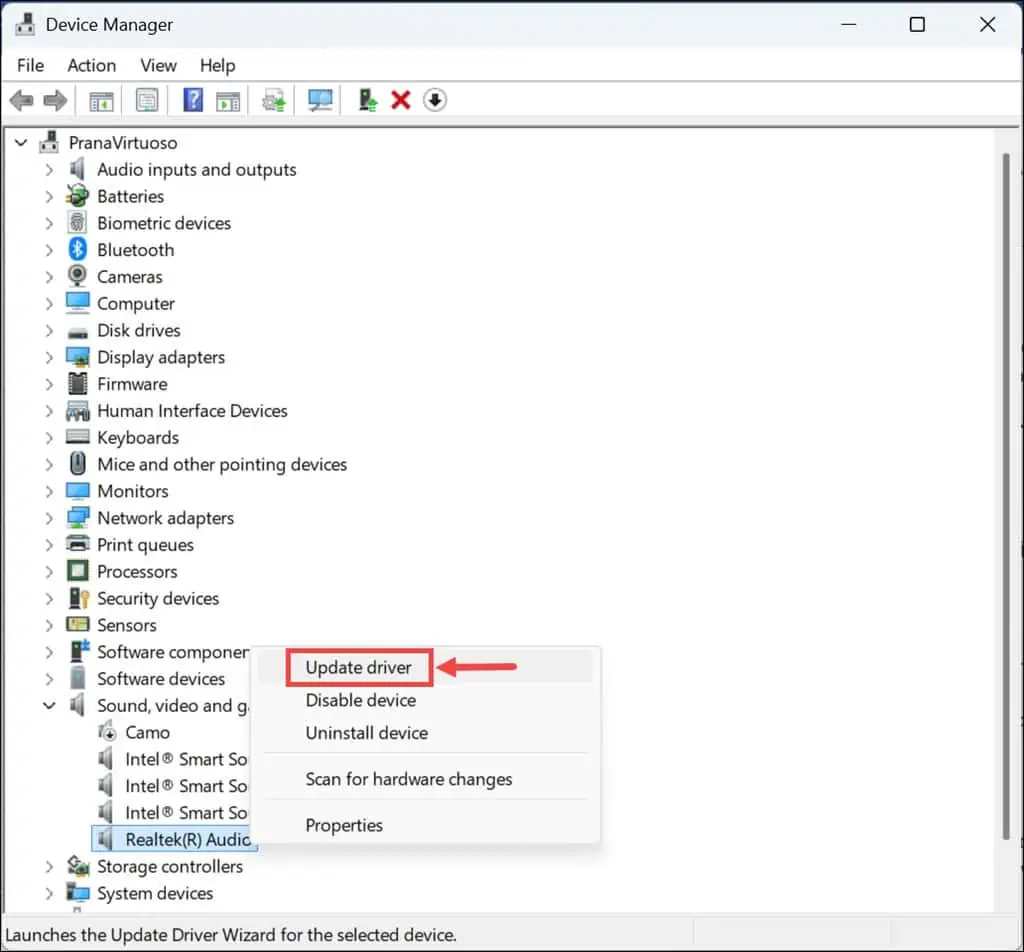
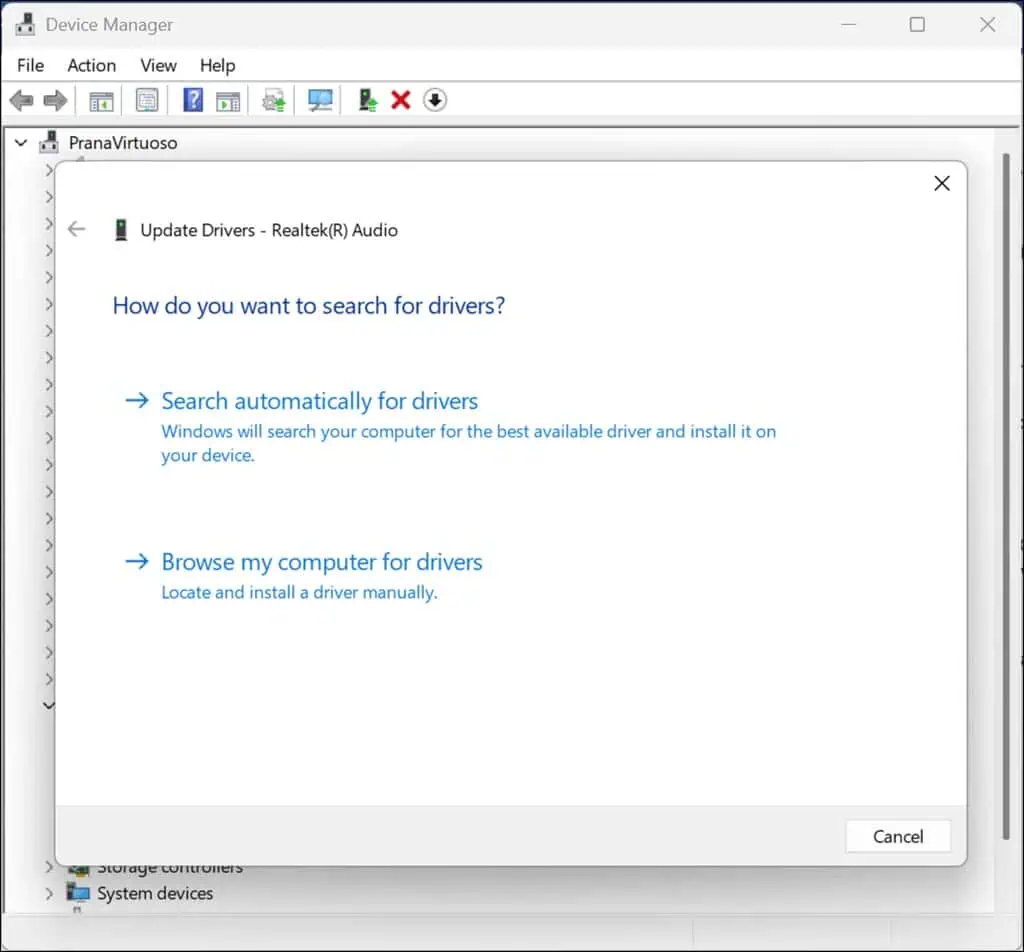
- Right-click on the audio device and select Update Driver.
- Next, select how you want to update them. If you’ve manually downloaded the driver on your system, choose Browse my computer for drivers or select Search automatically for drivers if you don’t have them on your PC.
- Follow the onscreen instructions based on the option you chose.
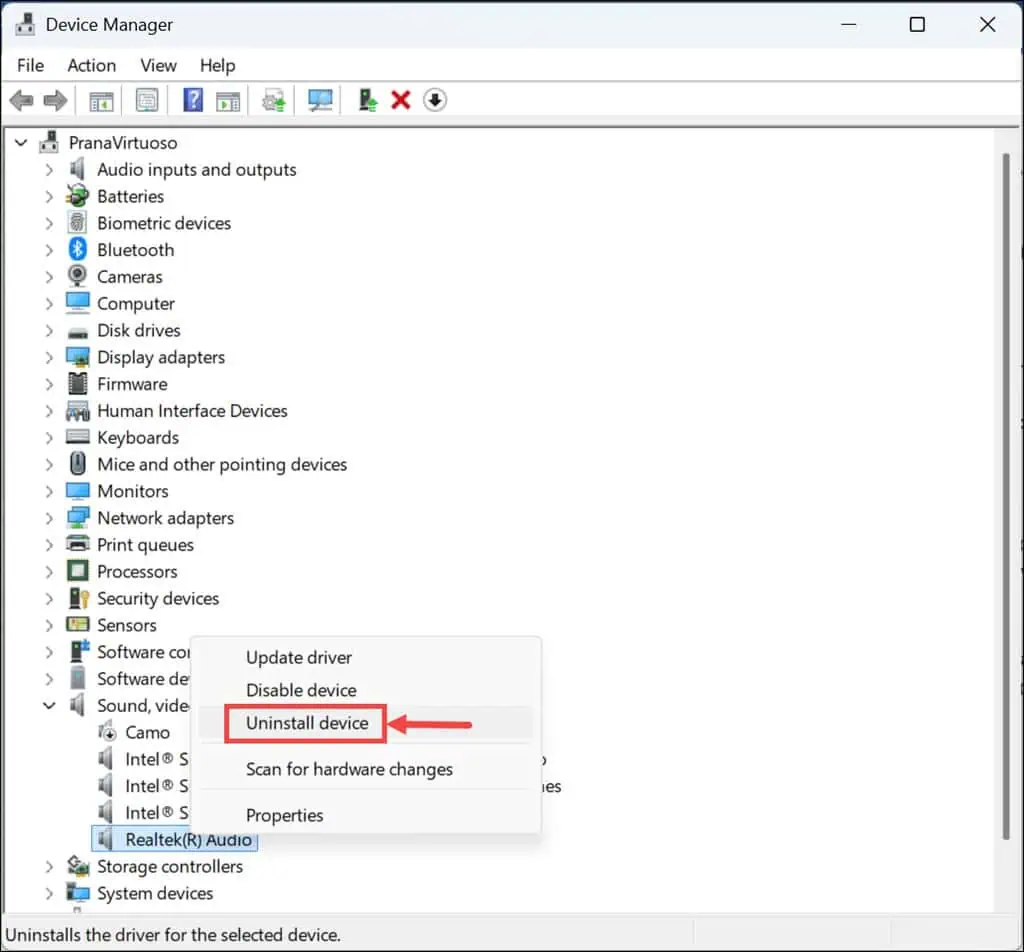
If even updating doesn’t work, try uninstalling and then re-installing the audio driver.
- Right-click on it and select Uninstall Device.
- Follow the onscreen instructions.
- After that, restart your system, and Windows should automatically install the missing driver. If not, manually download the latest driver from the manufacturer’s website and install it.
If you find it tedious or difficult to manually perform these changes, you can use a robust dedicated driver updater program like PC Helpsoft.
4. Disable Other Audio Drivers
If you have multiple audio drivers installed, either disable or uninstall them, as some users have reported that the problem was solved after this action. It’s especially applicable if you have AMD High Definition Audio Device and AMD Streaming Audio Device.
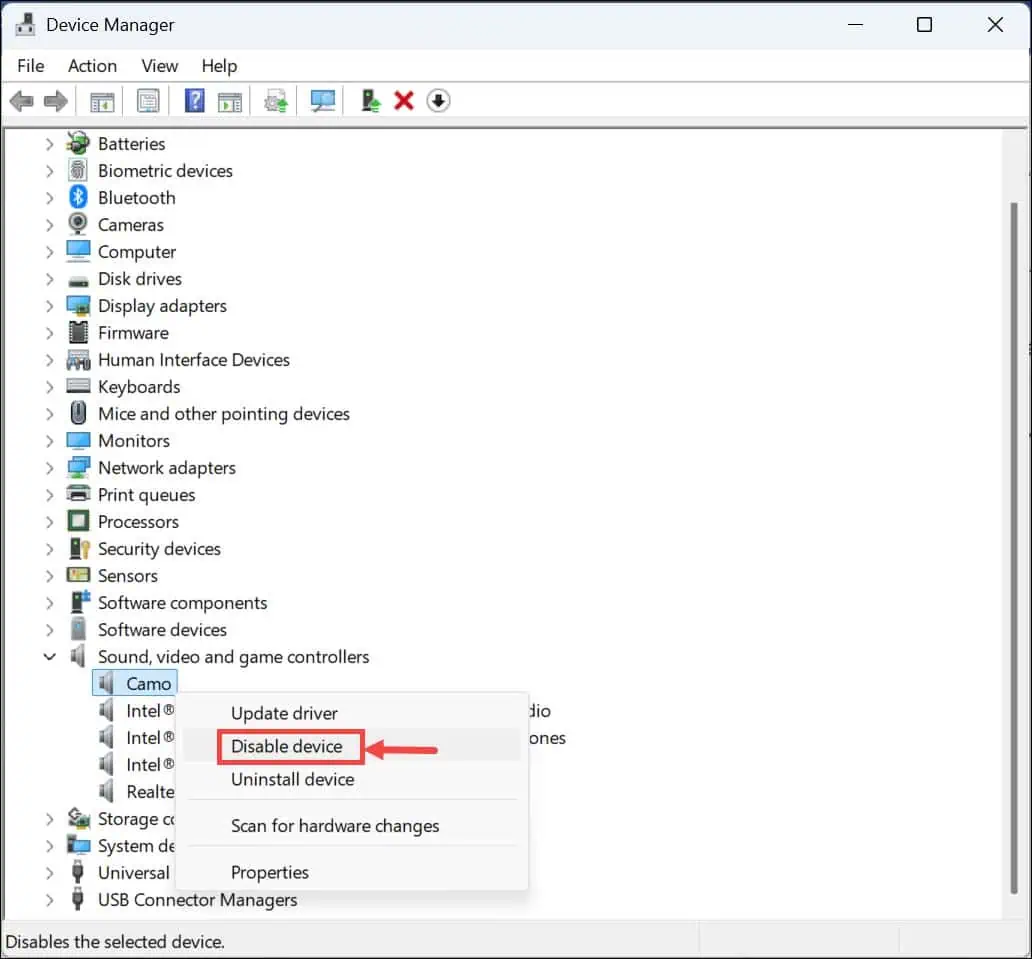
- Right-click on the Start button and select Device Manager.
- Expand the Sound, Video, and Game Controllers section and check for the devices (drivers) that you don’t actively use.
- Right-click on them and select Disable Device.
5. Turn Off Audio Enhancements
Audio enhancements let you adjust the sound output. However, sometimes they can introduce static noise.
Here’s how to turn them off:
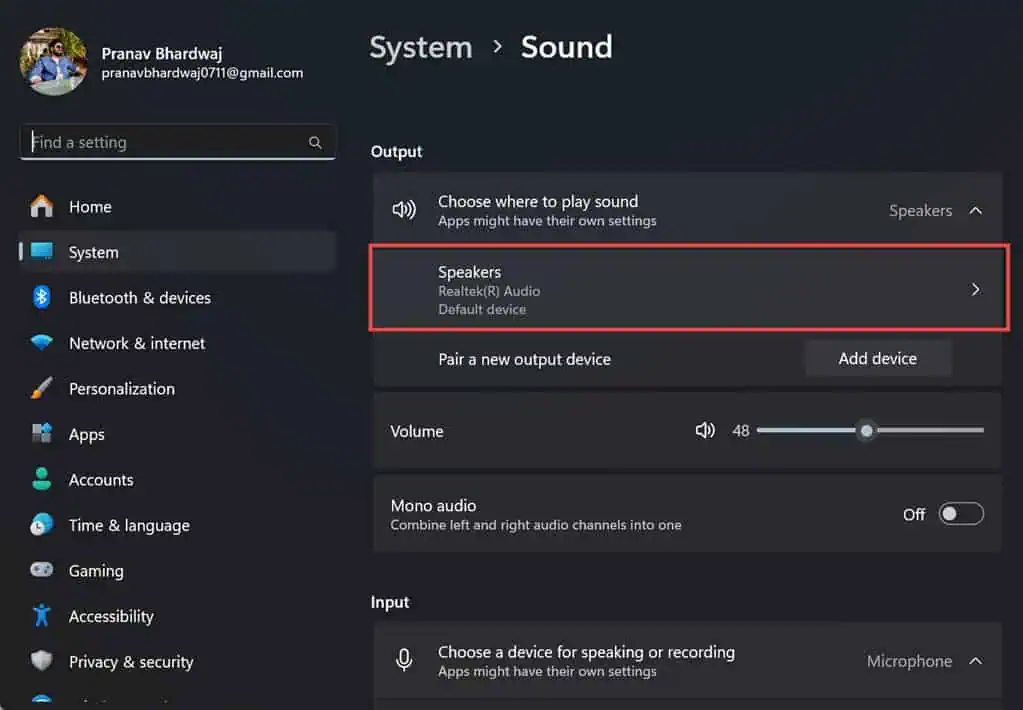
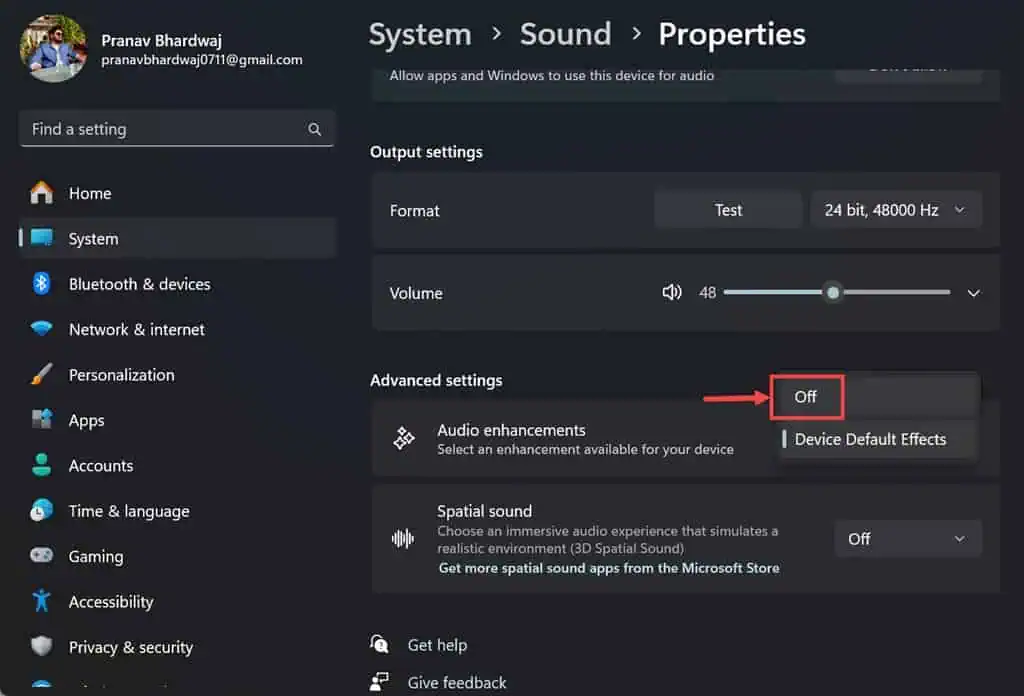
- On the right side of the taskbar, right-click the ‘speaker icon’ and select Sound Settings.
- Under the Output section, select your audio device – speaker or headphones.
- Scroll down and look for Audio Enhancements under Advanced Settings.
- Expand the drop-down menu next to it and choose Off.
6. Restore Windows to a Previous Point
If none of the above solutions worked, try restoring Windows to a previously saved point where the audio was working fine.
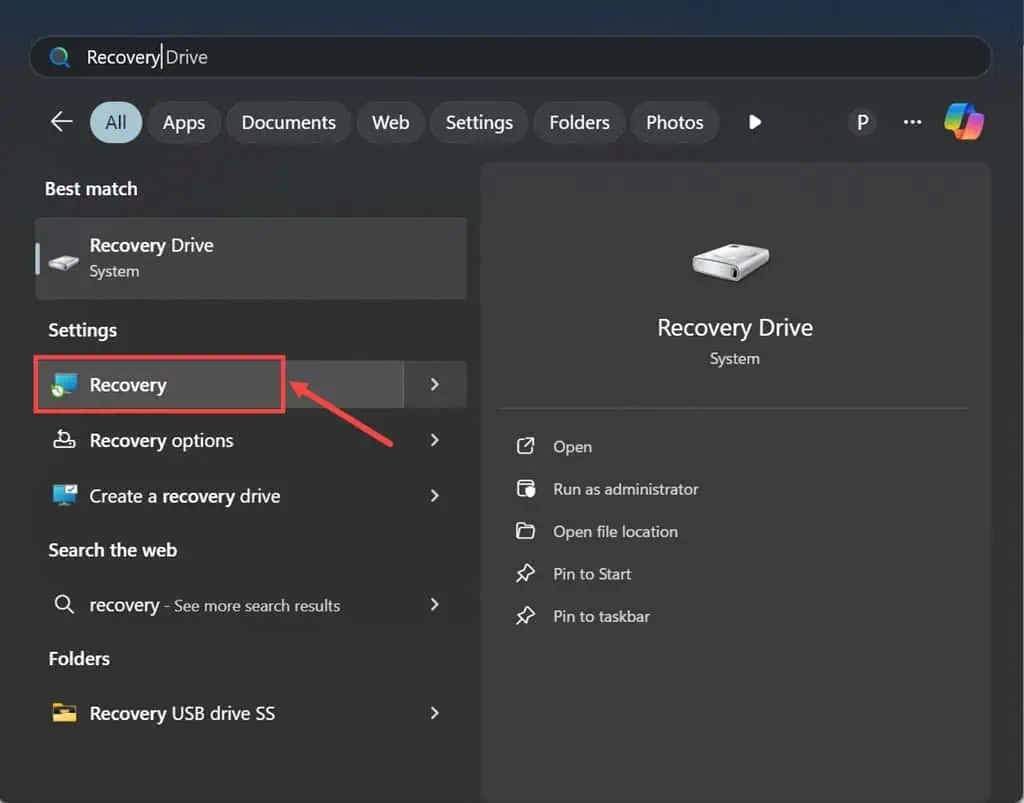
- Search for the Recovery option and click its icon to launch Windows Recovery settings.
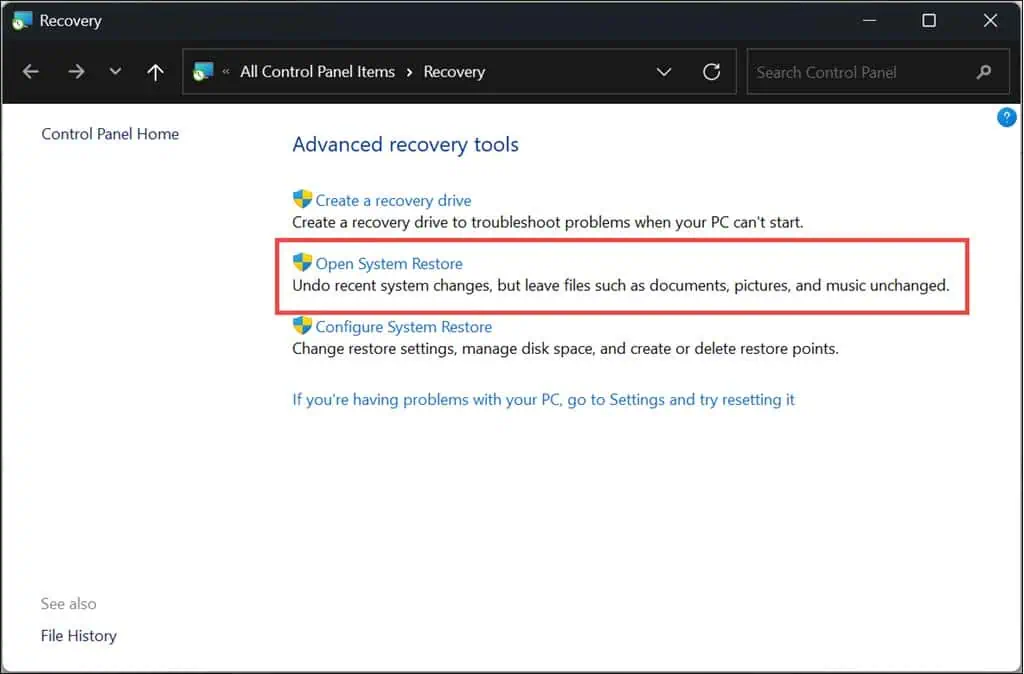
- Under Advanced Recovery Tools, select the Open System Restore option.
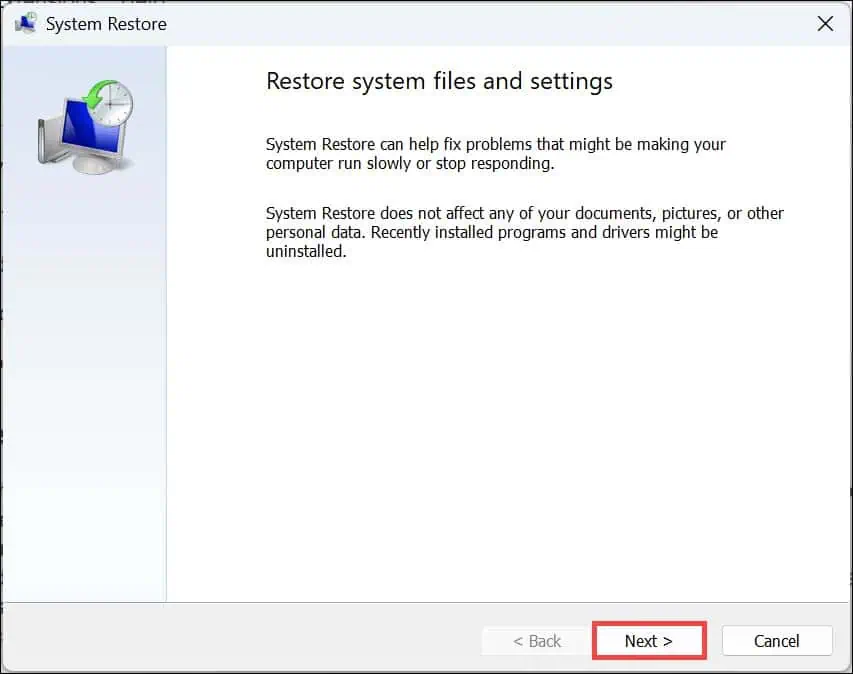
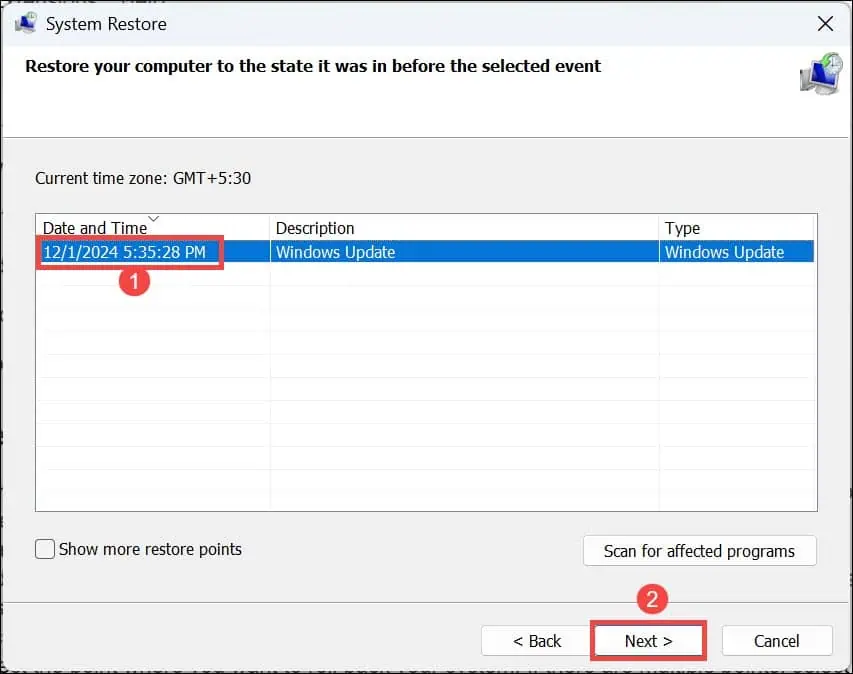
- Click the Next button to begin the process.
- Select the point where you want to roll back your system. If there are multiple points, select the oldest one for the safest approach.
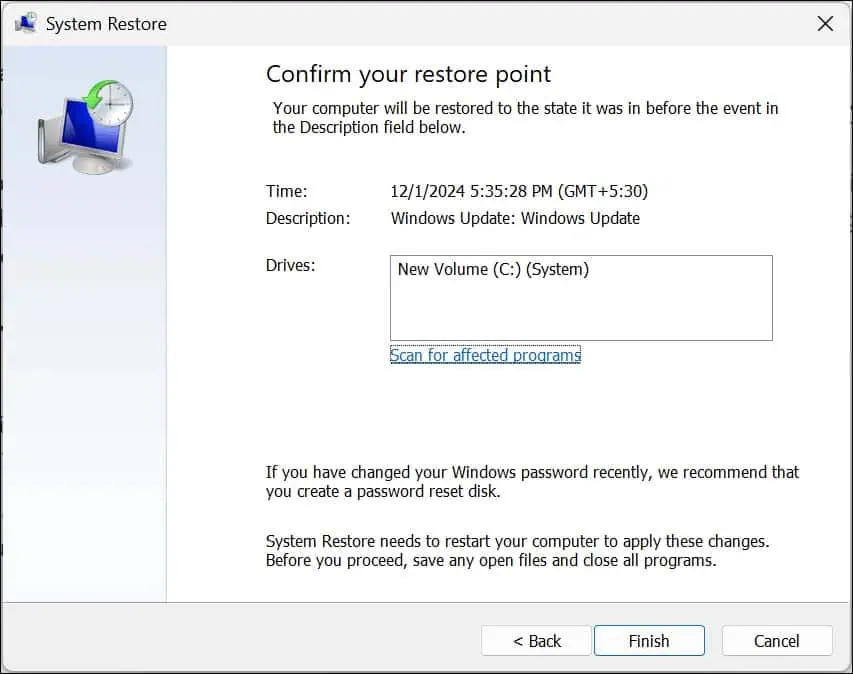
- Finally, click the Finish button to complete the restoration process.
There you have it – the best practical solutions to fix static noise on Windows 11. It can be frustrating to face such an audio issue, but by systematically applying these solutions, you can easily fix it.
Read our disclosure page to find out how can you help MSPoweruser sustain the editorial team Read more


User forum
0 messages