Kernel Mode Heap Corruption: 10 Best Fixes
7 min. read
Published on
Read our disclosure page to find out how can you help MSPoweruser sustain the editorial team Read more
Key notes
-
- Kernel Mode Heap Corruption occurs due to Windows OS kernel detecting memory corruptions.
- First, try restarting the PC, power cycling it, or removing newly installed hardware.
- Then, check for Windows Updates, update device drivers, run DISM and SFC scans, and more covered in this guide.
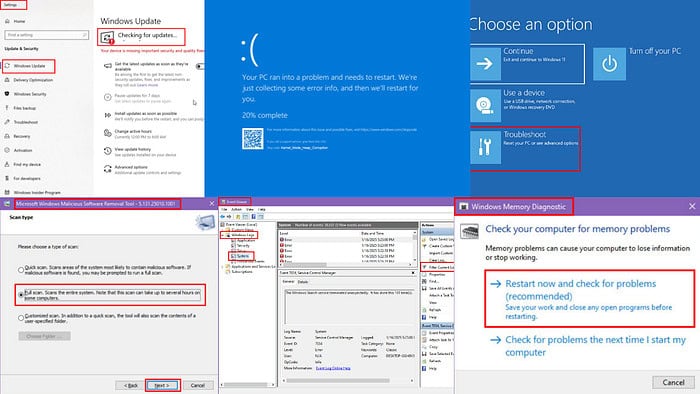
The Kernel Mode Heap Corruption BSOD error occurs when the Windows kernel detects memory corruption in a driver or system component. Also, it’s often caused by malfunctioning software or game tools.
The error happens during driver operations, such as hardware communication or memory allocation. The system halts with a Blue Screen of Death to prevent further damage and your PC asks for a restart.
Read until the end to find proven fixes that worked for many users who experienced this issue before you. Let’s get started!
1. Quick Fixes
Here are some immediate measures to get into the computer:
- The PC will usually restart automatically when you see the Blue Screen of Death with this error message. If it doesn’t, you can press and hold the Power button until the screen turns black. Now, press the Power button again to start the device.
- Also, if you have recently installed hardware, like a GPU or RAM, take that out and run the PC as it were before adding any new components.
- Power cycle the device by shutting it down, removing all cables, and pressing the Power button for 30 seconds. For laptops with removable batteries, remove the battery pack first. Ignore this step for Microsoft Surface PCs or other laptops with non-removable batteries.
Now, find below advanced instructions when the issue becomes intermittent or persistent:
2. Apply the Latest Windows Updates
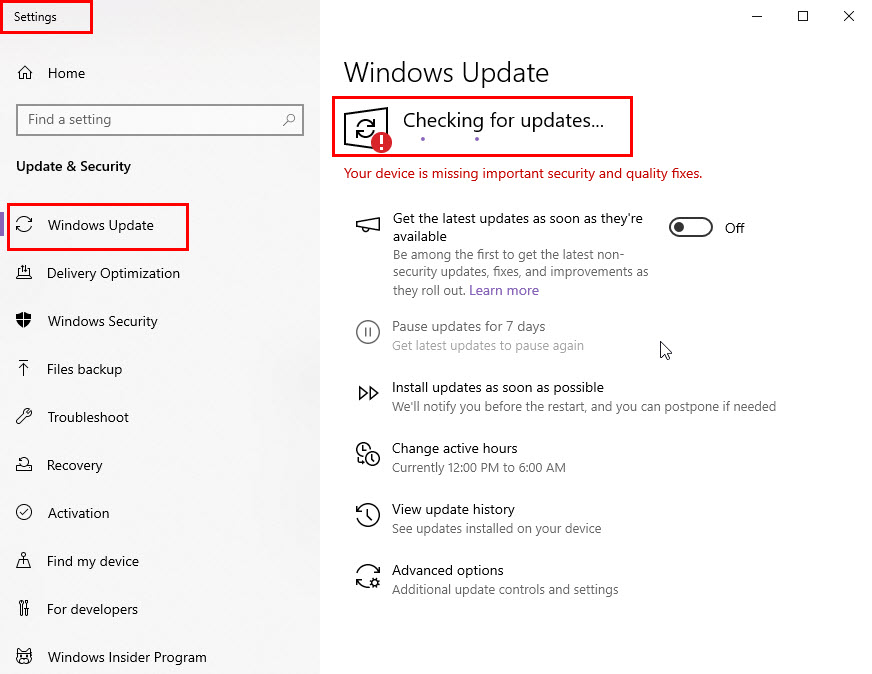
- Open the Start menu, type Windows Update, and select Check for updates from the Best results section.
- Click Check for updates.
- If any are found, click Download and install, then restart your PC if prompted.
3. Update Device Drivers
There are two ways to update existing system and third-party drivers:
From Windows Update
Apply all the pending Windows Updates or do the following:
- Press the Windows + I keys to launch the Settings app.
- Click on the Windows update or Update & Security option.
- Select Windows update from the left-side navigation panel.
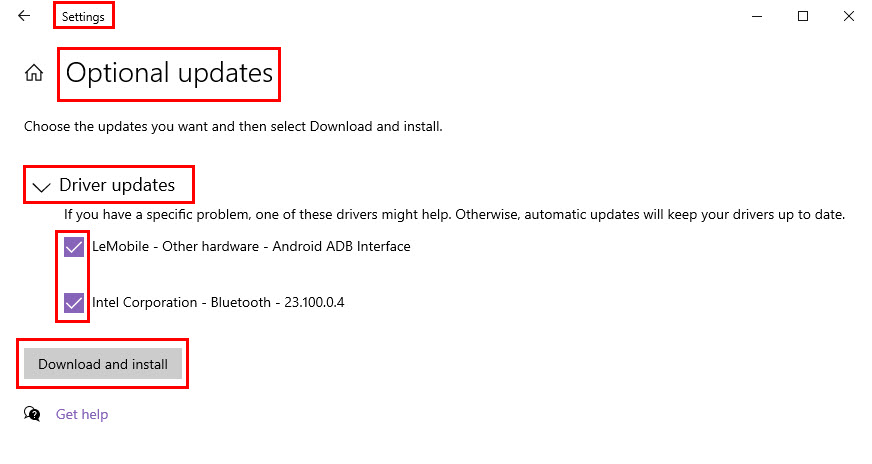
- Click on the View optional updates link.
- Expand the Driver updates tree, checkmark all pending driver updates, and hit the Download and install button.
Using a Third-Party App
If you wish to save time and automate the process, you can download and install PC HelpSoft Driver Updater for free.
Run the app, perform the initial scan, and activate the software to update all the system drivers in one click.
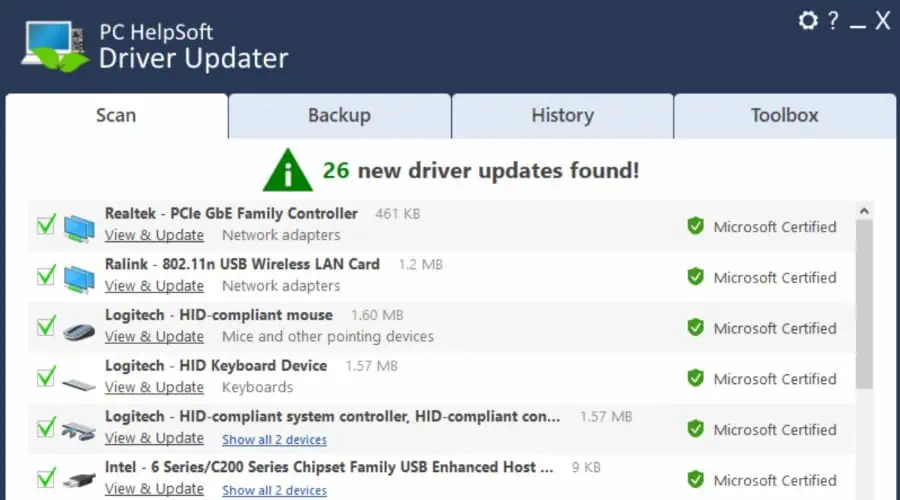
This PC Helpsoft tool sources all certified and official drivers from thousands of PC and accessory manufacturers.
4. Check for Malware
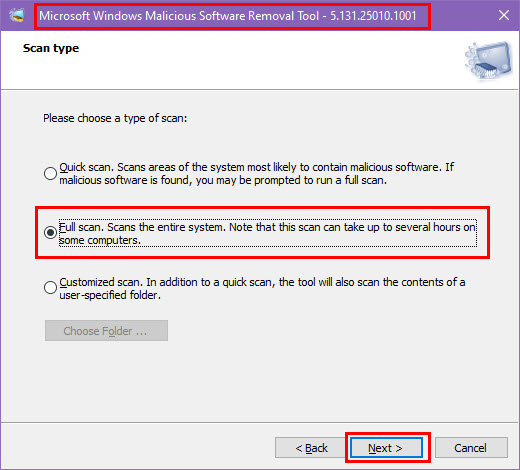
- Download the Windows Malicious Software Removal Tool from Microsoft’s official website.
- Run the Windows-KB890830-x64-V5.131 app directly from the Downloads folder.
- Click Next on the first window.
- Select Full scan and hit Next.
- The scanning will begin automatically.
- Sit back, relax, and let MSRT do its magic.
- Once done, hit Finish and reboot the PC.
5. Check RAM’s Health
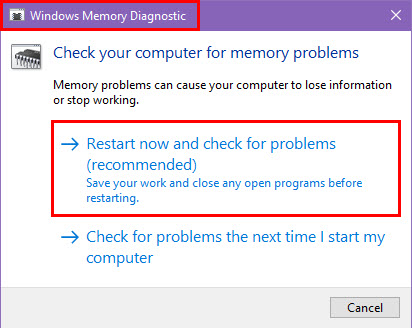
- Open the Start menu and type Windows Memory Diagnostic into the search bar.
- Select Windows Memory Diagnostic from the search Best results section.
- Choose Restart now and check for problems to begin the memory test.
- The system will restart automatically and begin scanning the RAM for issues.
- Wait for the memory test to complete. This process can take several minutes.
- Once the test finishes, your computer will restart again.
- After restarting, the test results will appear in the notification area, or you can check the event log for detailed results.
Here’s how to get the results:
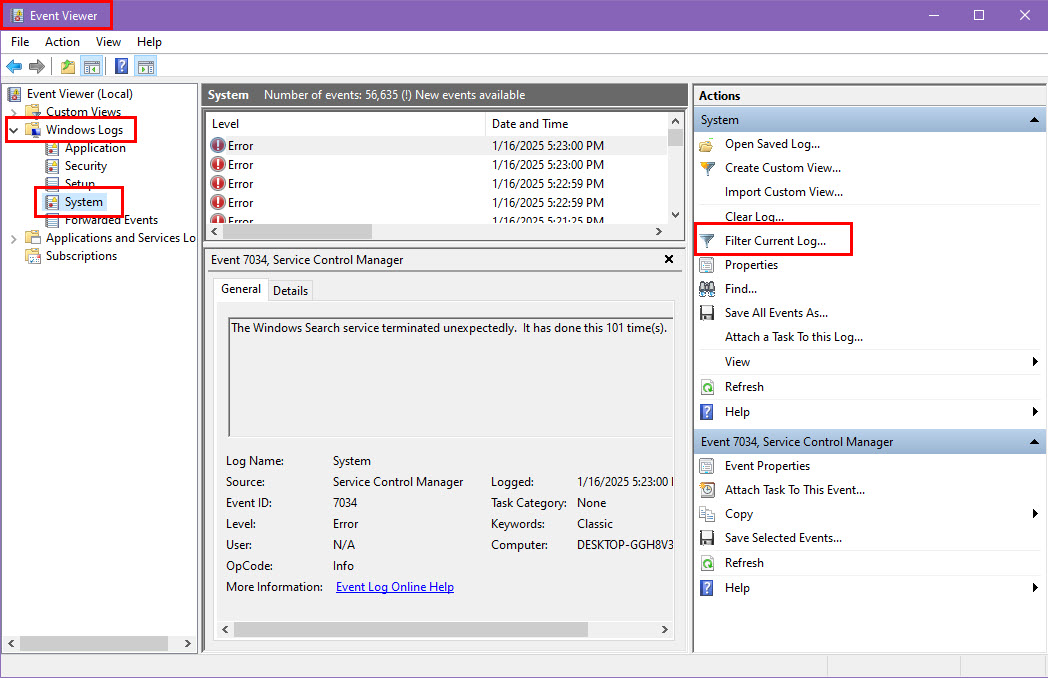
- Press Windows + X and select Event Viewer.
- In Event Viewer, expand Windows Logs and click on System.
- In the right panel, click Filter Current Log.
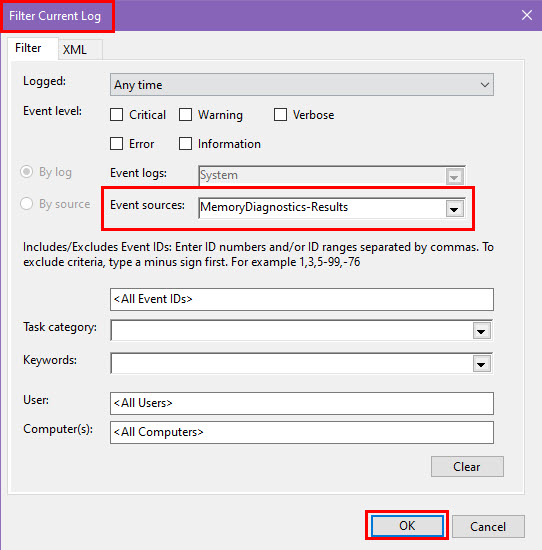
- Under Event sources, select MemoryDiagnostics-Results.
- Click OK, and the results from the Windows Memory Diagnostic will be displayed in the log.
To interpret the results in Event Viewer, do the following:
- Find and look at the Event ID 1101 entries.
- In the General tab, the report will show the results.
- If the test was successful, you’ll see:
- No memory errors were detected: This indicates that the RAM is likely not faulty.
- If errors were detected, the report will show:
- One or more errors were found: It means that your RAM might have issues.
If that’s the case, alternate the RAM chips by keeping one and removing the other. If there’s just one, try installing new RAM instead.
6. Run SFC and DISM Scans
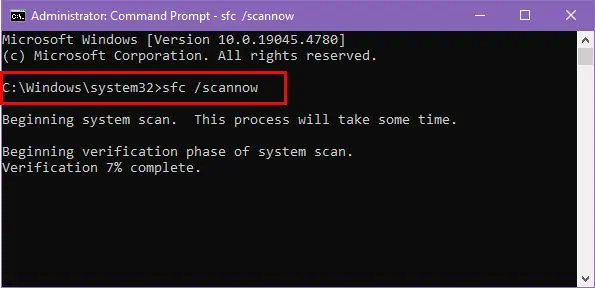
Firstly, let’s run the SFC scan by following these steps:
- Open Command Prompt as an administrator by searching for cmd, right-clicking, and selecting Run as administrator.
- Type sfc /scannow and press Enter.
- After the scan completes, check the results. If you get “Windows Resource Protection found corrupt files but was unable to fix some of them,” you’ll have to run a DISM scan next.
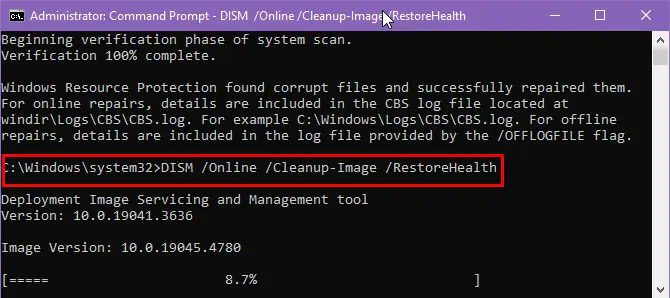
Here’s how:
- Launch CMD as an administrator.
- Type DISM /Online /Cleanup-Image /RestoreHealth and press Enter.
- After the scan completes, check the result:
- The restore operation completed successfully means the issues were fixed.
- The source files could not be found means the scan couldn’t find the necessary files.
- The corruption was not repaired means further action may be needed.
Now, reboot your PC and see if the issue goes away.
7. Perform a Clean Boot
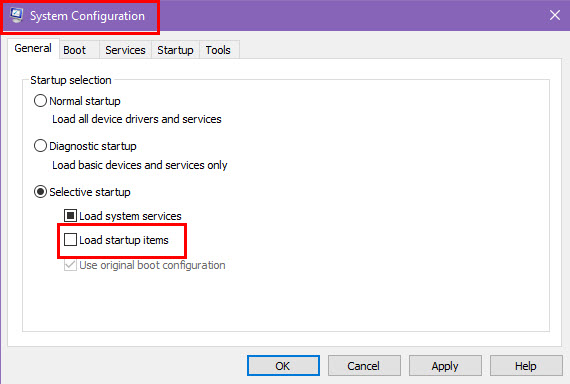
- Press Windows + R to open the Run dialog, type msconfig, and press Enter to open the System Configuration window.
- In the System Configuration window, click on the General tab.
- Select the Selective startup option and uncheck Load startup items.
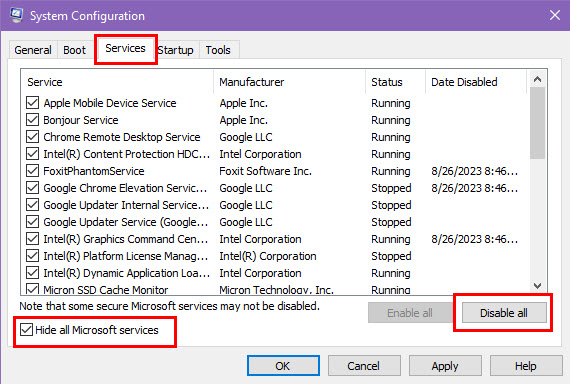
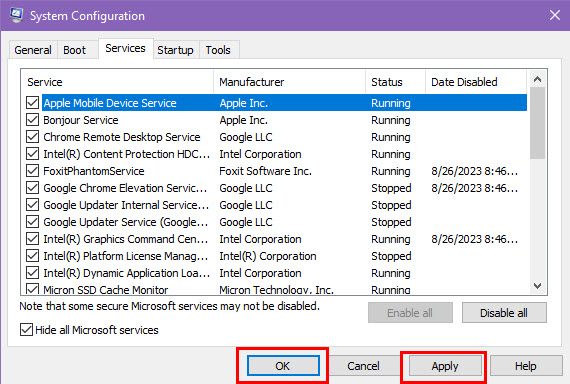
- Go to the Services tab in the System Configuration window.
- Check the box labeled Hide all Microsoft services to prevent essential services from being disabled.
- Click Disable all.
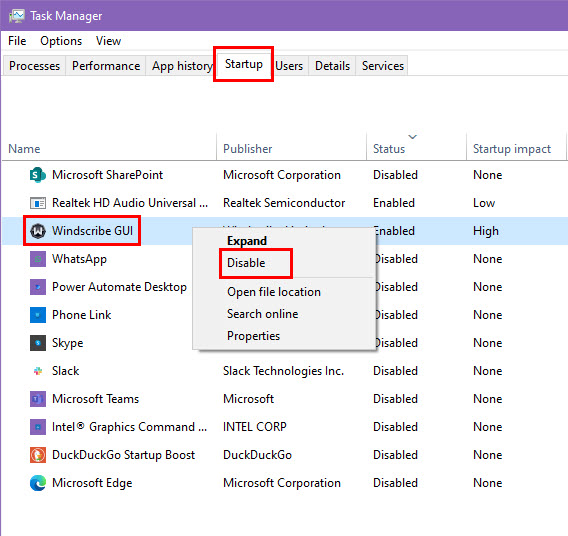
- Next, go to the Startup tab and click Open Task Manager.
- In Task Manager, right-click each startup item and select Disable.
- Close Task Manager, then return to the System Configuration window.
- Click Apply and then OK.
- When prompted, click Restart to perform the clean boot.
8. Disable Gaming Tools
If there are gaming tools, like overlays for recording or anti-cheat software, uninstall them. Here are some common apps you might have:
Gaming Tools:
- Razer Cortex
- MSI Afterburner
- EVGA Precision X1
- RivaTuner Statistics Server
- Game Booster
- CCleaner
- Outplayed
- XSplit Gamecaster
- OBS Studio
Overlays:
- Discord
- Streamlabs OBS
- XSplit Broadcaster
- NVIDIA GeForce Experience
Anti-Cheat Apps:
- Easy Anti-Cheat
- BattlEye
- Vanguard
- FairFight
- Valve Anti-Cheat (VAC)
9. Run Driver Verifier Manager Tool
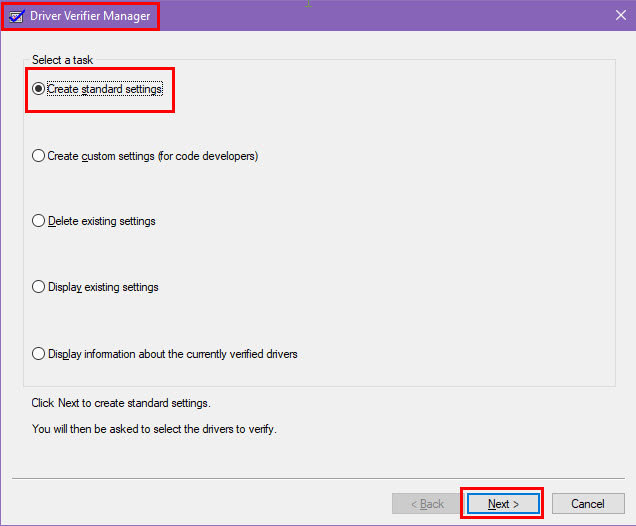
- Press the Windows key and type Verifier in the search bar.
- Select Driver Verifier Manager from the list.
- Select Create standard settings and click Next.
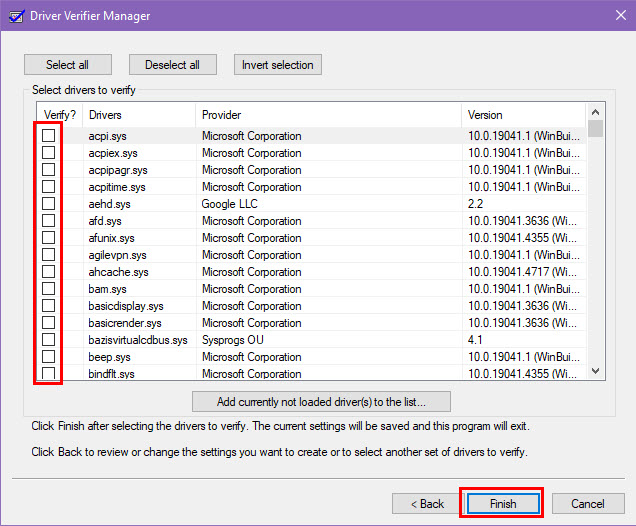
- Click on Select driver names from a list in the next dialog box.
- Choose the drivers you want to verify and click Finish.
- Restart your computer to begin the verification process.
10. Perform a System Restore or Reset PC
If you can gain acces to your system after seeing the Kernel Mode Heap Corruption BSOD error, try restoring the PC to the last known good configuration:
- Open the Start menu and type System Restore in the search box.
- Select Create a restore point from the search results.
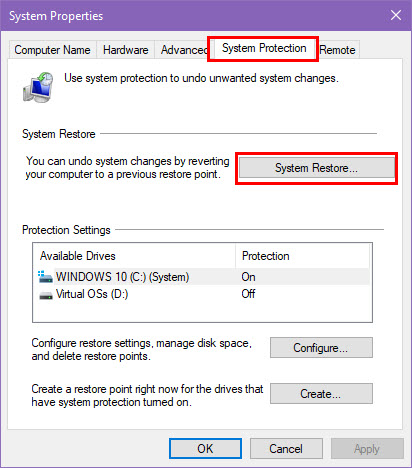
- In the System Properties window, go to the System Protection tab.
- Click the System Restore button.
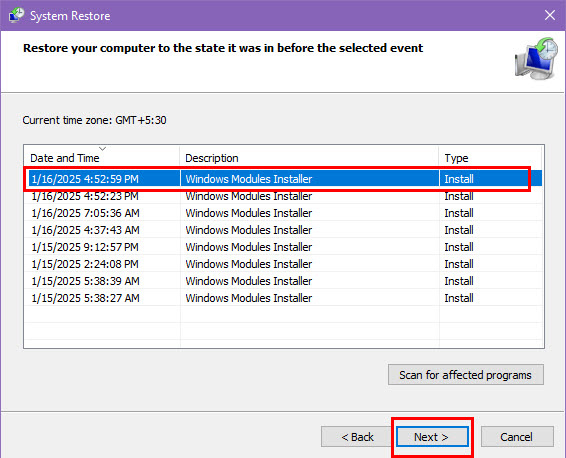
- Select a restore point from the available list and hit the Next button.
- Follow the on-screen instructions.
Reset the PC
Sometimes, the BSOD error will be persistent and won’t let you enter the system desktop. In that case, try resetting:
- Long-press the Power button until the PC shuts down.
- Start it up and long-press the Power button when the Windows logo appears.
- Repeat once more.
- You should see the Please Wait loading screen.
- In a bit, you should enter the WinRE environment.
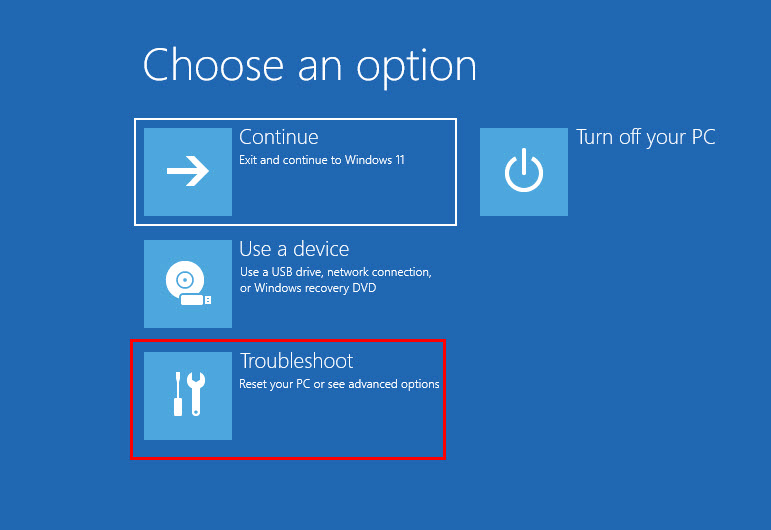
- Click on the Troubleshoot button.
- On the Troubleshoot dialog box, click on Reset this PC.
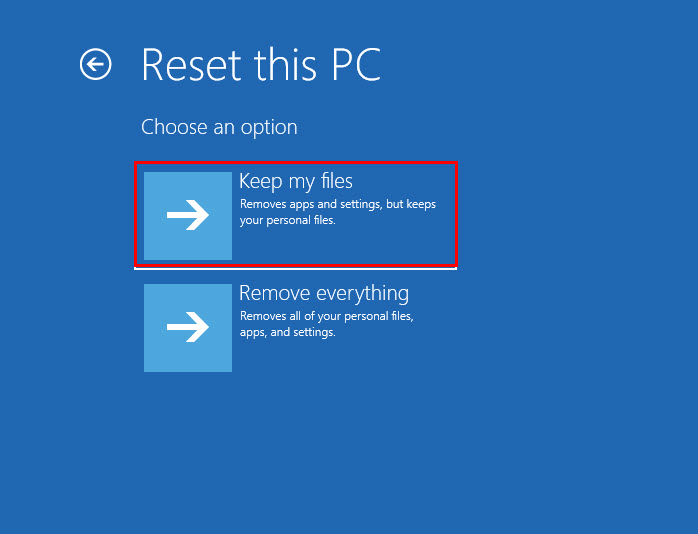
- Choose the Keep my files option in the next window.
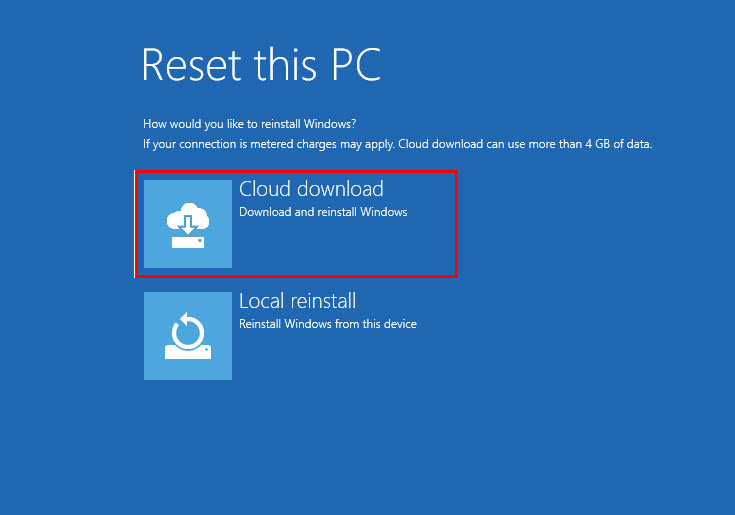
- On the Reset this PC screen, click on Cloud download.
- From this step, follow all on-screen instructions to complete the system reset process.
The above solutions should help you fix the Kernel Mode Heap Corruption BSOD error.
If the issue still persists, contact the technical support team of the device manufacturer. Here are some websites for popular support portals:
- Official HP® Support
- Official Support | ASUS
- Surface help & learning – Microsoft Support
- Support | Dell
- Support | MSI Global
- Lenovo Support
- Support | Acer.
For any other blue screen errors, you might want to read how to run BSOD troubleshooter in Windows 11 & 10. You might also face the Kernel Security Check Failure error.






User forum
0 messages