4 Easy Ways to Convert DVD to Digital Video on Windows
![]() 11 min. read
11 min. read
![]() Updated on
Updated on
Share this article
Improve this guide
Read our disclosure page to find out how can you help MSPoweruser sustain the editorial team Read more
The Netflix vs. Blockbuster saga is the epitome of how streaming media gradually take over physical DVDs. For most of us, DVDs become obsolete year by year and are left to rust in long-forgotten boxes – or, does it need to be? With DVD to digital converters, we can turn DVDs into digital videos and save them forever: the best memories, stories, and everything that we cherish.
With the methods provided below, all these headaches will be gone for good:
• Optical discs are vulnerable and can be scratched or get damaged easily;
• It is less convenient to play DVDs anywhere, anytime. With digitized format, you can playback video on the go, streaming it over NAS home sever and cast it to big screens.
• DVDs can take up too much space if it’s not for collection purposes.
1. How to Convert DVD to Digital with VideoProc Converter
DVD to digital converter not reading DVD? Region-locked DVD won’t play? For anyone with unhappy experiences converting DVD to digital, here is the remedy from Digiarty Software – VideoProc Converter. It is the overall best solution to rip DVDs and turn DVDs to digital MP4, MOV, MKV, AVI, WebM, MPEG-2, HEVC as well as Video_TS folder, ISO image, VOB files, and 420+ output formats.
Its developers have been serving the DVD collectors for more than 15 years, with flagship software VideoProc Converter to rip, convert, copy, clone, and backup DVDs, at 1:1 original quality and Hardware Accelerated turbo speed.
Running on Windows on Mac, VideoProc Converter is baked with these features to facilitate DVD to digital conversion:
• Convert Any DVDs: Home DVDs, workout DVDs, 99-title DVDs, region-locked, scratched, and old DVDs.
• Comprehensive conversion modes: Convert DVD to digital format, main movie content copy, full title copy, MKV maker, create VIDEO_TS folder, DVD to ISO image – 100% content and structure preserved.
• 47x faster speed: Tapping on the latest tech of QSV, VCN, or NEVNC from Intel, AMD, and NVIDIA, the Hardware Acceleration support in VideoProc Converter delivers faster conversion speed without compromising image quality.
• User-friendly settings: Select titles, subtitles, audio tracks, option to preserve multi-language voiceover, subtitles, metadata, stereo or mono, option to merge titles, and deinterlace DVDs.
• Handy Toolkit: Besides copy DVDs to Windows and Mac computers, you can also use VideoProc Converter to edit, convert, download and record videos easily. This tool is lightweight, powerful, and low-spec PC friendly.
Better yet, VideoProc Converter has pre-configured profiles to convert DVD to digital in 1-click, which is time-saving for non-techie persons, as it requires zero learning curve.
Here’s how to digitize DVD easily with 1:1 original quality:
Step 1. Go to the official site of VideoProc Converter to free download and install it.
Step 2. Go to the DVD module from the main interface, and insert your disc to the DVD drive.
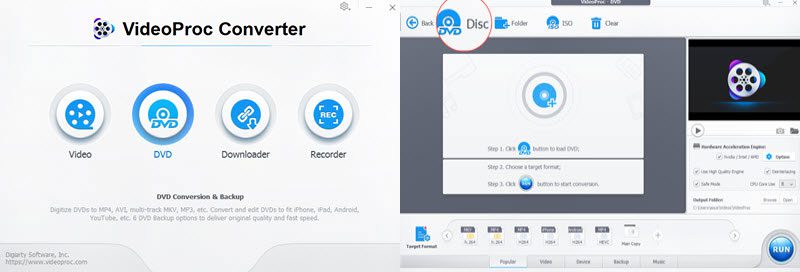
Step 3. Click the DVD disc icon to load DVD.
By default, VideoProc Converter will automatically detect the DVD disc file system, and you can simply click Done. You can also select the disc from the drop-down menu when there are multiple discs loaded.
Step 4. Select a target format and click Run to digitize the DVD to a digital format.
At the bottom of the interface, you can select a target format. There are pre-configured formats such as MP4, MKV, AVI, WebM, MOV, and DVD-specific formats such as VIDEO_TS folder, ISO image, PAL/NTSC VOB, etc.
Which format shall I use?
• To playback on any device: Click the Target Format icon, and choose corresponding devices, such as iPad, iPhone, Xbox, Samsung TV, general videos, etc.
• For archival purposes: Click the Backup icon and choose Main Copy (if you only want to keep the main movie) or Title Copy (if you want to preserve everything such as hidden tracks or special features besides the main movie).
• To upload to video sites/cloud drives: MP4 H264 is recommended for its wide compatibility.
• To preserve multi-language voice-over and subtitles: Use the MKV Copy profile inside the Backup tab.

VideoProc Converter also supports editing DVDs. For instance, you can cut out the best scenes from your favorite movie, or trim off unwanted parts from the video. It doesn’t require you to have any knowledge of video editing, thanks to the known-at-a-glance user interface.
If you’re wondering how to play DVD on Windows 11, we’ve got you covered.
2. How to Convert DVD to Digital Video with MakeMKV
MakeMKV is a free DVD to digital video converter that wins the heart of many DVD and Blu-ray collectors. It supports open DVD and Blu-Ray discs, as well as AVCHD and ISO files. Plus, the AACS and BD+ protected discs are supported for free during the 30-day trial.
To convert DVD to digital video with MakeMKV, you can also preserve Meta information, such as multi-language audio channels and subtitles. The output format, as its name suggests, is the MKV container only.
This converter runs on Windows, Mac OS X, and Linux. You can visit its official site and install the corresponding version for your system.
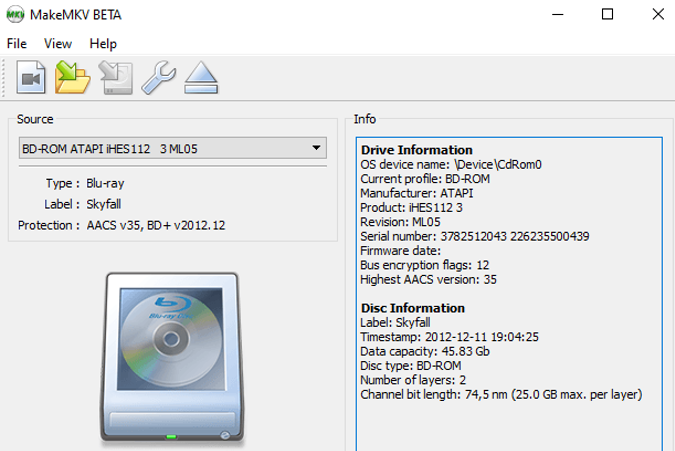
Step 1. Insert the DVD or Blu-Ray into your DVD optical drive, and launch MakeMKV so that it starts to automatically detect the DVD disc.
Step 2. Select the correct Source from the drop-down menu. If you only insert one DVD or Blu-Ray into the drive, then leave it to the default source.
Step 3. Start to scan the DVD by clicking the large DVD drive icon on the interface.
During the scanning process, MakeMKV will detect possible errors, scan titles, and check whether there are protection schemes.
Depending on your hardware and the DVD type, the process can take several minutes to finish. If your DVD keeps spinning, wait patiently until it’s done.
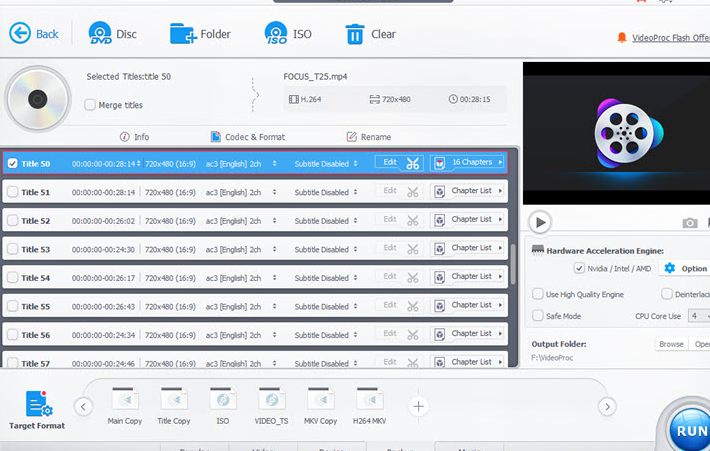
Step 4. Select the titles in the DVD that you want to digitize.
This DVD to Digital video converter will list out all the available titles from the DVD, and at a time, you may be overwhelmed by the number of options.
Don’t worry, if you only want to keep the main content (the movie itself, for instance), then choose the Title with the largest video file size.
If you also want to digitize content such as bonus videos, hidden tracks, and special features, then you will need to tick the corresponding titles.
Tip: You can right-click on the interface, and hit Unselect all. By doing so, you can then manually select only the needed DVD titles.
Step 5. Select audio and subtitles as you wish.
For instance, many DVDs and Blu-Rays come with multi-language channels, and you can opt to digitize only the English audio track. Likewise, check the corresponding subtitles as per your need.
Step 6. Choose the output path for the digital video.
You can click the folder icon to browse and designate a folder to store the video.
Step 7. Start to convert DVD to digital video by clicking the Make MKV button.
As you can see, this DVD to Digital video converter only supports MKV format after conversion. It is a nice option to include both hard-coded and soft-coded subtitles and multi-track audio channels. However, if you plan to play digitized DVDs on Apple devices, MKV is less compatible when compared to MP4.
3. How to Convert DVD to Digital Video with VLC
VLC is free and open-source software running on Windows, Mac (both M1 and Intel-based versions), and Linux.
It’s not a secret the VLC media player can be repurposed as a DVD to digital video converter, not to mention its bonus features to record, stream, and editing videos for free.
Using VLC, there are times you may encounter errors such as “no disc found”, “DVD not reading”, or VLC cannot play non-UDF mastered DVDs. Still, given that VLC is completely free, there is nothing to complain about.
You can follow the detailed steps below to turn DVDs into digital videos using VLC:
Step 1. Put DVD into the drive and launch the VLC media player on your computer.
If you have yet installed VLC, visit its official site and download the right version for your machine.
For M1, and M2 Macs, download the Apple Silicon version, for 32bit or 64bit Windows, choose the corresponding one.
Step 2. Go to the menu in VLC, and click File > Convert/Save option on Windows.
On Mac, the option is written as Convert/Stream.
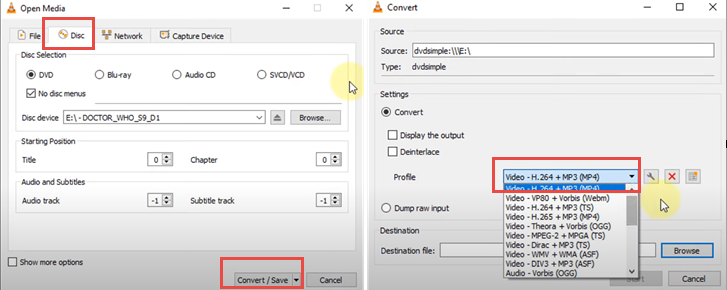
Step 3. Click the Disc tab, which sits between the File and the Network tab, and select the disc type.
For Blu-Ray discs, you may need additional operations for the conversion to be working. The keys database (KEYDB.cfg) and AACS dynamic library (libaacs.dll) are required to be installed, and they only work on VLC 2.0 and higher versions.
Step 4. Click Convert/Save button at the bottom of the current interface.
Step 5. In the newly opened Convert window, click the Profile menu to select a target format.
Video H264+MP4 (MP4) is recommended for its wide compatibility.
If you want to further reduce DVD file size while maintaining image quality, you can use H265 MP4. The drawbacks are compatibility issues and slower conversion speed.
Step 6. Start to digitize DVD in VLC.
Click Browse to select the destination path and click the Start button.
4. How to Turn DVD into Digital Video with HandBrake
Another popular way to digitize DVD collections is to use HandBrake. As a free and open-source video transcoder, Handbrake has been around for nearly two decades, serving DVD collectors worldwide. It’s a nice option to turn your physical media into digital MP4, MKV, and WebM videos, especially for home DVDs such as wedding memories and birthday videos. For store-purchased DVD and Blu-Ray, however, you will need to add an additional library, libdvdcss, into Handbrake’s installation folder.
HandBrake runs on Windows, Mac, and Linux. You can visit its official site to download and install the software and follow the steps below to transfer DVD to digital videos:
Step 1. Insert the DVD disc into your drive and open HandBrake.
If your computer doesn’t have a DVD drive – which is the case for most modern desktops and laptops – then you can use an external DVD drive.
Step 2. In the Source Selection window, HandBrake will show you the detected DVD. If you have multiple DVDs, you can choose the needed one and hit Open this DVD or Bluray Drive.
Step 3. Choose the DVD title that you want to convert.
Click the drop-down menu of Title, there you shall see multiple titles. Depending on whether you only want the main content – the movie itself, for instance – or everything that’s on the original DVD, you may select one or multiple titles to convert.
But before adding multiple titles to the Queue, you need to manage the settings for each title.
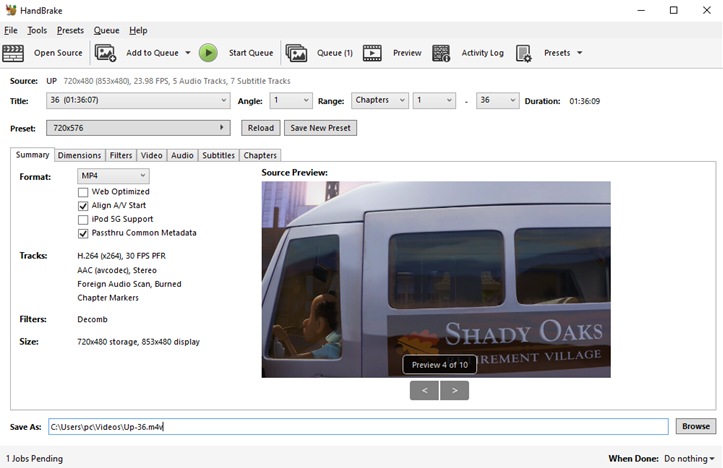
Step 4. Manage the settings for DVD conversion.
Preset: Depending on where you live, the DVD can be either PAL (European countries) in NTSC (North America, Japan) format. Go for 720×480 if your DVD is NTSC and 720×576 for PAL.
If you cannot find the corresponding resolution in the Preset, click Save New Preset to add a custom resolution. Then type in 720×480 or 720×576.
Video container format: you can choose the format under the Summary tab in HandBrake. The available options are MP4, MKV, and WebM. Note that when choosing MP4 for the first time in HandBrake, it may end up in M4V. You can force to MP4 in Preferences > Output Files > MP4 file extension > Always use MP4.
Note that if you have chapter markers enabled, use SRT subtitles or AC3 audio, M4V is needed if you want to playback the digital video in the QuickTime Player.
Audio: For multi-language DVDs, you can choose the preferred audio channel in the drop-down menu under the audio tab. If you prefer the 5.1 stereo audio, don’t forget to select that channel.
Subtitle: Just as in the Audio tab, you can choose subtitles in the desired language.
Step 5. Add to Queue.
Once you finished tweaking the settings for a specific title, you can repeat the above steps to select another title and manage its settings. In this way, you can convert multiple titles by adding them to the Queue.
The Add to Queue option is right under the menu.
Step 6. Choose the output path.
At the bottom of the interface, you can click the Browse button to designate the destination.
Step 7. Convert DVD to Digital formats by clicking the Start Queue button.
Turning DVD to MP4, MKV and other digital formats in HandBrake requires many steps and tricky tweaks, but once you get the hang of it, your workflow shall be more efficient.
Disclaimer: Please note that we don’t condone the ripping of rental DVDs and copy-right protected discs. Please digitize DVDs for fair use.


User forum
0 messages