USB to HDMI Adapter Not Working: 11 Best Fixes
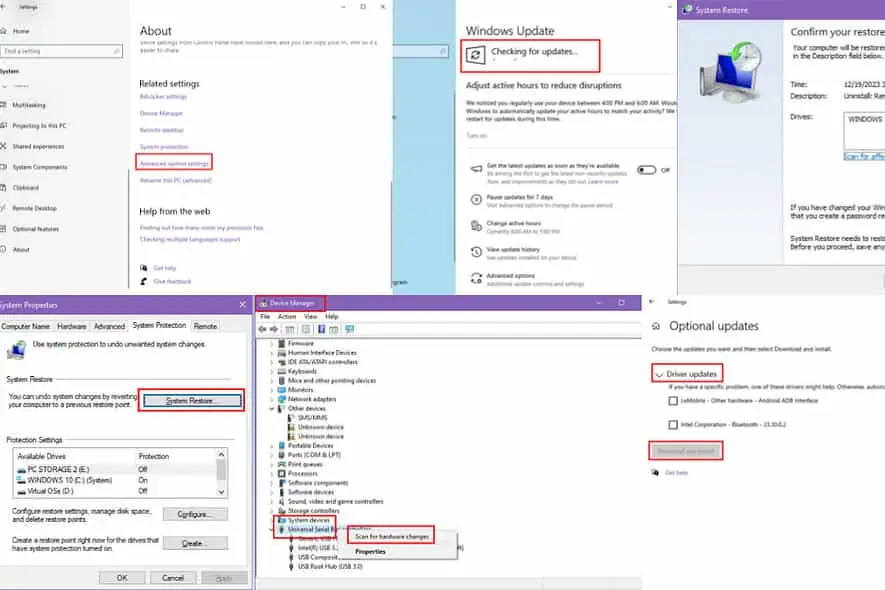
Is your USB to HDMI adapter not working on a Windows PC or Mac?
You can try these proven fixes that helped me on several occasions when I was an IT technical support specialist in one of the Fortune 500 companies.
Solution 01: Test the USB Port With a Different Accessory
Use a different USB device to test the USB port you’re using. You can connect an external USB storage stick or cable to charge a smartphone.
If either of the accessories works, the USB port is okay.
Solution 02: Refresh Device Manager
- Disconnect the USB to HDMI adapter.
- Restart the PC or laptop.
- Sign in to your Windows account on the device.
- When you’re on the Desktop, click the Start Menu button.
- Type Device and click on the search result that says Device Manager.
- Now, connect the USB to HDMI adapter again.
- Scroll to the bottom and select the USB controllers menu.
- Right-click and choose Scan for hardware changes option.
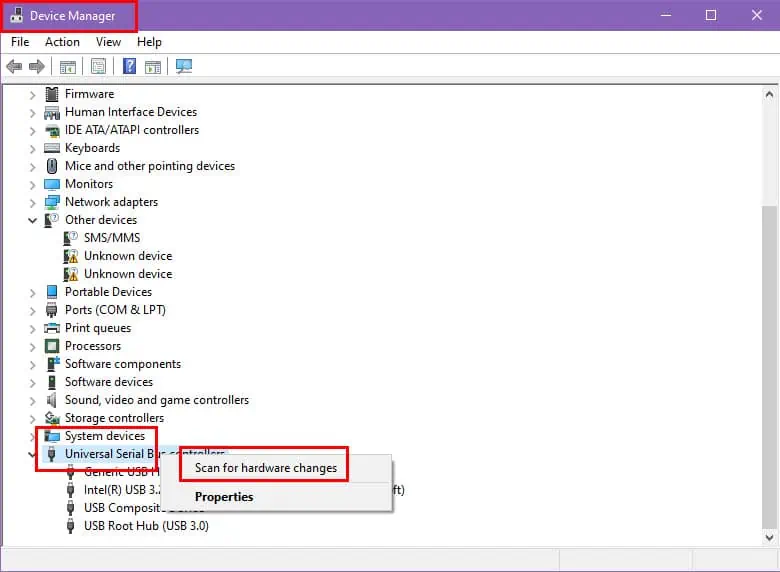
- Once done scanning, check if the USB to HDMI adapter is working.
Solution 03: Switch USB Ports
Are you connecting the USB to HDMI adapter into the front USB ports?
Try one of the USB ports located at the back panel of the PC case. Also, you must use a USB 3.0 port. They have a blue-colored insulator inside the port that’s easily visible. You can also see USB 3.0 SS written on the I/O cover on some PC cases.
Solution 04: Check If the OS Is Compatible
All the latest USB to HDMI adapters support Windows 10 or later. If you need one for Windows 7 or Windows XP PCs, check the user manual or product description of the accessory you’re buying.
For example, look at these products on Amazon:
- Windows XP supported: USB to HDMI Adapter, USB 3.0/2.0 to HDMI for Multiple Monitors
- Windows XP not supported: BENFEI USB 3.0 to HDMI Adapter, USB 3.0 to HDMI Male to Female Adapter
Solution 05: Update USB Driver
From Device Manager
- Open the Device Manager tool from the Start Menu.
- Scroll to the bottom to find the Universal Serial Bus controller component.
- Click on that to expand its items.
- Since you’re looking for USB 3.0 ports, select any of the same ports and right-click.

- Click on the Update Driver option on the context menu.
- Choose Search automatically for drivers on the next screen and follow on-screen instructions.

Using the Manufacturer’s Website
- Find out your PC’s motherboard model name and look it up on Google Search.
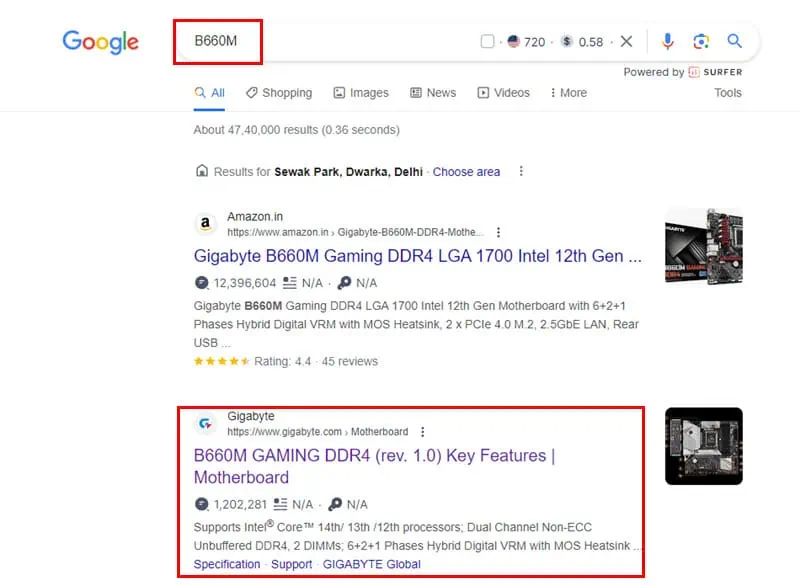
- You should see a search item for the motherboard as a product on the manufacturer’s website.
- Click on that.
- You should land on the web portal of the motherboard.
- Look for the Support link on the portal.
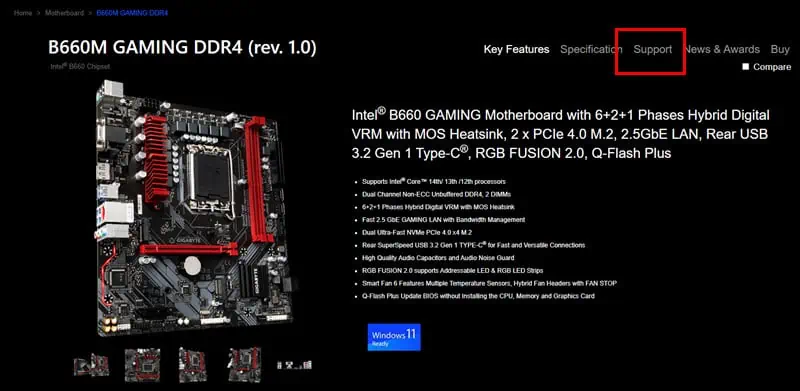
- Click on it.
- You should now arrive on the Downloads portal for the motherboard.
- Here, you should find the USB driver you’re looking for.
- Download the driver and install it by double-clicking the installer package.
Using Intel’s Drivers
- Go to the Download Drivers & Software portal of Intel.
- Search for the term USB.

- Choose an appropriate USB driver that matches your PC or laptop.
- Download and install the driver.
Solution 06: Update Windows OS
- Press Windows + I to launch the System or Settings app on the Windows PC.
- Click on the Update & Security menu.
- Now, click on the Check for updates button.
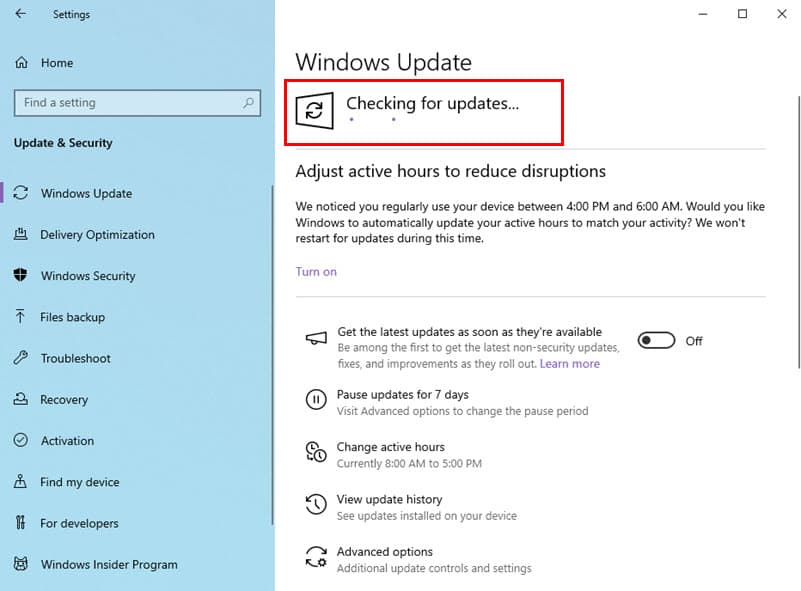
- Wait for the Windows update to complete.
- Again come back to the Windows Update dialog.
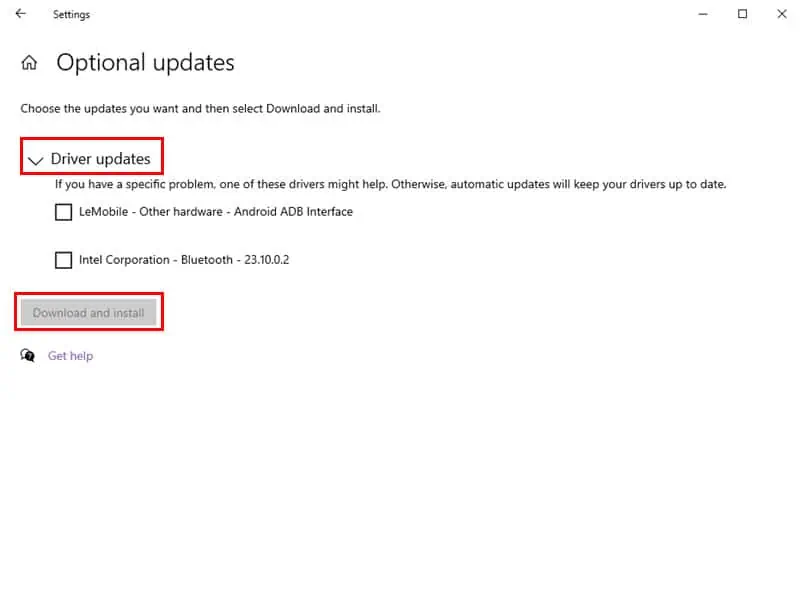
- Click on the View optional updates link.
- Expand the Driver updates section.
- If you see any Intel USB driver or any other USB driver updates here, checkmark the item.
- Click Download & install.
Solution 07: Restore Windows OS
Is the USB to HDMI adapter not working after a recent and major change on the PC or laptop? For example, you installed an application or hardware.
- Open the Windows Settings tool by pressing the Windows + I keys on the keyboard.
- Choose the System menu on the Settings app.
- Scroll down to the bottom of the System dialog to find About. Click on that.
- Again scroll down on the right side, below About, to locate the Advanced system settings link.
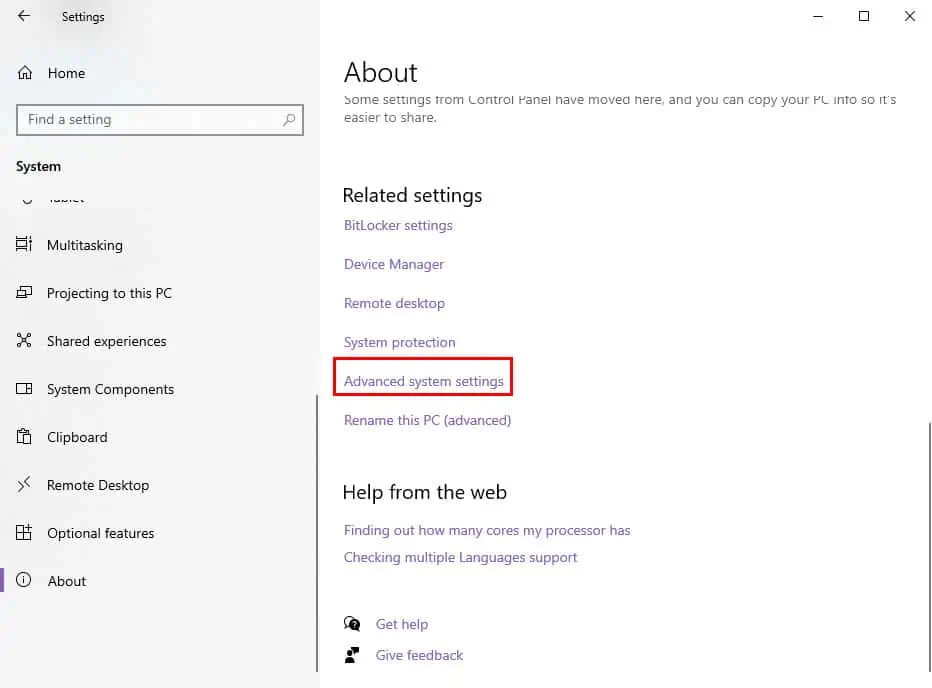
- Click Advanced system settings.
- You should now see the System Properties dialog.
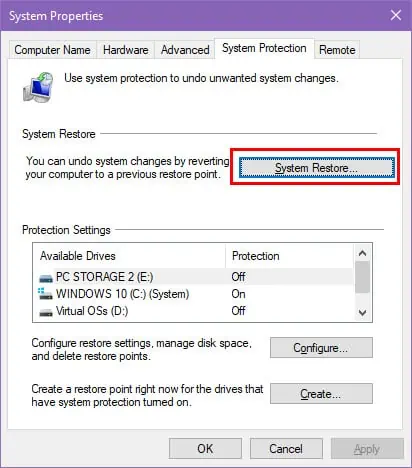
- Click on the System Protection tab and hit the System Restore button.
- Click Next when the System Restore tool opens.
- Choose a System Restore Point sometime before the last major change of the PC.
- Click Next and hit Finish.
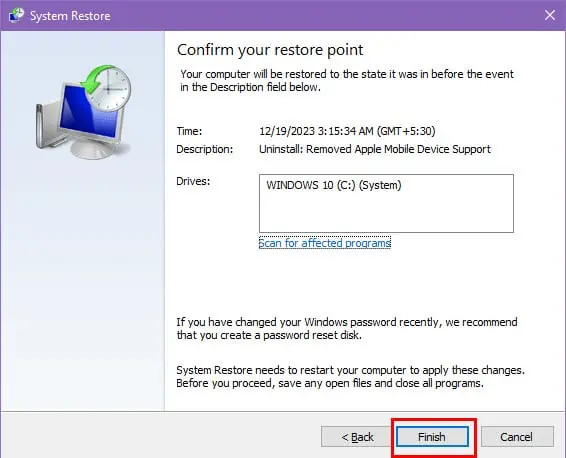
- Follow on-screen instructions to complete the system restoration process.
Solution 08: Use a Third-Party App
Alternatively, you can use a third-party PC system repairing and USB driver updating app like EaseUS DriverHandy.
- Download and install EaseUS DriverHandy.
- Hit the Scan button on the Home Screen of the app.
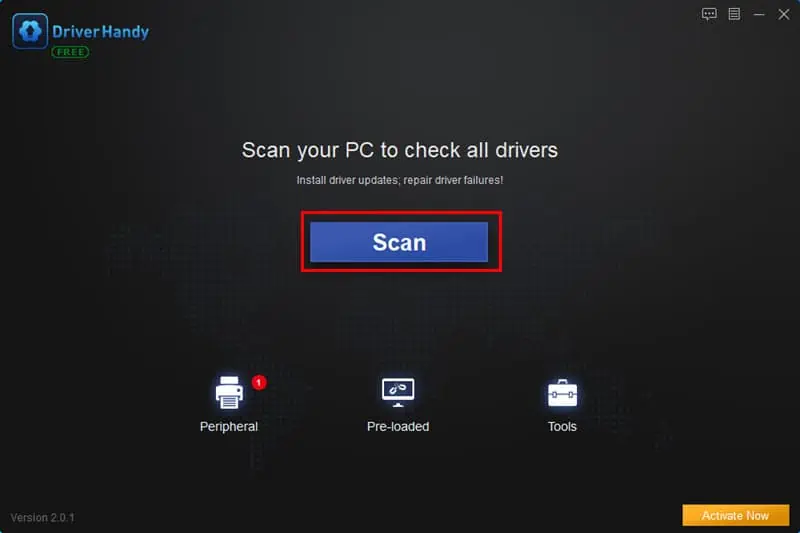
- The app will take you to the Driver Status tab once the scanning is complete.
- Click on the Peripheral Drivers menu on the left-side navigation panel.
- Now, choose USB Drivers from this section.
- On the right-side menu, EaseUS DriverHandy will show “Driver is abnormal” warnings for problematic USB ports.
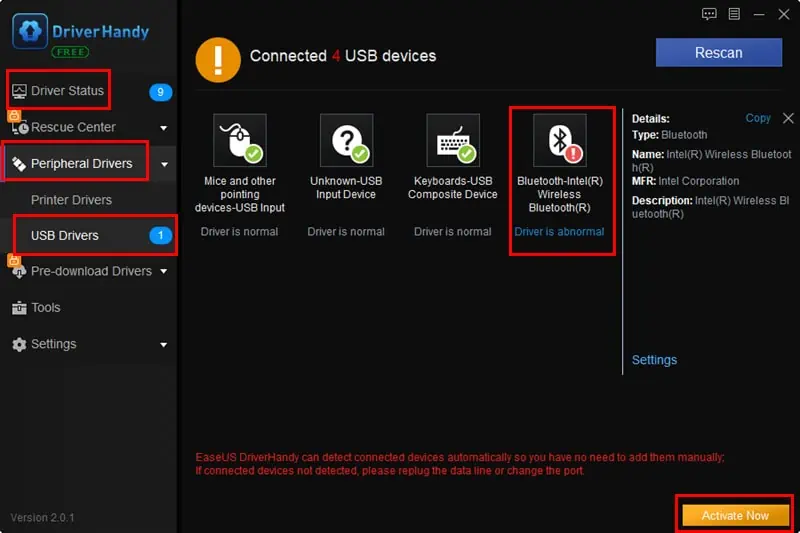
- If your USB to HDMI adapter accessory is in this list, click on it.
- Activate the tool by buying a license and fix the USB port in a single click.
Solution 09: Check Compatibility (for Mac)
Not all USB to HDMI adapters are for Mac. So, buy one after doing extensive product research. For example, these are the compatible ones:
Solution 10: Reset NVRAM for Intel Macs
- Shut down your Mac.
- Press the power button to turn on your Mac.
- Hold down the Option + Command + P + R keys simultaneously right after pressing the power button.
- Keep holding down the keys until you hear the startup sound for the second time.
- If your Mac doesn’t have a startup sound, you can release the keys after you see the Apple logo. Here, the loading bar shall appear and disappear twice.
Note: This method will wipe out all visual and audio configurations you’ve created. However, it doesn’t affect any data on the device.
Solution 11: Force Reset Apple Chip Macs
- Long press the power button until the screen turns black.
- Release the power button.
- After 10 seconds, press the power button once.
Related readings:
- Windows 10 Doesn’t Recognize Android: Step-By-Step Guide
- Complete Guide: How to Fix A Corrupted USB Flash Drive on Mac
- 5 Best Boot Repair Tools for Windows 10 & 11
Now you know how you can fix your USB to HDMI adapter when it’s not working as it should. Try the above troubleshooting ideas in the order they appear to invest less time.
If you know a better solution, do write about it in the comment box!
Read our disclosure page to find out how can you help MSPoweruser sustain the editorial team Read more


User forum
0 messages