Laptop WiFi Not Working? Here Are 11 Easy Fixes
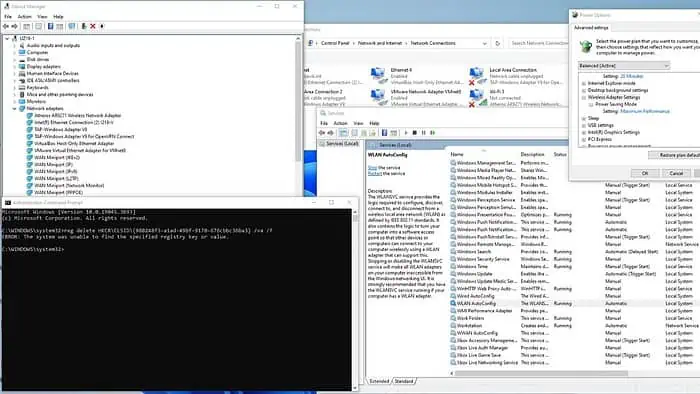
Is your laptop WiFi not working? I can help you troubleshoot the issue in no time.
WiFi connectivity hiccups often arise due to:
- Outdated drivers
- Disabled WLAN AutoConfig
- Corrupted registry key
- DNS issues
- Incorrect power settings
Now, while this may seem like a lot, I guarantee the fixes are pretty easy. Let me show you:
Laptop WiFi not working – How to fix it?
1. Preliminary checks
Before we get into the nitty-gritty, I suggest you perform the following prechecks:
- Restart your laptop to try to fix network connectivity issues.
- Ensure your WiFi is enabled by checking the laptop’s physical WiFi switches or function keys (like Fn + F2, F3, etc.)
- Ensure that the Airplane Mode is turned off.
- Ensure that you have the latest Windows updates installed.
- Restore your BIOS settings to default or update the laptop’s BIOS.
- Restart your modem and wireless router.
- Household devices like cordless phones, microwaves, and Bluetooth can interfere with WiFi signals. Check for interference to avoid connection issues.
- Temporarily disable your security software (antivirus and firewall)
2. Update your WiFi drivers
Visit the manufacturer’s website to update your WiFi adapter’s driver manually. Alternatively, use third-party software, such as PC HelpSoft Driver Updater, as it can replace outdated drivers with the latest ones. In this example, I will demonstrate the manual installation of the WiFi driver for my Lenovo IdeaPad 3 laptop.
1. Download and extract the WiFi driver from the official manufacturer site in your preferred folder before installing it. Also, I suggest removing your existing WiFi driver before updating or installing a new one.
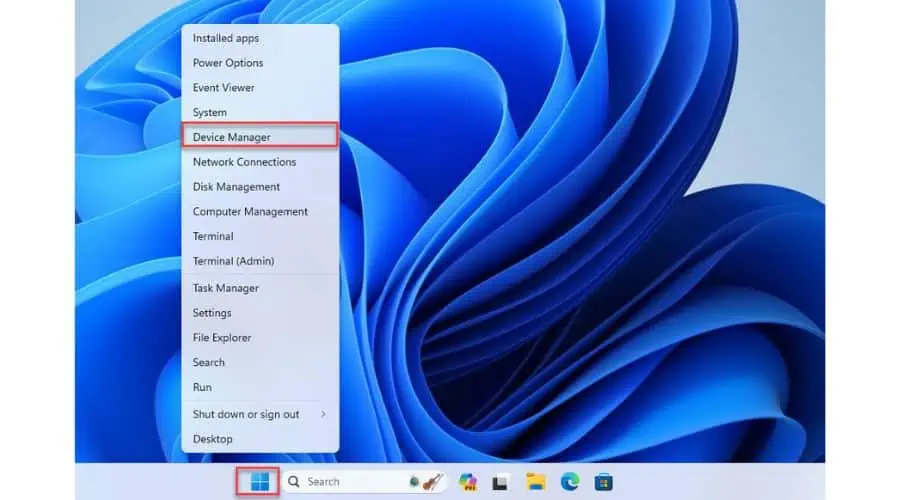
2. Right-click on the Start menu and choose Device Manager.
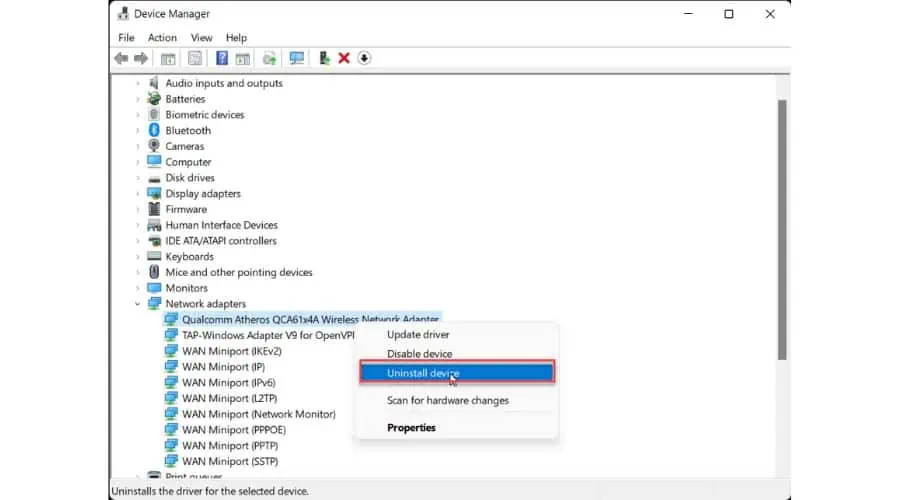
3. In Device Manager, expand the Network adapters section. Right-click on your WiFi adapter and choose Uninstall device.
4. Reboot your laptop and open Device Manager again. If you don’t see a WiFi adapter, look for entries labeled Unknown device or with a yellow exclamation mark. It is also possible that Windows will install a generic WiFi driver.
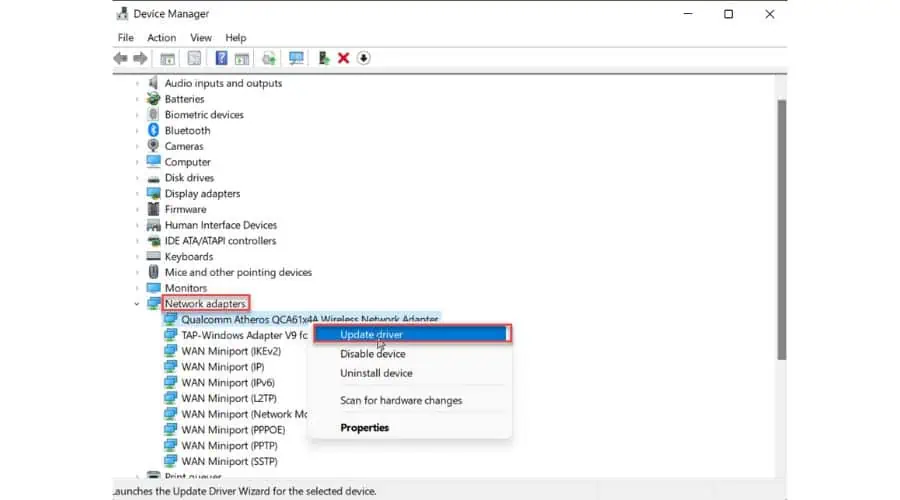
5. Right-click on your WiFi adapter and select Update driver.
6. Browse to the folder where you saved and extracted your WiFi driver, then click Next.
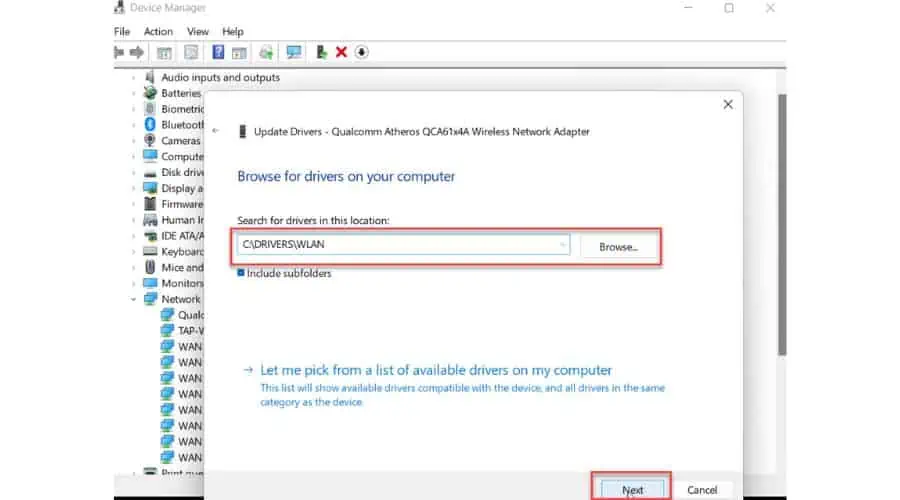
7. Wait for the WiFi driver to be installed and click the Close button.
8. If your laptop WiFi is still not working, proceed to the next step.
3. Reset the WLAN AutoConfig service
WLAN AutoConfig is a Windows service that allows your laptop to connect to wireless networks. If disabled, your WiFi will not work. Ensure this service is running automatically or reset it:
1. Press the Win + R keys simultaneously to show the Run dialog box.
2. Type “services.msc” and press Enter to open the Services window.

3. Find WLAN AutoConfig in the list of services, right-click on it, and select Properties.
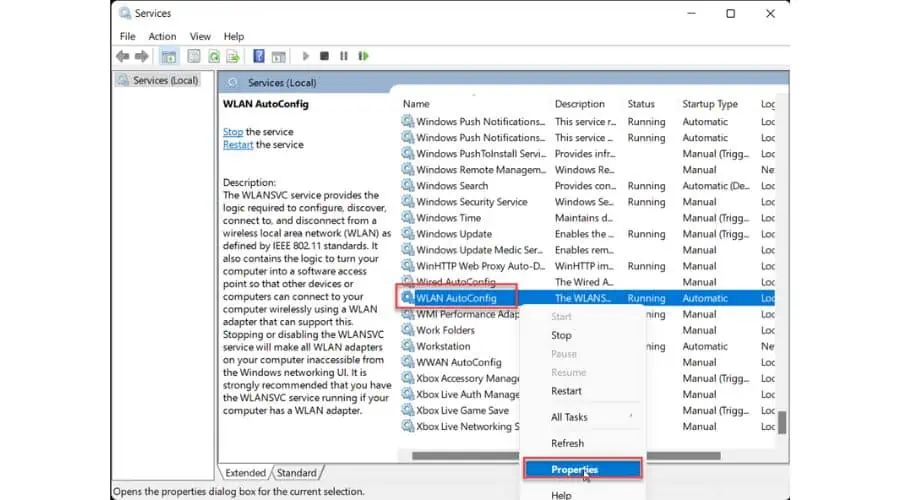
4. Ensure the Service status is Running. If not, select Automatic in Startup type and click Start. Confirm changes on Apply and OK.
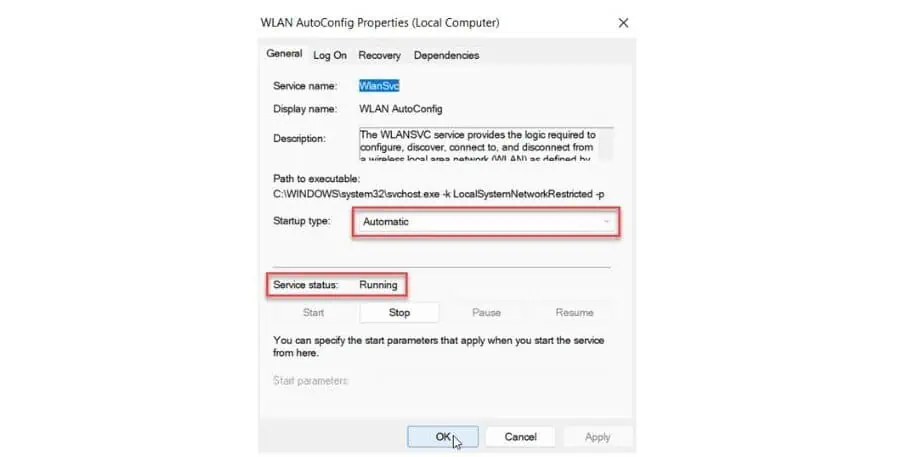
5. Reboot your PC and check if the laptop WiFi is working.
4. Delete Registry Key
This method involves deleting a registry key where wrong information about the wireless network is listed.
To do that:
1. Type “Command Prompt” in the Search bar. Then, right-click to choose Run as administrator.
2. Type the following command into the command prompt “reg delete HKCR\CLSID{988248f3-a1ad-49bf-9170-676cbbc36ba3} /va /f” and press Enter. (If you receive an error message indicating that the specified registry key does not exist, this method won’t fix your problem. Move to the next solutions.)

3. Once the command is completed, you must restart your laptop. After the restart, you should be able to view and browse available wireless networks as before.
5. Enable SSID broadcast for your WiFi router
When you enable the Service Set Identifier (SSID) broadcast, your WiFi network becomes visible to your network adapter. Conversely, disabling SSID broadcast will make your WiFi network invisible to others. This may be done for security reasons, as hiding the network name can prevent unauthorized access.
Before using this method, ensure you have the following information: IP address, username, and password for your wireless router. Consult your router manual.
1. Log into your router with its username and password (type the default router IP address in your browser, and press Enter.)
2. Go to Wireless Settings. Enable SSID broadcast, and click Save.
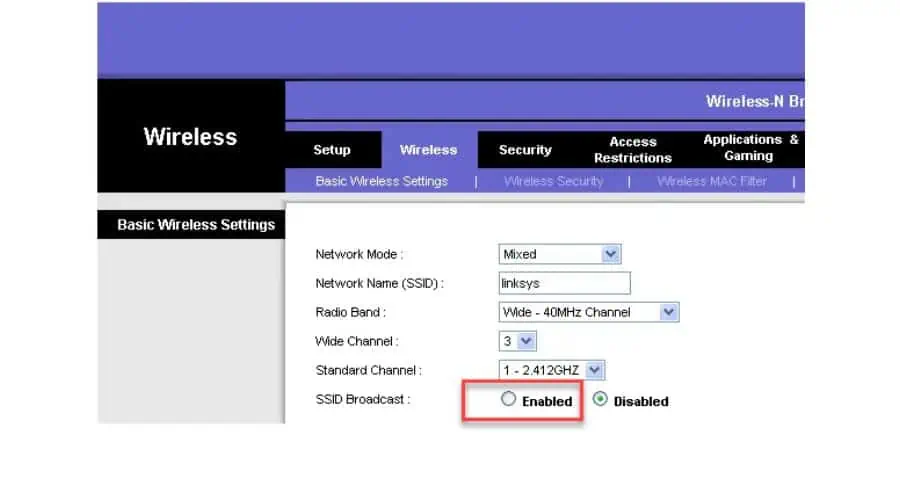
3. Reboot your laptop and reconnect to your WiFi network.
6. Check if WiFi is enabled on your laptop
If your laptop’s WiFi isn’t working, it may be because the WiFi connection isn’t enabled in ??? Windows settings.
To solve that:
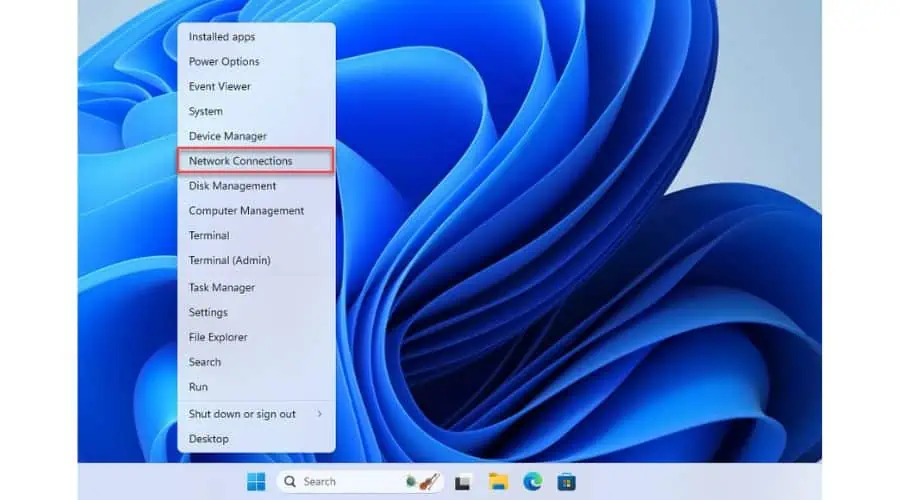
1. Right-click on the Start button and select Network Connections.
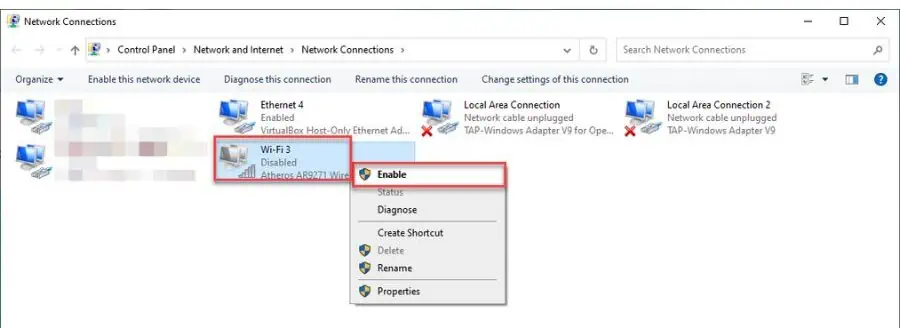
2. If your WiFi icon is grayed, it indicates your adapter is disabled. Right-click on your WiFi adapter and click Enable.
3. Reboot your laptop and reconnect to your WiFi again.
7. Change adapter Power Settings
If you have WiFi issues, I recommend enabling the Maximum Performance in your Power Options.
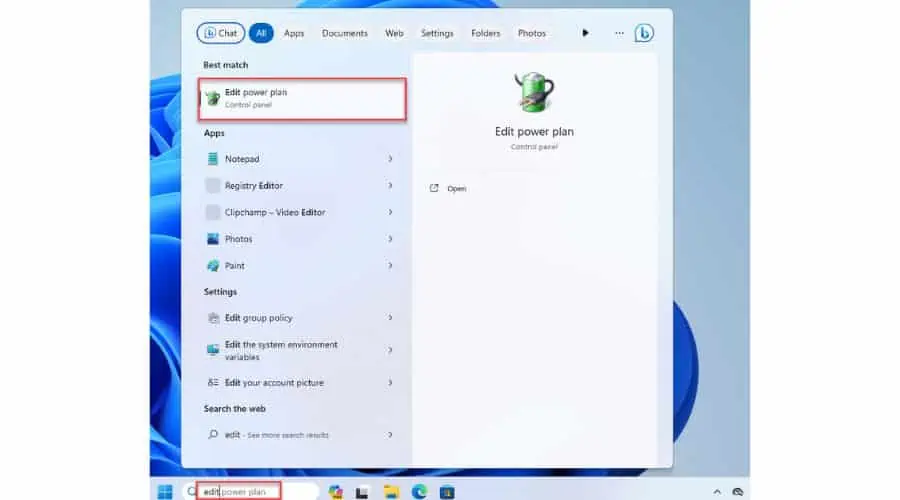
1. Click on the Search bar, type “edit power plan,” and click Edit power plan in the Best match.
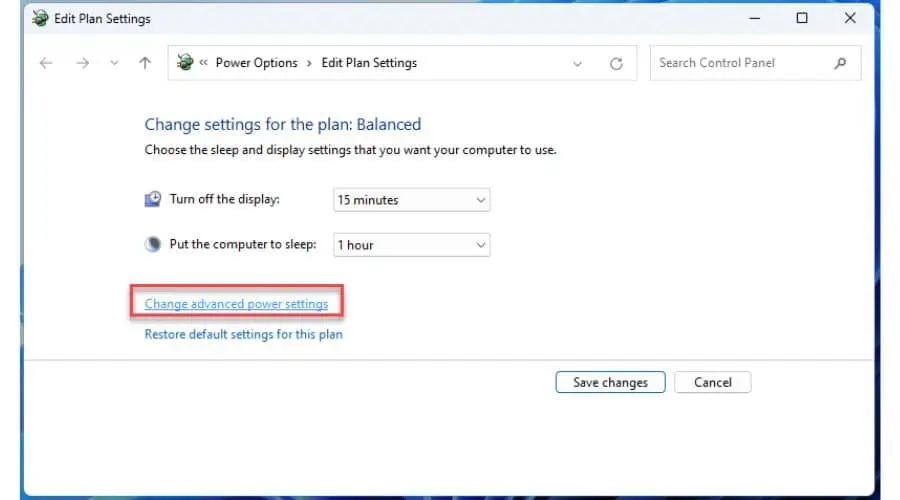
2. In the settings, click Change advanced power settings.
3. Click on Wireless Adapter Settings > Power Saving Mode and choose Maximum performance.
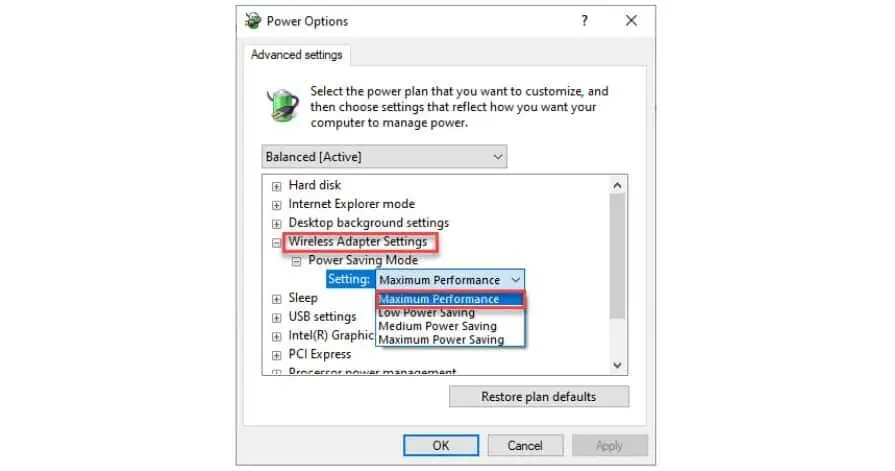
4. Confirm changes on Apply and OK and reboot your laptop.
8. Flush your DNS
Flushing your DNS cache will delete IP addresses or other DNS records from the cache. This will eliminate any incorrect data that might be causing connection problems.
1. Type “Command Prompt” in the Search bar. Then, right-click to choose Run as administrator.
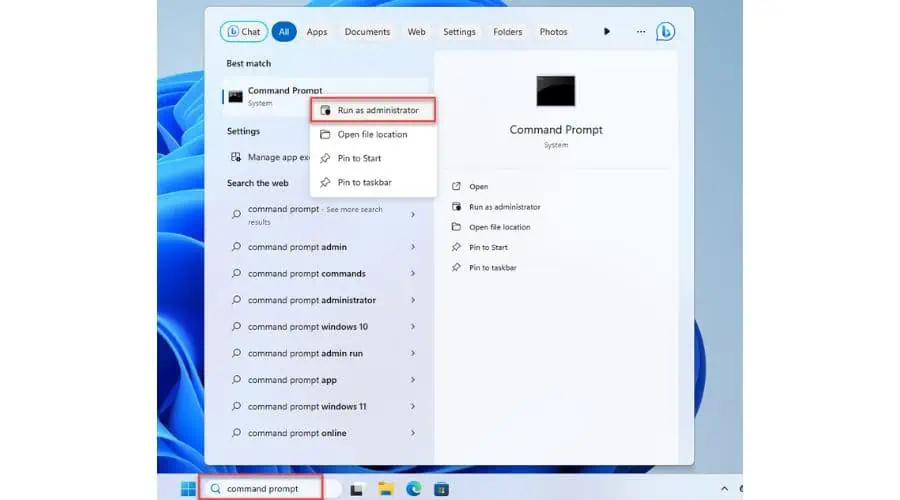
2. Type the following commands, and press Enter after each:
- ipconfig /flushdns
- ipconfig /registerdns
- ipconfig /release
- ipconfig /renew
- netsh winsock reset
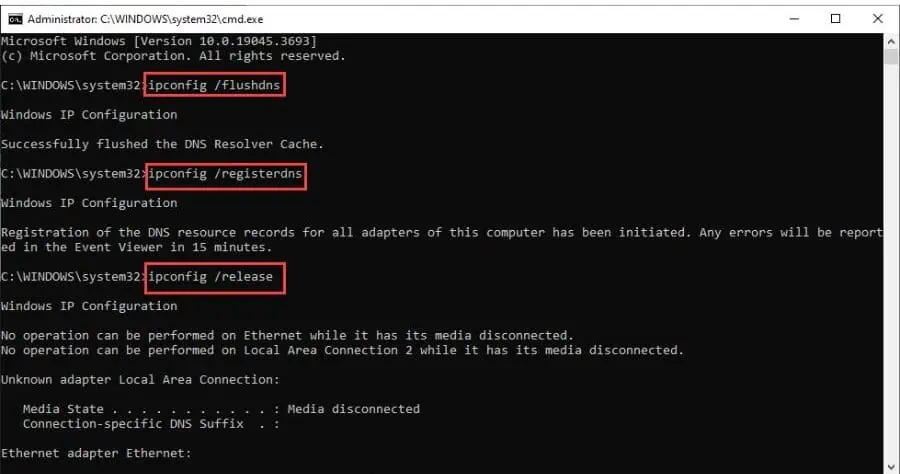
3. After executing all the commands, restart your laptop, reconnect to WiFi, and see if it works.
9. Obtain DNS server address automatically
If your laptop’s WiFi is not working, it might be because it isn’t configured to obtain the DNS server address.
To fix it:
1. Right-click on the Start button and select Network Connections.
2. Right-click your WiFi network adapter and select the Properties option.
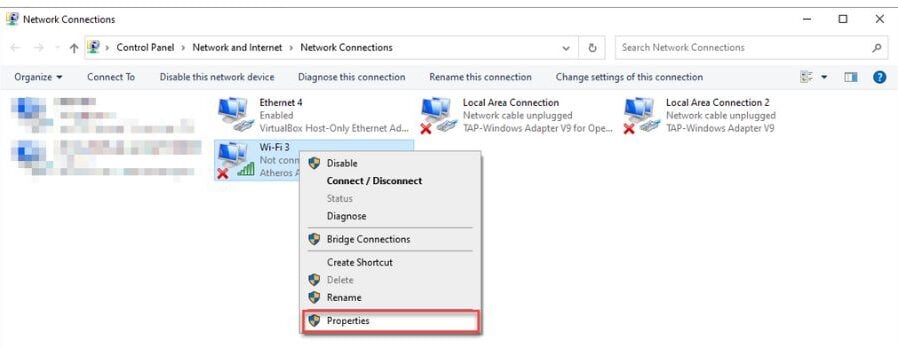
3. Select Internet Protocol version 4 (TCP/IPv4) and click the Properties button.
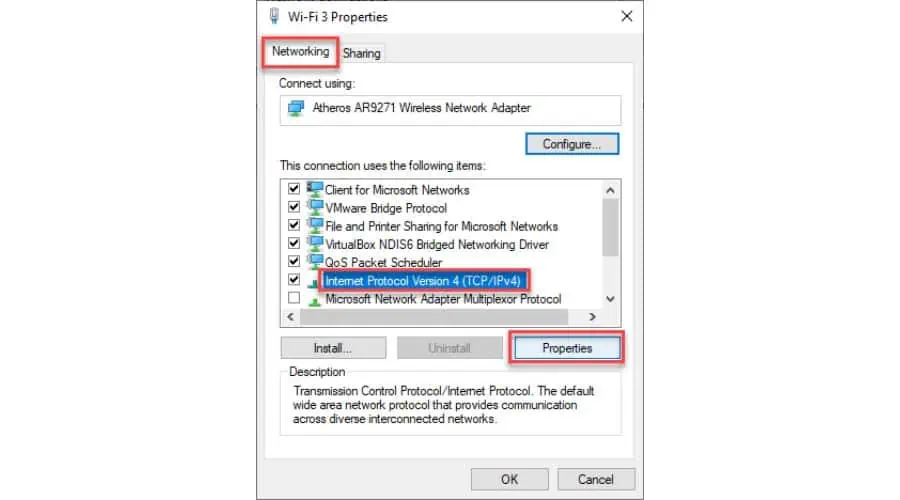
4. Now, tick the radio button for the Obtain an IP address automatically and Obtain DNS server address automatically options and click OK.
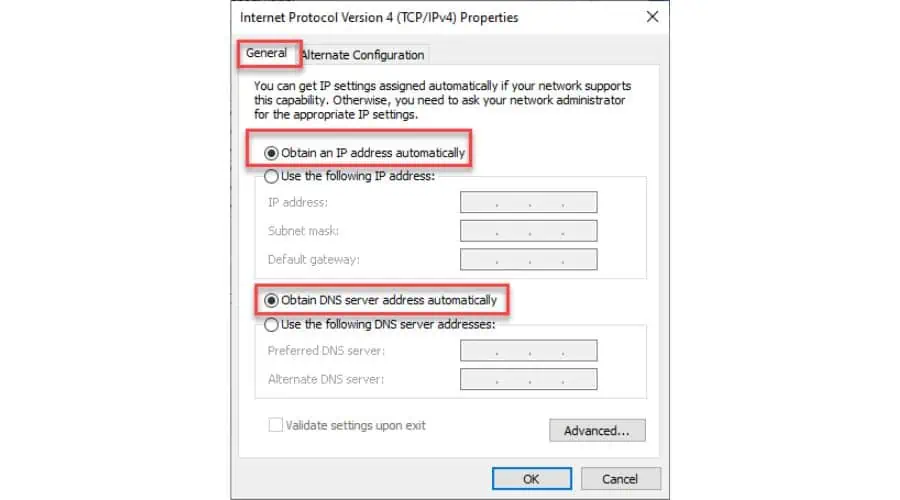
5. Reboot your laptop.
10. Run the Hardware and Devices Troubleshooter
Windows Troubleshooter is a helpful tool for fixing common issues like WiFi connectivity problems. It detects and resolves possible bugs/glitches by restarting the required components.
1. Type “Command Prompt” in the Search bar. Then, right-click to choose Run as administrator.
2. In the Command Prompt, type “msdt.exe -id DeviceDiagnostic” and press Enter.
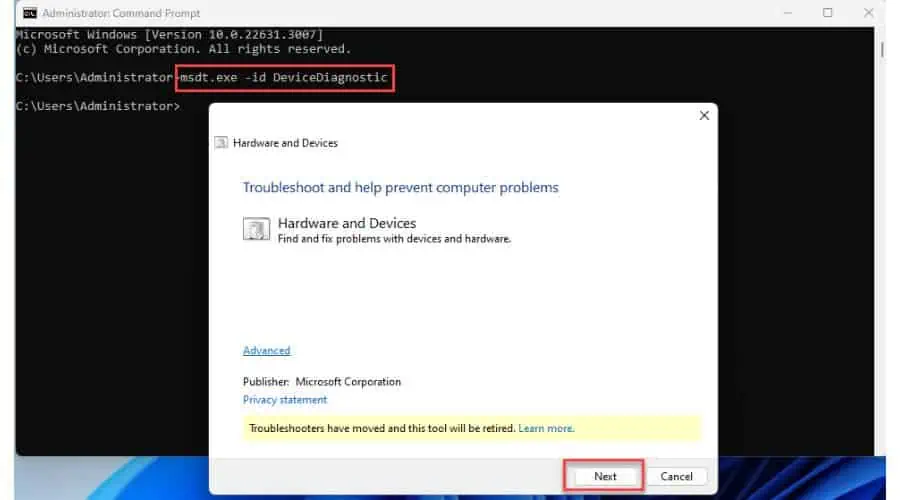
3. Once the Hardware and Devices troubleshooter appears, click the Next button to proceed with the tool.
11. Reset your network
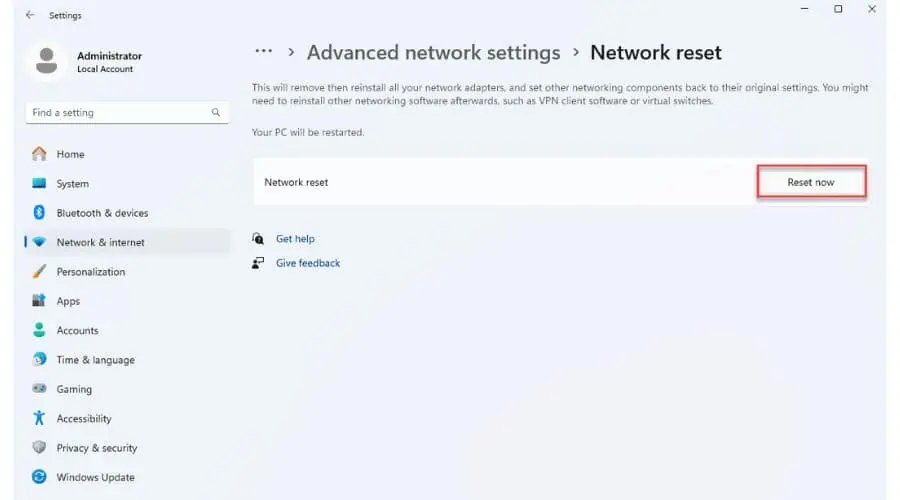
If you have tried everything else and are still having issues, resetting your network may help. This involves removing and reinstalling all your network adapters and resetting their settings to their default values.
1. Right-click on the Start button and select Network Connections.
2. On the Network & Internet page, click Advanced network settings.
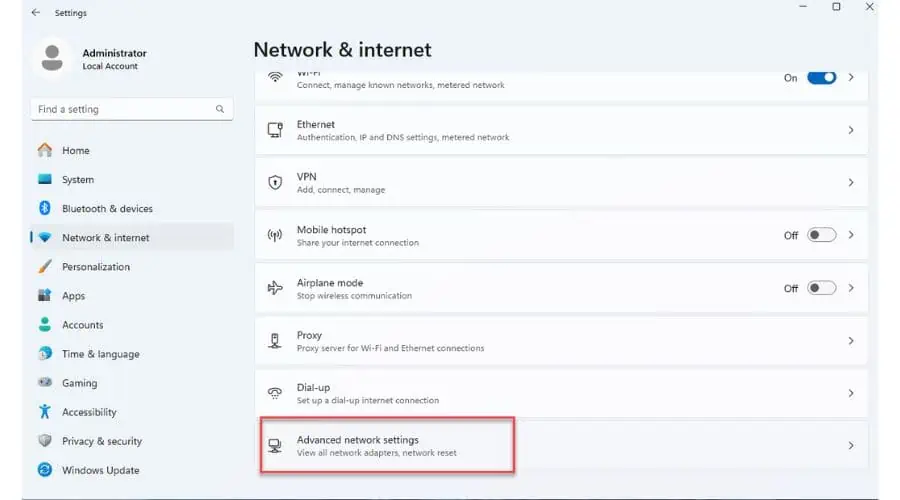
3. On the Advanced network settings page, click Network reset.
4. Click the Reset now button, confirm the action, and reboot your PC.
If your laptop WiFi is not working, the methods above will fix it in no time. Just start from the first solution and work your way down the list until the issue is gone.
Read our disclosure page to find out how can you help MSPoweruser sustain the editorial team Read more


User forum
2 messages