IRQL NOT LESS OR EQUAL Blue Screen Error - DIY Fix-It Guide
10 min. read
Published on
Read our disclosure page to find out how can you help MSPoweruser sustain the editorial team Read more
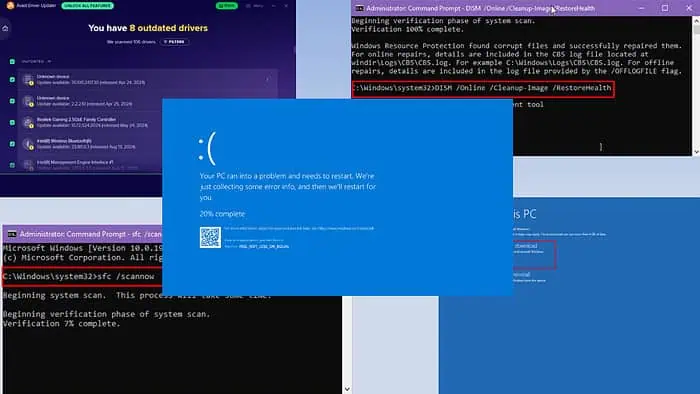
If you keep seeing the IRQL NOT LESS OR EQUAL STOP code on a blue screen on your Windows 10 or 11 PC, read on.
When a kernel-mode process or driver attempts to access a paged memory address it doesn’t have the proper access rights to, Windows OS shows this blue screen of death. Secondly, this BSOD event occurs if a high-priority (IRQL) process attempts to interact with a lower-priority one.
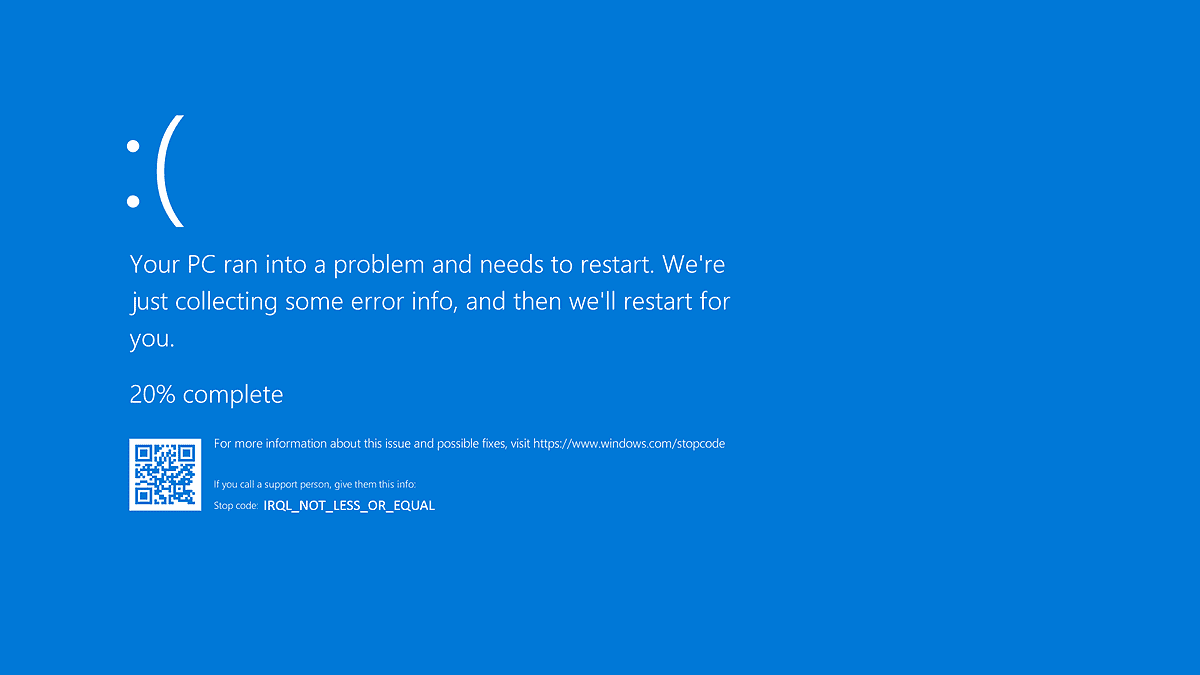
Here are more details of the STOP code:
STOP Code: IRQL_NOT_LESS_OR_EQUAL
Bug Check Value: 0x0000000A
Recently, I encountered this error on my Windows 10 PC and have tried over 20 BSOD troubleshooting ideas suggested by the Microsoft Learn forums, Reddit, Quora, and other reliable sources. Only the following ones have come out as the winners:
Perform a Clean Boot in Windows OS
When a third-party driver software or background service tries to access a disallowed paged memory in the Windows OS, here’s how you can confirm and fix it:
- Press the Windows + R keys to launch the Run dialog.
- In the command box, type msconfig and press Enter.
- The System Configuration dialog box will open.
- Navigate to the Services tab and checkmark the Hide all Microsoft services option.
- Now, click on the Disable all button.
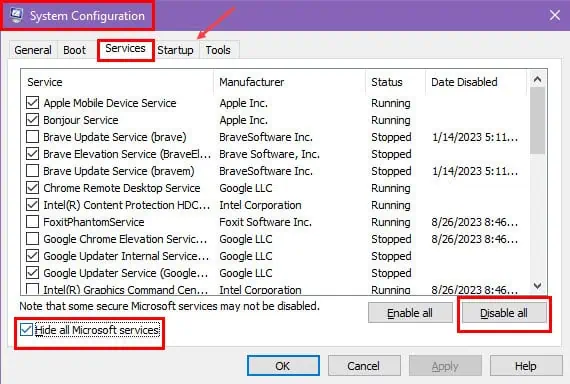
- This should deactivate all third-party services.
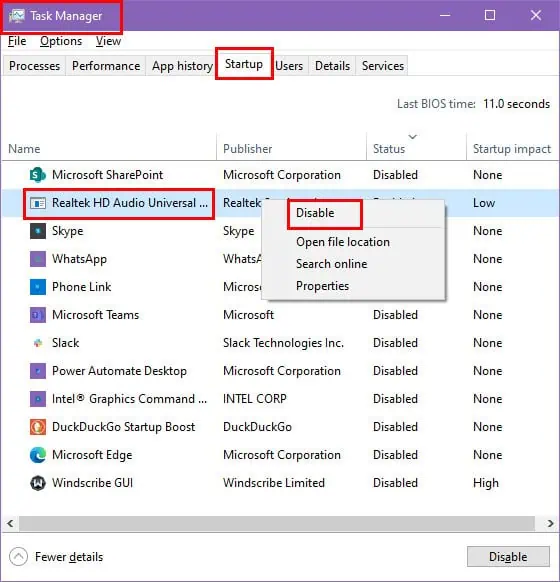
- Now, go to the Startup tab and click on the Open Task Manager link.
- You’ll directly land on the Startup tab of the Task Manager.
- Right-click on an item in the list and select Disable.
- Repeat the steps to disable all third-party apps from running at system startup.
- Close the Task Manager.
- Click Apply and OK on the System Configuration dialog box.
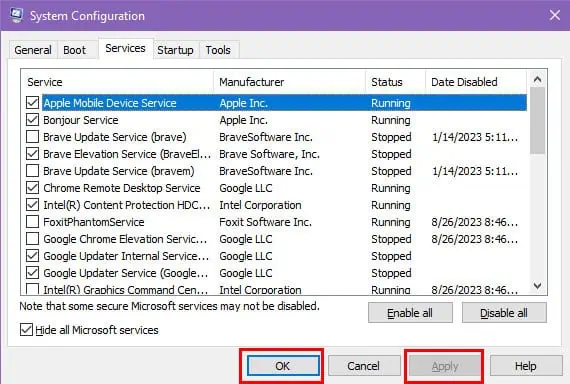
- Restart the PC.
Once the troubleshooting is done, repeat the above steps in the reverse order to activate all third-party services and startup items.
Run Windows Driver Verifier
Faulty drivers are often attributed as the primary cause for the bug check event IRQL NOT LESS OR EQUAL.
Before doing anything, save and close all applications on your PC. Also, make a backup of content that you stored in the Windows OS installation drive or the C:\ drive.
Now, follow these steps carefully:
- Press the Windows + R keys together to open the Run dialog box.
- Type verifier and hit Enter to launch the Driver Verifier Manager.
- Select Create standard settings and click Next.
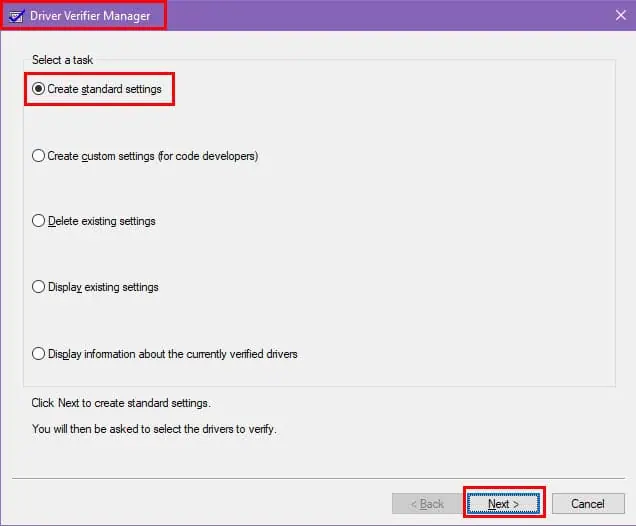
- Choose Automatically select all drivers installed on this computer or select drivers manually, then click Finish.
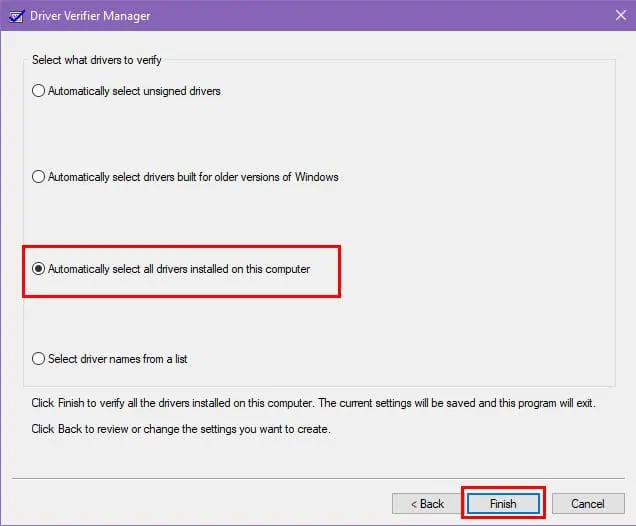
- Restart your computer to apply the changes.
- After reboot, Windows will monitor the chosen drivers for issues.
- If the Driver Verifier detects any problematic drivers, your system might enter a BSOD.
- This crash report will typically show the name of the faulty driver.
- Alternatively, you can check Event Viewer.
- From the Event Viewer table, you should be able to find the driver that failed during the test.
- Look in the Event Viewer > Windows Logs > System > red and critical Errors with messages like BugCheck or Driver Verifier Detected Violation.
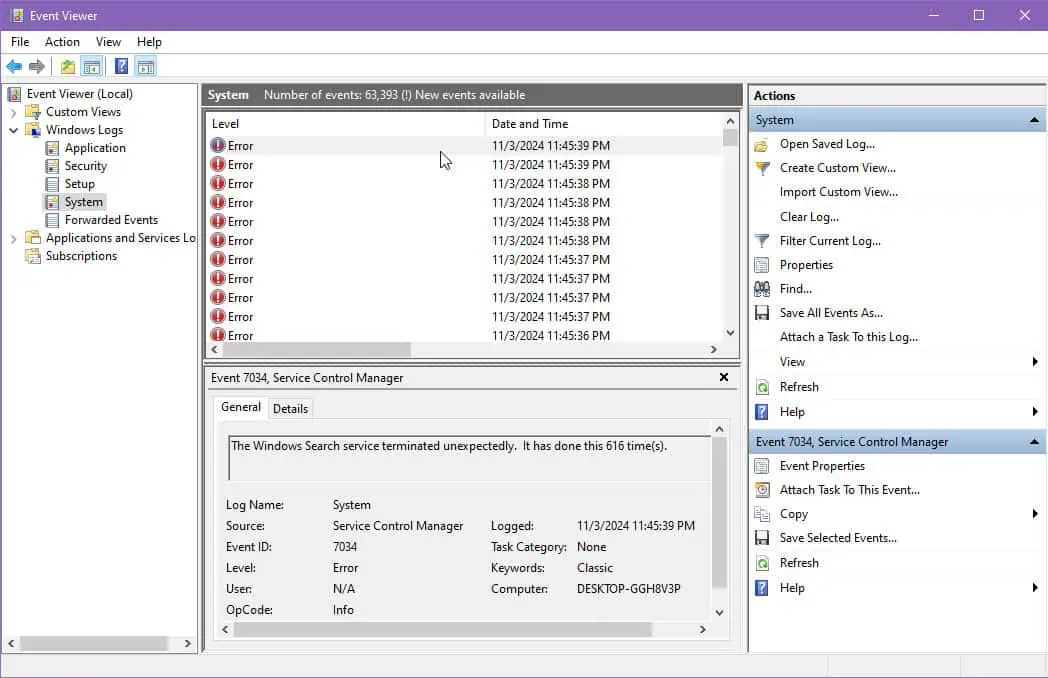
- To stop the Driver Verifier, open Run, type verifier /reset, and press Enter, then restart your computer.
- Uninstall the faulty driver. Follow the steps mentioned in the next section below.
Don’t perform any critical work on the PC while the test is ongoing.
Uninstall and Re-install a Recently Used Driver
You can remove recently installed hardware or virtual drivers to fix the IRQL NOT LESS OR EQUAL error. Also, you can use this method to remove all drivers showing the yellow warning triangles.
Using Apps & Features
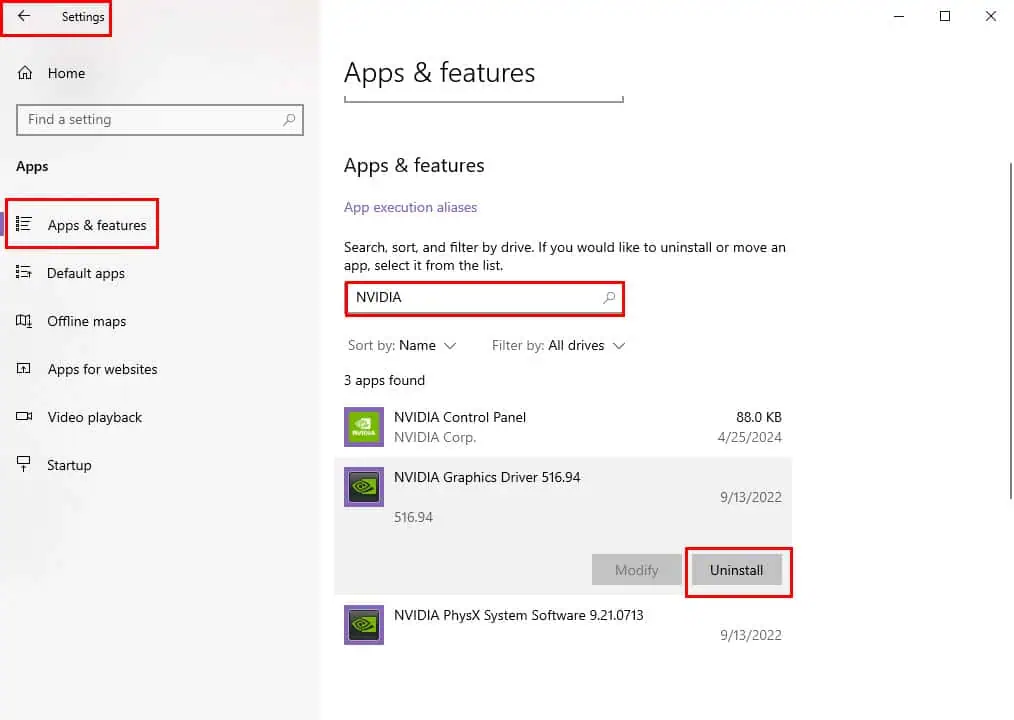
Certain drivers, like GPU, .NET, Microsoft Visual C++ Runtime, and more show up on the Apps & features window. So, follow these steps first:
- Press the Windows + I keys to launch the Settings app.
- Click on the Apps settings menu.
- Now, select Apps & features from the left on Apps Settings Home.
- On the right, type in the driver name into the Search this list box.
- Hit Enter.
- Click on the driver name.
- Hit Uninstall.
Using Device Manager
For those drivers that won’t show up on the Apps & features window or you’ve already deleted some from the Apps settings window, follow these steps:
- Press the Windows + X keys simultaneously to bring up the Power User menu.
- Click on the Device Manager option.
- Locate the device name linked to the hardware or virtual driver you installed.
- Double-click to expand the device name tree.
- Select a component inside the expanded tree, right-click, and select Uninstall device.
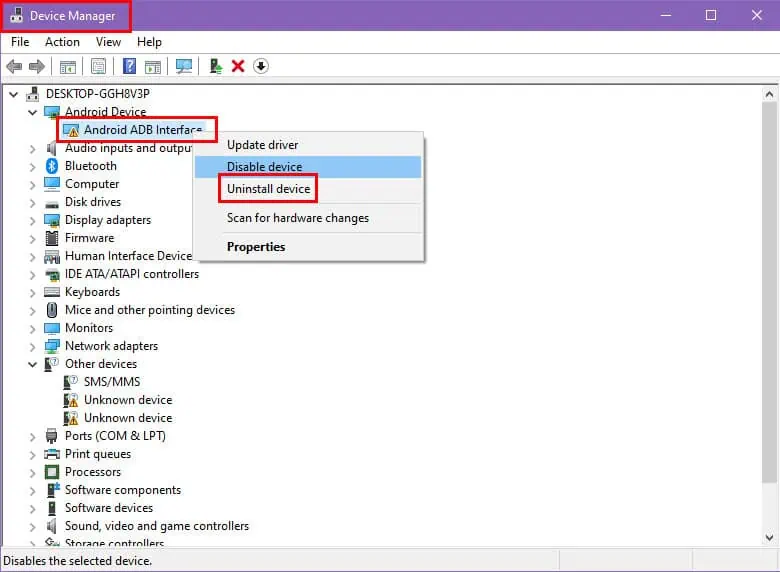
- Repeat the same steps for all other drivers you want to remove or those showing a yellow warning sign.
- Restart the PC.
Update All System Drivers
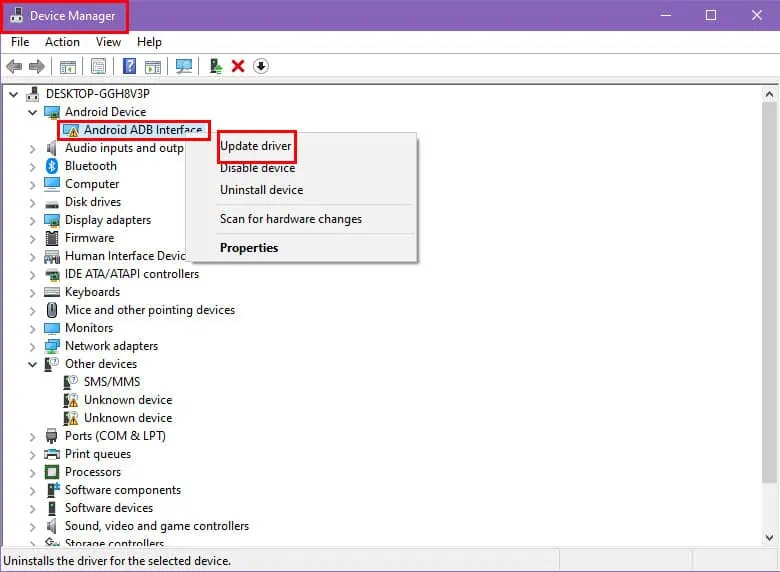
When removing doesn’t help, try updating all the device drivers to their latest editions. Now, you can do this manually, using the Device Manager tool > select a device name > right-click > select Update driver and follow onscreen instructions.
Alternatively, if you wish to automate the process, you can use a dedicated tool like Avast Driver Updater.
Here’s a quick demo:
- Download the Avast Driver Updater for free.
- Install the app.
- Run the app from the Start menu or Desktop using its shortcut icon.
- Click on the Scan Driver button.

- It’ll show an itemized report of outdated drivers.
- Hit the Update All button, get a paid license, and start updating all drivers in one click.
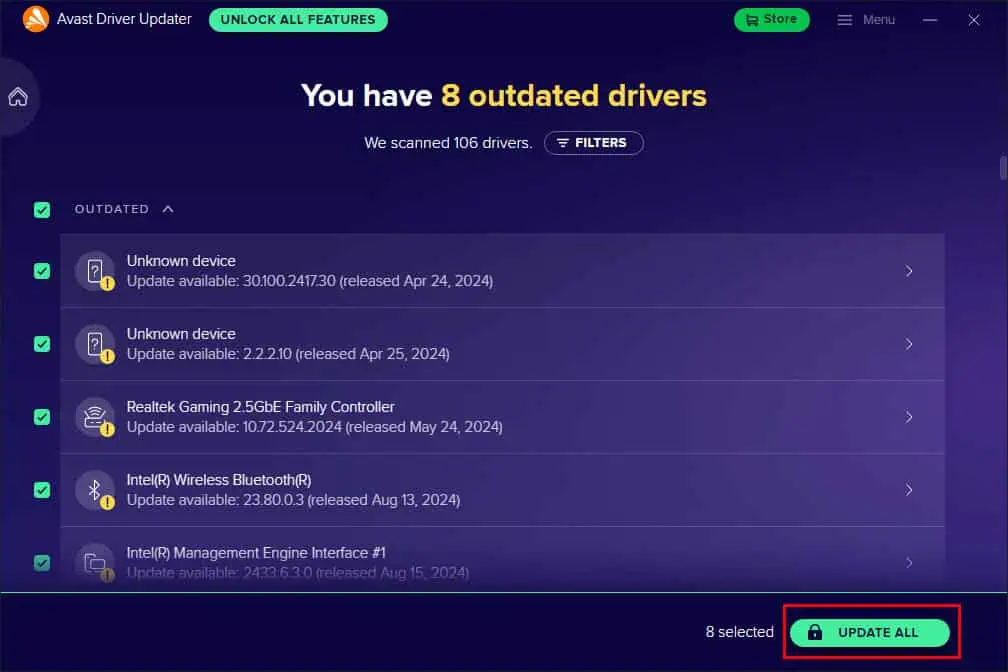
The tool will source Microsoft-approved official drivers from trusted sources and install those automatically.
Remove External Peripherals
Disconnect non-essential peripherals like racing steering, game controllers, game recording devices, NAS devices, removable storage, etc., from your PC.
If you’ve uninstalled any drivers for a network card, GPU, internal game recording device, etc., remove that hardware as well.
Especially for a GPU, don’t forget to connect the VGA or HDMI cable to the output from the motherboard. You’ll find this built-in port at the back of the CPU case. For laptops, ignore this step.
Check the Disk Drives for Errors
Since the IRQL NOT LESS OR EQUAL STOP code is primarily attributed to page file issues, you might also want to perform a disk check. It’s especially recommended for the SSD or HDD where you’ve installed the Windows OS and assigned a percentage of the storage as virtual memory or page files.
- Press the Windows and X keys together to open the Power User menu.
- Select the Terminal (Admin) item.
- The Windows PowerShell prompt will open.
- Copy and paste the following command into the terminal:
chkdsk C: /f /r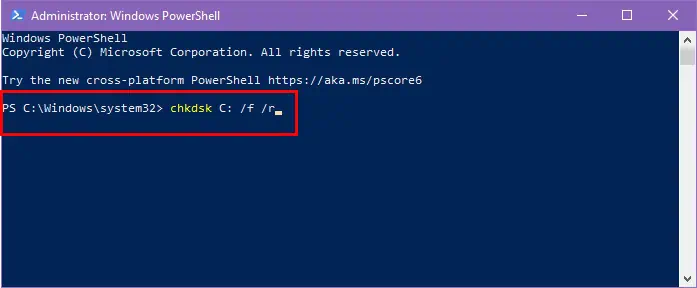
- Hit Enter.
- Wait until the process finishes.
- Reboot the PC if the scan doesn’t start instantly after pressing Y.
Now, monitor your system for several hours to check if the issue comes back.
Scan and Remove Malware
- Get the Windows Malicious Software Removal Tool.
- Execute the app from Downloads.
- Select Next on the home window.
- Choose the Full scan option.
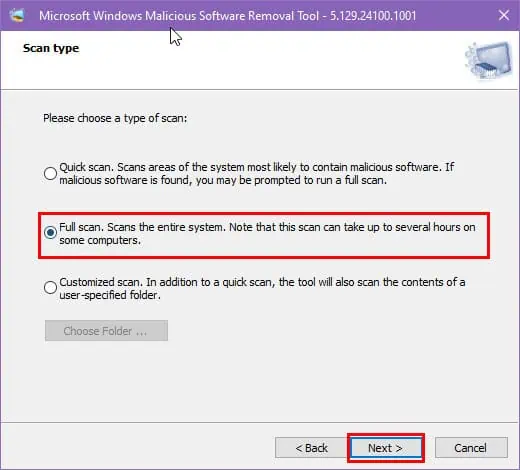
- Click Next.
- Wait for the progress bar to reach 100%.

- Restart the PC once done.
Perform the SFC and DISM Scans
If the problem is linked to any corrupted Windows system file or driver, you must scan the entire system with the SFC command and fix problematic files using the DISM command.
SFC Scan
- Click on the Start menu and type CMD.
- Select Run as administrator when the Command Prompt tool shows up.
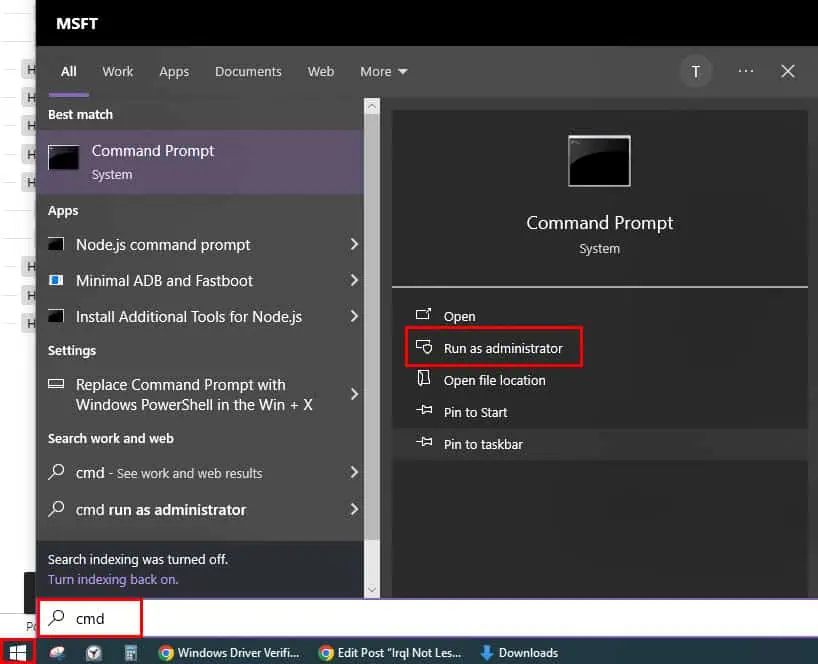
- Enter sfc /scannow and press the Enter key.
- The command will look up the entire Windows installation directory for corrupted system files. Hence, it might take a while.
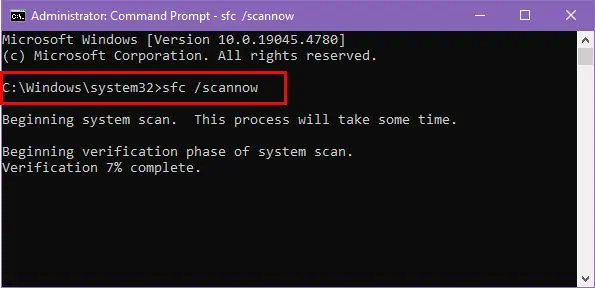
- The SFC scan will also attempt a primary-level recovery of the corrupted files.
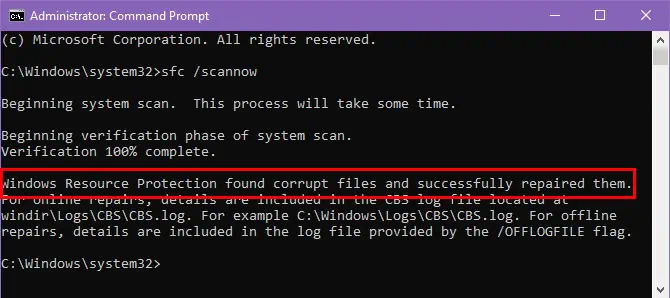
- Here are the results you can expect and recommended actions:
- Windows Resource Protection did not find any integrity violations: Windows system files are in good condition, and no further action is needed. You can ignore the DISM scan step.
- Windows Resource Protection found corrupt files and successfully repaired them: the SFC command itself fixed the file system issues. Skip the DISM step.
- Windows Resource Protection found corrupt files but was unable to fix some of them: Run the DISM scan.
- Windows Resource Protection could not perform the requested operation: Reboot into Safe Mode and then run the SFC scan.
DISM Scan
First, ensure the PC is connected to a reliable internet network. Now, follow these steps:
- In the same SFC scan command line interface, type in the following script:
DISM /Online /Cleanup-Image /RestoreHealth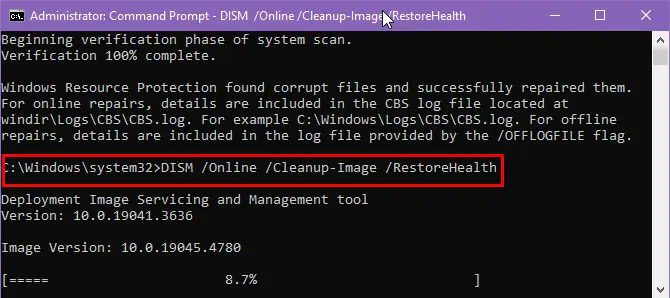
- Hit Enter to start the Windows file system repair process.
- DISM scan might take up to 20 minutes depending on the internet bandwidth.
- Once the process is over, reboot the PC.
If the scan fails, attempt again by rebooting the PC into Safe Mode.
Reboot Into Safe Mode
This mode allows you to diagnose if the IRQL NOT LESS OR EQUAL BSOD error happens because of third-party software, driver, or services. It also allows you to run SFC and DISM scans smoothly. Here’s how to enable it:
- If you can access the Desktop, press the Shift key, and click on the Start menu.
- Click on the Power icon and select Restart.
- Keep the Shift key pressed even during POST.
- Let it go when you see the Please Wait screen.
- If you’re unable to enter the Desktop, press and hold the power key until the PC shuts down.
- Turn it on and again repeat the step to turn off the system.
- Now, switch on the PC to see the Please Wait splash screen.
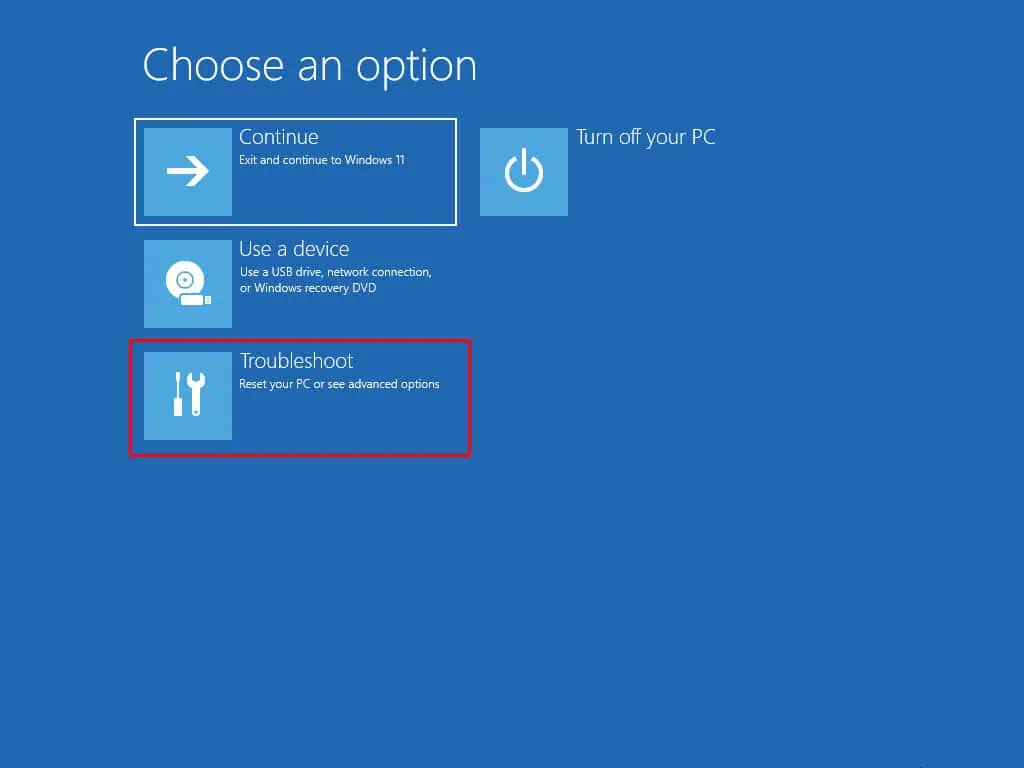
- Select Troubleshoot on the Choose an option screen.
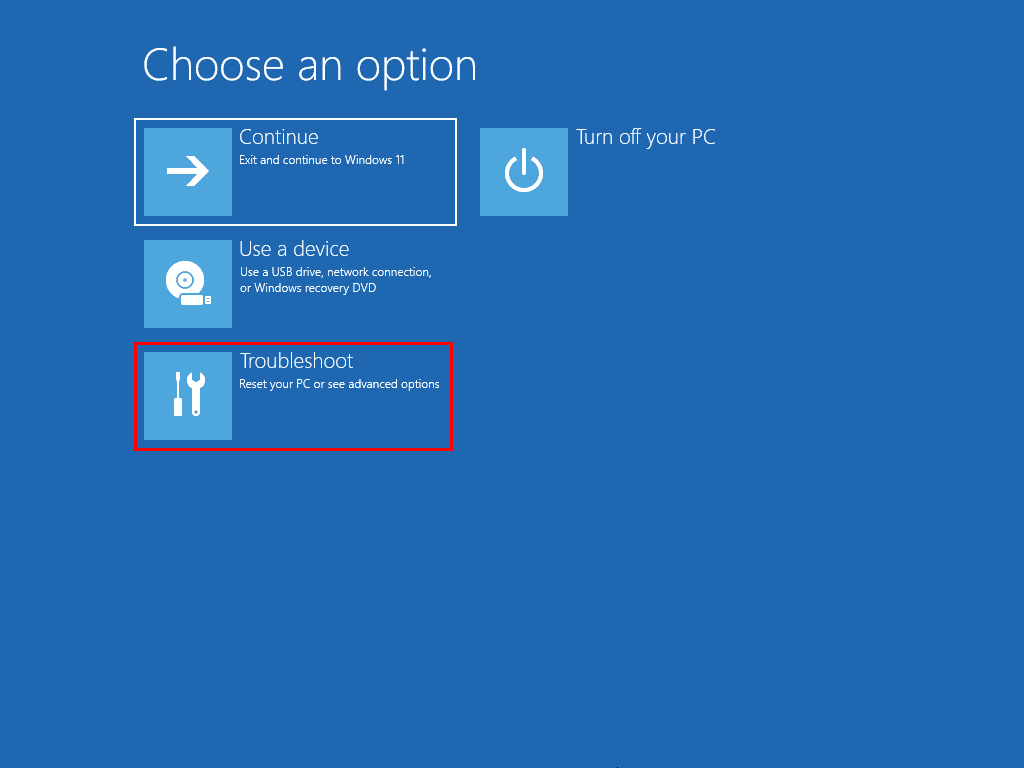
- Click on Advanced options in the following window.
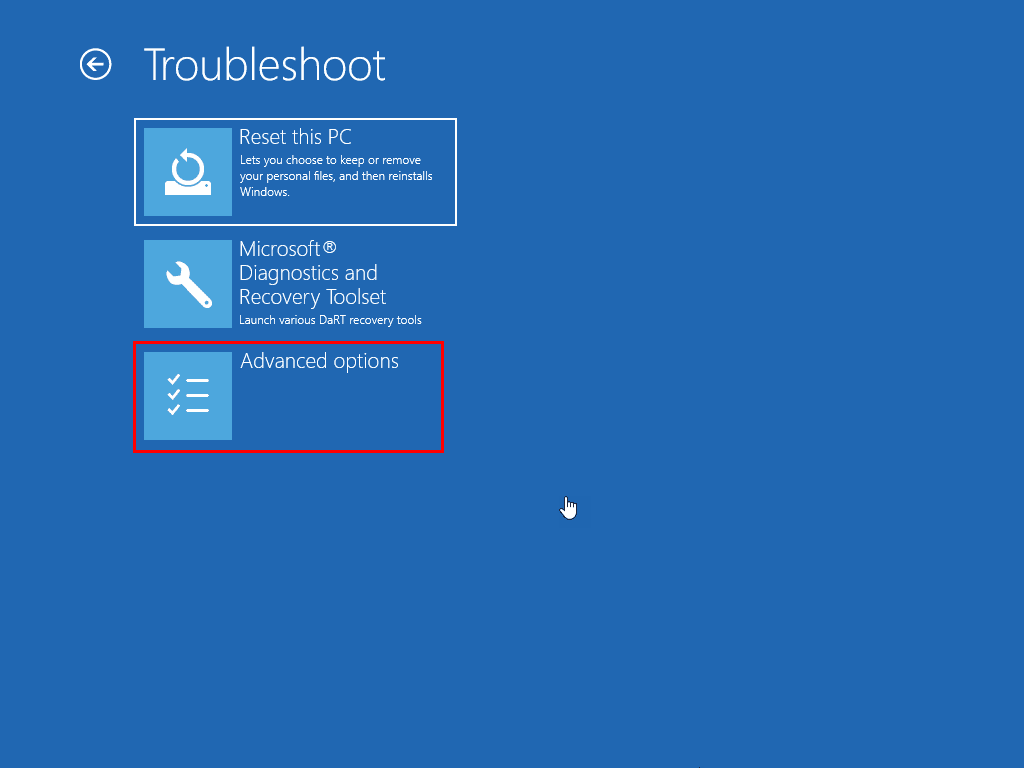
- Select Startup settings.
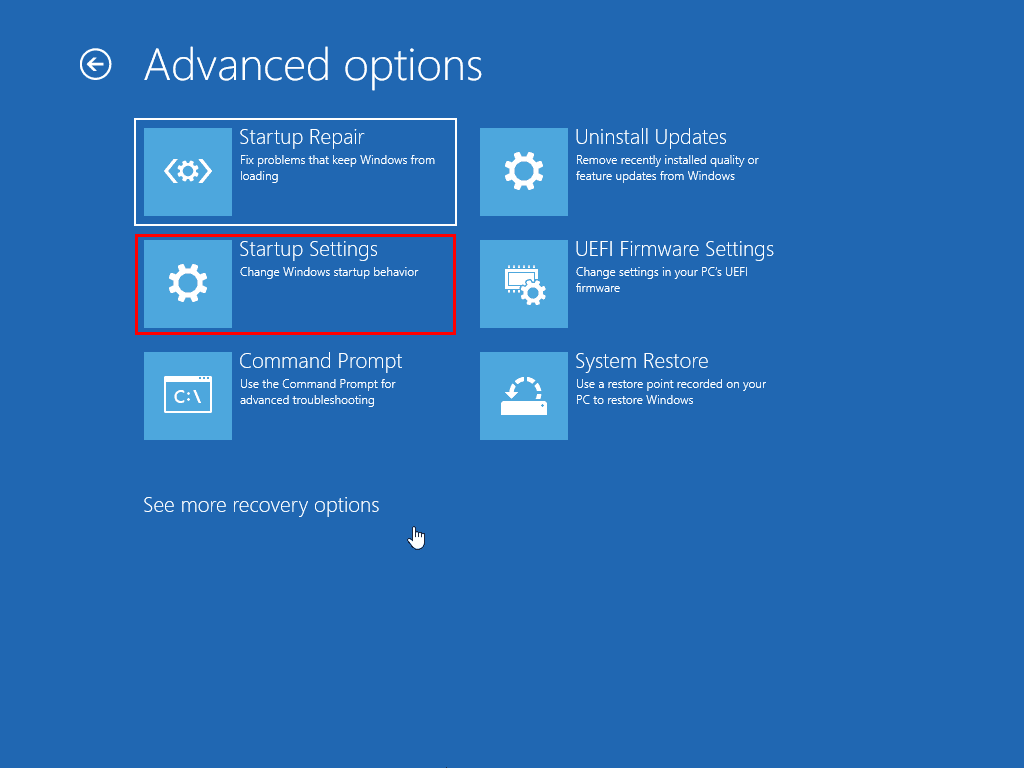
- Hit the Restart button.
- When the Startup Settings dialog appears again, press 4.
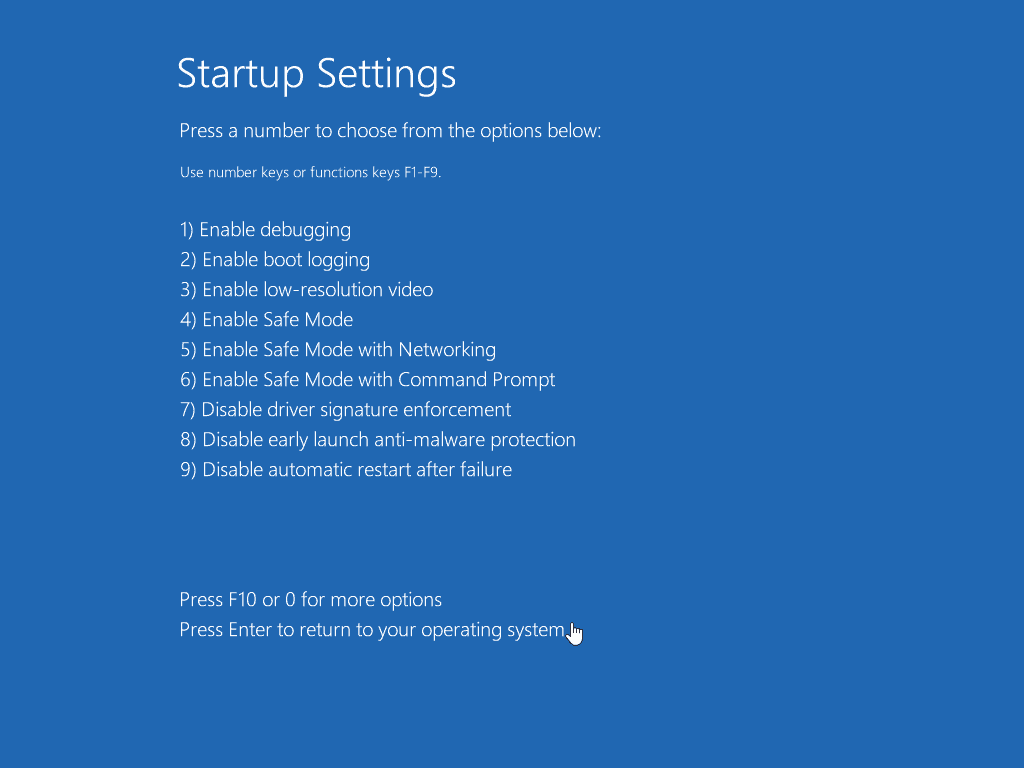
- The Windows will load into Safe Mode.
Restore the PC
If the BSOD error occurs occasionally, try to restore the PC to the last known good configuration with a system restore. Here are the quick steps:
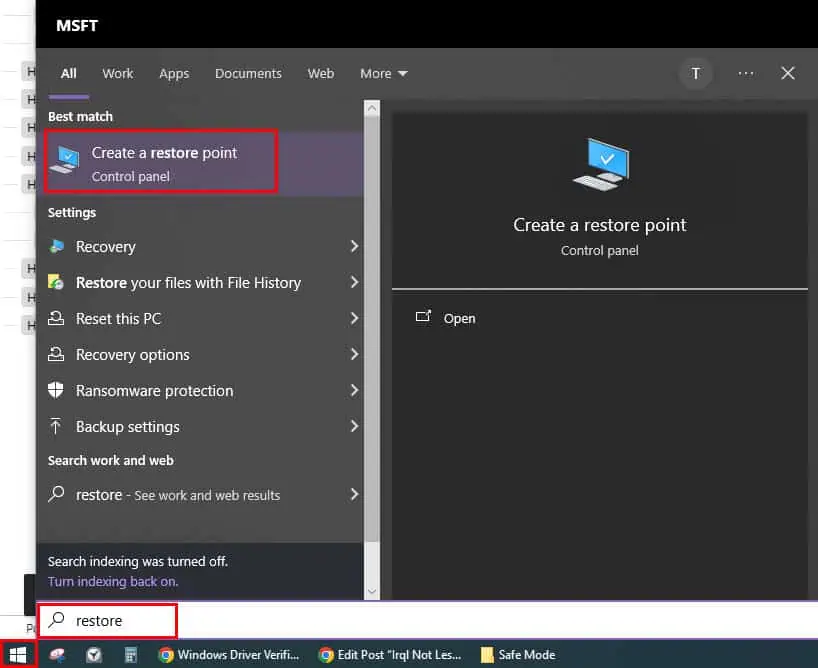
- Type Restore in the Start menu and click on the Create a restore point app.
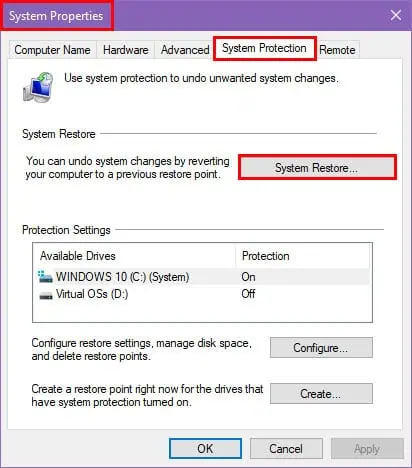
- Click the System Restore button on the System Properties dialog.
- You should see the System Restore wizard. Click Next.
- Select a restore point from the table.
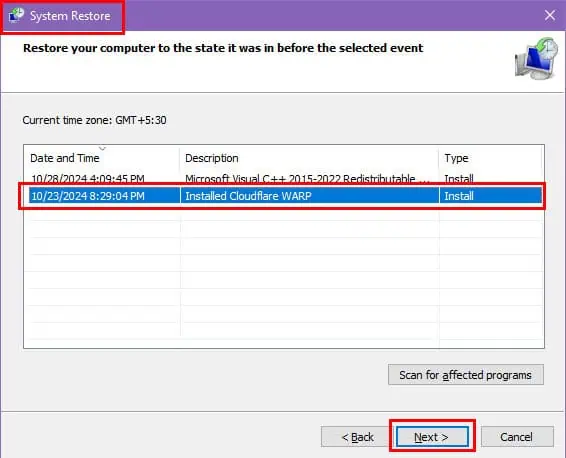
- Click on Next.
- Hit the Finish button.
Ensure you remove personal files from the Windows installation drive before attempting this method.
Reset the PC
You might need to reset the PC to its factory settings in the following situations:
- The BSOD error comes back intermittently.
- You’re unable to access the Desktop.
- Your PC has entered a BSOD loop.
In that case:
- Press and hold the power button to switch off the device.
- Now, turn it on, and press and hold the power switch again when the screen goes past the manufacturer’s logo.
- Repeat this step once more.
- Now, turn on the device and you should see the Please Wait or Automatic Repair loading screen.
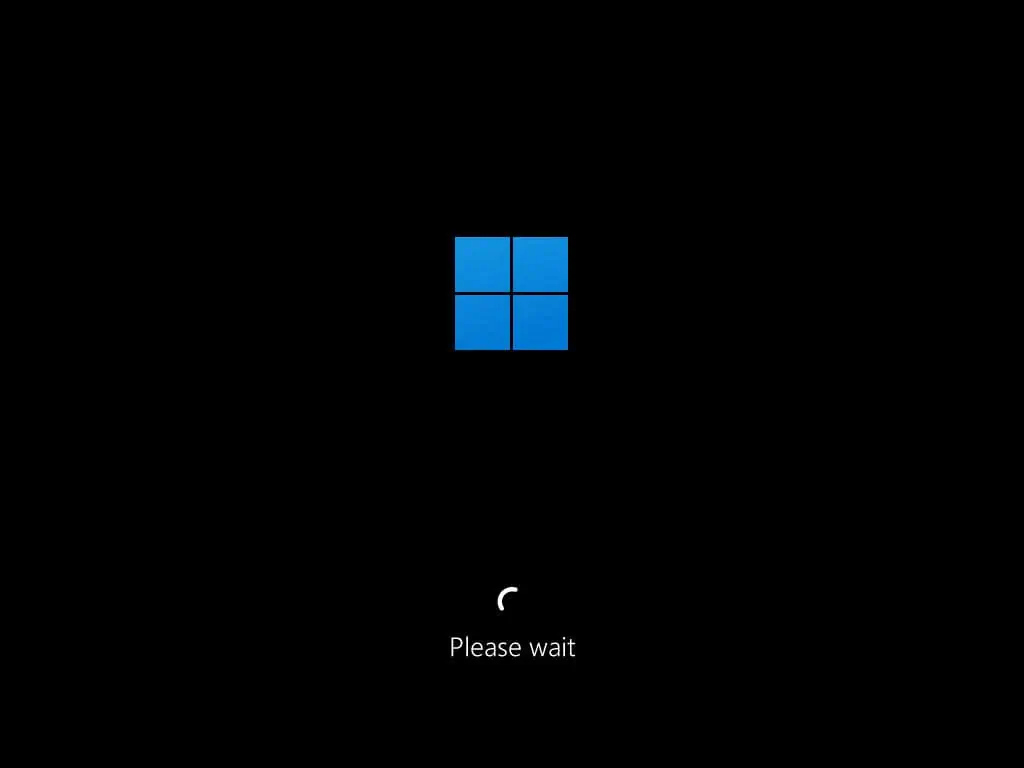
- When you see the WinRE window, click Troubleshoot.
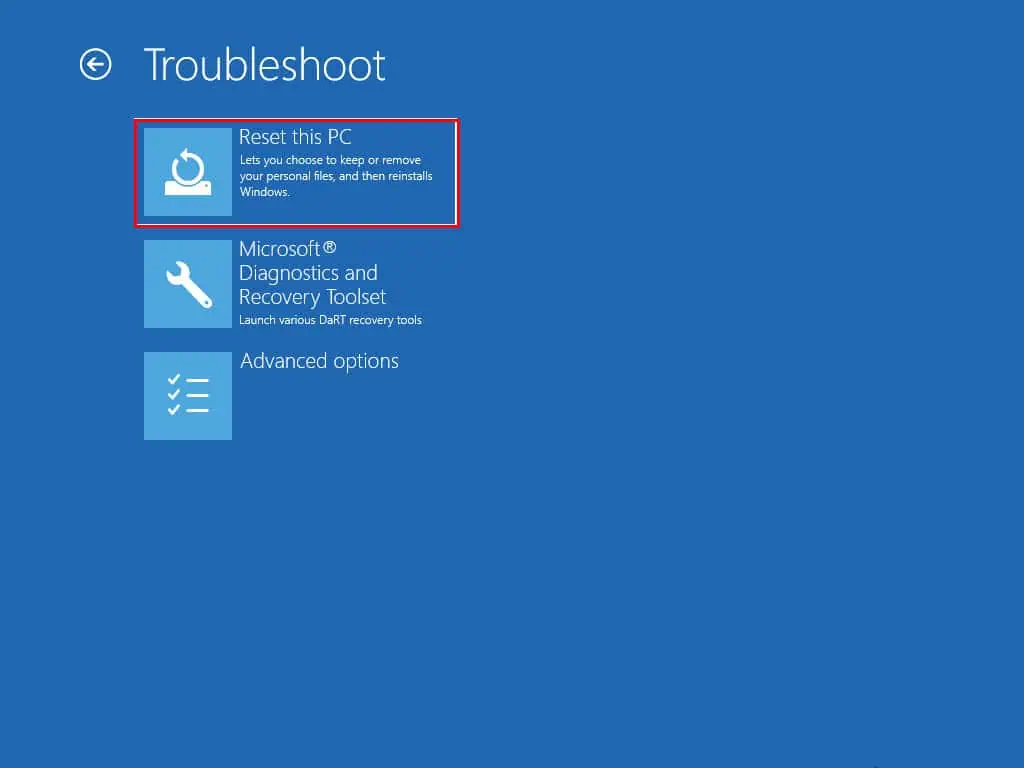
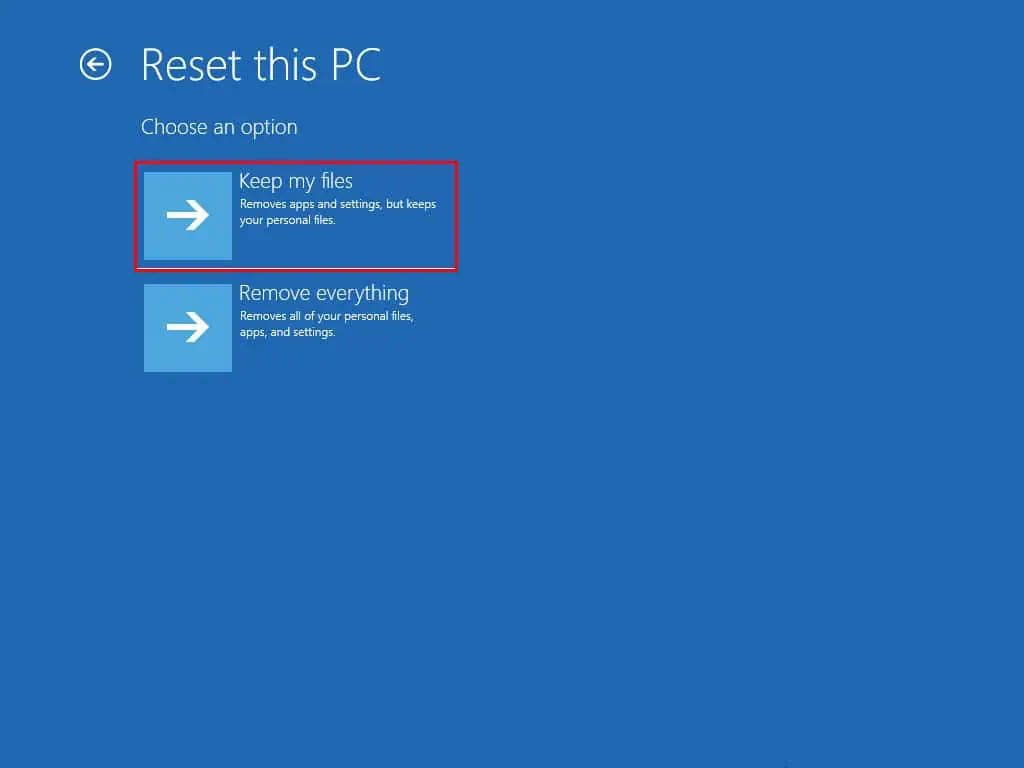
- Click on the Reset this PC button.
- Select Keep my files.
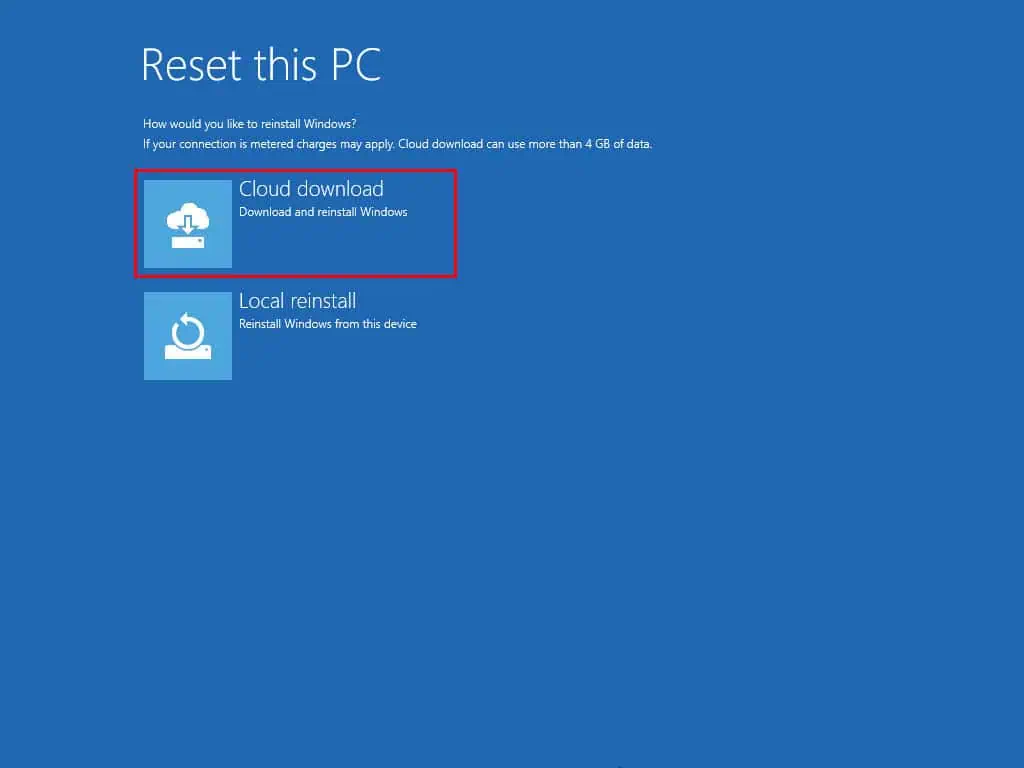
- Choose Cloud download for the Windows installation media.
- Follow the on-screen guidance to complete the device resetting process.
Now you know how to troubleshoot the STOP code IRQL NOT LESS OR EQUAL related blue screen issues on a Windows 10 or 11 PC.
Try these methods in the order they’re listed above and name the step that worked for you in the comment box.
If you’re also experiencing memory management blue screen errors, we can help you out!






User forum
0 messages