How To Screenshot On MacBook Air: A Step-by-Step Guide
We’ll cover the keyboard shortcuts, the Grab app, and even how to annotate your screenshots for clarity. If you also work on a Windows PC, you can complement these skills by following this Windows 11 snipping guide to capture similar content there. Let’s dive in and learn how to take screenshots like a pro!
How Do I Take a Screenshot on My MacBook Air?
Capturing the Entire Screen
The most common type of screenshot is capturing the entire screen. This is useful when you want to save a complete view of everything you’re seeing.
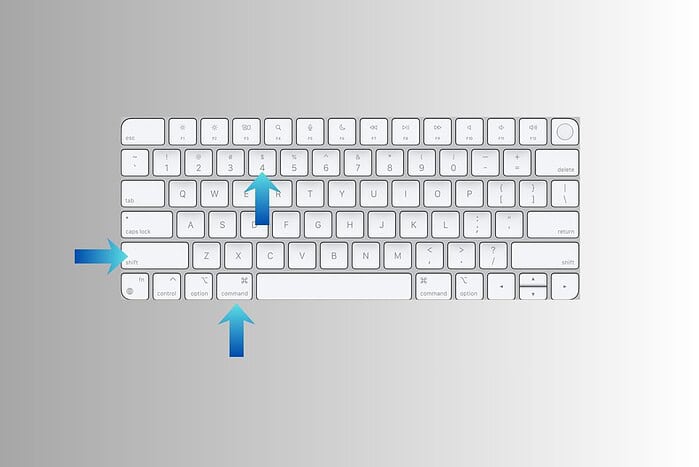
- Press and hold the Shift, Command, and 3 keys simultaneously.
- You’ll hear a camera shutter sound, and a thumbnail of the screenshot will briefly appear in the corner of your screen.
- The screenshot will be saved as a PNG file on your desktop.
Capturing a Specific Window
Sometimes you only need to capture a specific window, such as a browser window or an application.
- Press and hold the Shift, Command, and 4 keys simultaneously.
- Press the Space bar. The cursor will change to a camera icon.
- Move the camera icon over the window you want to capture. The window will be highlighted.
- Click on the window.
- The screenshot will be saved as a PNG file on your desktop.
Capturing a Selection
If you only want to capture a specific area of the screen, you can use the selection tool.
- Press and hold the Shift, Command, and 4 keys simultaneously.
- The cursor will change to a crosshair.
- Click and drag the crosshair to select the area you want to capture.
- Release the mouse button or trackpad.
- The screenshot will be saved as a PNG file on your desktop.
Using the Grab App (for Older macOS Versions)
While keyboard shortcuts are the most convenient, older macOS versions may benefit from using the Grab application.
- Open Finder.
- Go to Applications > Utilities.
- Open Grab.
- Choose the type of screenshot you want to take from the Capture menu (e.g., “Selection,” “Window,” “Screen,” or “Timed Screen”).
- Follow the on-screen instructions to take your screenshot.
- Save the screenshot from the Grab application.
Saving Screenshots to the Clipboard
Instead of saving screenshots directly to your desktop, you can copy them to the clipboard. This is useful if you want to paste the screenshot into an application immediately. When you paste them into documents, you can give your pages a cleaner look by setting 1-inch margins in Google Docs for consistent formatting.
- Use any of the above methods (entire screen, window, or selection).
- Hold down the Control key while using the keyboard shortcut. For example, press Control + Shift + Command + 4 to capture a selection to the clipboard.
- Paste the screenshot into your desired application (e.g., Pages, Mail) by pressing Command + V.
Tips
- Use Shift-Command-5 to open the Screenshot app, which provides all screenshot options in one interface.
- Customize screenshot save locations and other settings in the Screenshot app’s Options menu.
- Use Preview to annotate or edit screenshots after taking them. Double-click the screenshot on your desktop to open it in Preview.
- When you capture social content for reference, you can more easily track what you have online by finding your photos on Facebook and comparing them with your local screenshots.
Different Screenshot Methods Compared
Here’s a quick comparison of the different methods for taking screenshots on a MacBook Air:
| Method | Keyboard Shortcut | Description |
|---|---|---|
| Entire Screen | Shift + Command + 3 | Captures the entire screen. |
| Specific Window | Shift + Command + 4, then Space Bar | Captures a specific window. |
| Selection | Shift + Command + 4 | Captures a selected area of the screen. |
| Screenshot App | Shift + Command + 5 | Opens the Screenshot app with all options. |
| Save to Clipboard (Any Type) | Add Control key to any of the above shortcuts | Saves the screenshot to the clipboard instead of the desktop. |
Capturing Your MacBook Air Screen, Simplified
Taking screenshots on a MacBook Air is simple once you know the different methods. Experiment with each technique to find the ones that best suit your needs. Whether you need to capture the entire screen, a specific window, or just a selection, your MacBook Air has you covered. As you manage all these captures across devices, you might occasionally clear space or retire a Windows machine, in which case this guide to permanently deleting files in Windows 11 can help you wipe sensitive screenshots safely. And if you also capture steps on your iPhone, you can pair your Mac instructions with this iPhone 11 power-off guide when documenting full device workflows.
FAQ
How do I change the default save location for screenshots?
Open the Screenshot app (Shift + Command + 5), click “Options,” and choose a new save location from the dropdown menu.
How do I take a screenshot of the Touch Bar on MacBook Pro?
Press Shift + Command + 6 to capture the content displayed on the Touch Bar.
What file format are screenshots saved in by default?
Screenshots are saved as PNG files by default.
Can I edit screenshots immediately after taking them?
Yes, a thumbnail appears in the corner of your screen. Click it to open the screenshot in Preview for editing.
How do I take a timed screenshot?
Open the Grab app (Applications > Utilities) and select “Timed Screen” from the Capture menu. A 10-second timer will begin before the screenshot is taken.
Read our disclosure page to find out how can you help MSPoweruser sustain the editorial team Read more
Improve this guide


User forum
0 messages