How to Build Native Mobile Apps with Bubble
When developing a mobile app, going native provides the best user experience. This means the app is designed specifically for your chosen mobile operating system and can make use of device features.
But how do you build native mobile apps efficiently, especially if you’re on a budget or have little coding experience?
How to Build Native Mobile Apps
1. Outsourcing
Outsourcing the development of your app to third-party agencies or freelancers is a logical choice. It can be cost-effective, especially for businesses with limited in-house resources or those looking to save on hiring and training costs.
Moreover, you can tap into a global pool of experienced developers who have the required skills.
Outsourced teams can often complete projects faster due to their specialization, allowing you to launch apps more quickly.
However, this does come with some challenges. You must be able to effectively communicate the requirements and goals for your app to get good results. A lot of back and forth can lead to a slower turnaround and hidden costs.
Furthermore, a lack of direct oversight can give rise to quality control and data security issues.
2. Learn Traditional Tools and Frameworks
The second option is to adopt traditional tools and frameworks for building native mobile apps in-house.
For example, Android Studio is Google’s official IDE for Android app development, offering a feature-rich environment for building and testing apps. For iOS you might choose Xcode and Swift. Meanwhile, React Native is a popular cross-platform framework for building natively rendered iOS and Android apps using JavaScript and React.
Of course, it’s not easy to learn coding and maintaining an in-house team is expensive and not realistic for smaller businesses.
3. No Code App Builders
This is where no-code app builders come into play. Instead of hiring or outsourcing projects to skilled coders, anyone can create apps themselves at a fraction of the cost.
These tools typically offer a visual interface where users can drag-and-drop pre-built components, connect them using logic, and configure settings to create functional apps.
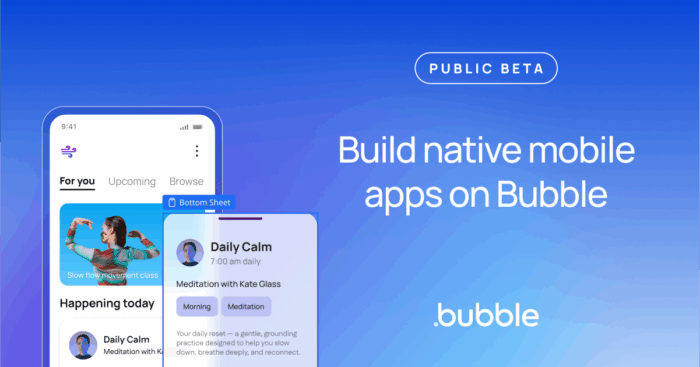
When it comes to native mobile apps, our current go-to is Bubble. This comprehensive app building platform offers an intuitive visual builder, lots of plugins to instantly add functionality, and affordable pricing plans that scale up as your app grows.
How to Use Bubble to Build Native Mobile Apps
Here’s how to get started with Bubble and begin building a native mobile app:
1. Getting Started
1. Go to Bubble.io and try it for free or choose one of the premium plans, starting from $32/mo.
2. From the Bubble dashboard, click the Start from scratch button and give your app a name. Ignore choosing a template for now, and you will be given a blank page.

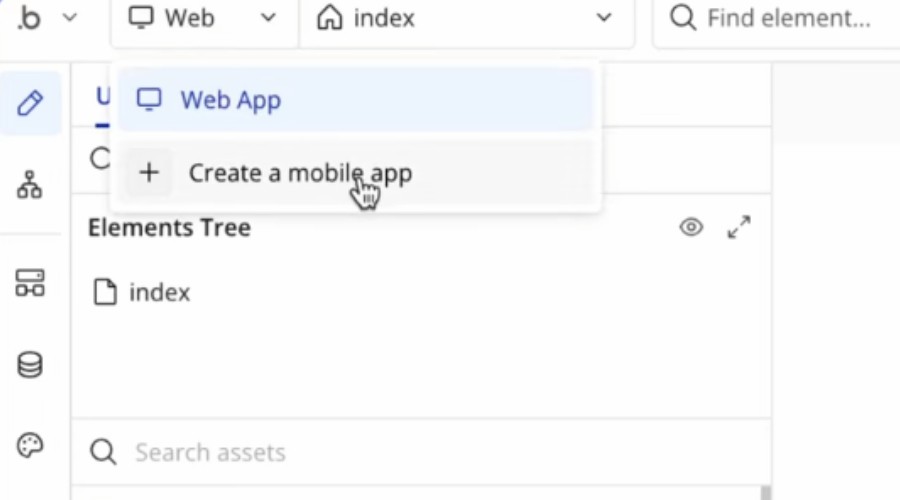
3. From the blank canvas, go to the top left dropdown menu where it says Web and choose Create a mobile app. You can easily switch between web and mobile when creating a cross-platform app.
2. Design App Home Page (View)
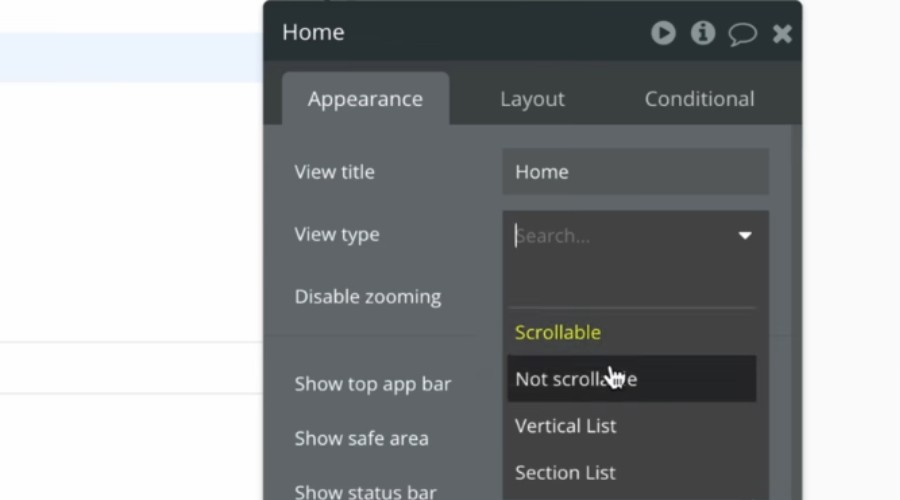
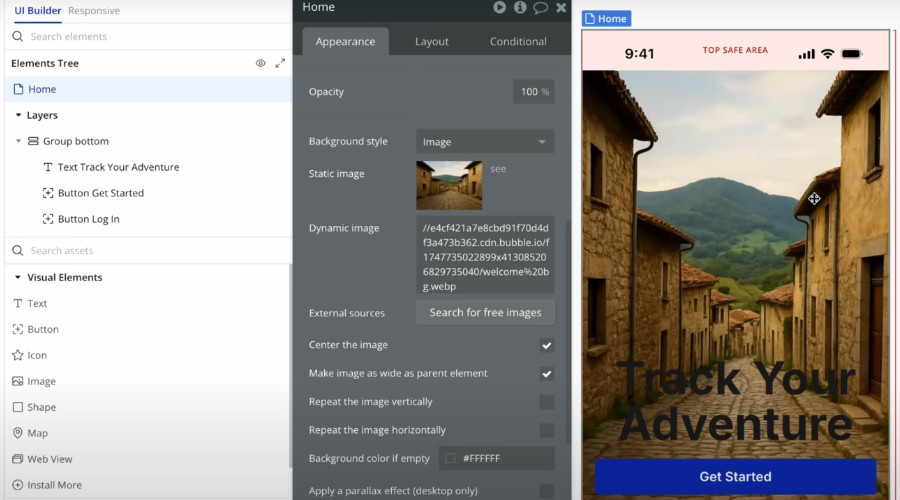
4. You’ll now see a canvas for designing your mobile app’s interface. By default, you begin working on the Home view. You can set this to be scrollable, not scrollable, or a list.
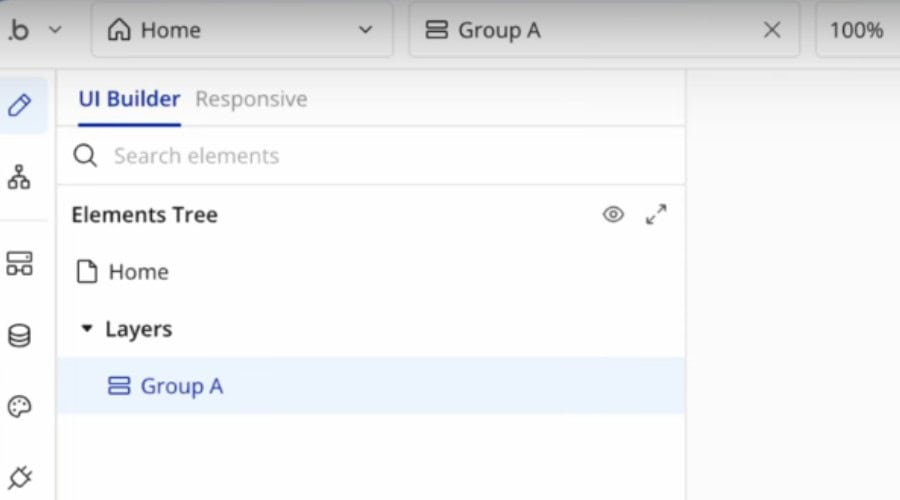
5. On the left is the Elements Tree, displaying the current view, its layers, and elements.
5. Below is the library of elements, which you can drag onto the canvas and configure the element’s properties.
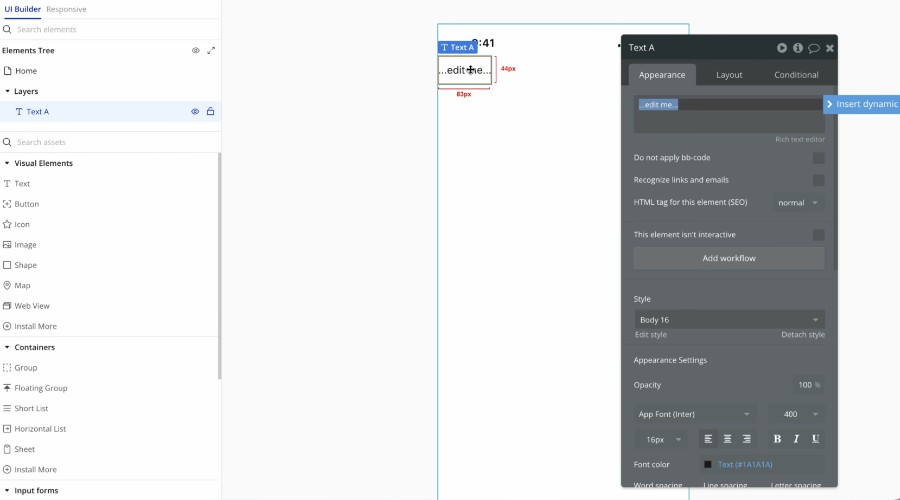
6. For example, if you add a text element, you can change the font, size, color, spacing, etc.
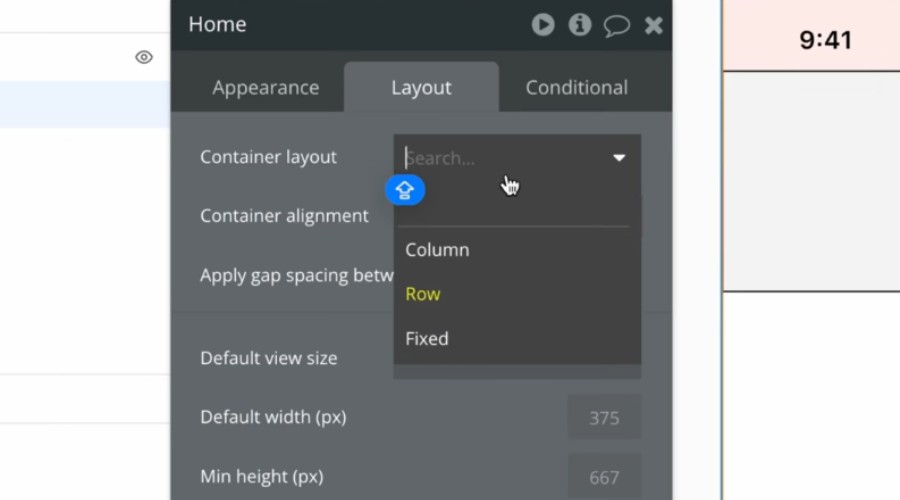
7. The layout tab in the properties window defines how the element is positioned. This can be in a column or row, relative to other elements. Or by choosing fixed, you can position it anywhere on the page.
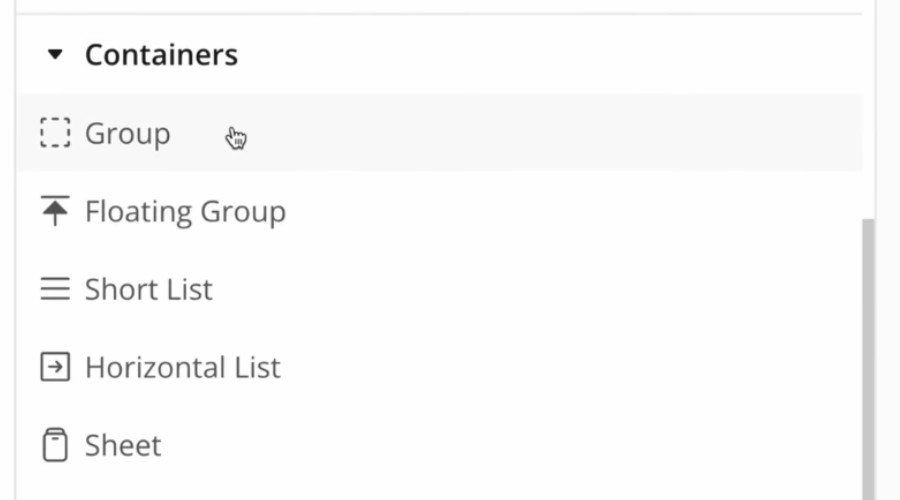
8. By using the Group Container element, you can handle the layout of multiple child elements dropped within the group. You can also change the individual alignment of each child element.
9. Create multiple groups with nested elements to begin building out your Home view.
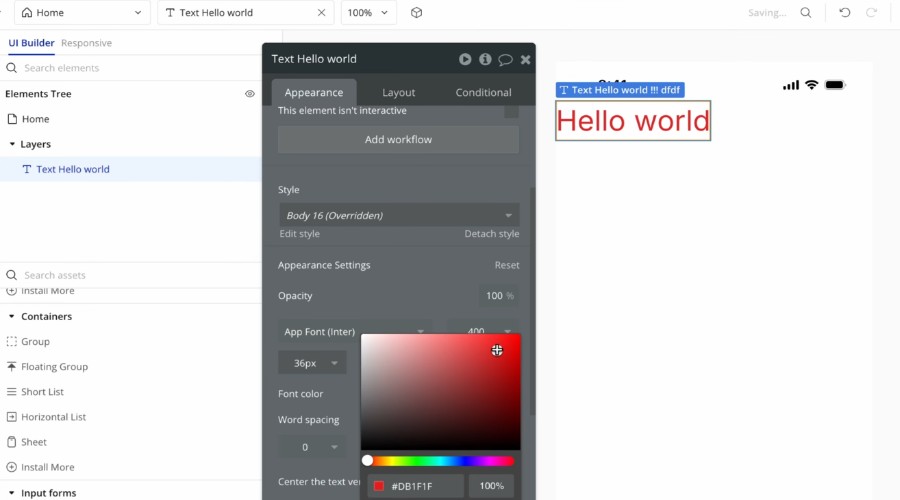
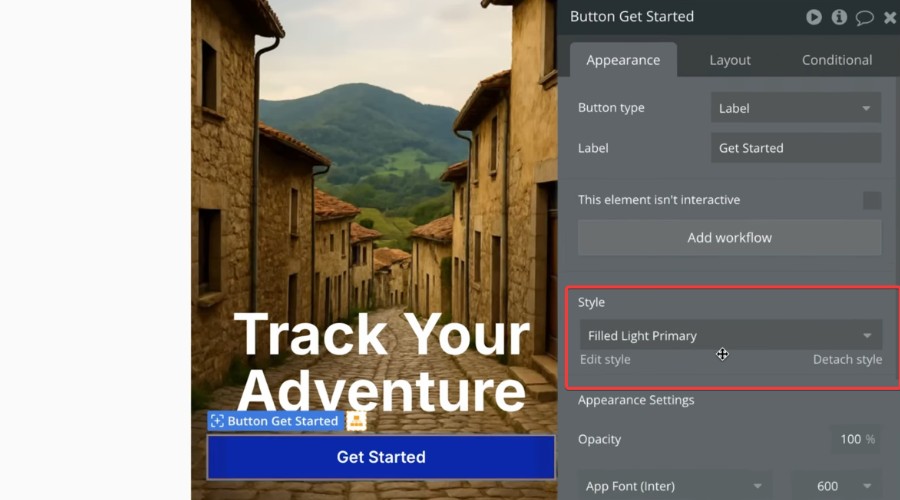
10. Use the Appearance tab to change various style and color settings for each group or element.
11. At the top level you can apply a background image.
12. For consistency and to make applying your favorite styles easier, navigate to the main styles area on the left. Here you can configure different styles for each element.
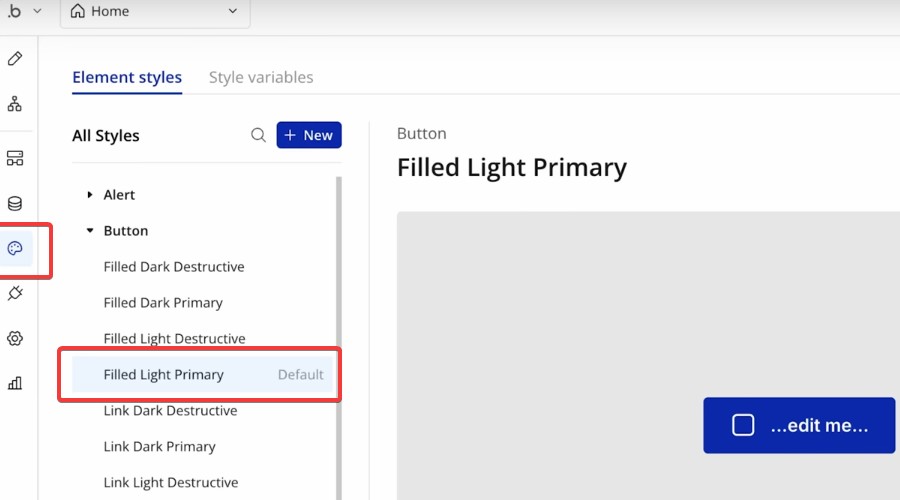
13. You can then select the style from an element’s properties on the canvas.
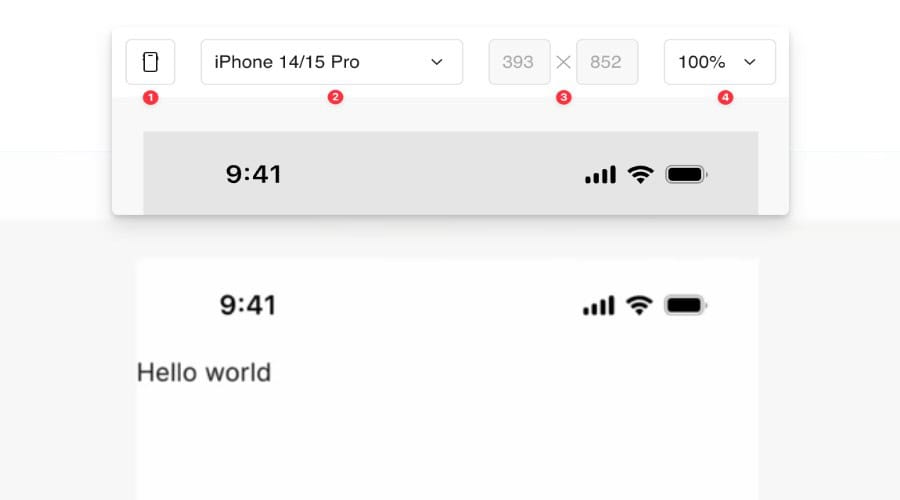
14. Click the preview button on the top right at any time to see what your app looks like.
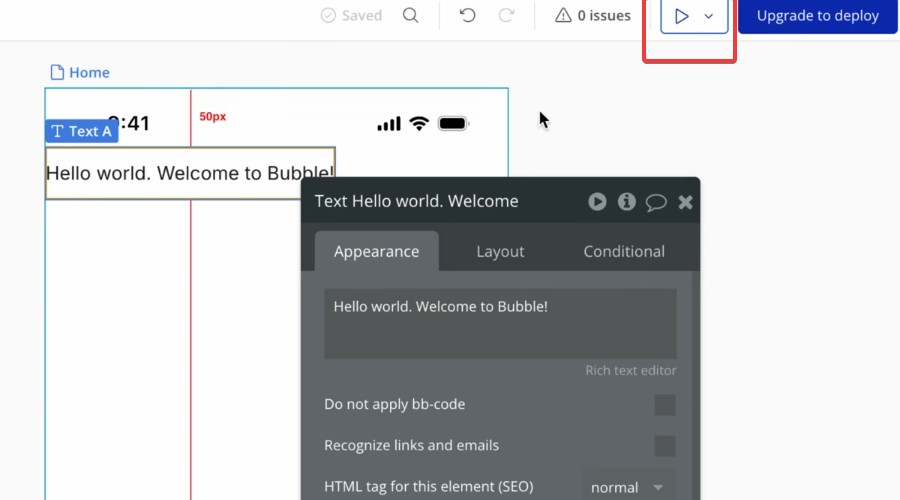
15. The emulator bar offers a dropdown menu of different devices and screen sizes for previewing.
3. Basic Navigation Workflow
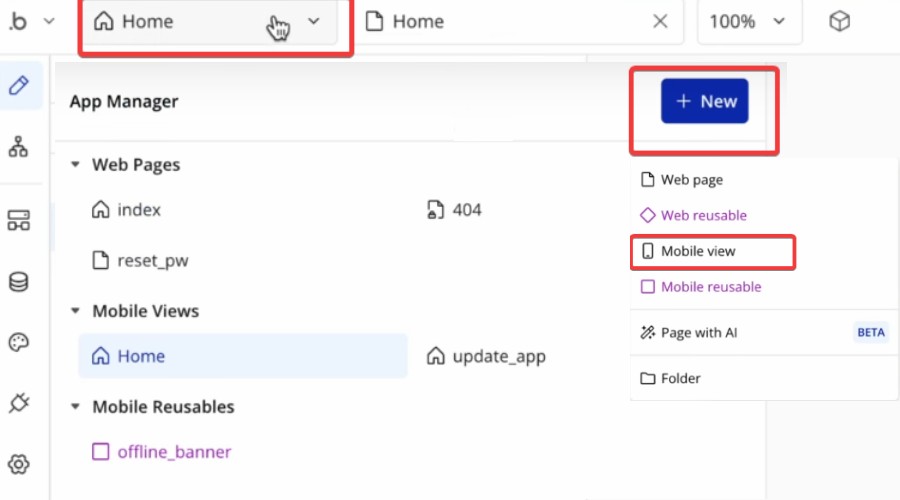
16. Once you have created your Home view, it’s time to create other views and link them together. Click the Home dropdown in the top left to open the App Manager, then click New, and Mobile View.
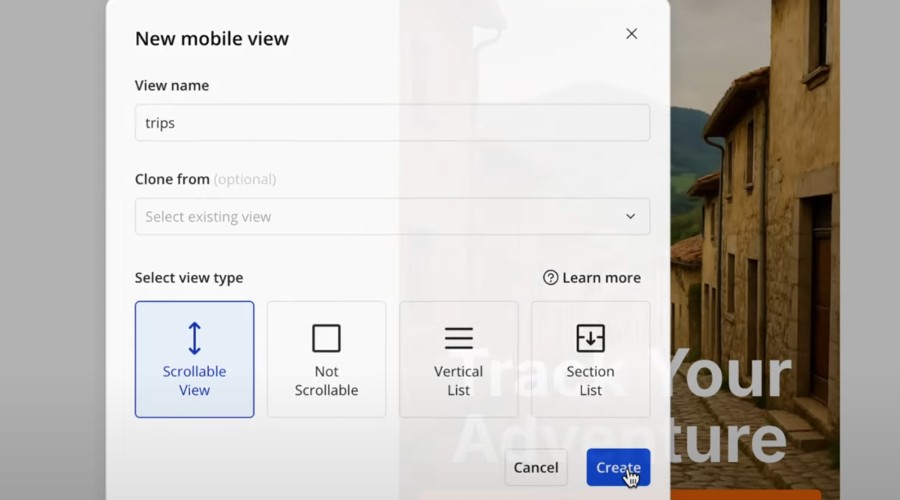
17. Give it a name, consider cloning an existing view, and set the view type. You’ll then be back in the editor, ready to design your new view.
18. Under Appearance, check the box: Include as Tab Item, so it’s available for navigation workflows.
19. When you have finished designing the new view and want to link it on the Home view, open the Workflows tab on the left.
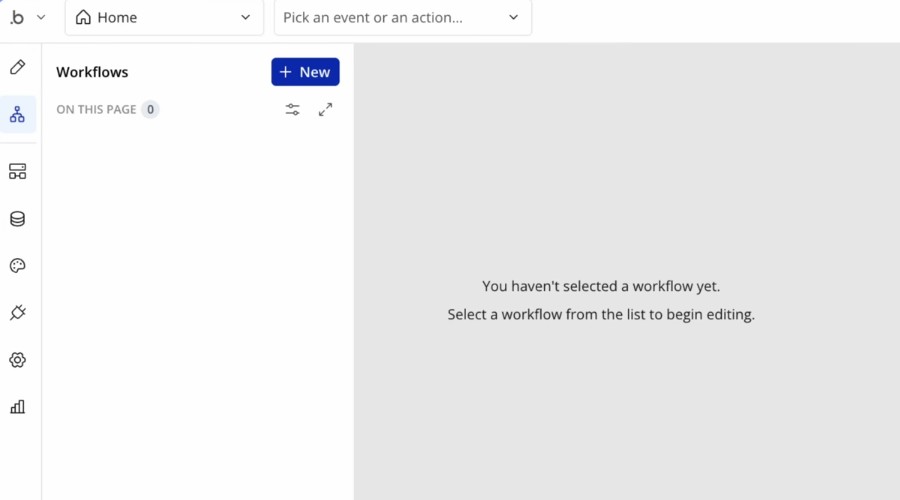
20. Click New > New Event > Elements > An element is tapped. This lets you define what happens when a user taps an element, such as tapping the Get Started button element on the Home view to go to the new view.
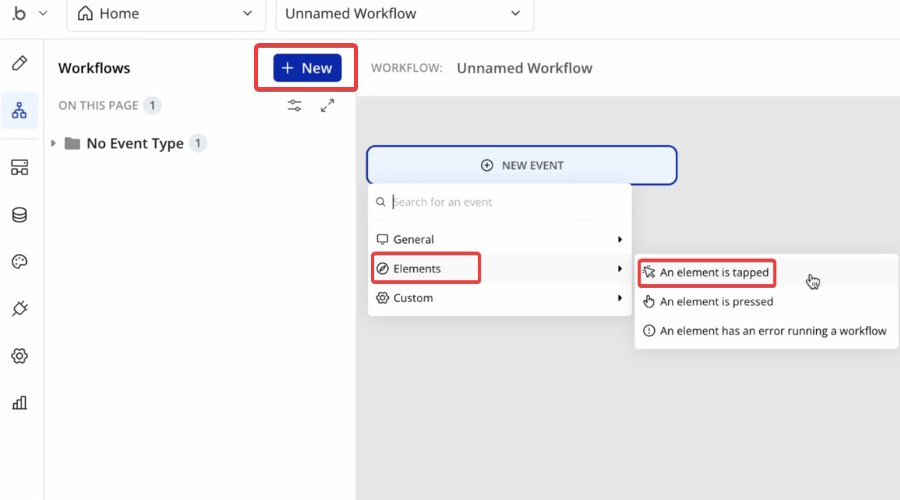
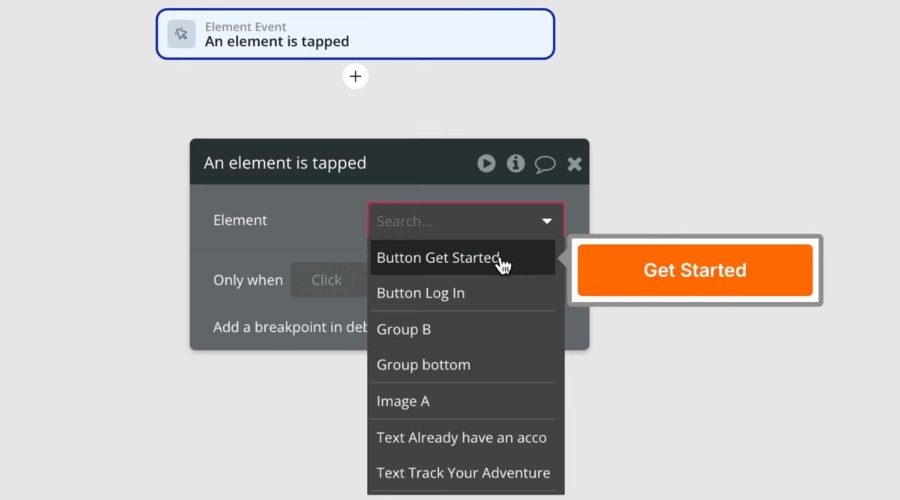
21. Select the element to trigger the action.
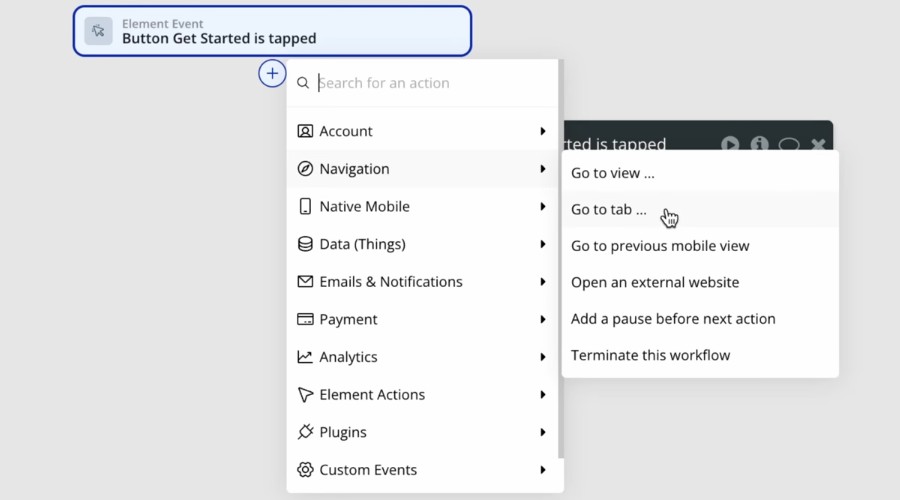
22. Click the plus icon to browse the actions. In this case, go to Navigation and select Go to tab. Now you can choose which view should be linked to.
Note: This is a basic workflow, but Bubble can create a wide range of complex sequences, including native mobile gestures and actions. E.g, accessing the device camera, location services, or photo gallery.
4. Plugins
You can add new elements and features to your app via official Bubble and community made plugins.
23. Click the plugins tab on the left and browse the library of plugins.
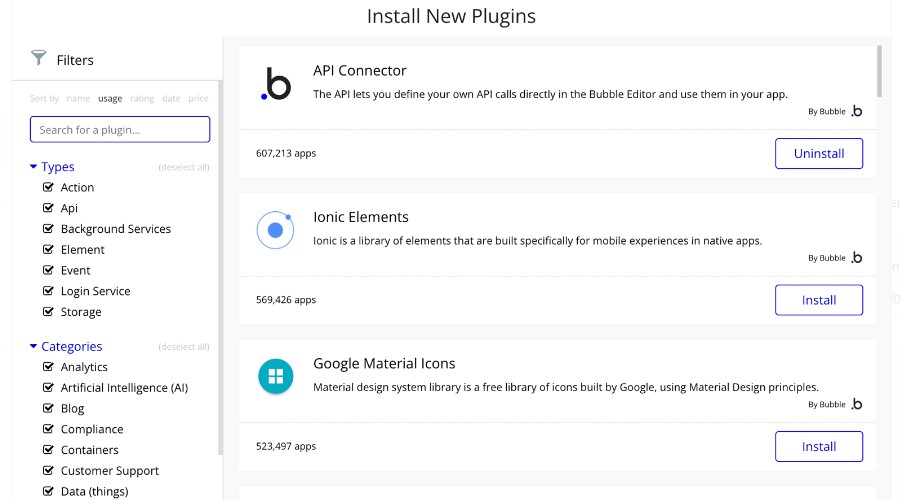
24. When you have found one you like, it takes one click to install, though some are premium.
25. Configure a plugin’s settings by locating it under Manage Existing Plugins.
5. Capturing Data
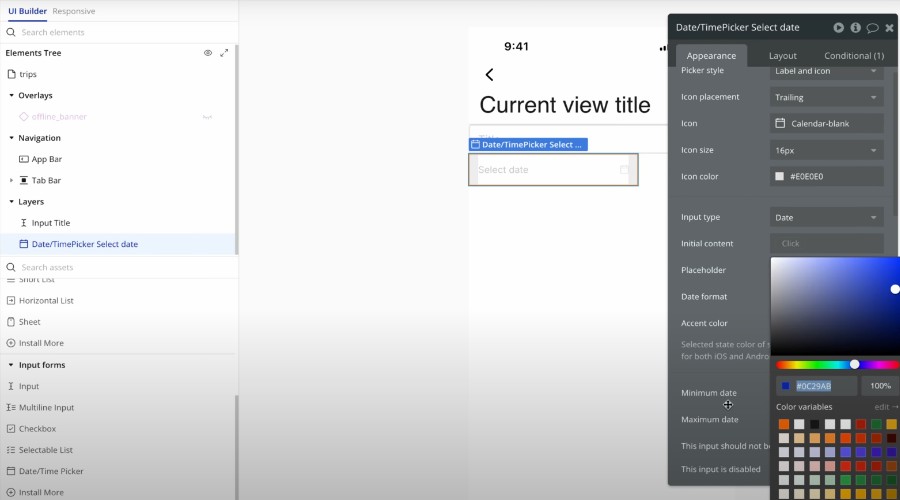
Your Bubble app comes with a built-in database, which can be accessed via the Data tab in the dashboard. This is set up automatically and can be populated when you make use of Input form elements in the app builder. To do this:26. Under the Elements Tree, scroll down to Input forms and drop your chosen input element onto the canvas, such as Date/Time Picker. Then give it a Placeholder name.
27. Depending on the type of input element, you can change numerous properties. Content format defines the type of data that can be input. E.g, Currency, Password, US Phone, etc.
28. Add as many elements as required for your form.
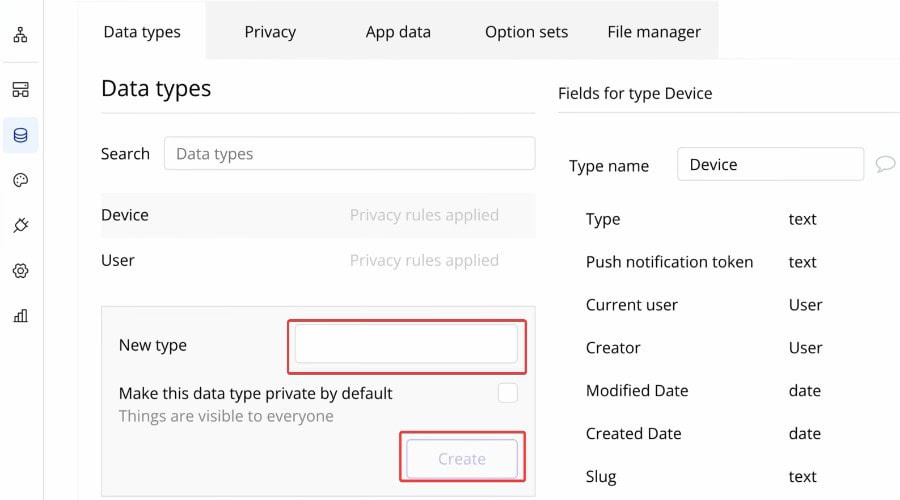
29. When you are happy with your form, go to the Data tab and under Data types create a New type by entering a name and clicking create. Give it a name relevant to your form.
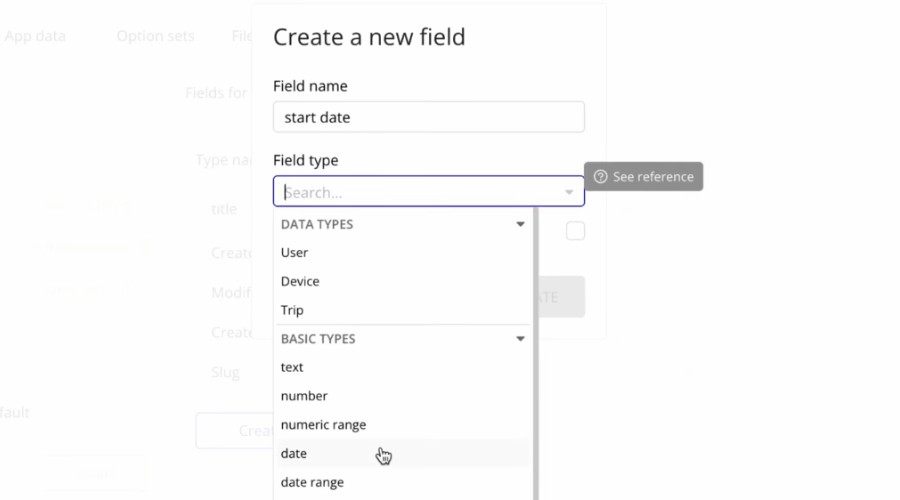
30. Click Create a new field to begin creating the fields that correspond with each input element of your form. Give each field a name and choose a field type. E.g., for a Date input you will select the Date field type.
31. You must then create a workflow around the input elements and the data type for the data to be captured.
32. If you are using a button element to launch the form, you can follow our previous workflow step to create a new event: New > New Event > Elements > An element is tapped and select your button.
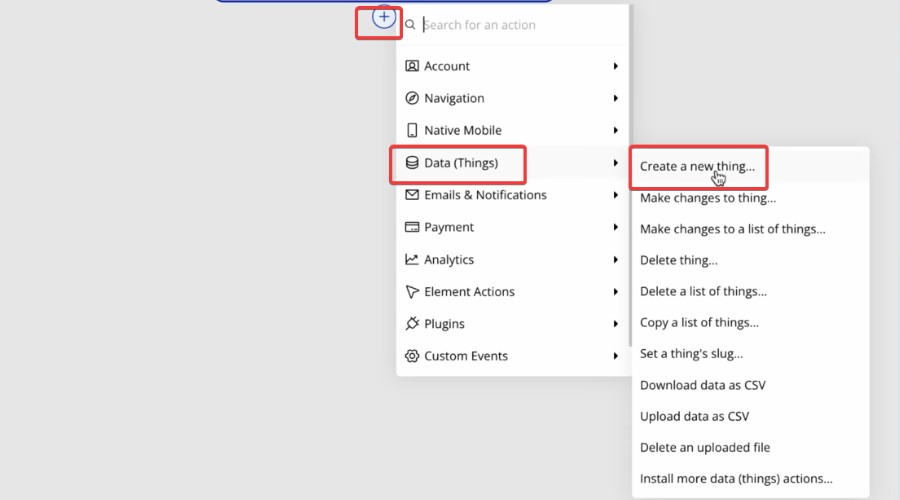
33. This time when you click the plus icon to choose an action, navigate to Data > Create a new thing.
34. Under Type, you can now select your new Data Type from the dropdown menu.
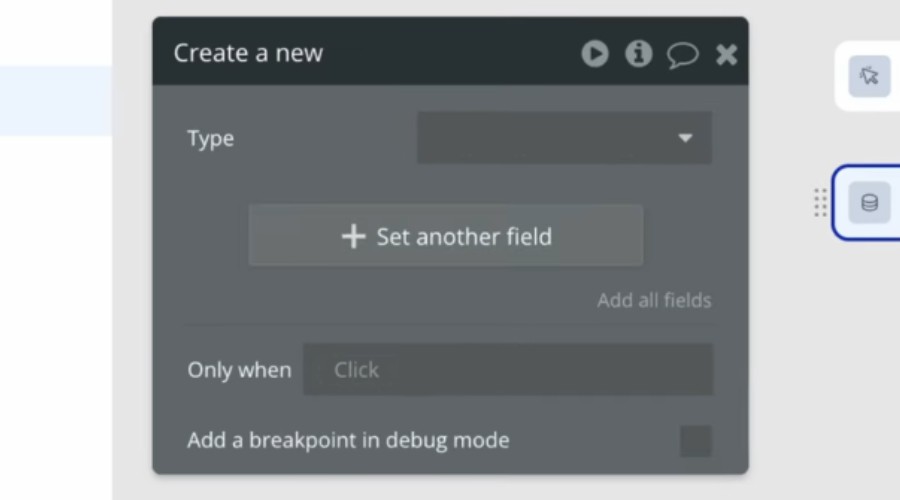
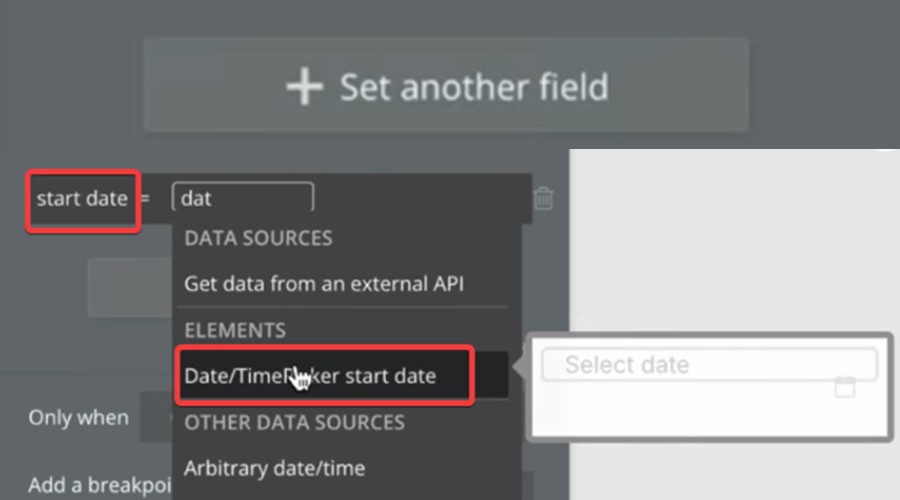
35. Click Set another field, and you can choose the database field name and corresponding input element name.
Now whenever a user completes the form in the app, it is stored correctly in the database.
Conclusion
By following the above steps, you will be able to get a good understanding of how Bubble for native mobile works, though we have only scratched the surface of what is possible.
So, if you want to handle everything from design to publishing a finished app, all without touching any code: Start Bubble for free now!
Read our disclosure page to find out how can you help MSPoweruser sustain the editorial team Read more
Improve this guide


User forum
0 messages