How To Add A Horizontal Line In Word - Quick Guide

Find below a few methods to add a horizontal line in Microsoft Word and keep your docs organized.
From quick shortcuts to more customizable options, you’ll learn how to add the perfect line for your needs.
How Do I Insert a Horizontal Line in Word?
Method 1: Using Autocorrect Shortcuts

Word’s autocorrect feature provides a quick and easy way to insert basic horizontal lines.
- Type three hyphens (
---), asterisks (***), underscores (___), equal signs (===), tildes (~~~), or number signs (###) on a blank line. - Press
Enter. Word will automatically replace the characters with a horizontal line.
Note: The type of character you use will determine the style of the line. Hyphens create a thin, single line; asterisks create a thicker, dotted line; underscores create a bold line; equal signs create a double line; tildes create a wavy line; and number signs create a triple line.
Method 2: Using the Borders and Shading Menu
For more control over the line’s appearance, the Borders and Shading menu offers customization options.
- Place your cursor where you want the horizontal line to appear.
- Go to the “Home” tab.
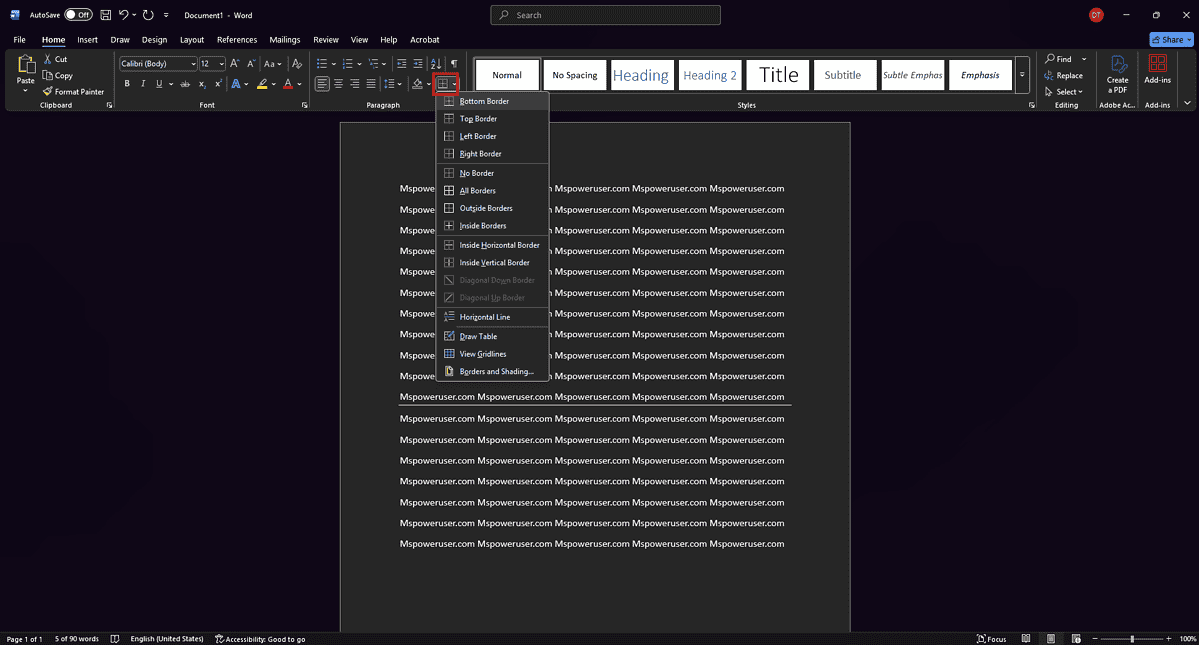
- In the “Paragraph” group, click the dropdown arrow next to the “Borders” button.
- Select “Borders and Shading…” at the bottom of the menu.
- In the “Borders and Shading” dialog box, go to the “Borders” tab.
- In the “Setting” section, choose “None” to clear any existing borders.
- Click on the bottom border in the preview area (or use the corresponding buttons) to add a horizontal line.
- Customize the line’s style, color, and width using the options on the right.
- Click “OK” to insert the line.
Method 3: Using the Shapes Tool

The Shapes tool allows you to draw a line manually, providing maximum control over its placement and appearance.
- Go to the “Insert” tab.
- In the “Illustrations” group, click “Shapes.”
- Select a line shape (usually just “Line” under the “Lines” category).
- Click and drag on the document to draw the line. Hold down the
Shiftkey while dragging to create a perfectly straight horizontal line. - Once the line is drawn, the “Shape Format” tab will appear. Use the options in this tab to customize the line’s color, weight (thickness), and style.
Method 4: Using the “Horizontal Line” Option (Older Versions of Word)
Some older versions of Microsoft Word have a dedicated “Horizontal Line” option.
- Go to the “Insert” tab.
- Look for the “Horizontal Line” option (it may be under “Symbols” or a similar category).
- Click “Horizontal Line” to insert a basic horizontal line.
- Double-click the line to open the “Format Horizontal Line” dialog box, where you can customize its width, height, color, and alignment.
Tips for Working with Horizontal Lines
- Removal: To remove a line created with autocorrect, press
Ctrl+Z(orCmd+Zon a Mac) immediately after the line is created. To remove a line created with other methods, simply select the line and pressDelete.
Comparing Horizontal Line Methods in Word
Here’s a quick comparison of the different methods for inserting horizontal lines in Word:
| Method | Ease of Use | Customization Options | Best For |
|---|---|---|---|
| Autocorrect Shortcuts | Very Easy | Limited | Quick, basic lines |
| Borders and Shading Menu | Moderate | Moderate | More control over style and placement |
| Shapes Tool | Moderate | Extensive | Maximum control over appearance and position |
| Horizontal Line (Legacy) | Easy | Moderate | Quick insertion with some customization |
Adding Visual Breaks to Your Documents
Horizontal lines are a simple yet powerful tool for improving the visual appeal and organization of your Word documents. By using the methods outlined above, you can easily add and customize horizontal lines to suit your specific needs.
FAQ
How do I change the color of a horizontal line in Word?
If the line was created using Borders and Shading or the Shapes tool, you can change the color by selecting the line and using the color options in the “Shape Format” or “Borders and Shading” dialog box. If the line was created using autocorrect, you may need to delete it and recreate it using a different method to change the color.
How do I make a horizontal line thicker in Word?
For lines created with Borders and Shading or the Shapes tool, you can adjust the “Weight” or “Width” setting to make the line thicker.
How do I move a horizontal line in Word?
For lines created with Borders and Shading, you may need to adjust the paragraph spacing above and below the line. For lines created with the Shapes tool, you can click and drag the line to move it.
Why is my horizontal line dotted in Word?
If you used asterisks (***) with the autocorrect method, Word will create a dotted line. Use a different character or a different method to create a solid line.
How do I remove a horizontal line in Word?
Select the line and press the Delete key. If the line was created using autocorrect, you can also press Ctrl+Z (or Cmd+Z on a Mac) immediately after the line is created to undo the autocorrect.
Final Thoughts
Mastering the art of adding horizontal lines in Word provides a subtle yet impactful way to structure and refine your documents. Experiment with different methods and styles to discover the best approach for enhancing your writing projects.
Read our disclosure page to find out how can you help MSPoweruser sustain the editorial team Read more
Improve this guide


User forum
0 messages