How to Clear Clipboard in Windows: 5 Quick Ways
Learning how to clear the clipboard on Windows PC is considered a basic data privacy protection practice. If you didn’t know yet that someone can access your PC browsing and working habits by accessing the clipboard history, you’re giving away personal and work data to strangers.
From copying and pasting snippets of code to duplicating intricate design elements, the clipboard serves as your trusty sidekick. Put an end to this data leak today and enhance data privacy on shared Windows computers by reading this article all the way through.
Method 1: Restarting the Clipboard User Service
Before the Windows 10 Insider Preview Build 17666, there was no dedicated user interface to manage clipboard data. So, if you’re on a Windows operating system built before May 9, 2018, and haven’t updated yet, follow these steps:
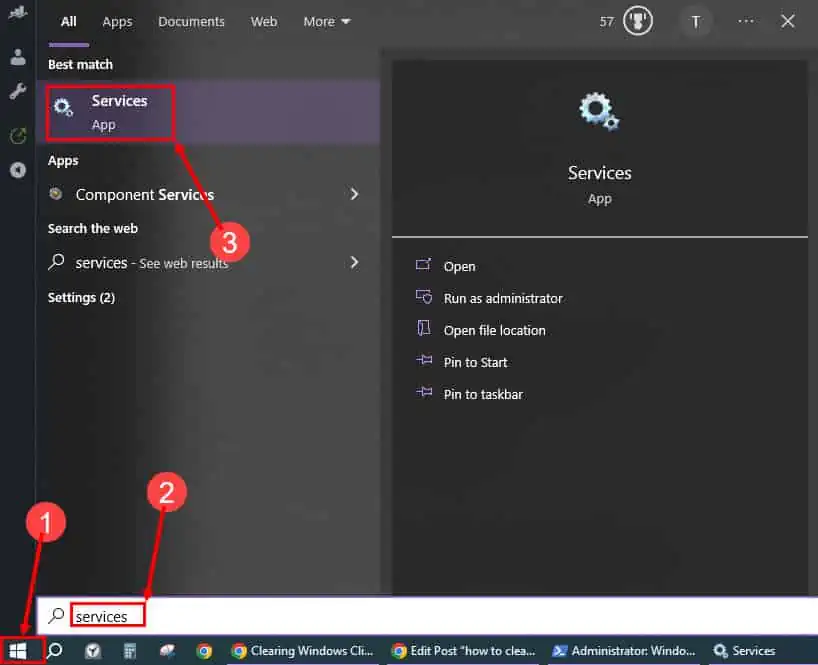
- Click the Windows flag or Start button.
- Type Services.
- Click on the Services app to launch the Services window.
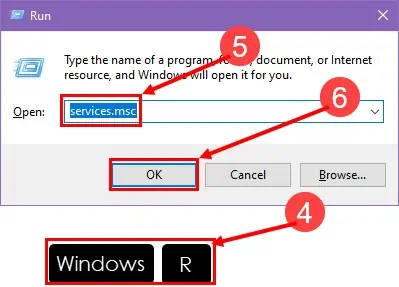
- Alternatively, press Windows + R.
- Type
services.mscin the Open field. - Click OK.
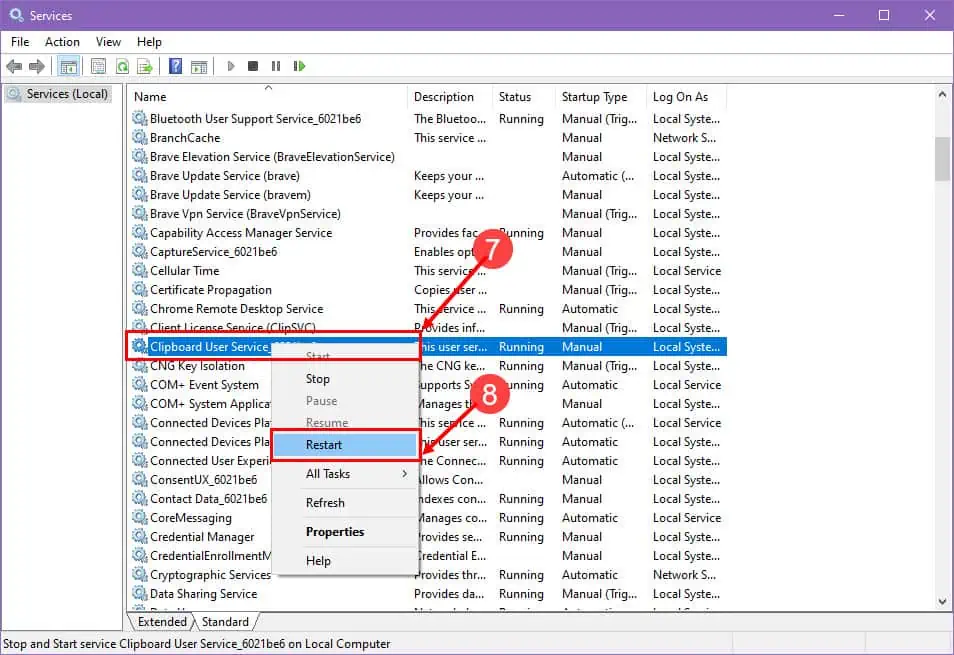
- On the Services window, find the Clipboard User Service item.
- Right-click and choose Restart on the context menu.
You’ve successfully cleared the Windows clipboard history.
Method 2: Using a Hotkey
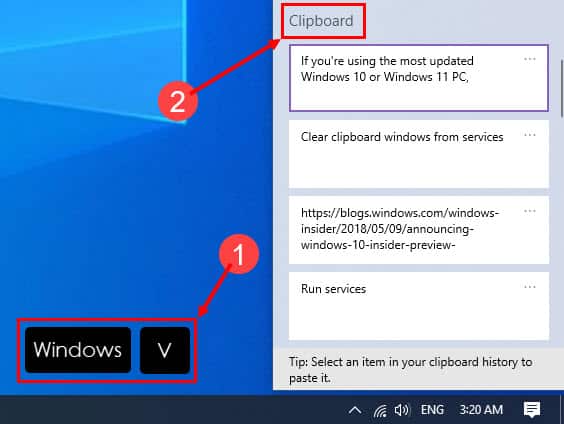
Managing Windows clipboard content is super-easy if you’re using the most updated Windows 10 or Windows 11 PC. Here’s how:
- Press Windows + V from anywhere on your Windows 10 or 11 PC.
- The Clipboard interface will pop up.
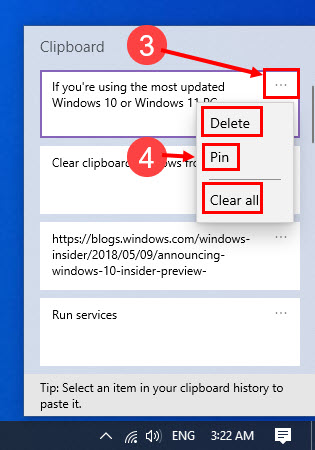
- Click the ellipses or three-dots icon in the top-right corner of a clipboard item.
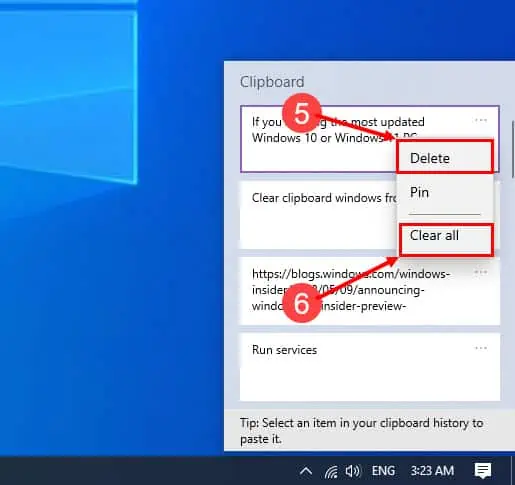
- You should see three options: Delete, Pin, and Clear all.
- If you need to erase a specific clipboard item, scroll the list and delete the item.
- If you want to delete the whole clipboard content, choose Clear all.
Method 3: From Windows Settings App
Another intuitive way to manage clipboard content or delete entirely every saved data on the clipboard is the Clipboard Settings. Here’s how you can access and control it:
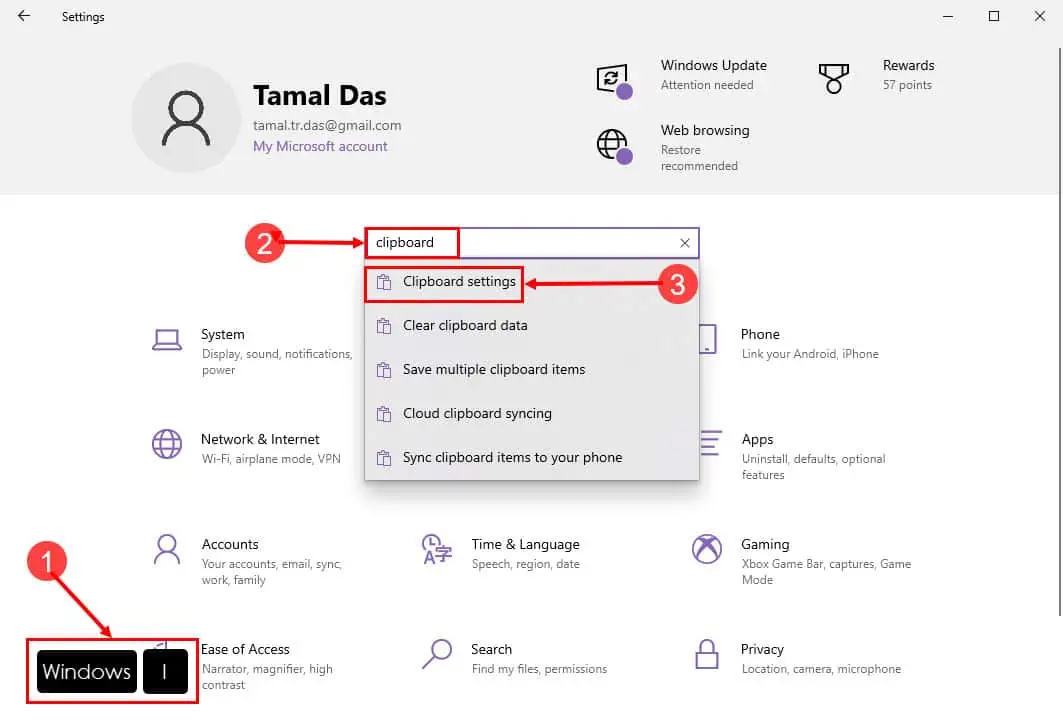
- Press Windows + I on your keyboard.
- Type Clipboard into the Find a setting field.
- On the search items, choose the Clipboard settings option.
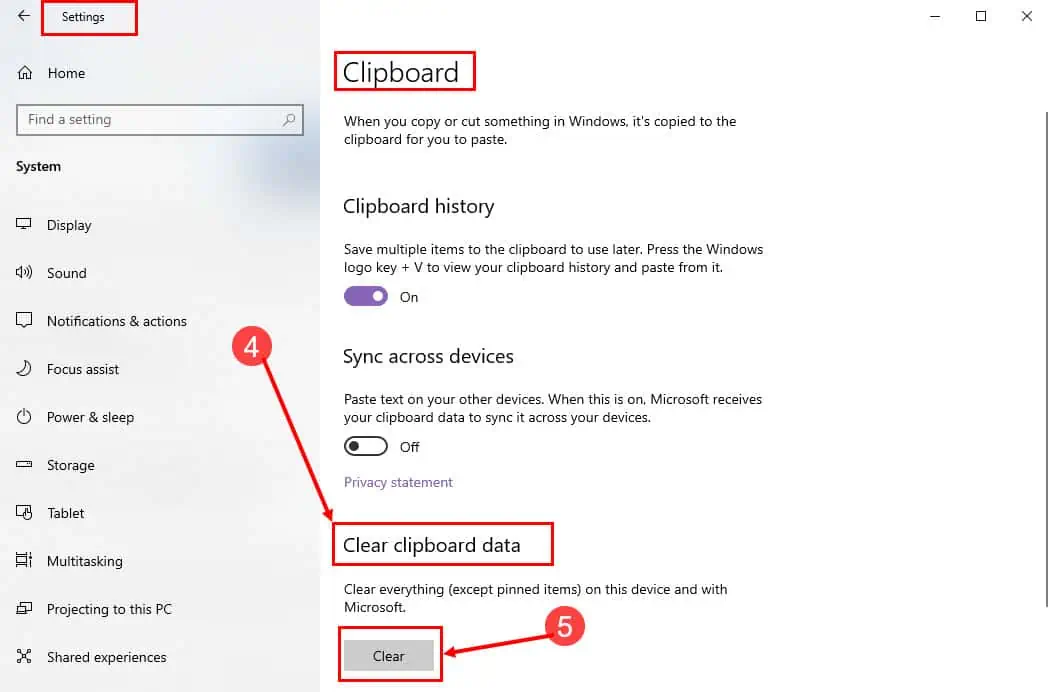
- Go to Clear clipboard data below the Clipboard section on the right-side menu of the Settings app.
- Click the Clear button to delete the clipboard data of the PC.
Method 4: Using a PowerShell Command
Are you a coding geek? Do you love to write scripts to automate various tasks on your Windows PC using PowerShell? Then, you’ll like these steps the most:
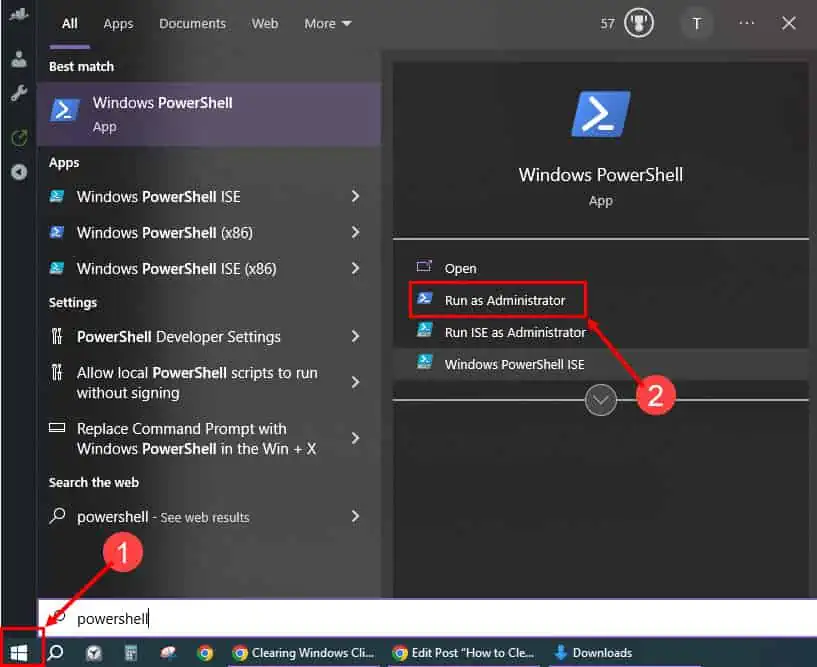
- Click Start and type PowerShell.
- Choose the Run as administrator option below the Windows PowerShell App section.
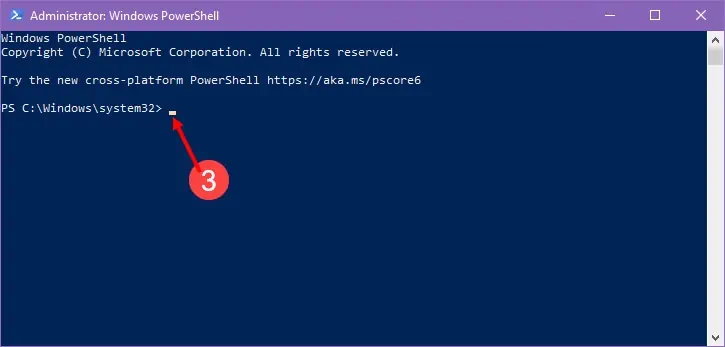
- You should now see the following command line interface:
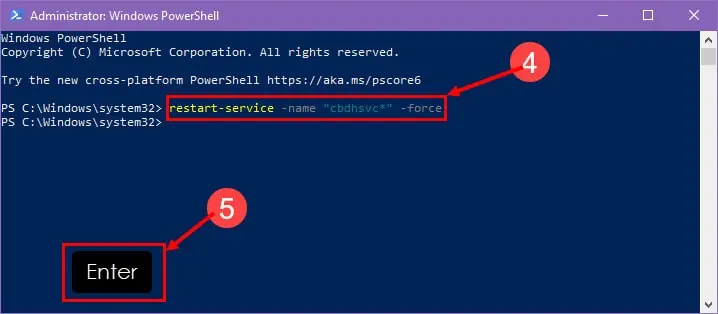
- There, copy and paste the following PowerShell script:
Restart-Service -Name "cbdhsvc*" -force - Hit Enter to execute.
- Now, press the Windows + V hotkey to verify that you’ve deleted the entire Windows clipboard.
Method 5: Prevent Windows From Storing Clipboard History
Most Windows PC users don’t know that Microsoft Windows enables the clipboard history feature by default. If you also didn’t know this before today, know that the best way to protect your privacy on a shared Windows PC is by deactivating the clipboard history feature. Find below how:
- Call the Windows Settings app by pressing the Windows + I keys.
- Search Clipboard in the Search field and select Clipboard settings.
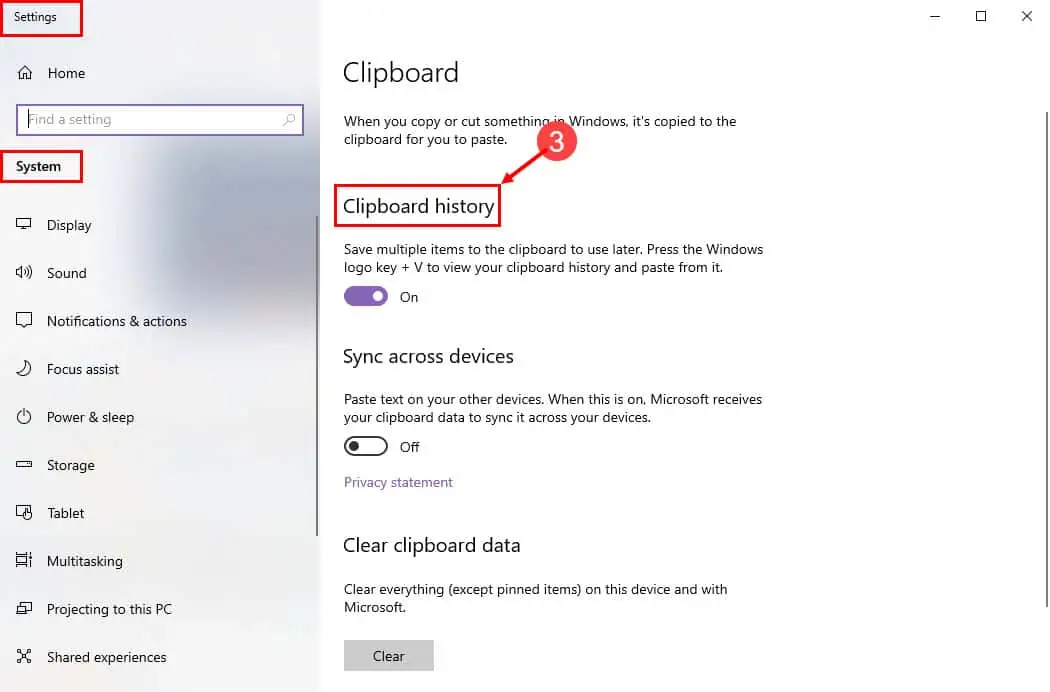
- On the Clipboard interface of Windows Settings > System, go to Clipboard history.
- The radio button should show an On signal.
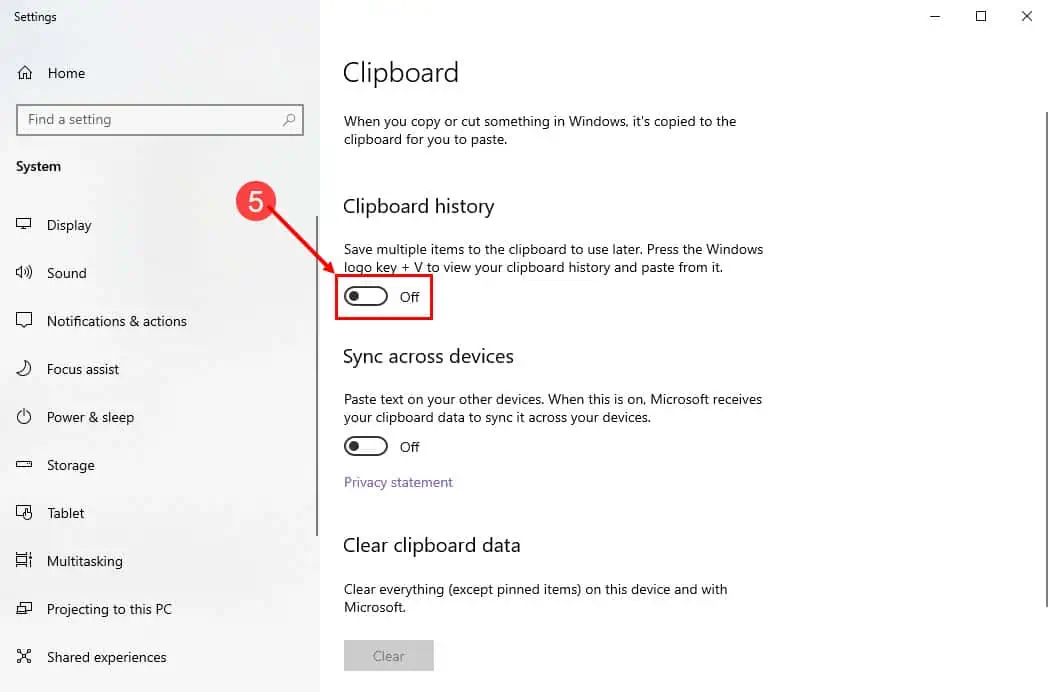
- Click it once to disable it.
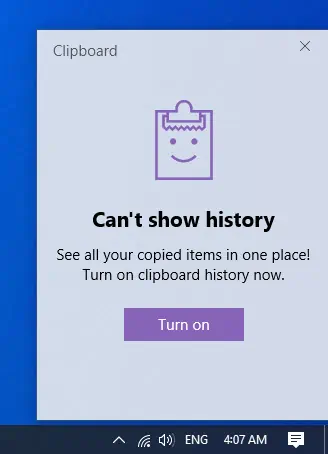
Follow the above steps when you log in to any shared Windows PC before starting your work. Disabling the feature also clears existing history as shown below:
You must clear the clipboard data on Windows PC if you’re a privacy-conscious individual. It’s imperative to do so on every shared PC you use throughout the day. Do this at the beginning or end of the session to protect what you saved in the clipboard from prying eyes.
Deleted: Comment below if this Windows clipboard management article helped you.
Read our disclosure page to find out how can you help MSPoweruser sustain the editorial team Read more


User forum
0 messages