How to Unlock iPhone without Passcode or Face ID
To better safeguard your iPhone and prevent others from hacking into your device without permission, Apple introduced both passcode and Face ID to set a screen lock. Usually, to protect personal privacy, a lock exists so that only you can enter your iPhone. However, sometimes you may suddenly forget the passcode, your Face ID fails to work, or your device becomes unavailable because of multiple wrong passcode attempts. All of these situations push you to learn how to unlock your iPhone without a passcode or Face ID. Here to quickly get you out of lockup issues, some workable solutions are shared, and you can completely bypass screen lock at home.
Part 1: Unlock iPhone without Face ID or Passcode Using MagFone iPhone Unlocker
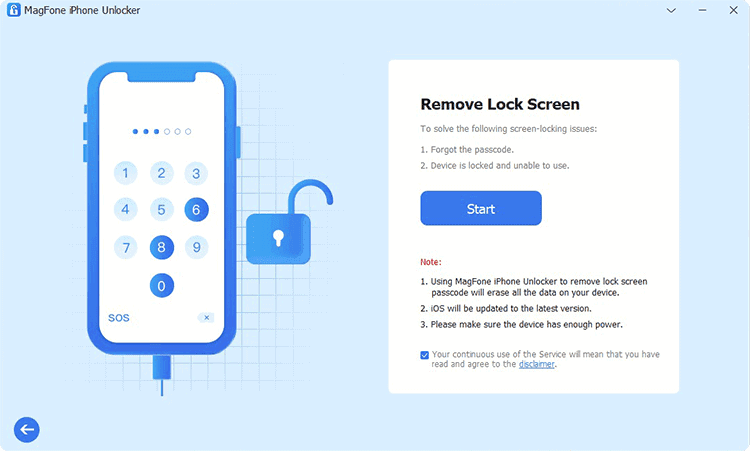
No matter which iPhone model and iOS version you’re using, MagFone iPhone Unlocker is here a dependable yet professional iOS unlocking tool. It can help factory reset and unlock your iPhone under any possible lockup circumstances, like screen unavailable, device disabled, passcode-forgotten, Face ID failed to be recognized, etc. It ideally supports basic 4-digit & 6-digit passcode and advanced Face ID & Touch ID. More than that, this dedicated software is able to unlock iPhones without Apple ID. You can even bypass MDM restrictions and turn off Screen Time without a passcode effortlessly.
Stunning Features of MagFone iPhone Unlocker:
- Unlock iPhone without a passcode, Face ID, or Touch ID
- Support all models of iPhone, iPad, and iPod touch
- Compatible with the newest iOS, like iOS 16 and later
- Remove Apple ID from iPhone without iCloud password
- Unlock the Screen Time passcode and remove MDM without data loss
How to Unlock iPhone without Face ID or Passcode Using MagFone
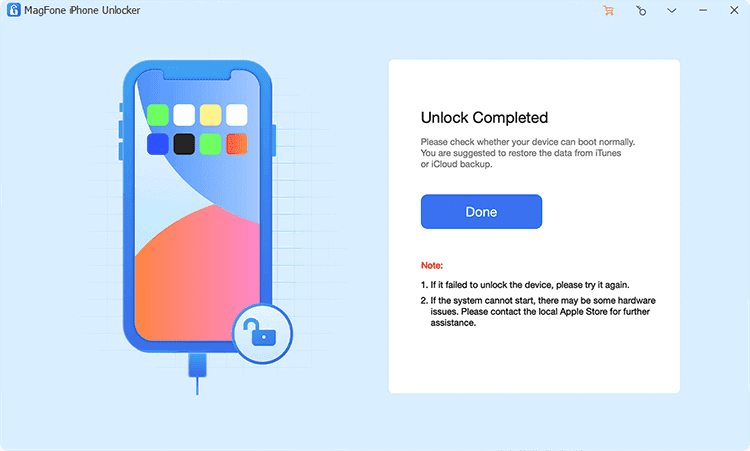
Step 1: Pre-install iTunes on your computer. Then, download and finish installing a compatible MagFone iPhone Unlocker from the official website. Simply get it launched and connect your iPhone via a USB. In the main interface, click on “Unlock iOS Screen” and afterward, “Start” to continue.
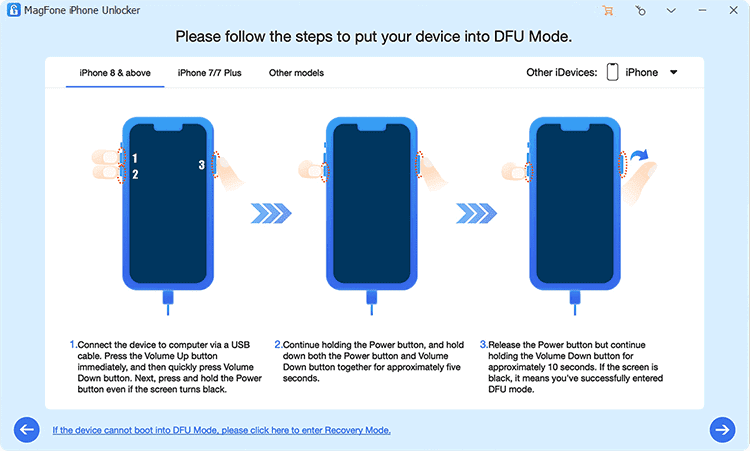
Step 2: Choose the model of your iPhone device and put it into DFU/Recovery mode by following the onscreen instructions. Once you successfully get into the related mode, you can see the right arrow turning blue at the bottom for you to click.
Step 3: MagFone iPhone Unlocker can show its detected device information for you to check, and then it’s time to “Download” the firmware package for your iPhone.

Step 4: Click on the “Unlock” button in this program to unzip the firmware package and factory reset your iPhone. After that, your device data and settings, including screen passcode or Face ID, will be removed. So you can enter your device again.
Part 2: Unlock iPhone without passcode or Face ID on Security Lockout
If your iPhone is luckily running iOS 15.2 and later, you can get a great way to unlock it without using a passcode or even Face ID. The operation is quite easy, and you can completely make it on your iPhone directly, with no other device requirements. Just note that you should remember the Apple ID password, and your iPhone will be restored to factory settings. If it’s acceptable for you, then do it using the steps now.

Step 1: Try to enter the wrong passcode on your screen again and again until you can see “Erase iPhone” shown at the bottom.
Step 2: Tap the “Erase iPhone” option on the security lockout screen.
Step 3: Enter your Apple ID password to sign out of your Apple ID as instructed.
Step 4: Wait for the erasing process completion, and your iPhone will be restarted with no screen lock.
Part 3: How to Unlock iPhone without Passcode or Face ID with iTunes
Nearly all Apple users know iTunes and have this tool on computers for better managing iOS devices. You can use it to back up data and fix some issues as iPhone gets locked with no valid passcode or Face ID. If you have synced your device with iTunes and a trusted computer previously, you can directly connect it and restore your iPhone. However, for the one who hasn’t done this before, it’s necessary to put iPhone into recovery mode in advance and then restore the device.
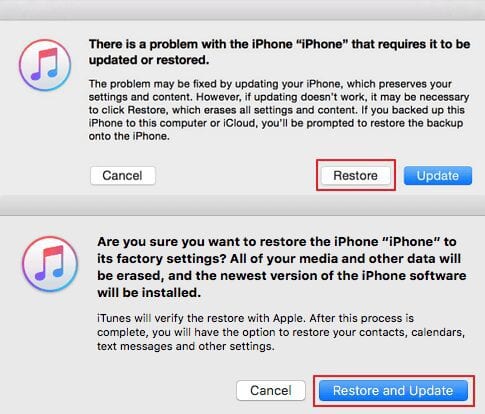
Step 1: Launch the latest iTunes on your computer and connect your iPhone using a USB cable;
Step 2: Now turn off your iPhone, and quickly press the Volume Up and Volume Down buttons. Hold the Side button until the Connect to iTunes screen appears on the screen. This means your iPhone is successfully put into recovery mode;
Step 3: A pop-up window will show with “Restore” and “Update” options. You need to click on the “Restore” button now.
Step 4: Confirm your operation and keep your iPhone connected all the time until the process ends and your device is restored with no passcode or Face ID.
Part 4: Unlock iPhone without Passcode or Face ID via iCloud
Aside from aiding you to find your device and back up data, iCloud can also be applied to erase and reset your iPhone. It wipes out your content and settings so that you can enter your device again without a Face ID or passcode. This way is easy, and you should make sure that the Find My feature has been turned on.
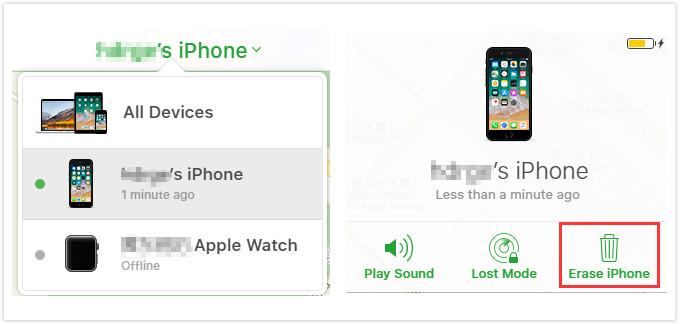
Step 1?Go to visit icloud.com and sign in to your account with your Apple ID & password;
Step 2: Select the Find My iPhone option and click on it;
Step 3: Choose your iPhone from the “All Devices” list and hit on the “Erase iPhone” option to unlock your device screen.
Conclusion
Here you’ve learned how to unlock your iPhone without a passcode or Face ID using 4 best solutions, including iOS unlock like MagFone iPhone Unlocker, Security Lockout, iTunes, and iCloud. You can test and use the way best for you. If you care about the data, it’s possible to recover it from your previous backups after unlocking a device. Anyway, hope you can enjoy using your iPhone again without hassle.
Read our disclosure page to find out how can you help MSPoweruser sustain the editorial team Read more


Improve this guide


User forum
0 messages